YSI Pro2030 User Manual Download Page 19

30

31

Before re-installing the Do sensor o-rings, make sure to use a clean workspace, 

clean hands and avoid contact with anything that may leave fibers on the o-ring 

or  grooves.  Even  a  very  small  amount  of  contamination  (hair,  grit,  etc.)  may 

create a path for water intrusion or contamination.

To re-install the Do sensor o-rings:

Place a small amount of o-ring grease between your thumb and index finger.  

(More grease is not better!)

Draw the o-ring through the grease while pressing the fingers together to place 

a very light covering of grease on the o-ring. Place the o-ring into its groove 

ensuring that it does not twist or roll.

Use the previously grease-coated finger to once again lightly go over the surface 

of the o-ring.

GENERAL MAINTENANCE - Do SENSoR PoRT

It  is  important  that  the  entire  sensor  connector  end  be  dry  when  installing, 

removing or replacing the sensor. This will prevent water from entering the port. 

once the Do sensor is removed, examine the connector inside the port. If any 

moisture is present, use compressed air to completely dry the connector or let it 

air dry. If the connector is corroded, contact YSI Technical Support or the YSI 

authorized dealer where you purchased the instrument.  

sensor MaIntenance

SENSoR MAINTENANCE - TEMPERATURE

You  must  keep  the  temperature  sensor  free  of  build  up.  other  than  that,  no 

additional  maintenance  is  required.  A  toothbrush  can  be  used  to  scrub  the 

temperature sensor if needed. 

Remove sensors upside down (facing the ground) to help prevent water 

from entering the port upon removal.

Do  not  over-grease  the  o-rings.  The  excess  grease  may  collect  grit 

particles that can compromise the seal.  Excess grease can also cause the 

waterproofing capabilities of the o-ring to diminish, potentially causing 

leaks. If excess grease is present, remove it using a lens cloth or lint-free 

cloth.

i

i

SENSoR MAINTENANCE - CoNDUCTIVITY

The openings that allow sample access to the conductivity electrodes should be 

cleaned regularly. The small cleaning brush included in the Maintenance Kit is 

intended for this purpose. Dip the brush in clean water and insert it into each 

hole 10 to 12 times. In the event that deposits have formed on the electrodes, it 

may be necessary to use a mild detergent (laboratory grade soap or bathroom 

foaming tile cleaner) with the brush. Rinse thoroughly with clean water, then 

check  the  response  and  accuracy  of  the  conductivity  cell  with  a  calibration 

solution.

SENSoR MAINTENANCE - DISSoLVED oXYGEN  

Membrane Cap Installation
The  Do  sensor  (Polarographic  or  Galvanic)  is  shipped  with  a  protective  red 

cap that needs to be removed before using. Remove the red protective cap or 

used cap membrane and replace it with a new cap membrane following these 

instructions: 

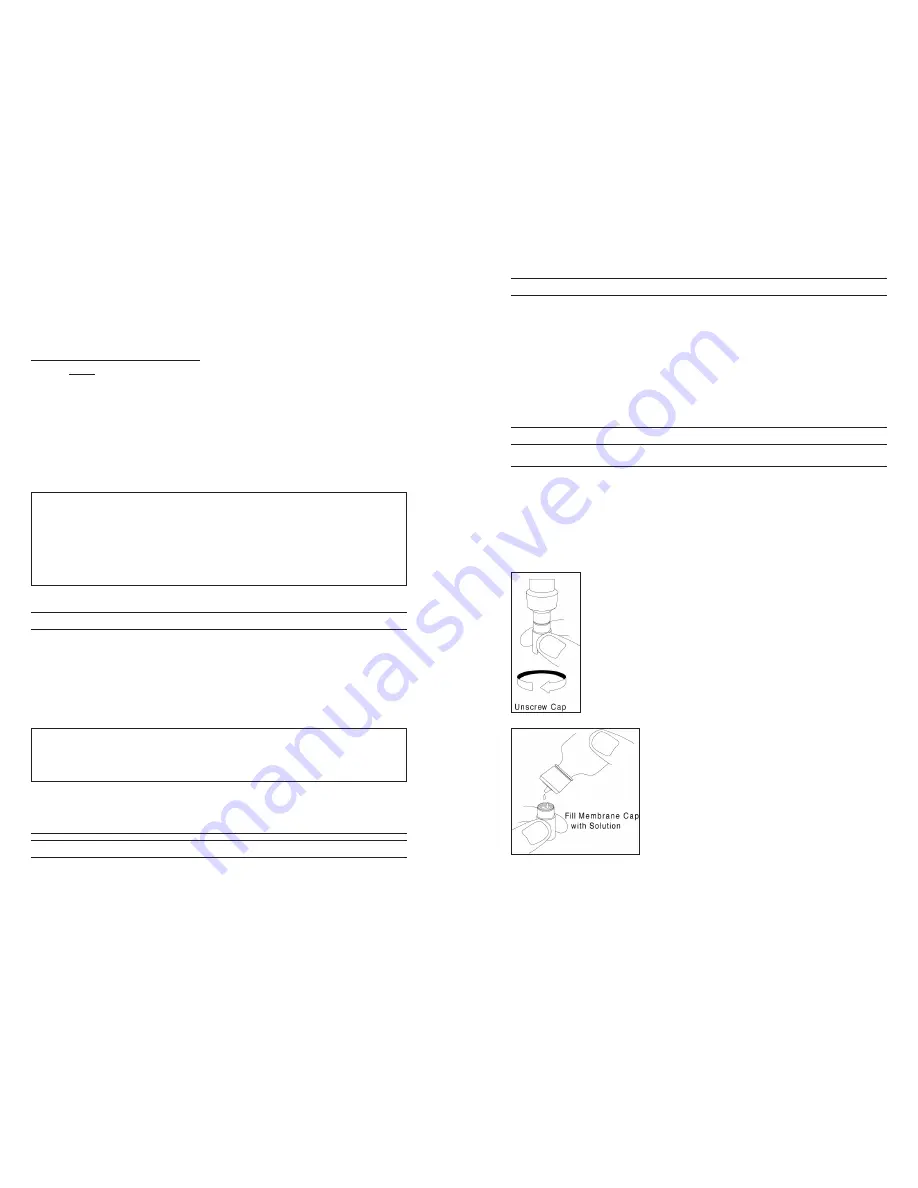
Remove the sensor guard to access the sensor.

Remove  the  protective  red  cap  by  pulling  it  straight  off  the 

sensor.  or,  unscrew  and  remove  the  used  cap  membrane  by 

holding  the  sensor  while  unscrewing  the  cap  membrane. 

Discard the used cap membrane. 

Thoroughly  rinse  the  sensor  tip  with  distilled  or  deionized 

water.


Fill a new cap membrane 3/4 full with electrolyte 

solution that has been prepared according to the 

directions  on  the  bottle.  Be  very  careful  not  to 

touch the membrane surface.

Lightly tap the side of the cap membrane to release 

bubbles that may be trapped.

Summary of Contents for Pro2030

Page 1: ...USER MANUAL English Pro2030 ...

Page 2: ...Navigation 7 First Power On 8 System Setup Menu 8 DO Local 9 Last Digit Suppression LDS 10 Quick DO Calibration Quick DO Cal 10 Audio 11 Contrast 11 Sensor Type 11 Membrane Type 12 Auto Stable 13 DO Units 14 Conductivity Units Cond Units 14 Specific Conductance Reference Temperature SPC Ref Temp 15 Specific Conductance Temperature Coefficient SPC C 16 TDS Constant 16 Temperature Units 17 Pressure ...

Page 3: ...lace at its sole discretion free of charge any product that YSI determines to be covered by this warranty To exercise this warranty call your local YSI representative or contact YSI Customer Service in Yellow Springs Ohio at 1 937 767 7241 800 897 4151 or visit www YSI com for a Product Return Form Send the product and proof of purchase transportation prepaid to the Authorized Service Center selec...

Page 4: ...parts with items on the packing list If any parts or materials are damaged or missing contact YSI Customer Service at 800 897 4151 1 937 767 7241 or the authorized YSI distributor from whom the instrument was purchased Battery Installation The instrument requires 2 alkaline C cell batteries Under normal conditions the average battery life is 425 hours at room temperature without using the back lig...

Page 5: ...turn instrument on Press a second time to turn backlight on Press a third time to turn backlight off Press and hold for 3 seconds to turn instrument off 4 Menu Use to enter the System Setup menu from the Run screen 5 Enter Press to confirm entries and selections 6 Down Arrow Use to navigate through menus to navigate through box options at the bottom of the Run screen and to decrease numerical inpu...

Page 6: ...head connector on the cable are 3 clean and dry Grasp the sensor with one hand and the cable bulkhead in the other 4 Push the sensor into the connector on the cable until it is firmly seated and 5 only 1 o ring is visible Failure to properly seat the sensor may result in damage Twist the sensor clockwise to engage the threads and finger tighten Do 6 NOT use a tool This connection is water tight Fo...

Page 7: ...information before displaying the main Run screen figure 5 The first time the Pro2030 is turned on it will step through language sensor and membrane selections see the First Power On section of this manual for more information Figure 5 Run screen Backlight Once the instrument is powered on pressing the power backlight key will turn on the display backlight The backlight will remain on until the ke...

Page 8: ...tup menu contains multiple screens that are notated as pages The current page is indicated near the bottom of the display figure 7 Use the up and down arrow keys to scroll through menu options and menu pages Exiting the System Setup Menu To exit the System Setup menu press the down arrow key until the ESC Exit box is highlighted then press enter to return to the Run screen DO Local DO Local can be...

Page 9: ... For more information on Quick DO Cal see the Calibration section of this manual Audio Audio can be enabled or disabled by using the up or down arrow keys to highlight Audio and pressing enter When enabled there will be an X in the box next to Audio When Audio is enabled the Pro2030 will beep twice to indicate stability when Auto Stable is enabled The instrument will also beep when a key is presse...

Page 10: ...itional Teflon membranes 5914 Blue 2 0 mil polyethylene PE Less flow dependence than 1 25 mil membrane but somewhat slower response Polarographic Membrane Kits Item Color Material Description 5908 Yellow 1 25 mil polyethylene PE Faster response time and less flow dependence than traditional Teflon membranes 5909 Blue 2 0 mil polyethylene PE Less flow dependence than 1 25 mil membrane but somewhat ...

Page 11: ... temperature values using algorithms found in Standard Methods for the Examination of Water and Wastewater TDS g L displays Total Dissolved Solids in grams per liter TDS is calculated from conductivity and temperature using a user selectable TDS constant TDS mg L displays Total Dissolved Solids in milligrams per liter TDS is calculated from conductivity and temperature using a user selectable TDS ...

Page 12: ...ess enter to open the submenu With the TDS Constant highlighted press enter to make the field adjustable Next use the up or down arrow key to increase or decrease the value The input range is 0 30 to 1 00 Press enter to save the new TDS Constant Next highlight the ESC Exit box and press enter to close the submenu Temperature Units Highlight Temperature Units and press enter to open a submenu that ...

Page 13: ... the Pro2030 is calibrated at the factory The barometer reading must be accurate to ensure accurate DO calibrations and readings If the barometer requires an adjustment use the up or down arrow keys to highlight the barometer box along the bottom of the Run screen then press enter Next use the up or down arrow keys to adjust the barometer reading to the local true barometric pressure Continually d...

Page 14: ...necessary to calibrate in both and mg L or ppm Calibrating in will simultaneously calibrate mg L and ppm and vice versa YSI recommends calibrating the dissolved oxygen sensor in for both ease and accuracy i Calibrating in Percent DO Perform this calibration procedure when Quick DO Cal is disabled in the System Setup menu Perform steps 1 4 of the Quick DO Calibration procedure 1 Press and hold the ...

Page 15: ...e Reference Temperature and the SpecificConductanceTemperatureCoefficientregardlessofwhatisconfiguredin the System Setup Menu The default value for the Reference Temperature is 25 C It is not necessary to calibrate conductivity specific conductance and salinity Calibrating one of these parameters will simultaneously calibrate the others YSI recommends calibrating specific conductance for greatest ...

Page 16: ...ey to exit the calibration error message and return to the Run screen See the Troubleshooting guide for possible solutions T aking M easurements Before taking measurements be sure the instrument has been calibrated to ensure the most accurate readings Turn the instrument on and wait 5 15 minutes if using a polarographic sensor Install the sensor guard to protect the sensor and membrane Place the p...

Page 17: ...to access Data mode Note that the function boxes at the bottom of the display are different in Data mode figure 10 Figure 10 Data mode Viewing Data Once in Data mode use the up and down arrow keys to view saved data sets in sequential order or press enter to access the bottom functions After accessing the bottom functions highlight the Data box and press enter to regain access to viewing data The ...

Page 18: ...ng properly If the gasket o rings and sealing surfaces are not maintained properly it is possible that water can enter the battery compartment and or sensor port of the instrument If water enters these areas it can severely damage the battery terminalsorsensorportcausinglossofbatterypower falsereadingsandcorrosion to the sensors or battery terminals Therefore when the battery compartment lid is re...

Page 19: ...over grease the o rings The excess grease may collect grit particles that can compromise the seal Excess grease can also cause the waterproofing capabilities of the o ring to diminish potentially causing leaks If excess grease is present remove it using a lens cloth or lint free cloth i i Sensor Maintenance Conductivity The openings that allow sample access to the conductivity electrodes should be...

Page 20: ...sensor tip directly down on the sanding disc and twist it in a circular motion to sand the gold cathode The goal is to sand off any build up and to lightly scratch the cathode to provide a larger surface area for the electrolyte solution under the membrane Usually 3 to 4 twists of the sensor are sufficient to remove deposits and for the gold to appear to have a matte finish Rinse the sensor thorou...

Page 21: ...ranes Chemical cleaning should be performed as infrequently as possible First attempt a membrane change and recalibrate If a new membrane does not resolve the problem then proceed with cleaning i At the time the cap membrane is changed YSI recommends that you rinse the anode and cathode figure 12 with distilled or deionized water and wipe with a clean paper towel If white deposits are evident on t...

Page 22: ... membrane 2 type selection in the System Setup menu Calibration sleeve may not be 3 100 water saturated ensure sponge is moistened Ensure adequate sample movement if 4 performing mg L or ppm calibration Allow sufficient stabilization time for 5 dissolved oxygen and temperature AND wait at least 3 seconds before confirming a DO or DO Local calibration Replace membrane and electrolyte 6 Clean sensor...

Page 23: ...y calibration 3 Verify temperature readings 4 are accurate Sample conductivity is outside 5 the measurement range of the instrument i e 0 200 mS Contact YSI Tech Support 6 S pecificati o ns These specifications represent typical performance and are subject to change without notice For the latest product specification information please visit YSI s website at www ysi com or contact YSI Tech Support...

Page 24: ... a temperature and conductivity sensor The dissolved oxygen sensor is sold separately D eclarati o n o f C o nf o rmity The undersigned hereby declares on behalf of the named manufacturer under our sole responsibility that the listed product conforms to the requirements for the listed European Council Directive s and carries the CE mark accordingly Manufacturer YSI Incorporated 1725 Brannum Lane Y...

Page 25: ... and users are expected to understand and follow the battery disposal requirements for their specific locale C o ntact I nf o rmati o n Ordering and Technical Support Telephone 800 897 4151 USA 1 937 767 7241 Globally Monday through Friday 8 00 AM to 5 00 ET Fax 1 937 767 9353 orders 1 937 767 1058 technical support Email environmental ysi com Mail YSI Incorporated 1725 Brannum Lane Yellow Springs...

Page 26: ... Air at 760 mm Hg Pressure Salinity Measure of quantity of dissolved salts in water Chlorinity Measure of chloride content by mass of water S 0 00 1 80655 x Chlorinity 0 00 Temp C Chlorinity 0 Salinity 0 5 0 ppt 9 0 ppt 10 0 ppt 18 1 ppt 15 0 ppt 27 1 ppt 20 0 ppt 36 1 ppt 25 0 ppt 45 2 ppt 0 0 14 62 13 73 12 89 12 10 11 36 10 66 1 0 14 22 13 36 12 55 11 78 11 07 10 39 2 0 13 83 13 00 12 22 11 48 ...

Page 27: ...7 6 73 6 41 6 10 5 81 32 0 7 31 6 96 6 62 6 31 6 01 5 72 33 0 7 18 6 84 6 52 6 21 5 91 5 63 34 0 7 07 6 73 6 42 6 11 5 82 5 55 35 0 6 95 6 62 6 31 6 02 5 73 5 46 36 0 6 84 6 52 6 22 5 93 5 65 5 38 37 0 6 73 6 42 6 12 5 84 5 56 5 31 38 0 6 62 6 32 6 03 5 75 5 48 5 23 39 0 6 52 6 22 5 98 5 66 5 40 5 15 40 0 6 41 6 12 5 84 5 58 5 32 5 08 41 0 6 31 6 03 5 75 5 49 5 24 5 01 42 0 6 21 5 93 5 67 5 41 5 1...

Reviews: