YSI Pro10 User Manual Download Page 8

8

9

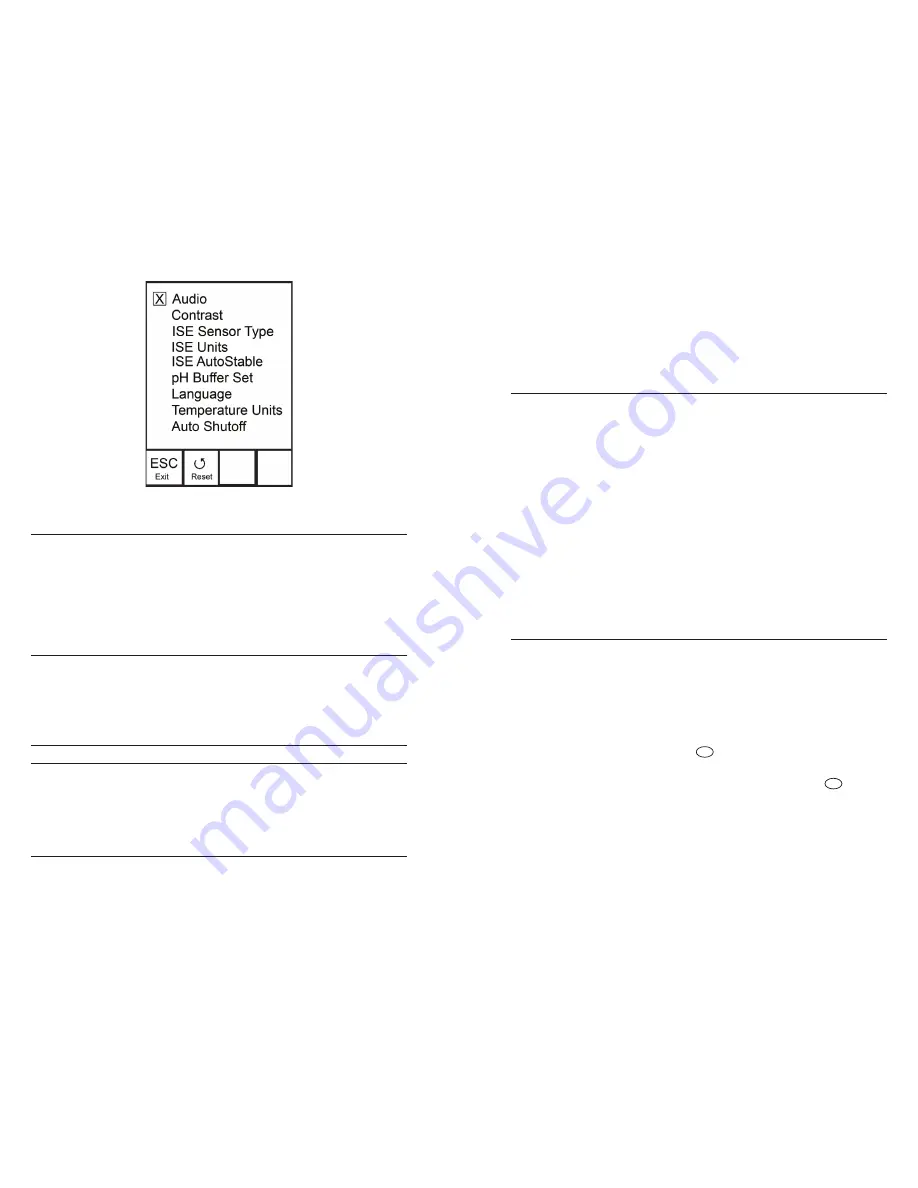
Figure 7, System Setup menu. Audio is enabled.

aUdIo  

Audio can be enabled by highlighting Audio and pressing enter. When 
enabled, there will be an ‘X’ in the box next to Audio. 

When Audio is enabled, the Pro10 will beep twice to indicate stability 
when Auto Stable is enabled. The instrument will also beep when a key 
is pressed.  When Audio is disabled, the Pro10 will not beep. 

contrast

To adjust the display Contrast, use the up or down arrow keys to 
highlight Contrast, then press enter. Next, use the up or down arrow 
keys to adjust the contrast.  The up arrow key will darken the contrast 
and the down arrow key will lighten the contrast. After adjusting the 
contrast, press enter to save and exit the Contrast adjustment function.   

ALTERNATE CONTRAST ADJUSTMENT OPTION

If necessary, there is an alternate method of adjusting the contrast. To 
adjust the contrast, press and hold the menu key, then press the up 
arrow key to darken the contrast or press the down arrow key to lighten 
the contrast.  

Ise sensor type

ISE Sensor Type sets the type of ISE sensor being used; either pH  
(model #1001 or #1001A) or ORP (model #1002).

Use the up or down arrow keys to highlight ISE Sensor Type, then press 
enter to open a submenu. Highlight the sensor type corresponding 
to the sensor installed on the cable and press enter to confirm. The 
enabled sensor type will have an ‘X’ in the box next to it. Next, use the 
down arrow key to highlight the ESC – Exit box, then press enter to 
save changes and to close the sensor submenu.  

Ise UnIts

Highlight ISE Units and press enter to open a submenu that allows you 
to select the ISE units to be displayed on the Run screen. Highlight a 
unit and press enter to enable or disable it. An enabled ISE unit will 
have an ‘X’ in the box next to it. Highlight the ESC-Exit box along the 
bottom of the display and press enter to save any changes and to close 
the ISE Units submenu. 

When pH is enabled in the ISE Sensor Type menu, there are two 
selectable measurement units: pH and pH mV.  pH mV is the sensor’s 
electrical measurement signal before being converted into pH units. pH 
mVs can help you determine if you are performing a good calibration 
and the condition of the pH electrode. 

When ORP is enabled in the ISE Sensor Type menu, only ORP mVs can 
be enabled as the ISE unit.  

Ise aUto staBle

Auto Stable utilizes preset values to indicate when a reading is stable. 
The preset values are adjustable in the System Setup menu. The user 
can input a % change (0.0 to 9.9%) in measurement reading over ‘x’ 
amount of time in seconds (3 - 19). The auto stable criteria is applied 
to the pH measurement or the ORP mV reading depending on which 
sensor is enabled in the ISE Sensor menu. 

When Auto Stable is enabled, an

AS

 symbol will display next to the 

reading on the Run screen and blink during stabilization. When the ISE 
reading stabilizes based on the Auto Stable settings, the

AS


symbol 

will display steadily and the instrument will beep twice if Audio is 
turned on. 

To enable Auto Stable, highlight ISE Auto Stable, then press enter to 
open the submenu. Next, use the up or down arrow keys to highlight 
the % change or seconds (secs) input field, then press enter to make 
the highlighted field adjustable. Use the up or down arrow keys to 
adjust the selected value, then press enter to confirm changes. Once 

Summary of Contents for Pro10

Page 1: ...USER MANUAL English Pro10 User Manual DOCUMENT 605192 ...

Page 2: ...ttery Installation 1 Key Pad 2 Connecting the Sensor and Cable 3 Run Screen 5 Backlight 6 Powering Off 6 Navigation 6 First Power On 7 System Setup Menu 7 Audio 8 Contrast 8 ISE Sensor Type 8 ISE Units 9 ISE Auto Stable 9 pH Buffer Set 10 Language 10 Temperature Units 10 Auto Shutoff 10 Resetting the System Setup Menu to Factory Default 11 Calibration 11 Temperature 11 pH Calibration 12 ORP Calibr...

Page 3: ...ct YSI Customer Service in Yellow Springs Ohio at 1 937 767 7241 800 897 4151 or visit YSI com for a Product Return Form Send the product and proof of purchase transportation prepaid to the Authorized Service Center selected by YSI Repair or replacement will be made and the product returned transportation prepaid Repaired or replaced products are warranted for the balance of the original warranty ...

Page 4: ...r missing contact YSI Customer Service at 800 897 4151 1 937 767 7241 or the authorized YSI distributor from whom the instrument was purchased Battery Installation The instrument requires 2 alkaline C cell batteries Under normal conditions the average battery life is 425 hours at room temperature without using the back light A battery symbol will blink in the lower left corner of the display to in...

Page 5: ...h box options along the bottom of the Run screen and to increase numerical inputs 3 Power and Backlight Press once to turn instrument on Press a second time to turn backlight on Press a third time to turn backlight off Press and hold for 3 seconds to turn instrument off 4 Menu Press to enter the System Setup menu from the Run screen 5 Enter Press to confirm entries and selections 6 Down Arrow Use ...

Page 6: ...5 Push the sensor into the connector on the cable until it is firmly seated with only 1 o ring visible Failure to properly seat the sensor may result in damage 6 Twist the sensor clockwise to engage the threads and finger tighten Do NOT use a tool This connection is water tight The sensor is shipped with the tip in a storage bottle To remove twist the bottle off the lid and remove the bottle from ...

Page 7: ...u the up and down arrow keys will move the highlighted bar up and down the system setup options See the System Setup menu section of this manual for more information about these options First Power On The instrument will step through an initial configuration when powered on for the first time to select the language Use the up or down arrow keys to highlight the appropriate language then press ente...

Page 8: ...to open a submenu that allows you to select the ISE units to be displayed on the Run screen Highlight a unit and press enter to enable or disable it An enabled ISE unit will have an X in the box next to it Highlight the ESC Exit box along the bottom of the display and press enter to save any changes and to close the ISE Units submenu When pH is enabled in the ISE Sensor Type menu there are two sel...

Page 9: ...s and to close the Temperature Units submenu Auto Shutoff Auto Shutoff allows you to set the instrument to turn off automatically after a period of time since the last button press In the setup menu use the up or down arrow keys to highlight Auto Shutoff then press enter to open the submenu Press enter while the minute field is highlighted to make it adjustable Next use the up or down arrow keys t...

Page 10: ...g to stabilize Note the pH mV reading pH mVs in buffer 4 should be 159 to 180 mV from the previous buffer 7 pH mV value pH mVs in buffer 10 should be 159 to 180 mV from the previous buffer 7 pH mV value 10 Press enter to complete the calibration or press Cal to cancel 11 Calibration Successful will display for a few seconds to indicate a successful calibration and then the instrument will return t...

Page 11: ...s Before taking measurements be sure the instrument has been calibrated to ensure the most accurate readings Install the sensor guard to protect the sensor Place the probe in the sample to be measured and give the probe a quick shake to release any air bubbles Be sure the sensors are completely submerged in the sample pH ORP pH and ORP readings are typically quick and accurate However it may take ...

Page 12: ...tial For example if there are 15 records and number 12 is erased then 13 becomes 12 14 becomes 13 and 15 becomes 14 The instrument will return to Data mode after erasing one data set Select Erase All Data Sets and press enter to clear the Pro10 memory and return to Data mode Exiting Data Mode While in Data mode press enter to access the bottom functions Next highlight the ESC Exit box and press en...

Page 13: ...ring to diminish potentially causing leaks If excess grease is present remove it using a lens cloth or lint free cloth General Maintenance Sensor Port It is important that the entire sensor connector end be dry when installing removing or replacing a sensor This will prevent water from entering the port Once the sensor is removed examine the i i connector inside the port If any moisture is present...

Page 14: ...he sensor with clean water not DI water and then soak for at least 1 hour in clean water with occasional stirring to remove residual bleach from the junction If possible soak the sensor for a period of time longer than 1 hour in order to be certain all traces of chlorine bleach are removed Then rerinse the sensor with clean water and retest i Dry the port and sensor connector with compressed air a...

Page 15: ...f 1500 to 1500 mV 3 Verify temperature readings are accurate 4 Recalibrate the ORP sensor 5 Clean the ORP sensor and recalibrate 6 Contact YSI Tech Support S pecifications These specifications represent typical performance and are subject to change without notice For the latest product specification information please visit YSI s website at ysi com or contact YSI Tech Support Parameter Range Resol...

Page 16: ...ommitted to reducing the environmental footprint in the course of doing business Even though materials reduction is the ultimate goal we know there must be a concerted effort to responsibly deal with materials after they ve served a long productive life cycle YSI s recycling program ensures old equipment is processed in an environmentally friendly way reducing the amount of materials going to land...

Page 17: ...authorized service centers throughout the United States and Internationally For the nearest service center information please visit ysi com and click Support or contact YSI Technical Support directly at 800 897 4151 1 937 767 7241 When returning a product for service include the Product Return form with cleaning certification The form must be completely filled out for a YSI Service Center to accep...

Page 18: ...Item 605192 Rev A July 2014 2014 YSI Incorporated ...

Reviews: