background image

http://www.yowzafitness.com/ 

31 


TROUBLESHOOTING 


NOTE

: Do not touch any internal electric wires without consulting the manufacturer. 

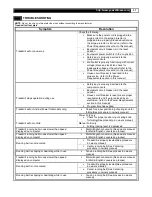
Treadmill will not start

Symptom 

Resolution 


Treadmill will not power up 

Check the following: 


Make sure the power cord is plugged into a 
surge protector, the surge protector is 
plugged into a properly grounded outlet and 
the surge protector is turned on (refer to the 
Power Requirements section in this manual). 


Equipment circuit breaker is in the reset 
position 


Equipment power switch is in the on position 


Safety key is properly inserted into the 
computer console 


Wall outlet is properly functioning with correct 
voltage (Have an electrician check for 
inadequate voltage at the outlet refer to the 
Power Requirements section in this manual) 


House circuit breaker is reset and is the 
proper size. (refer to the Power 
Requirements section in this manual)  


Treadmill stops operation during use 


Safety key is properly inserted into the 
computer console 


Equipment circuit breaker is in the reset 
position 


House circuit breaker is reset, meets proper 
requirements and if worn replaced by an 
electrician. (refer to the Power Requirements 
section in this manual) 


Program time has expired 


Treadmill will not incline(Power fold models only) 


Check for proper positioning of spring knob for 
folding(See procedure in owners manual) 


Treadmill will not unfold 

Power Fold only 


Check for proper positioning of spring knob 
for folding(See procedure in owners manual) 

Manual Fold only 


Folding locking lever is depressed  


Treadmill running belt moves slower than speed 
displayed on computer 


Metric/English conversion (See owners manual 
for Metric/English conversion process) 

Treadmill running belt moves slower than speed 
displayed on computer 


Metric/English conversion (See owners manual 
for Metric/English conversion process) 

 
Running belt is not centered 


Treadmill is properly leveled(See procedure 
in owners manual) 


Center running belt (See Centering 
procedure in owners manual) 


Running belt is slipping or hesitating while in use 


Tension running belt (See process in owners 
manual) 

Treadmill running belt moves slower than speed 
displayed on computer 


Metric/English conversion (See owners manual 
for Metric/English conversion process) 

 
Running belt is not centered 


Treadmill is properly leveled(See procedure 
in owners manual) 


Center running belt (See Centering 
procedure in owners manual) 


Running belt is slipping or hesitating while in use 


Tension running belt (See process in owners 
manual) 


Summary of Contents for Osprey

Page 1: ...8 FOLDING INSTRUCTIONS UNFOLDING INSTRUCTIONS P22 P23 9 TRANSPORT INSTRUCTIONS CORRECT USE P24 P25 10 MAINTAINENCE P26 P27 11 IMPORTANT STEPS P28 12 MUSCLE CHART P29 13 STRETCHING ROUTINE P30 14 TROUBLESHOOTING P31 15 WARRANTY P32 P33 16 COMPUTER OPERATION P34 P42 Yowza Technical Support 877 969 9240 Enter Serial Number ________________________ Enter Original Sales Order ________________________ P...

Page 2: ...admill Athletic support clothes are recommended for both men and women Always wear athletic shoes Never use the treadmill with bare feet wearing only stockings or in sandals When connecting the power cord plug the power cord into a grounded circuit No other appliance should be on the same circuit Always straddle the belt and allow it to start moving before stepping onto the belt Always examine you...

Page 3: ...res The manufacturer recommends a single outlet surge protector with a UL 1449 rating as a Transient Voltage Surge Suppressor TVSS with a UL suppressed voltage rating of 400V or less and an electrical rating 110VAC 15 amps This treadmill must be grounded to reduce the risk of electrical shock Grounding provides a path of least resistance for electric current should the treadmill malfunction This t...

Page 4: ...te a friend Some of the assembly steps may require heavy lifting It is recommended that you obtain the assistance of another person when assembling this product User Weight Limitation Please note that there is a weight limitation for this product If you weigh more than 300LBS Approx 136 Kgs It is not recommended that you use this product Serious injury may occur if the user s weight exceeds the li...

Page 5: ...ble this product No Description Qty 267 Handlebar 2 258 Upright fix bolt cover left 1 221 Upright fix bolt cover right 1 265 Left Handlebar cover outside 1 264 Left Handlebar cover inside 1 263 Right Handlebar cover inside 1 262 Right Handlebar cover outside 1 E Power Cord 1 130 Safety Key 1 F Silicone bottle 1 ...

Page 6: ...duct To help distinguish between the various types of screws and bolts use the scale below to measure them and compare them to the sizes listed No Description Qty 837 M10x58 Bolt 4 126 M8X12 Allen head bolt 6 843 M3X14 Screw 8 A 5mm Allen Key 1 B 6mm Allen Key 1 C Screwdriver 1 D 5mm Allen Wrench 1 MILLIMETERS ...

Page 7: ...sor cover Lower 1 OSPREY 251 256 Console support frame 1 OSPREY 256 257 Hand pulse sensor cover upper 1 OSPREY 257 258 Upright fix bolt cover left 1 OSPREY 258 259 Left upright lower cover Rear 1 OSPREY 259 261 Left side motor hood decorate cover 1 OSPREY 261 262 Right Handlebar cover outside 1 OSPREY 262 263 Right Handlebar cover inside 1 OSPREY 263 264 Left Handlebar cover inside 1 OSPREY 264 26...

Page 8: ...nt motor hood decorate cover Left 1 OSPREY 371 372 Motor cover protect cushion front 1 OSPREY 372 373 Φ8X17X1 5 Washer 11 OSPREY 373 378 Motor Cover Lower 1 OSPREY 378 406 Left rear end cap lower 1 OSPREY 406 409 Right rear end cap decorate cover 1 OSPREY 409 424 M10 Spring 1 OSPREY 424 432 OD23X39 Axle 1 OSPREY 432 448 Non slip cushion 28 OSPREY 448 450 Right side rail 1 OSPREY 450 452 Left side ...

Page 9: ...6 Elevation and control board connect wire Grey 1 OSPREY 706 709 Earth cable 1 OSPREY 709 710 Two female head power cable Red 2 OSPREY 710 711 Two female head power cable White 1 OSPREY 711 712 Handle pulse wire 2 OSPREY 712 713 Blue grey two core power wire 2 OSPREY 713 715 LOP of elevation motor 1 OSPREY 715 716 Transfer wire 1 OSPREY 716 717 8 PIN computer connect wire 1 OSPREY 717 720 Hand pul...

Page 10: ...PREY 837 839 M4x12x12 Washer 2 OSPREY 839 840 M3 5X16 Screw 4 OSPREY 840 842 Φ10X20X1 5 Washer 2 OSPREY 842 843 M3X14 Screw 8 OSPREY 843 845 M4 2X15 Screw 2 OSPREY 845 847 M6 Nut 1 OSPREY 847 860 Φ6 5X12 6X1 25 Washer 3 OSPREY 860 863 M8X38 Bolt 4 OSPREY 863 864 M8X25 Screw 8 OSPREY 864 865 M10X38 Bolt 2 OSPREY 865 866 Φ6 4X24X2 Washer 2 OSPREY 866 ...

Page 11: ...loor in an open area B Remove the treadmill and all the components and hardware from the box C Check the quantities of all components and hardware with the component and hardware lists on pages 5 6 D After verifying inventory if there are any missing parts please contact Yowza fitness at 877 969 9240 ...

Page 12: ...up to vertical position STEP2 B Using the M8x58mm Bolt 837 to secure the upright to frame by 6mm Allen Key B STEP2 C Attach the Upright fix bolt cover right 221 to the frame then attach the Upright fix bolt cover left 258 to the frame 837 X4 221 X1 258 X1 221 837 837 258 ...

Page 13: ... Using the M8X12 Allen head bolt 126 to secure the console Support tube to upright by 5mm Allen Wrench D STEP1 C Attach the Handlebar 267 into the Console Support Tube up Using the M8X12 Allen head bolt 126 to fix them together by 5mm Allen Wrench D or 5mm Allen Key A 126 X6 267 X2 ...

Page 14: ... the Right Handlebar cover outside 265 into upright STEP3 D Adjust the Right handlebar outside cover position keep the plastic PIN is relative then push in STEP3 E Fixed 264 and 265 together using M3X14 Screw 843 STEP3 F Repeat the same operation as 1 5 and assembly the right handlebar cover first inside cover 263 then outside cover 262 Your treadmill is now fully assembled 843 X8 264 X1 265 X1 26...

Page 15: ...http www yowzafitness com 15 ATTENTION ADJUSTABLE CUSHION How to adjust the level for treadmill You can adjust the Rear adjustment cushion as following show when you unfold treadmill on the floor 2 1 ...

Page 16: ...16 YOWZA OSPREY TREADMILL EXPLODED DIAGRAM 845 802 131 802 802 110 109 130 132 138 135 145 147 840 802 802 ...

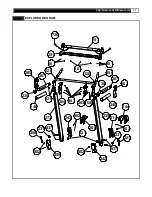
Page 17: ... www yowzafitness com 17 EXPLODED DIAGRAM 257 720 251 801 801 801 256 262 126 267 264 843 126 126 265 273 239 244 221 231 837 242 802 231 261 267 235 248 126 235 248 263 243 259 258 802 837 231 218 802 802 ...

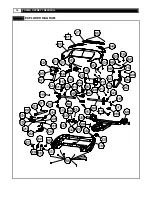
Page 18: ...18 YOWZA OSPREY TREADMILL EXPLODED DIAGRAM ...

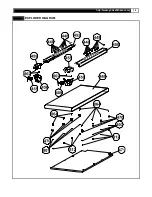
Page 19: ...http www yowzafitness com 19 EXPLODED DIAGRAM ...

Page 20: ...20 YOWZA OSPREY TREADMILL EXPLODED DIAGRAM ...

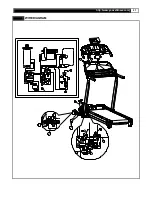
Page 21: ...http www yowzafitness com 21 WIRE DIAGRAM 717 718 713 716 715 711 710 710 709 703 702 704 717 713 717 716 716 713 706 713 705 变压器 704 702 703 715 717 713 713 712 713 719 720 709 710 711 ...

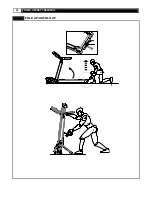
Page 22: ...22 YOWZA OSPREY TREADMILL FOLD UP UNFOLD UP ...

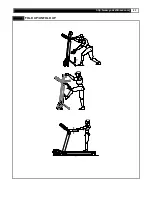
Page 23: ...http www yowzafitness com 23 FOLD UP UNFOLD UP ...

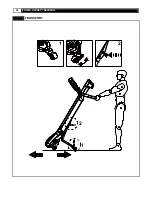
Page 24: ...24 YOWZA OSPREY TREADMILL TRANSPORT 1 2 1 2 ...

Page 25: ... easier by focusing on a fixed object in front of you in the room Run as if you wanted to approach the object Always keep a distance which you can reach the front hand bar Major exercise type This equipment focuses on your lower body and it can train your thigh and shank muscles Important Incorrect excessive training can cause health injuries ...

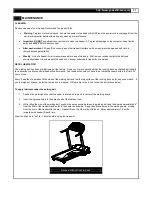
Page 26: ...ocedure until the walking belt is centered It may be necessary to set walking belt tension once you have completed this procedure if the belt feels like it is slipping while walking Refer below to the Walking belt slipping instructions Walking belt has shifted to the right First unplug the power cord from the surge protector Using the hex key provided turn the right rear roller adjustment bolt 1 4...

Page 27: ...cked periodically for lubrication to ensure optimal treadmill performance Your treadmill should not have to be lubricated usually within the first 400 hours of use Every 2 months of operation lift the sides of the walking belt and feel the top surface of the running deck as far as you can reach If you feel signs of silicone no further lubrication is required If it feels dry to the touch follow the...

Page 28: ...to exercise only for a few minutes in your target zone However your aerobic fitness will improve over the next six to eight weeks Don t be discouraged if it takes longer It s important to work at your own pace Ultimately you ll be able to exercise continuously for 30 minutes And the better your aerobic fitness the harder you will have to work to stay in your target zone But remember these essentia...

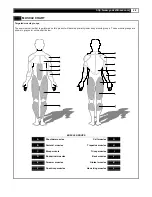
Page 29: ...lop primarily lower body muscle groups These muscle groups are shown in gray color on the chart below MUSCLE GROUPS A Shoulder muscles Calf muscles G B Pectoral muscles Trapezius muscles H C Bicep muscle Tricep muscles I D Abdominal muscles Back muscles J E Forearm muscles Gluteal muscles K F Quadricep muscles Hamstring muscles L ...

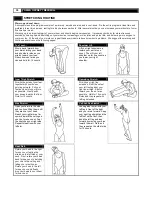
Page 30: ...ner Thigh Stretch Sit with the soles of your feet together with your knees pointing outward Pull your feet as close into your groin as possible Gently push your knees towards the floor Hold for 15 counts Hamstring Stretch Sit with your right leg extended Rest the sole of your left foot against your right inner thigh Stretch toward your toe as far as possible Hold for 15 counts Relax and then repea...

Page 31: ...quirements section in this manual Program time has expired Treadmill will not incline Power fold models only Check for proper positioning of spring knob for folding See procedure in owners manual Treadmill will not unfold Power Fold only Check for proper positioning of spring knob for folding See procedure in owners manual Manual Fold only Folding locking lever is depressed Treadmill running belt ...

Page 32: ...ncluding but not limited to regular inspection and wear component replacement We do not warrant damage caused by the lack of normal maintenance repairs such as those detailed within the Owner s Manual We do not warrant any causes beyond our control Corrosion oxidation or deterioration caused by product location exposure or environment or conditions caused by unsuitable finishes cleaners or lubrica...

Page 33: ...EQUENTIAL OR INCIDENTAL DAMAGES LOSSES OR EXPENSES INCLUDING BUT NOT LIMITED TO COMMERCIAL LOSSES BUSINESS INTERRUPTION OR DAMAGE TO PROPERTY OTHER THAN THE PRODUCT OR PRODUCTS TO WHICH THIS LIMITED WARRANTY APPLIES EFFECT OF STATE LAWS Some States do not allow limitations on how long an implied warranty lasts so the above limitation may not apply to you Some States do not allow the exclusion or l...

Page 34: ...OWZA OSPREY TREADMILL COMPUTER OPERATION LCD DISPLAY A B EXPRESS INCLINE BUTTONS STOP ENTER BUTTON C D INCLINE UP DOWN BUTTON SPEED UP DOWN BUTTON E F START BUTTON PROGRAMME BUTTON G H EXPRESS SPEED BUTTONS ...

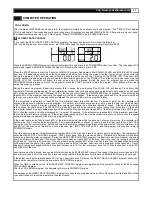
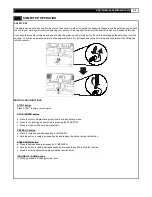
Page 35: ...top and then reinsert the safety key into the console BUTTONS AND FUNCTIONS START button Press START to begin your exercise STOP ENTER button a Press to confirm program and preset function values setting mode b Press to run setting procedure before pressing the START KEY c Press to stop exercise during workout time SPEED UP button a Press to increase exercise speed by 0 1MPH KPH b Hold the button ...

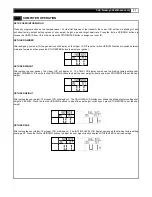
Page 36: ...SION The computer has been preset to calculate and show all information in English miles pounds inches The computer can be set to display information in Metric kilometers kilograms centimeters To do this set the POWER SWITCH located on the base frame to ON Press and hold the START button Insert the SAFETY KEY and pull up The computer will sound one short BEEP and the LCD will show KM and blink Pre...

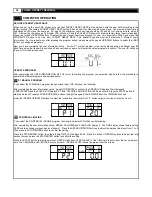
Page 37: ...t your gender SET USER WEIGHT After setting the user gender The Upper LCD will display W The TIME LCD display now shows the blinking factory setting user weight 150LB 68KG Press the Incline UP DOWN buttons to adjust the user weight correctly and press STOP ENTER to set the user weight SET USER HEIGHT After setting the user weight The Upper LCD will display H The CALORIES LCD display now shows the ...

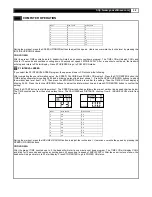
Page 38: ...prior to starting the program you selected please follow the procedure to operate the different programs as described below P1 MANUAL PROGRAM If you select the P1 MANUAL program the upper and lower LCD will show the following After completing the user information set up press STOP ENTER to confirm the SPEED LCD displays the initial speed 2 0MPH 3 2KPH and the PULSE LCD displays P TIME CALORIES AND...

Page 39: ...D UP DOWN buttons to adjust the workout load level from 1 to 9 Then press the STOP ENTER button to confirm the setting Then the TIME LCD will display a blinking 24 00 Press the Incline UP DOWN buttons to adjust the total workout time and press STOP ENTER button to confirm the setting Press the START button to start the workout The SPEED start and change follows the pre set workout load speed chart...

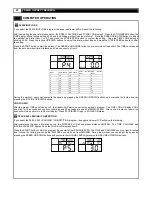
Page 40: ...9 8 3 0 4 2 3 10 9 3 2 4 4 3 11 During the workout users can overwrite the speed by pressing the SPEED UP DOWN buttons and overwrite the incline level by pressing the INCLINE UP DOWN buttons COOL DOWN After the pre set TIME counts down to 0 the treadmill will start a one minute cool down program The TIME LCD will display COOL and blink for 10 seconds and continue counting down 50 seconds at a spee...

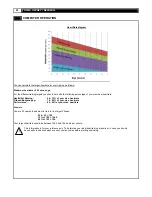
Page 41: ... pulse The PULSE LCD will display P and blink the computer will not change the incline level If the heart rate monitor senses the user s pulse properly and the actual user s pulse does not reach 65 of the maximum heart rate 220 age x 65 then the incline level will be increased by 1 level per 30 seconds If the actual pulse reaches 65 of the maximum heart rate the incline level will remain unchanged...

Page 42: ...0 70 of your max heartrate Fitness Bodyshaping 70 80 of your max heartrate Performance 80 90 of your max heartrate Example You are 25 years old and want to train for the target Fitness 220 25 195 70 of 195 136 5 80 of 195 156 Your target heartrate should be between 136 5 and 156 beats per minute This information is for your reference only To determine your individual training intensity or in case ...

Page 43: ...itness com 43 ADVICE Advice The owner s manual is only for the customer reference Yowzafitness can not be held responsible for mistakes occurring due to translation or change in technical specification of the product ...

Page 44: ......
Reviews: