Youshiko YC9475 User Manual Download Page 33

33

8.2.1  RE-PAIRING THE SENSOR(S) MANUALLY

Whenever you changed the batteries of the 7-in-1 weather sensor array or other additional 

sensors, re-synchronization must be done manually.

1.  Change all the batteries to new ones in the low battery sensor(s).

2.  Press 

[ SENSOR / WI-FI ]

 key on the console to enter sensor synchronization mode (as 

indicated by the flashing antenna 

).

8.3 

RESET AND FACTORY RESET

To reset the console and start again, press the 

[ RESET ]

 key

 once or remove the backup battery 

and then unplug the adapter.

To resume factory settings and remove all data, press and hold the 

[ RESET ]

 key for 6 seconds.

8.4 

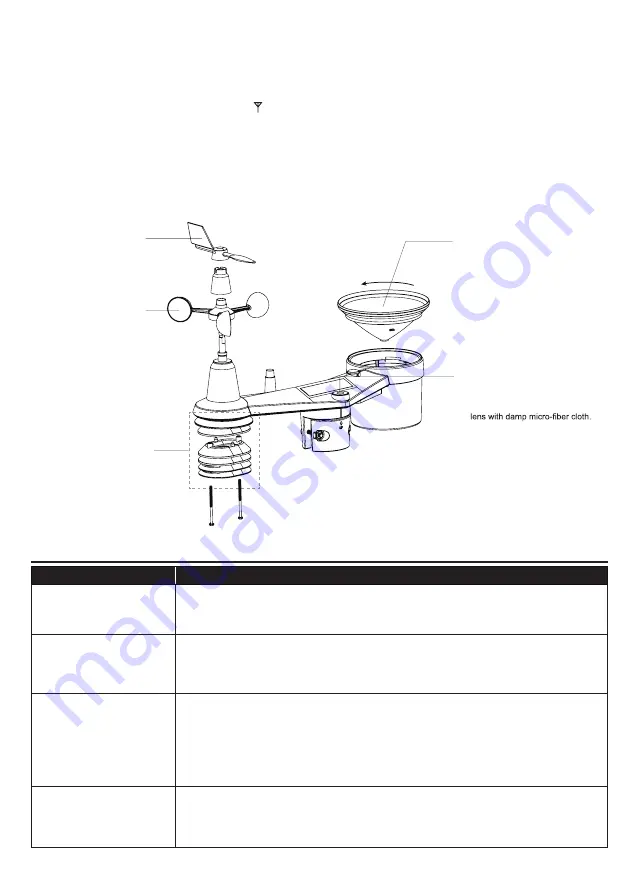
WIRELESS 7-IN-1 SENSOR ARRAY MAINTENANCE

REPLACE THE WIND VANE 

Unscrew and remove the wind 

vane for replacement


REPLACE THE WIND CUP

1. 

Unscrew and remove the 

top cap

2.Remove the wind cup for  

replacement 

CLEANING THE RAIN COLLECTOR 

1.Rotate the rain collector by turning  

it 30°anti-clockwise.

2.Gently remove the rain collector

3.Clean and remove any debris or 


insects.

4.Install the collector when it is clean 

and fully dried.

CLEANING THE UV SENSOR AND 

CALIBRATION

•  For precision UV measurement, 

gentle clean the UV sensor cover


• 

Over time, the UV sensor will 

naturally degrade. The UV sensor 

can be calibrated with a utility 

grade UV meter, please refer to 

Calibration section in previous


page for about the UV sensor 

cablibration.

CLEANING HYGRO-THERMO 

SENSOR

1.Remove the 2 screws at the 


bottom of the radiation shield.

2.Gently pull out the shield.

3.Carefully remove any dirt or 


insects on the sensor (do not 

let the sensors inside get wet). 

4.Clean the shield with water to 

remove any dirt or insects.

5.Install all the parts back when


they are clean and fully dried.

9. 

TROUBLESHOOT

Problems

Solution

7-in-1 wireless sensor 

is intermittent or no 

connection

1.  Make sure the sensor is within the transmission range
2.  If it still does not work, reset the sensor and resynchronize with console

Additional wireless 

sensor(s) is/are 

intermittent or no 

connection

1.  Make sure the sensor(s) is/are within the transmission range 
2.  Make sure the channel displayed match to the channel selection on sensor
3.  If it still does not work, reset the sensor and resynchronize with console

No WI-FI connection

1. 

Check the WI-FI icon on the display, it should be on if connectivity is 

successful

2.  In the console SETUP page, make sure the WI-FI settings (router's name, 

security type, password) are correct

3.  Make sure you connect to 2.4G band of the WI-FI router (5G not 

supported)

Data not reporting to

ProWeatherLive

1.  In the console SETUP page, ensure your Station ID and Station Key are 

correct

2. 

In the "Edit Devices" of the console on PWL, ensure the Device Mac 

address is entered correctly

Summary of Contents for YC9475

Page 1: ...6 Day Forecast WI FI Weather Station With 7 in 1 Professional Sensor Model YC9475 User Manual POLE IS FOR ILLUSTRATION PURPOSE IT S NOT INCLUDED...

Page 2: ...E TEMPERATURE FORECAST WITH CHANCE OF RAIN FOR TODAY NEXT 5 DAYS 15 4 3 4 OOUTDOOR TEMPERATURE HUMIDITY TEMPERATURE INDEX 15 4 3 5 INDOOR CHANNELS TEMPERATURE HUMIDITY 16 4 3 6 MULTI CHANNEL AND SCROL...

Page 3: ...nstructions for information Only use attachments accessories specified by the manufacturer This product is not a toy Keep out of the reach of children The console is intended to be used only indoors P...

Page 4: ...flammable liquid or gas A battery subjected to extremely low air pressure may result in an explosion or the leakage of flammable liquid or gas 1 INTRODUCTION Thank you for your purchase of 6 Day Fore...

Page 5: ...ing it permanently 2 2 SITE SELECTION Before installing the sensor array please consider the followings 1 Rain gauge must be clean every few months 2 Batteries must be changed every 2 to 2 5 years 3 A...

Page 6: ...ng clamp 9 Radiation shield and thermo hygro sensor 10 Red LED indicator 11 RESET key 12 Battery door 13 Drain holes 14 Rain sensor 15 Tipping bucket 3 1 1 INSTALL WIND VANE With reference to photo be...

Page 7: ...flashing every 12 seconds NOTE We recommend using non rechargeable Lithium AA batteries for cold weather climate but normally Alkaline batteries are sufficient for use in most weather condition 3 1 4...

Page 8: ...al installation with a compass or GPS Tighten the mounting bracket around a 30 to 40 mm diameter pole not included using two screw and nuts provided Use the bubble level on the 7 in 1 sensor to make s...

Page 9: ...etails of difference sensors Some of these sensors are multi channel Before inserting the batteries set the channel number if channel slide switch is located at back of sensors inside battery compartm...

Page 10: ...ee environment and without barriers However typically you will get 30m 100 feet maximum in real life installation which includes passing through barriers 4 Barriers Radio signal are blocked by metal b...

Page 11: ...If no display appears when power up the console you can press RESET key by using a pointed object If this process still not work you can remove the backup battery and unplug the adapter then re power...

Page 12: ...t 7 Wind direction speed 2 Outdoor temperature humidity 8 Sunrise sunset moon rise moon set 3 Rainfall Rain rate 9 Indoor CH temperature humidity 4 Barometer 10 Air quality 5 Today and 5 days Weather...

Page 13: ...0 AIR Press to switch between Sky visibility distance and Air quality 11 Display screen 12 SET Hold to enter time and date setting Press to toggle sun moon times 13 UNIT Hold to enter unit of measurem...

Page 14: ...count refer to PWL setup the console indicates the weather forecasts of today and next 5 days Multi day weather forecast section Weather forecast with High HI and Low LO temperatures is default mode i...

Page 15: ...can refer to section 5 and 6 for the WI FI and PWL setup Please input correct location for your device in ProWeatherLive Edit device page If the Wi Fi connectivity is not stable for over 3 hours the w...

Page 16: ...and wind speed data determines the current wind chill factor Wind chill number are always lower than the air temperature for wind values where the formula applied is valid i e due to limitation of for...

Page 17: ...upload to ProWeatherLive server and no history data will be saved in the console This mode shown below information Channel number of the current sensor Comfort indication of this sensor Temperature an...

Page 18: ...eference on the wind condition and is indicated by a series of text icons Level LIGHT MODERATE STRONG STORM Speed 2 8 mph 3 13 km h 9 25 mph 14 41 km h 26 54 mph 42 87 km h 55 mph 88 km h NOTE Windspe...

Page 19: ...38 km h Branches of a moderate size move Small trees in leaf begin to sway 18 24 mph 17 21 knots 8 0 10 7 m s 6 Strong breeze 39 49 km h Large branches in motion Whistling heard in overhead wires Umb...

Page 20: ...press BARO key to switch between ABSOLUTE and RELATIVE barometric pressure 4 3 10 RAIN The RAINFALL section shows the rainfall or rain rate information 4 3 10 1 THE RAINFALL DISPLAY MODE Press RAIN ke...

Page 21: ...d in distance either in km or miles and is generally refer to the distance at which an object or light can be clearly discerned and it depends on the transparency of the surrounding air Visibility ran...

Page 22: ...KY button to view the following lightning information Period of time since last lightning and estimated lightning distance Number of light per hour Return to Cloud Cover Number of strikes in last hour...

Page 23: ...4 3 17 WIRELESS SENSOR SIGNAL RECEIVING 1 The console display signal strength for the wireless sensor s as per table below No signal Weak signal Good signal Outdoor 7 in 1 sensor Hydro thermal sensor...

Page 24: ...h display format 8 Select Sunrise Sunset or Moon rise Moon set display Press INDEX or MODE key to select Sunrise Sunset or Moon rise Moon set display 9 Time sync ON OFF Press INDEX or MODE key to enab...

Page 25: ...During the snooze the alarm icon will keep flashing 4 4 3 UNIT SETTING Use the UNIT key to change the unit of the readings on the console display Below is the operation step Press and hold UNIT key f...

Page 26: ...EVICE IN PWL 1 In https proweatherlive net click the Create Your Account then follow the instructions to create your account create your account 2 Log in the ProWeatherLive and then click the Edit Dev...

Page 27: ...West is 74 3413 The device Mac address can be found on the backside of the console or in the SETUP page mentioned in section 6 3 The weather forecast and weather condition will be based on the Latitud...

Page 28: ...FI to the console s PWS WI FI network as shown in figures below console WI FI network name will always begin with PWS PWS 000710 PWS 000710 E g PC WI FI network interface E g Android smart phone WI FI...

Page 29: ...the sensor located hemisphere e g US and EU countries are N Australia is S Press to complete the WI FI related setting Enter station ID and key assigned by the ProWeatherLive PWL Router password leav...

Page 30: ...ffset 0 Current offset 0 Pressure Range 20 0 20 0o C 36 0 36 0o F Default 0 0 UV gain Range 0 01 10 Default 1 00 Current gain 1 00 Light gain Range 0 01 10 Default 1 00 Current gain 1 00 PM2 5 Range 9...

Page 31: ...ption of Relative Pressure which must be calibrated to sea level to account for altitude effects 7 PROWEATHERLIVE PWL LIVE DATA OPERATION 7 1 VIEW LIVE DATA Login your ProWeatherLive account Once your...

Page 32: ...nce the update is completed 7 The console will stay in AP mode for you to check the firmware version and all the current setting Simply press and hold SENSOR WI FI key for 6 seconds to exit AP mode IM...

Page 33: ...UV meter please refer to Calibration section in previous page for about the UV sensor cablibration CLEANING HYGRO THERMO SENSOR 1 Remove the 2 screws at the bottom of the radiation shield 2 Gently pu...

Page 34: ...not affect the performance of the unit 10 SPECIFICATIONS 10 1 CONSOLE General Specification Dimensions W x H x D 215 x 176 5 x 27mm 8 5 x 6 9 x 1 1 in Weight 503g with battery Main power DC 5V 1A ada...

Page 35: ...unit C and F Accuracy 0 C or 40 C 2 C 32 F or 104 F 3 6 F 0 40 C 1 C 32 104 F 1 8 F Resolution C F 1 decimal place Indoor Humidity Note Data detected by console Humidity unit Accuracy 1 20 RH 6 5 RH 2...

Page 36: ...m Display range 0 200Klux Resolution Klux Kfc and W m 2 decimal place 10 2 WIRELESS 7 IN 1 SENSOR Dimensions W x H x D 390 x 217 x 165 mm 15 5 x 8 5 x 6 5in Weight 757g with Batteries Main power 3 x...

Page 37: ......

Reviews: