background image

3

4   Network Connection and Power Supply

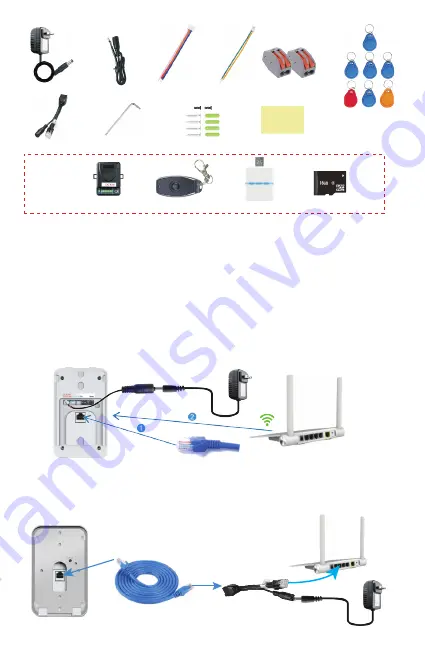
The smart doorbell can be powered and connected to the network in 3 ways, depending

on location of power source and strength of internet connection.

We would recommend that the LAN cable configuration is used if WiFi is not strong enough,

ie the distance between the doorbell and the router is greater than 10 meters. 

Power: Connect DC cable to doorbell and then to the power adaptor or AC transformer 

and then to mains.

Internet: The doorbell can be connected via LAN Cable. See pic A

Power: Same as 

4.1

.

Internet: The doorbell can be connected via WiFi.  See pic A

Power: Connect the doorbell via LAN Cable (cable not supplied) at RJ45 port to 

POE injector and into Router.

Internet: The doorbell can only be connected via LAN Cable if using this configuration.

4.1

4.2

4.3

Unlock control

Indoor chime

Remote control

MicroSD card

3  Accessories

12V Power adapter DC cable

POE injector

Screwdriver Screws and stopper  Adhesive tape

Unlock wiring Access wiring

Optional

5*  Blue User cards

1*  Red Delete card

1*  Yellow Add card

2* Connector

ID: 008641

WiFi Doorbell

A

Length Max 50meters

B

AC 8~24V or DC 12~36V

DC 12V

Summary of Contents for KW02

Page 1: ...ith the doorbell via real time video and full duplex talk take photos and record videos that save directly to your smart device or MicroSD card of doorbell activates your indoor chime with preset melo...

Page 2: ...on detection PIR alarm Tamper alarm Alarm Push message to smart phone send pic to the setting mail Push DC12 36V AC 8 24V or POE power by connect POE injector Power adapter RTSP 25 Frame HD 1080 720 S...

Page 3: ...e doorbell can be connected via LAN Cable See pic A Power Same as 4 1 Internet The doorbell can be connected via WiFi See pic A Power Connect the doorbell via LAN Cable cable not supplied at RJ45 port...

Page 4: ...m Power off wiring diagram Power on wiring diagram Power off wiring diagram NC 3A COM NO Exit NC 2A 1A COM NO Exit DC Cable NC 2A 1A COM NO Exit DC Cable Position 1S 4S 8S 16S Delay time NO COM NC Pai...

Page 5: ...e call button of the doorbell and then the smart device will run a call as normal with the app Open the call in the app and enter talk state Press the pair button on the unlock control and the unlock...

Page 6: ...is applied to the housing See pic A 86 box 2 8 Installation of Smart Doorbell 8 3 Use the 2 screws to secure the housing into a an existing structure see pic C 8 2 Use the 4 screws in the four corner...

Page 7: ...APP 10 1 Register Login Run the Yoosee app create a user for yourself on the app You can set yourself up as user either via your email address or phone number follow prompts to create a password Click...

Page 8: ...first user to add a doorbell is the administrator tap Share icon to enter 3 share modes 1 Enter the account email or mobile phone of share user then tap Share 2 Face to face sharing will make a QR cod...

Page 9: ...work connection between doorbell and your router 4 My Tab Account information General settings About User can bind email Phone modify login password logout Whether automatic start for Android APP Whet...

Page 10: ...disabled Alarm email Setting the mail to receive the screenshot after alarm trigger Human infrared detection This is enabled by default which PIR detects within 3 meters of doorbell Motion detection...

Page 11: ...Hang up Yoosee KBell A B Front door You have a vistor HD 1080 720 SD 640 360 LD 320 180 Record Screenshot Mute Unmute Unlock Switch to full screen Full duplex talk Will not receive the call and alarm...

Page 12: ...lick Manual add device to add device if can not nd devices automatically input devcie information to add Click if remove the device Windows Client CMS default account is admin password is blank can lo...

Reviews: