background image


32

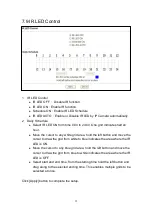
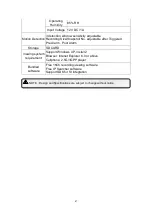
7.9 IR LED Control 


IR LED Control 


IR LED OFF

  Disable IR function. 


IR LED ON

Enable IR function. 


Schedule ON

Enable IR LED Schedule 


IR LED AUTO

Enable or Disable IR LED by IP Camera automatically. 

Daily Schedule 


Select IR LED ON from time 0:00 to 24:00. One grid indicates half an 

hour.   


Move the cursor to any white grid area, hold the left button and move the 

cursor to draw the grid from white to blue indicates the area where the IR 

LED is ON. 


Move the cursor to any blue grid area, hold the left button and move the 

cursor to draw the grid from blue to white indicates the area where the IR 

LED is OFF. 


Select start and end time, from the starting time hold the left button and 

drag along to the selected ending time. This enables multiple grids to be 

selected at once. 


Click [Apply] button to complete the setup. 

Summary of Contents for RYK-IP2280

Page 1: ...IP CAMERA User Manual...

Page 2: ...aused by inappropriate waste handling of this product The recycling of materials will help to conserve natural resources For more detailed information about recycling of this product please contact yo...

Page 3: ...Class B Digital Device pursuant to part 15 of the FCC Rules These limits are designed to provide reasonable protection against harmful interference in a residential installation This equipment generat...

Page 4: ...7 2 Date Time Settings 21 7 3 Name Settings 22 7 4 IP Settings 23 7 5 Wireless Network Settings 24 7 6 Video Settings 26 7 7 Motion Detection Windows 29 7 8 Alarm Settings 30 7 9 IR LED Control 32 7 1...

Page 5: ...Mpeg 4 and Mjpeg compression technology to provide quality image stable and smooth Mpeg 4 streams Requires less hard drive space saves motions on the SD card or by e mail notification to enable the mo...

Page 6: ...rm notification via e mail alarm images can be sent with e mail as attachments or FTP server forwarding images Network Protocol HTTP DNS SMTP FTP NTP DHCP PPPoE DDNS and RTP RTSP Built in microphone f...

Page 7: ...t package If something is missing contact your dealer as soon as possible Item Item Description Item Picture Qty 1 IP camera Option Function Wireless and IR LED 1 2 Camera Stand 1 3 Power Adaptor Inpu...

Page 8: ...setup the software s below Local LAN IP camera search Software Discoverer IE Browser ActiveX Compression Software New ActiveX software updates may be directly downloaded by the IP camera 16CH IP Came...

Page 9: ...5 Select Start Menu Folder The default folder is IP CAM Viewer Select if you want to create a desktop icon or not...

Page 10: ...6 Click Install button to start installation process Installation completed...

Page 11: ...e PC terminal and monitor from the IE browser 16CH viewing software or 3G Mobile phone 4 3 Suggested Computer Equipment CPU 3 0 GHz or above RAM 512 MB or above Sound Card For audio requirement Operat...

Page 12: ...IR LED 4 ACT LINK Indicator 5 LAN Speed Indicator Flashing green LED unlit indicates activity on a 10Mbps Ethernet network LED lit indicates activity on 100Mbps Ethernet network 6 Power Indicator Red...

Page 13: ...the card should be facing down and towards the rear of the IP camera Insert the card until you hear a click when the card is fully seated It is a Push to Click in and Push to Click out Eject mechanis...

Page 14: ...scover software change the IP address and finish the setup 6 1 Connect to IP Camera Three Methods for Connecting IP Camera 1 Get a Dynamic IP from DHCP Server Please refer to 6 2 On the LAN using Disc...

Page 15: ...track LAN connected IP Camera After 4 seconds of search the system will display the IP Cameras connected on LAN From the box list select and double click the desired IP Camera the system opens an IE b...

Page 16: ...Configure button and a dialog window pops up Configure Network Device After new network setup enter admin password Default Password admin 2 Press OK button and after 8 seconds the modification setup w...

Page 17: ...ialog box appears enter the username and password Default User Name admin and Default Password admin 6 4 Install ActiveX Once you have logged in your browser will go to the main IP CAM home page The f...

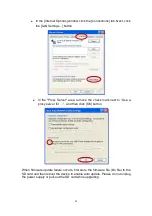
Page 18: ...d the installation will take care of itself If you are unable to install ActiveX Control please try again following the procedures below 1 On the IE browser Menu item bar select Tools Internet Options...

Page 19: ...d ActiveX controls Prompt Download signed ActiveX controls Prompt Automatic prompting for ActiveX controls Enable Initialize and script ActiveX controls not marked as safe Enable Run ActiveX control a...

Page 20: ...utton a security settings window appears Please follow the steps below to change items to Enable or Prompt Download unsigned ActiveX controls Prompt Initialize and script ActiveX controls not marked a...

Page 21: ...ly setup live images will be displayed on the IE browser Connect to IP Camera through IE browser NOTE Up to a maximum of 5 users can access one IP Camera at the time The 6th user may only implement fu...

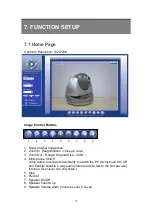
Page 22: ...w 3 Zoom Out Range Original Size 300 4 Microphone On Off Only admin level has the authority to switch the PC microphone On Off and Enable Disable 2 way audio listen and also talk to the camera site fu...

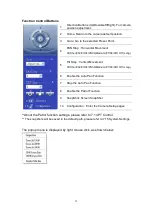
Page 23: ...p Vertical Movement 01 Short 02 03 04 05 06 Medium 07 08 09 10 11 Long 6 Enable the Auto Pan Function 7 Stop the Auto Pan Function 8 Enable the Patrol Function 9 SnapShot Screen SnapShot 10 Configurat...

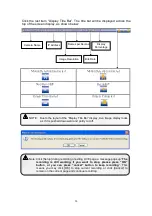
Page 24: ...per Second Bite Rate Display Percentage Note Click Setup during recording or exiting LIVE page a message pops up The recording is still working If you want to stop please press OK button or you can p...

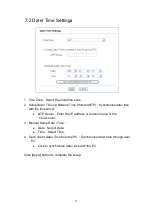
Page 25: ...onize date time with the time server NTP Server Enter the IP address or domain name of the time server 3 Manual Setup Date Time Date Select Date Time Select Time 4 Get Current Date Time from the PC Sy...

Page 26: ...namic IP address DDNS Provider Select websites that provides Dynamic DNS services that lets you gain access to monitor your IP CAM on a local network when the internet address of that network is const...

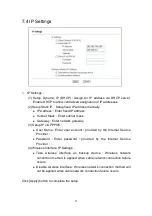
Page 27: ...way 3 Setup IP via PPPOE User Name Enter user account provided by the Internet Service Provider Password Enter password provided by the Internet Service Provider 4 Wireless Interface IP Settings Take...

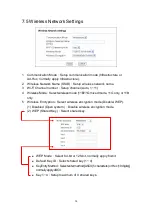
Page 28: ...ess Mode Select wireless mode 11B 11G mixed mode 11G only or 11B only 5 Wireless Encryption Select wireless encryption mode Disable WEP 1 Disabled Open system Disable wireless encryption mode 2 WEP Sh...

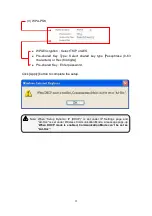
Page 29: ...63 characters or Hex 64 digits Pre shared Key Enter password Click Apply button to complete the setup Note When Setup Dynamic IP DHCP is set under IP Settings page and Ad Hoc is set under Wireless Co...

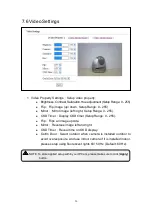
Page 30: ...OSD Timer Display OSD timer Setup Range 0 255 Flip Flips an image upside Mirror Reverses image left and right OSD Timer Reveal time on OSD display Out In Door Select outdoor when camera is installed o...

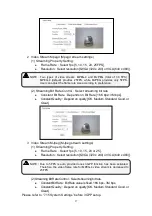
Page 31: ...10 15 20 or 25 Resolution Select resolution QVGA 320 x 240 or VGA 640 x 480 2 Streaming Bit Rate Control Select streaming bit rate Constant Bit Rate Bit Rate value is fixed 16K bps 3M bps Constant Qu...

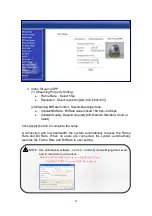
Page 32: ...m Standard Good or Great Click Apply button to complete the setup A connection with low bandwidth the system automatically reduces the Frame Rate and Bit Rate When no users are connected the system au...

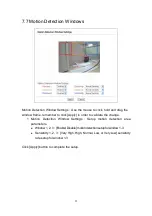
Page 33: ...er to click Apply in order to validate the change 1 Motion Detection Window Settings Setup motion detection area parameters Window 1 2 3 Enable Disable motion detection setup for window 1 3 Sensitivit...

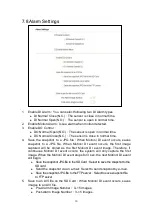
Page 34: ...Motion DI event occurs the first image captured will be stored as the first Motion DI event image Therefore if continuous Motion DI event occurs the system will only capture the first image When the...

Page 35: ...ard but not both Note When the condition of the bandwidth is inadequate unstable or SMTP setup is incorrect The system may not be able to send the motion event notification by e mail and a message app...

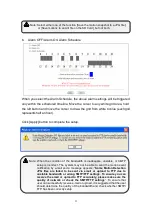
Page 36: ...to any white grid area hold the left button and move the cursor to draw the grid from white to blue indicates the area where the IR LED is ON Move the cursor to any blue grid area hold the left button...

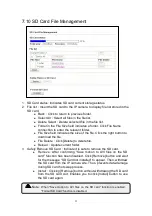
Page 37: ...tton to download the file File Delete Click Delete to delete file Reload Update current folder 3 Safely Remove SD Card Indicate it is safe to remove the SD card Remove After confirming Save motion to...

Page 38: ...5 When motion recording is activated it will be stored instantly onto the SD card Do not attempt to open recording files during recording as error may occur and the following message will appear To v...

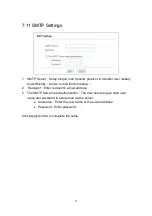
Page 39: ...y similar to mail function setup 2 Recipient Enter recipient s e mail address 3 The SMTP Server need authorization The user needs to give valid user name and password to send email via the server User...

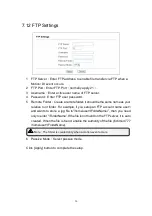
Page 40: ...should be the same name as your relative root folder For example if you setup an FTP account name user1 and wants to store a jpg file to home user1 FolderName then you need only to enter FolderName If...

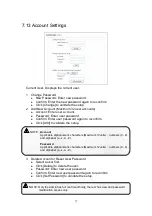
Page 41: ...m Click Add to validate the setup 3 Delete Account or Reset User Password Select a user first Click Delete to delete the user Password Enter new user password Confirm Enter new user password again to...

Page 42: ...trol Enable the Patrol function IP camera will follow the preset points in the Patrol List to do the multi points patrol Stop Stop the Patrol function 2 PT Config Horizontal and Vertical Movement Conf...

Page 43: ...button to add to Preset List Select the desired Preset Point and then click Go To button camera will move to the Preset Point position Click Delete button to delete the selected Preset Point Click Sel...

Page 44: ...function is read only Second Video Stream You can select 3GPP Output to 3G mobile phone or Mjpeg format NOTE The Profile is stored in PC and not in IP CAM If you reinstall or renew your PC the paramet...

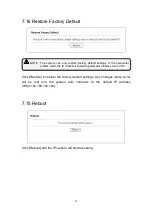
Page 45: ...far will be lost and the system auto connects to the default IP address Http 192 168 100 100 7 15 Reboot Click Reboot and the IP camera will start rebooting NOTE The system can only restore factory d...

Page 46: ...please don t turn off the power or press the reset button during a firmware update Note 1 Please confirm the connection quality and make sure that the IP camera maintains uninterrupted connection to...

Page 47: ...Server area remove the check mark next to Use a proxy server for and then click OK button When firmware update failure occurs first store the firmware file bin file to the SD card and then reboot the...

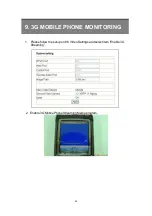
Page 48: ...44 9 3G MOBILE PHONE MONITORING 1 Please follow the setup on 8 6 Video Settings and select item Enable 3G Streaming 2 Enable 3G Mobile Phone Streaming Media program...

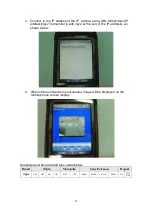
Page 49: ...3gv2 at the end of the IP address as shown below 4 When online connection is successful image will be displayed on the mobile phone screen display Supported cell phone brand type listed below Brand N...

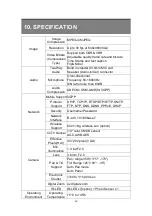
Page 50: ...AMR for 3GPP Mobile Support 3GPP Protocol Support UPnP TCP IP RTSP RTP HTTP SMTP FTP NTP DNS DDNS PPPoE DHCP Security Username Password Network Interface RJ 45 10 100base T Network Wireless Support 8...

Page 51: ...fter Triggered Pre Alarm Post Alarm Storage SD CARD Viewing system requirement Support Windows XP Vista32 Browser Intenet Explorer 6 0 or above Cellphone 2 5G 3GPP player Bundled software Free 16Ch re...

Page 52: ...Account then DynDNS will ask you to create a DynDNS account Please follow the instructions below to create your DyNDNS Account a Username Enter your account name If the account name that you ve enter...

Page 53: ...ount Check I agree to the AUP and I will only create one 1 free account and make sure the information is correct then click Create Account 4 Then you will see the screen Account Created and Dyndns wil...

Page 54: ...ill see Account Confirmed Your account is created successfully now and then login with your account 6 Please return to DynDNS website On the top right hand corner enter the User and Pass field that yo...

Page 55: ...51 7 After login successfully click My Service 8 Please click Dynamic DNS icon...

Page 56: ...desired host name ex IPCAM and its IP Address The IP Address may be the same as your IPCAM IP Address Click Create Host after setup has been completed Fixed IP users can fill in Fixed IP and Dynamic...

Page 57: ...IP address whenever you enter this host name 12 When you have completed the above setup you are no longer restricted by PPPoE application with your existing DDNS equipment IP Camera 13 When you have...

Page 58: ...N through Intranet you have to setup the NAT Table in the router or bandwidth router so that the device IP Address matches with the Internet IP Address Device IP Address 192 168 100 100 NAT Table 80 5...

Reviews: