background image

YMGI: Your Modern Green Idea 


YMGI, Engineered Comfort Products for A Sustainable and Efficient Green World! 


Steps to follow for warranty part replacement: 


1. The installing or service technician must contact YMGI tech support at 1-866-833-3138 ext. 703 from the installation 

location to check and confirm with YMGI Technical support the exact part(s) needed to fix the problem(s). 

 
2. YMGI will check the customer's warranty filing. There will be no charge for Parts with a validated and approved 

warranty. Any Parts that have not been validated and approved or have an invalid warranty filing resulting in an 
unapproved warranty request, will be charged accordingly. 


3

YMGI will ground ship out the parts ASAP. Expedited shipping is available at the customer's expense. 


4. Replacement parts that have an approved warranty registration are to be warranted for the remainder of the 2-year on 

parts and a 7-year compressor warranty. Purchasing of replacement parts without a valid warranty filing or unapproved 
warranty request, will be sold as is and are not covered by any warranty. 
 
YMGI is continually improving products with various engineering changes and these changes are made without prior 
notice. Such improvements or changes include but are not limited to product specification, appearance, functionality, 
size, packaging, etc. These improvements or changes will not void the limited warranty stated herein. YMGI is the final 
authority concerning this warranty policy. 

Summary of Contents for Symphony Solo Series

Page 1: ...nd professional practices for regular cooling and heating equipment such as NEC State or Local Codes and all related documents manuals provided by YMGI Failure to follow and adhere to all codes and documentation can cause damage to equipment property even personal injury Installer Currently licensed certified HVAC technicians only Must Read the manual and all provided documents prior to installati...

Page 2: ...roduction to Mini Splits 14 System Diagram 15 Accessories 16 Specification Sheet 17 Recommended Tools for Installation 19 Installation Site Selection 20 Indoor Unit Dimensions 22 Indoor Unit Installation 24 Outdoor Unit Dimensions 25 Outdoor Unit Installation 26 Piping Installation 27 Indoor Pipe Connection 28 Outdoor Pipe Connection 29 Indoor Condensate Drain Piping 30 Power and Wiring Installati...

Page 3: ...irements for handling reclaiming recovering and recycling of certain refrigerants the equipment and tools necessary to perform these service procedures In addition some states or municipalities may have additional requirements that must also be adhered to for responsible management of refrigerants HVAC R technicians must know the applicable laws and follow them Disposal Notice Do not dispose this ...

Page 4: ...ystem installer or HVAC professional as soon as possible and provide the following information Data on the unit model number serial number and owner s name A detailed description of the unit s problem before and after the problem occurred To avoid personal injury or property damage do not disassemble the unit yourself If disassembly is required to check the unit contact your authorized system inst...

Page 5: ...s etc which the manufacturer may not require certified and licensed personnel to install Reading and following YMGI Group recommendations and requirements contained in the following pages and other documents is the first step to help ensure a smooth installation and proper operation of your unit for many years YMGI doesn t recommend nor allow any do it yourself DIY installation partially or fully ...

Page 6: ...lling the piping through any structures at time of installation 2 Not installing an oil P trap in the copper suction line where the indoor unit is located 18 feet or more below the outdoor unit 3 Cross piping and or cross wiring of any units including more than one single zone or a multi zone system 4 Not conducting a positive leak check prior to the negative leak check 5 Not conducting a positive...

Page 7: ...D D or any other identifying marks on each pair of copper lines and wiring cable sets to keep from cross piping or cross wiring in multiple zone installations or where pipes for different single zone systems are close to one another 13 Secure the wiring cables that connect between the indoor unit and outdoor unit following all applicable NEC state and local codes for your installation If there is ...

Page 8: ...cation or 90 days as of original shipping date from YMGI Group whichever comes first This is a standard limited liability warranty and DOES NOT cover the following Any damage or repairs to properties or persons as an incident of or consequence of improper faulty transportation installation operation maintenance or service Any damage caused by frozen or broken water hoses or refrigeration pipes in ...

Page 9: ...est will be charged accordingly 3 YMGI will ground ship out the parts ASAP Expedited shipping is available at the customer s expense 4 Replacement parts that have an approved warranty registration are to be warranted for the remainder of the 2 year on parts and a 7 year compressor warranty Purchasing of replacement parts without a valid warranty filing or unapproved warranty request will be sold a...

Page 10: ...YMGI Your Modern Green Idea YMGI Engineered Comfort Products for A Sustainable and Efficient Green World 10 ...

Page 11: ...ine if they are reputable 4 Use only a reputable licensed certified HVAC installation professional to prevent any unexpected charges because of unethical business practices 5 Check their references verify they provide professional service for their customers N A T E or A C C A certified technicians are strongly recommended 6 Some contractors technicians may not feel comfortable about installing eq...

Page 12: ...e unit to moist or corrosive environments 17 While operating in cooling mode do not set the indoor unit s room temperature too low 18 YMGI Group recommends that only properly trained and authorized personnel be allowed to repair or service the unit Improper repairs or servicing can result in electric shock or fire hazards Please contact YMGI Group if you need help locating a qualified repair or se...

Page 13: ... Make sure to disconnect the power supply and switch off all circuits prior to inspecting or servicing the unit Inspecting and servicing the unit while the power supply is connected and the circuits are switched on could cause an electrical shock or fire DO NOT install the indoor unit near any cooking surfaces in direct sunlight or any ventilation systems Poor placement could decrease efficiency a...

Page 14: ...or bracket kit is used some outdoor units can be stacked 2 or 3 units high depending upon unit size and applications Air is discharged horizontally quietly and smoothly These units are a perfect fit in locations where installation and applications of general up flow condensing units are limited such as apartments condos lofts multi families and high rise buildings and others named or unnamed Indoo...

Page 15: ...Engineered Comfort Products for A Sustainable and Efficient Green World 15 SAMPLE DIAGRAM OF INSTALLED SYSTEM The refrigerant pipe drain pipe and electrical wiring for this unit should be installed by a qualified HVAC professional only ...

Page 16: ... for ceiling drilling 5 Mounting Board 4 Prevents gasket from falling off 6 Remote Controller 1 Remotely controls the indoor unit 7 Cable Clamp 4 Fastens the insulation to pipe 8 Pipe Insulation 1 Insulates the gas pipe 9 Pipe Insulation 1 Insulates the liquid pipe 10 Insulation 4 Insulates the drain pipe 11 Flare Nut 1 Connects the gas pipe 12 Flare Nut 1 Connects the liquid pipe 13 Service Valve...

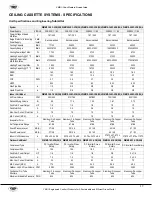
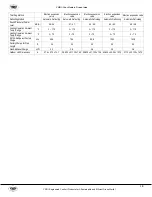
Page 17: ...S 36EC U2B 58 4 WMMS 48EC U2B 58 4 Air Flow Volume CFM 353 445 510 765 587 880 730 1095 900 1350 Dehumidifying Volume hr 85 1 14 1 42 1 61 2 13 Fan Motor Power Output HP 1 5 1 5 1 5 1 3 1 7 Fan Motor FLA A 0 5 0 5 0 9 0 9 1 5 Max Over Current Protection A 15 15 15 15 15 Min Current MCA A 1 0 1 0 1 5 1 5 2 0 Evaporator Form Aluminum Fin Copper Tube Aluminum Fin Copper Tube Aluminum Fin Copper Tube ...

Page 18: ...utomatic Defrosting Automatic Defrosting Sound Pressure Power Level dB A 56 56 57 57 58 58 63 63 59 59 Cooling Operation Ambient Temp Range F 0 118 0 118 0 118 0 118 0 118 Heating Operation Ambient Temp Range F 0 75 0 75 0 75 0 75 0 75 R410A Refrigerant Factory Charge ozs 49 6 78 4 84 8 123 2 140 8 Factory Charge for Pipe Length ft 25 25 25 25 25 Gas Additional Charge oz ft 0 3 0 6 0 6 0 6 0 6 Out...

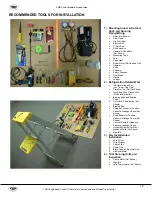
Page 19: ...k Individual wrench Set Use Two at One Time Flare Nut Tool Set Not Shown Hex Head Allen Wrench Sets Metric and Imperial Brazing Rods and Brazing Torch Outfit for AC Application Not Shown Brazing Flux Nitrogen Cylinder for Positive Pressure Leakage Check Not Shown Soap Bubble for Positive Pressure Leakage Check Not Shown Vacuum Pump for Negative Pressure Leakage Check Helium Refrigerant for Minor L...

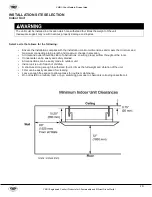
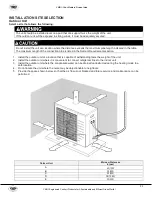
Page 20: ...nsions and meets the minimum and maximum connecting piping length and maximum change in elevation Air inlet and outlet should be clear of obstructions ensuring proper airflow throughout the room Condensate can be easily and safely drained All connections can be easily made to outdoor unit Indoor unit is out of reach of children A structure strong enough to withstand four 4 times the full weight an...

Page 21: ...mum length of the connection pipe is listed in the System Requirements section 1 Install the outdoor unit at a location that is capable of withstanding twice the weight of the unit 2 Install the outdoor unit where it is convenient to connect refrigerant lines to the indoor unit 3 Install the outdoor unit where the condensate water can be drained unobstructed during the heating mode to a safe locat...

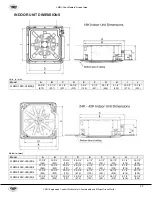
Page 22: ... Units in mm Model A B C D E F G H I WMMS 24EC V2B 58 4 37 3 8 949 32 3 4 832 30 3 4 781 26 3 4 679 6 1 4 159 9 1 2 241 36 1 8 918 8 1 2 216 39 1 8 994 WMMS 30EC V2B 58 4 37 3 8 949 32 3 4 832 30 3 4 781 26 3 4 679 6 1 4 159 9 1 2 241 36 1 8 918 8 1 2 216 39 1 8 994 WMMS 36EC V2B 58 4 37 3 8 949 32 3 4 832 30 3 4 781 26 3 4 679 6 1 4 159 9 1 2 241 36 1 8 918 8 1 2 216 39 1 8 994 WMMS 42EC V2B 58 4...

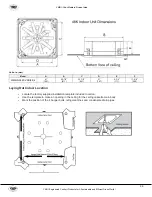
Page 23: ...MS 48EC V2B 58 4 41 1041 35 7 8 911 33 1 8 841 31 787 6 3 4 171 11 3 8 289 Laying Out Indoor Location Locate the factory supplied installation template included in carton Use the template to make an opening in the ceiling for the ceiling cassette main body Mark the position of the 4 hanger bolts refrigerant lines and condensate drain pipes ...

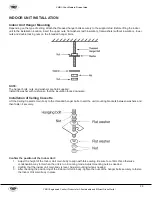
Page 24: ... Install the washer with cushion so that the insulation faces downward Installation of Ceiling Cassette Lift the Ceiling Cassette main body to the threaded hanger bolts Insert the unit mounting brackets between washers and then fasten it securely Confirm the position of the Indoor Unit 1 Adjust the height of the Indoor Unit main body to align with false ceiling Be sure to confirm this otherwise co...

Page 25: ...T DIMENSIONS in mm Model A B C D E UMAT18HP230V1AO 37 5 8 955 15 5 8 396 27 1 2 700 22 560 14 1 8 360 UMAT24HP230V1AO UMAT30HP230V1AO 38 5 8 980 16 3 4 427 31 1 8 790 24 610 15 1 2 395 UMAT36HP230V1AO UMAT42HP230V1AO 43 5 8 1107 17 3 8 440 43 1 4 1100 24 7 8 631 15 3 4 400 UMAT48HP230V1AO 37 3 4 958 16 1 4 412 53 1 8 1349 22 1 2 572 14 3 4 376 ...

Page 26: ... a drain pipe to drain condensate water during operation in heating mode 1 Insert the drain joint included into the selected hole located on the bottom of the base pan and then connect the drain hose field supplied to the drain joint 2 All other holes must be sealed with plugs included to avoid water leaks except for the drain pipe mounting hole 3 Route drain hose to safe location for disposing of...

Page 27: ...eaks into the indoor space NOTE Expandable foam insulation may be added to fill large wall gaps Apply per manufacturer s instructions Piping Preparation 1 Do not open service valves or remove protective caps on pipes until instructed by this manual 2 Keep tubing free of dirt sand moisture and contaminants 3 Insulate each refrigerant pipe and condensate hose with minimum 3 8 10 mm wall thermal pipe...

Page 28: ...with either refrigerant pipe carefully center the pipe to the indoor unit connection port then hand tighten the flare nut 5 Repeat procedure with remaining pipe 6 Tighten both flare nuts using a standard wrench and a torque wrench as shown below 7 Carefully tighten flare nuts to correct torque level referring to the Torque Table below Pipe Diameter inch mm Nut Size inch mm Tightening Torque ft lbs...

Page 29: ...the flare fittings 4 Starting with either refrigerant pipe carefully center the pipe to the indoor unit connection port then hand tighten the flare nut 5 Repeat procedure with remaining pipe 6 Tighten both flare nuts using a standard wrench and a torque wrench as shown 7 Carefully tighten flare nuts to correct torque level referring to the Torque Table below Pipe Diameter inch mm Nut Size inch mm ...

Page 30: ... and or pipes to prevent sweating which may cause water stains or wall damage If a gradual pitch from the drainage port is not obtainable the Ceiling Cassette contains an internal condensate drain pump with limited head or lift The condensate drain pipe may have a vertical height of 39 in maximum above the unit drainage port within the first 12 in as long as the remaining condensate drain pipe gra...

Page 31: ...and regulations of the electric company so that the system will operate properly 6 Provide a GFI circuit breaker at the electrical panel in accordance with the NEC and the local electrical company standards 7 Connect the power supply firmly to the terminal block Improper installation may cause a fire 1 The main power supplies are high voltage while the communication wire and the Tether Controller ...

Page 32: ...ransmitting devices Locate wire terminals 1 and 2 Connect communication cable from outdoor unit to terminals 1 and 2 Secure cable inside wire clamp strain relief Verify cable is secure not loose and no external force on wires affects the connections at the terminals NOTE Record wire colors and terminal references for use with Outdoor Unit wire connections Indoor Unit Power Wiring Locate wire termi...

Page 33: ...tions NOTE Crossing communication wires will cause an E6 system malfunction code and possible damage Secure cable inside wire clamp strain relief Verify cable is secure not loose and no external force on wires affects the connections at the terminals Outdoor Unit Power Wiring Insert main power wires through the wire holes on conduit mounting bracket Secure main electrical power conduit with lockin...

Page 34: ... wall mounting location See Indoor Unit wiring section for instruction to connect the Wired Tether Controller to the indoor unit Wired Tether Controller Installation Pull communication cable through switch box if one is used and Wired Tether Controller back plate Securely fasten back plate to the switch box or wall Locate wire terminals X1 and X2 on rear of Tether Controller panel Carefully connec...

Page 35: ...ors on the basis of their own preference Refer to the I FEEL Function in the Tether Controller Owner s Manual for detailed instructions CEILING CASSETTE PANEL DISPLAY Power ON OFF Indicator Red when the unit is powered on white when the unit has started Timer Indicator Yellow when the time is set off when it is not Digital Display When it receives a valid signal from the remote controller it will ...

Page 36: ...ct diameter length and booster fan size based on the required airflow See table below for duct and hole sizes Unit Size Hole Diameter Min Duct Diameter BtuH inch mm 18 000 2 375 60 2 5 64 24 000 48 000 2 875 73 3 0 76 NOTE Fresh air intake amount should be 20 or less of whole air amount to prevent condensation To install fresh air intake Locate the fresh air hole on side of cassette unit Carefully...

Page 37: ...te body 5 Complete the decorative grille attachment by hooking the remaining two 2 corners to the Ceiling Cassette main body Note Be careful not to pinch the swing louver motor wires between the decorative grille and ceiling cassette main body 6 Find the four 4 height adjustment screws located on the corners of the decorative grille Use the four 4 height adjustment screws to adjust gap between dec...

Page 38: ...detector may also be used for a leakage test NOTE You may want to perform leak testing and evacuation before wiring to save time electrical connections can be completed while your vacuum pump is running Use vacuum pump rather than refrigerant to discharge air when installing the unit Additional Charge Refrigerant for the pipe length of 25 feet has been charged at the factory If the piping is great...

Page 39: ... Operate vacuum pump until a vacuum of 500 microns or less is achieved The evacuation duration depends on the vacuum pump size and unit s capacity generally 20 minutes for the 9 000 Btu H units to 1 hour for a larger 36 000 Btu H unit 6 Close the manifold valves and shut off the pump a If vacuum holds below 700 microns for 15 minutes the system can be considered dry and leak free Go to step 5 b If...

Page 40: ...g the system on in heating mode The system should start heating mode within 3 5 minutes Verify the new set point lights up on the Floor Ceiling unit display Verify the outdoor fan and compressor are operating Verify the indoor fan is operating Verify the indoor discharge air is heating the room Press the OFF button on the Remote Controller Verify Remote Controller display turns OFF and the system ...

Page 41: ...r button of controller is not turned on Controller is in sleep mode or timer mode Otherwise contact a qualified service professional for assistance The unit is not heating or cooling adequately Cause There are a number of reasons for inadequate cooling or heating Solution Check the following Remove obstructions blocking airflow into the room Clean dirty or blocked air filter that is restricting ai...

Page 42: ...s higher than protective temperature value the unit will report high discharge temperature protection If the protection occurs over 6 times the unit cannot be recovered automatically Switch off the unit or re energize the unit after cutting off power to reset this protection 5 E6 Communication Malfunction Communication Failure Between Indoor and Outdoor Main Board If the outdoor unit does not rece...

Page 43: ...e unit will report compressor overload protection If the fault occurs successively 3 times the unit will not recover automatically Switch off the unit or re energize the unit to eliminate this protection 16 H4 Overload Protection Evaporator Temperature Condenser Temperature If indoor unit detects the evaporator coil temperature is higher than protective temperature value the unit will report overl...

Page 44: ...ustainable and Efficient Green World 44 USER NOTES AND INSTALLATION SERVICE MAINTENANCE NOTES INSTALLATION NOTES Put down whatever questions you have or problems you have seen as a unit history No Date Notes Asked Your Technician for Help Did You Ask YMGI Tech for Help ...

Page 45: ...ustainable and Efficient Green World 45 USER NOTES Put down whatever questions you have or problems you have seen as a unit history No Date Installation Company Name Technician Name Phone HCAC License Job Not Performed by Technician Technician Checklist Completed Fully ...

Page 46: ... Green Idea YMGI Engineered Comfort Products for A Sustainable and Efficient Green World 46 SERVICE MAINTENANCE NOTES No Date Contents of Service Maintenance Technician s Company Name Technician Name Phone HCAC License ...

Page 47: ...YMGI Your Modern Green Idea YMGI Engineered Comfort Products for A Sustainable and Efficient Green World 47 ...

Page 48: ... SEER 09 24K Btu h 58 2 Single Zone 16 22 SEER 09 36K Btu h 58 4 78 1 Single Zone 18 23 SEER 09 36K Btu h Symphony CHOIR DC Inverter 59 2 DC Inverter Multiple Zone 16 SEER 2x09K to 5x12K Btu h 59 2S DC Inverter Multiple Zone 16 SEER 6x09K to 9x09K Btu h 59 4 DC Inverter Multiple Zone 21 SEER 5x09K to 5x12K Btu h Symphony VRF DC Inverter HP or Heat Recovery up to 64 zones Symphony HARMONY Packaged ...

Reviews: