ASSEMBLY INSTRUCTIONS
15
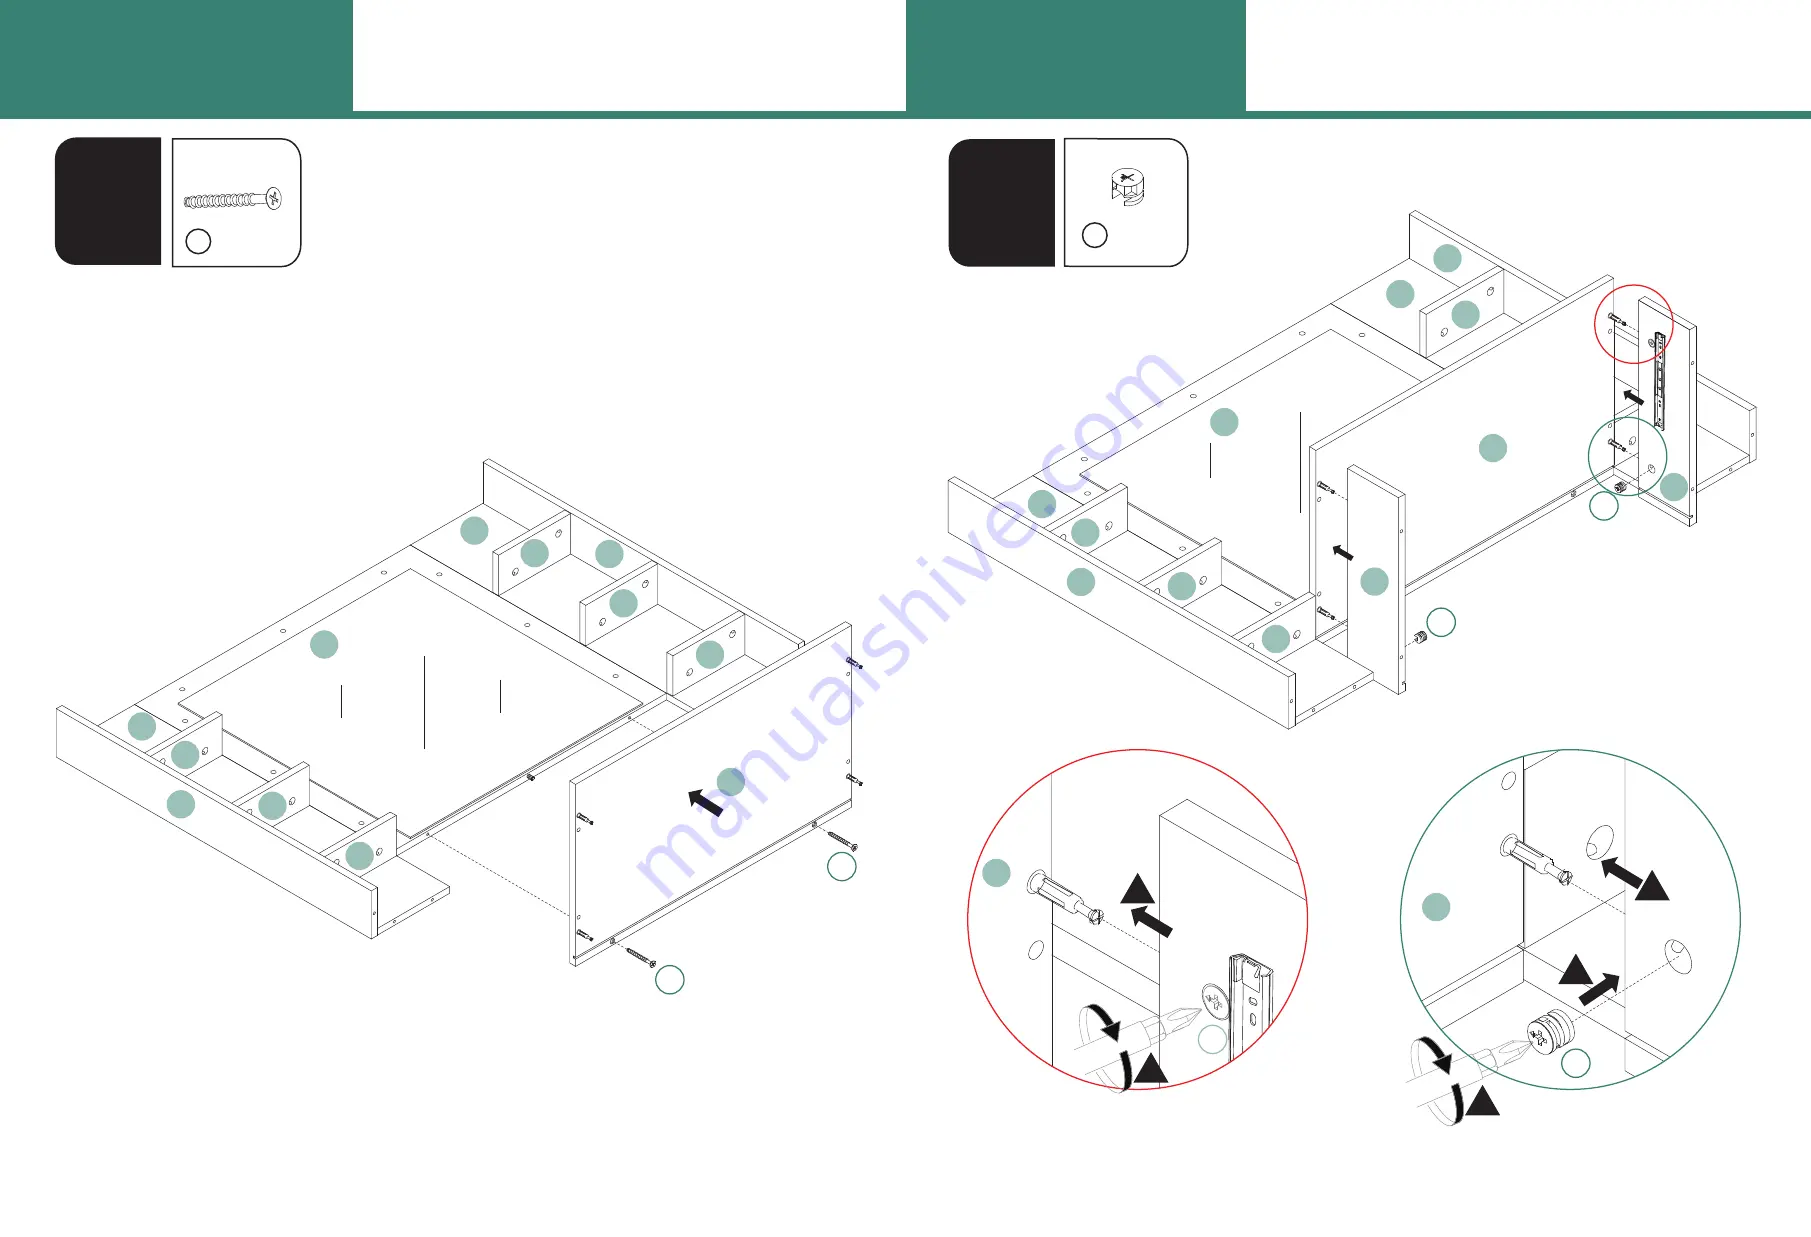
16
9
Note: Part B is the pre-installed
accessory mentioned in step 1.
8
2pcs
F
1
13
14
17
19
18
B
3
4
180°
2
Page 1: ......
Page 2: ...commended 4 Assemble on a at clean and soft surface X1 X2 X1 Item no Qty Reference Image Item no Qty Reference Image Item no Qty Reference Image Item no Qty Reference Image FTBFVT 0049 FTBFVT 0050 FTB...
Page 3: ...1 X2 X6 X12 X1 X2 X3 X2 X4 X1 X9 X1 X1 X18 X18 X60 Item no Qty Reference Image X1 8X40mm ST3 5X35mm ST3 5X14mm M6X25mm ST3X12mm M7X50mm M4X18mm L250mm 39 A V C B E D G F H K J M L O N Q P S R U T 19 1...
Page 4: ...at the marked position When installing the inner guide rail please use the guide rail notch to assemble towards the inner direction of the drawer Please x the screws according to the marked position...
Page 5: ...leting these three steps secure the other two screws on the hinge Align the screws with the center of the mounting hole of the guide rail Note Installing the slide will block the hole of part B eccent...
Page 6: ...ASSEMBLY INSTRUCTIONS ASSEMBLY INSTRUCTIONS 9 10 2 3 1pc 1pc 1 1pc 10 1pc 16 1pc 17 5 24pcs X4 A 1 5 10 17 16 A X4 A X3 A X3 A X4 C X4 C X4 A A X6 A X6 A 1pc 14 1pc 15 6pcs A 8pcs C 14 15...
Page 7: ...ASSEMBLY INSTRUCTIONS ASSEMBLY INSTRUCTIONS 11 12 5 6pcs B 4 16pcs D 4pcs H 13 13 14 14 18 18 19 19 19 19 18 18 15 15 13 14 15 H D or 1 2 180 B B B B B B B 3...
Page 8: ...ASSEMBLY INSTRUCTIONS ASSEMBLY INSTRUCTIONS 13 14 7 6 6pcs B 6pcs B 13 13 14 14 16 15 15 17 17 19 19 19 18 18 18 B B B B B B B B B B B B B B 1 3 2 180 1 2 180...
Page 9: ...TIONS ASSEMBLY INSTRUCTIONS 15 16 9 Note Part B is the pre installed accessory mentioned in step 1 8 2pcs F 1 13 14 16 15 17 19 19 19 18 18 18 F F 2pcs B 1 1 3 4 13 14 16 15 17 19 18 18 18 B B B 1 3 1...
Page 10: ...ASSEMBLY INSTRUCTIONS ASSEMBLY INSTRUCTIONS 17 18 10 11 1pc 32 13 13 14 16 18 18 18 15 17 19 15 17 19 1 1 2 2 3 3 4 4 32 32 32 4pcs F 1pc 2 F F F F F 14 16 18 18 18...
Page 11: ...ASSEMBLY INSTRUCTIONS ASSEMBLY INSTRUCTIONS 19 20 12 13 6pcs F 4pcs G 2 5 5 10 16 16 F F F G G F G G F G G 8pcs B 14 15 17 19 16 18 18 18 2 5 7 8 11 12 3 1 4 13 10 B B B 1 2 3 180...
Page 12: ...ASSEMBLY INSTRUCTIONS ASSEMBLY INSTRUCTIONS 21 22 14 15 1pc 33 1pc 34 2pcs 6 8pcs F 2 5 7 33 6 6 34 8 11 12 10 16 1 13 17 F F F F F F F F 2 5 7 8 11 12 10 16 1 13 17...
Page 13: ...CTIONS 23 24 16 17 1pc J 1pc N 4pcs D 2pcs K or or 4pcs D 2pcs 9 16 14 14 15 15 16 18 19 18 19 9 9 19 18 18 18 18 19 19 19 19 13 13 17 17 17 2 2 3 1 1 4 6 6 11 11 12 12 12 10 10 10 4 6 6 5 5 7 7 8 8 J...
Page 14: ...SSEMBLY INSTRUCTIONS 25 26 19 18 1pc 21 1pc 22 2pcs 26 4pcs R 2pcs 20 24pcs D 20 9 9 20 20 R D D D D D D R Q 1 11 12 10 5 7 14 15 16 18 18 18 19 19 19 13 17 3 2 14pcs A 21 22 26 A A A X5 A X4 A X2 4pc...
Page 15: ...the guide rail 1pc 24 1pc 25 1pc 31 1pc 23 4pcs E Pay attention to the position of the groove at the triangle mark make sure that the groove is in the same direction 22 22 22 23 23 23 24 24 24 24 25 2...
Page 16: ...guide rail Pay attention to the position of the groove at the triangle mark make sure that the groove is in the same direction L 2pcs 27 2pcs 28 2pcs 29 2pcs 30 8pcs E 8pcs B 4pcs M 4pcs P2 2pcs L 8pc...
Page 17: ...ASSEMBLY INSTRUCTIONS ASSEMBLY INSTRUCTIONS 31 32 25 24 9pcs S P2 P1 20 20 21 26 26 8 5 7 14 16 18 18 18 13 3 1 10 15 19 19 19 17 2 S S S S S S S S...
Page 18: ...26 27 ASSEMBLY INSTRUCTIONS ASSEMBLY INSTRUCTIONS 33 34 1pc Double sided tape V 1pc S 2pcs O V V V S S S S X9 S 14 15 13 33 32 32 13 34 O O O 13 13 S 1 3 4 5 2...
Page 19: ...ASSEMBLY INSTRUCTIONS ASSEMBLY INSTRUCTIONS 35 36 28 18pcs U 18pcs T T T U X18 T X18 U 33 32 34 29 2pcs WALL O 1 3 4 2 O O O O O O O O...
Page 20: ...ASSEMBLY INSTRUCTIONS ASSEMBLY INSTRUCTIONS 37 38 31 30 1pc 35 4pcs B 1pc 37 1pc 38 2pcs 36 16pcs A X6 A B B B B X2 A X2 A X6 A 36 36 38 37 37 38 35 A 180...
Page 21: ...ASSEMBLY INSTRUCTIONS ASSEMBLY INSTRUCTIONS 39 40 32 33 12pcs B 1pc 39 12pcs D 2pcs Q 36 36 36 36 38 38 35 35 37 37 39 39 X12 B 180 Q D D D D D D...
Page 22: ...ASSEMBLY INSTRUCTIONS 41 34 Installation Completed Not included...