


9
WARNING!
Do
not
keep
on
pressing
the
On
/
Off s
witch,
if
the
prote
ctive circuit has actuated. This may damage the batte
ry.
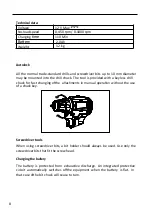
1.
Remove the battery pack from the handle, pressing the battery
release bution.
2.
Check that the mains voltage is the same as that marked on the rating
plate of the battery charger. Plug the mains plug of the battery charger
into the mains socket outlet.
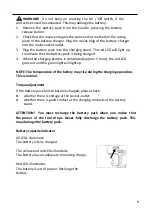
3.
Plug the battery pack into the charging stand. The red LED will light up
to indicate that the battery pack is being charged.
4.
When the charging process is completed (approx. 1 hour), the red LED
goes out and the green light will light up.
NOTE:
The
temperature
of
the
ba
tt
ery
may
rise
during
the
charging
op
eration.
This is normal.
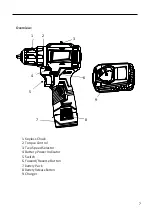
Torque
adjustment
I
f the battery pack fails to become charged, please check:
whether there is voltage at the socket-outlet.
whether there is good contact at the charging contacts of the battery
stand.
ATTENTION! You must recharge the battery pack when you notice that
the power of the tool drops. Never fully discharge the battery pack. This
may damage the battery pack.
Battery capacity indicator
All
LEDs
illuminate
The
battery
is
fully
charged.
The
yellow
and
red
LEDs
illuminate
The
battery
has
an
adequate
remaining
charge.
Red
LED
illuminates
The
battery
is
out of power
.
Recharge
the
battery.


