background image

18

EN

3. Maintenance/3.2 Dustbin and Washable Filter

1


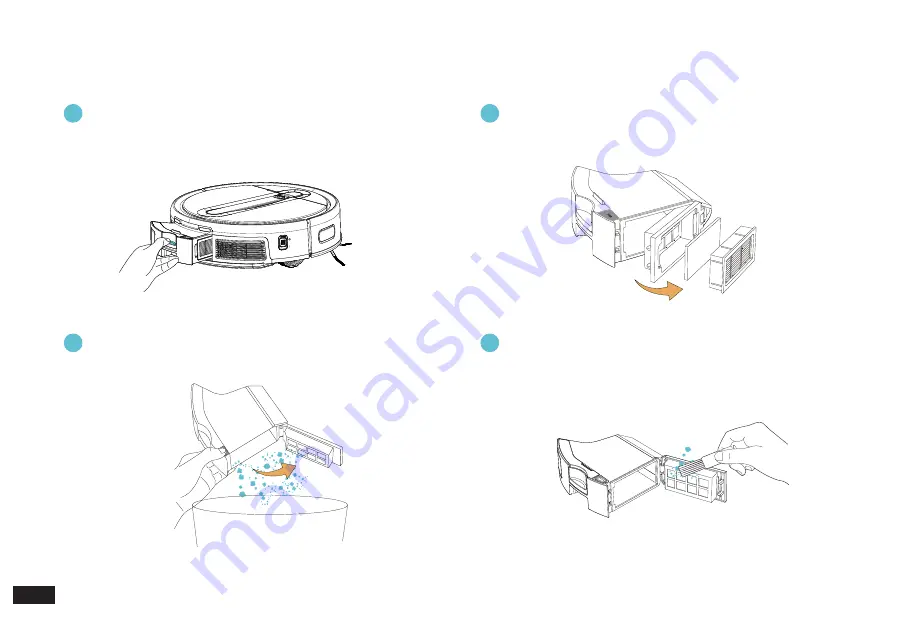
Press the Dustbin Release Button to remove the Dustbin

3


Open the Filter Net, remove the fine Washable Filter and the 

High-Efficiency Filter Assembly

2


Press the Dustbin Cover Release Button to empty the 

Dustbin

4


Clean the dust on both sides of the Filter Net with the Multi-

Function Cleaning Tool

PUSH

Summary of Contents for cube

Page 1: ...INSTRUCTION MANUAL GEBRAUCHSANWEISUNG MANUAL DE INSTRUCCIONES MANUEL D INSTRUCTION MANUALE DI ISTRUZIONI cube Robot Vacuum and Mop BUKU PETUNJUK MANUAL ARAHAN...

Page 2: ...items such as curtains and tablecloths off the floor 3 If there is a drop off in the cleaning area due to a step or stairs you should operate the Appliance to ensure that it can detect the step withou...

Page 3: ...ing that may reduce air flow 18 Take care not to damage the power cord Do not pull on or carry the Appliance or OMNI Station by the power cord use the power cord as a handle close a door on the power...

Page 4: ...d then power ON The Wi Fi module is turned on when Robot is restarted 24 Remove the Appliance from the OMNI Station and turn OFF the power switch to the Appliance before removing the battery for dispo...

Page 5: ...for the pure self protection and single control intended only Please be aware of the local data protection based legal obligations in case of use No surveillance of public places especially with cland...

Page 6: ...Cord Instruction Manual Note 1 All figures and illustrations are for reference only and may present differences in appearance from the actual product 2 The Edge Brushes Water Tank Plug Detachable Bas...

Page 7: ...Sensor Multi Surface Main Brush Multi Surface Main Brush Release Buttons Driving Wheels Water Outlet Anti Drop Sensors Dust Disposal Port Dustbin Release Button 1L UFO Water Tank Power Switch I ON O O...

Page 8: ...Contents 1 2 Product Diagram Note 1 The Detachable Base needs to be installed by the user before use 2 Lift the mop Built in Electric Scrubber before installation and put it down after installation O...

Page 9: ...y be necessary to place a physical barrier at the edge of a drop to stop the Robot from falling over it Put away objects such as wires cloths or slippers that may be on the floor to improve the mappin...

Page 10: ...ick sound indicates a successful connection Step 1 Lift the Scrubber and a click sound will be heard Step 2 Push the Detachable Base into the Station on a flat surface The click sound indicates a succ...

Page 11: ...n water and put it back into the Robot after installing the Plug 2 Mapping and Cleaning 2 2 Notes before Using 5 6 Note 1 Cover an area of at least 5 cm height from the bottom of any reflective object...

Page 12: ...move the Station while it is cleaning 2 Mapping and Cleaning 2 3 yeedi App After downloading please complete registration login and the network setup according to the guide in the mobile App page Met...

Page 13: ...ter the Wi Fi password respectively according to the prompts in the App and then wait for the setup result 5 If the network setup fails it is recommended that you try again according to the above step...

Page 14: ...Button to stop cleaning and press again to continue Press and hold for 2 seconds to end the current cleaning task Please place the Robot in the area to be cleaned before starting Press the SPOT Butto...

Page 15: ...he Robot enters the network setup mode If you are not going to use the Robot for a long time turn the power switch to o to shut it down Press the SPOT and HOME Buttons at the same time for 5 seconds W...

Page 16: ...alarm status The white light is solid on Standby network setup succeeded Base Station docking successful The white light is flashing Charging Start up Robot loading Firmware update HOME Indicator Ligh...

Page 17: ...Robot Parts Maintenance Frequency Replacement Frequency Easy to Clean Mopping Pad Every 3 6 months Edge Brushes Once every 2 weeks Every 3 6 months Multi Surface Main Brush Once per week Every 6 12 m...

Page 18: ...Button to remove the Dustbin 3 Open the Filter Net remove the fine Washable Filter and the High Efficiency Filter Assembly 2 Press the Dustbin Cover Release Button to empty the Dustbin 4 Clean the dus...

Page 19: ...th a clean soft cloth and do not use detergent Note Please avoid direct sunlight and exposure to high temperatures 3 Maintenance 3 3 Vision and Laser Fusion Navigation System and Edge Detection Sensor...

Page 20: ...in the Charging Contacts Please use dry cloth when cleaning Do not use wet cloth to prevent damage 2 Before cleaning the Robot Charging Contacts and Station Charging Contacts Pins turn the Robot OFF...

Page 21: ...Main Brush Remove any foreign objects caught in the Multi Surface Main Brush with the Multi Function Cleaning Tool Remove Edge Brushes Clean Edge Brushes with the Multi Function Cleaning Tool 1 2 3 Ma...

Page 22: ...el Clean Driving Wheels Clean Universal Wheel 1 2 Note Please check regularly whether the Edge Brushes Main Brush Driving Wheels and Universal Wheel have picked up excessive amounts of hair or trapped...

Page 23: ...Pull up and remove Filter Detachable Base Clean Detachable Base 3 2 4 Empty Dirty Water Tank 1 Note After rinsing please dry the Detachable Base and Filter with a soft cloth or put in a cool place Do...

Page 24: ...when you hear a click the Filter is in place Wipe Filter Install Detachable Base Install Filter 5 7 6 3 Maintenance 3 8 Dirty Water Tank Detachable Base and Filter 8 Note Be sure to lower the Scrubbe...

Page 25: ...be performed when the Robot is ready Press the SPOT and HOME Buttons at the same time for 2 seconds When you hear the voice prompt the Robot is ready for network setup No 2 4GHz network The Robot doe...

Page 26: ...Sensor in front of the Robot and the Visual Sensor at the top of the Robot regularly with a dry cloth Power cords slippers and other objects placed on the ground will affect the normal operation of th...

Page 27: ...cleaning The water outlets on the bottom of the Robot are clogged Clean the water outlets on the bottom of the Robot with a clean cloth and start it to check whether water is coming out normally If w...

Page 28: ...is preventing recharging for which reason the Robot cannot enter the room where the Cube Station is located Please open the door of the room where the Cube Station is located and keep the way to the...

Page 29: ...sink is full of water The Dirty Water Tank is not installed properly Press the Dirty Water Tank down to ensure proper installation and the indicator light shall be solid blue The Dirty Water Tank is f...

Page 30: ...Power Washing Mopping Pads 35W Power Drying 90W Power Emptying 1000 W Rated Output 20 V 2 A Frequency bands 2400 2483 5MHz Networked Standby Power Less than 2 00W Note 1 Output power of the Wi Fi mod...

Page 31: ...Shenzhen Reecoo Electronic Co Ltd Building 5 6 ShangLiLang Science and Technology Park ShangLiLang Community NanWan Street LongGang District ShenZhen City Guangdong Province P R China...

Reviews: