background image


Gigabit Color IP Phone                                                            Customizing Your Phone                                       


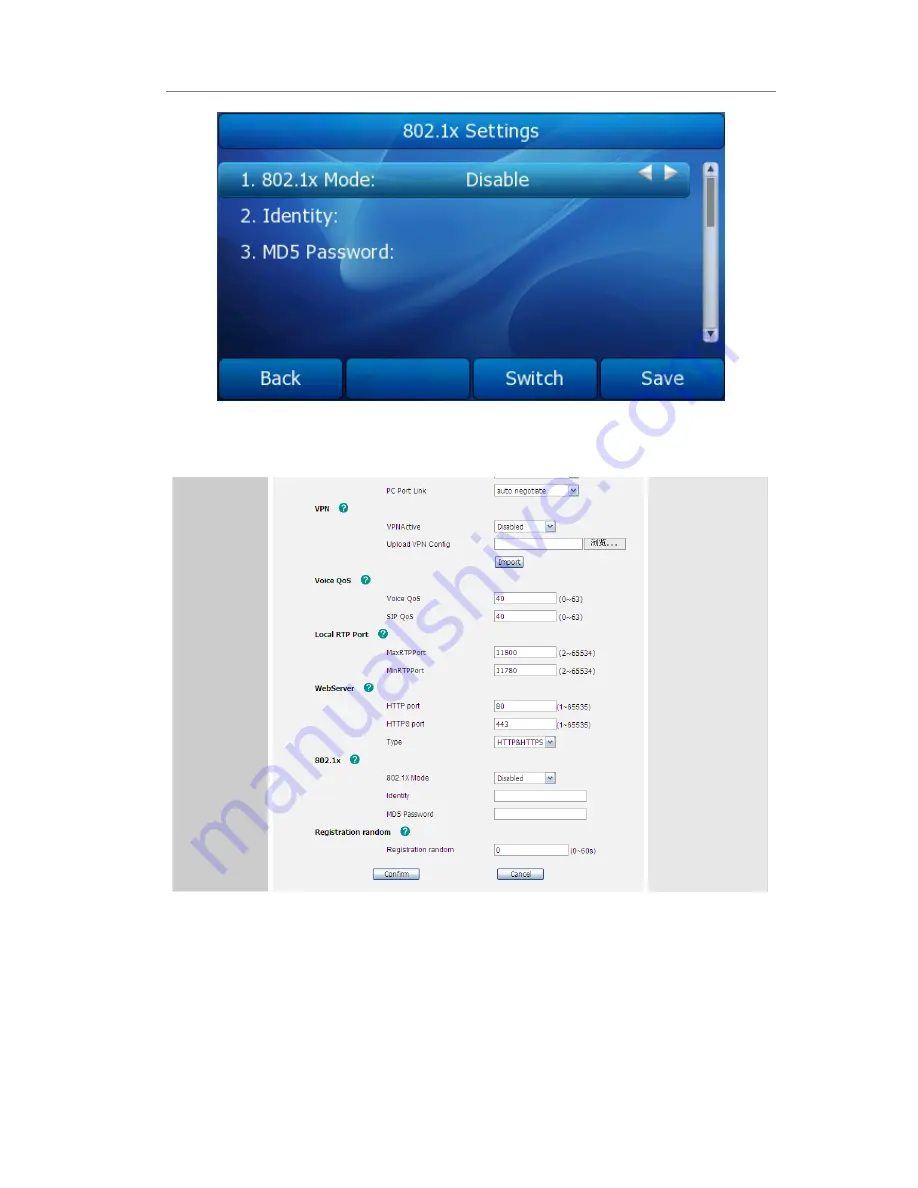
To configure 802.1x Settings via web interface: 
Choose Network->Advanced->802.1x to do the relating configuration.   


VPN 

A virtual private network (VPN) is a computer network that uses a public 
telecommunication infrastructure such as the Internet to provide remote offices or 
individual users with secure access to their organization's network. It aims to avoiding 

Summary of Contents for SIP-T38G

Page 1: ...tiptel Manual en tiptel IP 386 Yealink SIP T38G...

Page 2: ...t section in this guide before you set up and use the phone Declaration of Conformity Hereby it s declared that this phone is in conformity with the essential requirements and other relevant provision...

Page 3: ...izing Your Phone 17 Idle interface 17 Menu introduction 18 Status 19 Features 21 Call Forward 21 Call Waiting 22 DSS Keys 24 Key as Send 25 Hot Line 26 Anonymous Call 27 Auto Redial 29 DND Code 30 Int...

Page 4: ...Dialpad 83 Dial Plan 84 Feature Synchronisation 86 WatchDog 86 Action URL URI 86 XML IdleScreen 89 Using the Basic Call Functions 90 Making a call 90 Call Devices 90 Call Methods 90 Answering a call...

Page 5: ...Zero sp touch 105 DSS key Configuration 106 Line 107 Speed Dial 107 BLF 107 BLF List 108 Voice Mail 108 Pick Up 108 Group Pick up 108 Call Park 109 Intercom 109 DTMF 110 Prefix 110 Local Group 110 XM...

Page 6: ...ACD 116 Zero sp touch 116 URL 117 Voice 117 Ring 118 Tone Settings 119 Trouble Shooting 121...

Page 7: ...Gigabit Color IP Phone Getting Started Getting Started Packing List The following components are included in your package Gigabit Color IP Phone Phone Stand Power Adapter...

Page 8: ...arted Handset Handset Cord Ethernet Cable Quick Installation Quick Reference Guide CD Content Check this list before installation to ensure that you have received each item If you are missing any item...

Page 9: ...e Phone This section introduce how to assemble the phone with the components in the packing list Attach the stand Connect Handset and Headset Connect Network and Power 1 Attach the Stand as shown belo...

Page 10: ...h one to use Note 1 If inline power is provided do not install AC adapter Make sure the Ethernet cable and switch hub is POE compliant 2 The Internet Port can be also connected to Hub Switch IP PBX or...

Page 11: ...s subnet mask gateway DNS server etc Static IP Address If your phone cannot contact a DHCP Server for any reason you need to enter the network settings manually via Static IP Address Please contact yo...

Page 12: ...random time on electricity so that the phone will random register automatically within the set time Setting the power up time via web interface Choose Network Advanced Registration random enter the ti...

Page 13: ...powered and blink when there is an incoming call or there is a call on mute Soft Keys The screen will display labels for these keys to identify their context sensitive functions and you can custom so...

Page 14: ...eys Use the audio device control keys to perform the following actions depending on your phone type Adjust the volume of the handset headset speaker ring tone and signal tone Allows for hands free com...

Page 15: ...and all of the members can retrieve the call Blinking green 500ms Some part s is under the private hold status and only the initiator can retrieve the call Blinking red 500ms Three way conference all...

Page 16: ...f icons on its LCD you can refer to the following table for their meanings Icon Description Flashes when the internet is disconnected Account register failed Account registering Account register succe...

Page 17: ...an refer to DSS Keys Set the line key as corresponding function the corresponding icon will display on the line key label Line key ICON Description The default icon when you set the line key as other...

Page 18: ...tion For more information you can refer to DSS Keys 4 This area is showing the soft key labels The screen will display labels for these keys the default soft key 1 4 are History Directory DND and Menu...

Page 19: ...nd level submenu Status IP MAC Firmware More Network Phone Accounts Features Call Forward Always Forward Busy Forward No Answer Forward Call Waiting DSS Keys Line keys as DSS keys Memory Keys as DSS K...

Page 20: ...tting Reset to factory Set Password Set AES Key Auto Provision Display WallPaper Screensaver Theme Backlight App Digital Phone Frame Note is representative there is no second level submenu Status You...

Page 21: ...interface 2 User can check the IP address MAC and firmware directly 3 If you want to check more information you can Use the Up Down navigation keys choose More option press enter soft key 4 And then c...

Page 22: ...ll Forward to enter the configure page 2 There are 3 options Always Forward Busy Forward and No Answer Forward 3 If you choose one of them enter the phone number you want to forward 4 If you choose No...

Page 23: ...the changes To configure Call Forward via Web interface Choose Phone Features Forward to do the relating changes Please refer the above configuration information Call Waiting This call feature allows...

Page 24: ...ll waiting option 3 Use the navigation keys or Switch soft key to enable disable the Play Tone option This option used to define whether to play ring tones when there is call incoming during an active...

Page 25: ...s per key And it has 6 line keys which are able to set up to 32 functions per key Set up DSS key via phone interface 1 Press Menu Features DSS keys enter into the configure page 2 Choose one of the li...

Page 26: ...ation Key as Send Users can set a specific button or to active as the send button To set the send key via the IP phone interface 1 Press Menu Features Key as Send to enter the configuration page 2 Pre...

Page 27: ...res Hot Line to enter the configuration page 2 Enter the hot line number and HotLine Delay time for example 10 seconds then press the Save soft key to save the changes 3 When you pick up the handset o...

Page 28: ...terface 1 Choose Phone Features 2 Input the Hotline Number and Hotline Delay and then click the Confirm button to save the change Anonymous Call To set the anonymous call via the IP phone interface 1...

Page 29: ...to enter and choose whether to enable the anonymous rejection function The feature allows the subscriber to reject all calls from callers who have blocked the display of their calling identification i...

Page 30: ...Press the navigation keys to choose and set the redial times 5 Press Save soft key to save the changes Note When you dial a busy number after setting the auto redial function to Enable the phone will...

Page 31: ...Menu Features DND Code to enter the configuration page 2 Set the DND On Code and the DND Off Code then press the Save soft key to save the changes 3 When you press the DND soft key the phone will send...

Page 32: ...via web interface 1 Choose Phone Features DND On Code DND Off Code 2 Enter the corresponding contents 3 Click the Confirm to save the changes Intercom Intercom mode is useful in an office environment...

Page 33: ...enabled when there is incoming intercom calls to your extension if you are on an intercom conversation it will refuse the call automatically or it will put the current call on hold and put the incomin...

Page 34: ...busy on a call Do you want the server to inform you immediately when the contact ends the call in order to establish a conversation with each other in time Call Completion can help you to solve this...

Page 35: ...rmation about Remote Phone Book refer to Remote Phone Book Configure Broadsoft directory via phone interface 1 Press Menu Features Broadsoft Settings Menu Broadsoft Dir Settings 2 Choose Broadsoft Ite...

Page 36: ...one books at most CallLog Settings This feature allows you to download call history from the server Configure Broadsoft Call Log via phone interface 1 Press Menu Features Broadsoft Settings Menu CallL...

Page 37: ...all log History Setting User can set up whether to save Call history Record or not Enable this function the phone will save the call history record if choose disable the phone will not save call histo...

Page 38: ...e enable or disable this function 3 Click the Confirm button to save the changes Directory Local Directory To add a Group via Phone interface 1 Press Directory Local Directory to enter into the contac...

Page 39: ...er cannot delete the Contacts group Contacts is default system group it can t be deleted To add a contact via Phone interface 1 Press Directory Local Directory 2 Choose a group and press the Enter sof...

Page 40: ...y to highlight the one you want to edit press Option Detail and enter into the edit page 4 And then make the changes press Save soft key to save the changes or press Back soft key to return to the dir...

Page 41: ...tory Local Directory Search to enter into the search page Or choose a group and press the Enter soft key then press the number keypad to enter into the search page directly 2 It will turn to the searc...

Page 42: ...moved to the blacklist then the call from this contact cannot get through To move a contact in History to Contacts via Phone interface 1 Press History soft key to enter the local call history list 2...

Page 43: ...struction above for the parameters detail 2 In this page user can add delete edit the contacts also can upload delete the contact photo 3 When you finish the corresponding operation you must click the...

Page 44: ...se Contacts Contacts Contacts click the record which you want to edit 2 And then the record will turn orange 3 And then under the Contacts edit region Click the Browser button and then choose a photo...

Page 45: ...er only can delete the picture which is uploaded 3 A contact can only upload a custom photo And user can t rename the photo name the default name is default If multiple contacts want to use the same p...

Page 46: ...get through The configuration steps are similar as when you configure Local Directory Please refer to the section of Local Directory Remote Phonebook The IP phone has directory itself but in the enter...

Page 47: ...ook via Phone interface 3 Press Directory Remote Phonebook to enter the Remote Group page 4 Choose a specific one and press the Enter soft key it will go to the corresponding URL address to download t...

Page 48: ...e incoming call the phone will search the local directory when there is a coming call If they can t find the contact in the local directory it will search them through LDAP server and show the contact...

Page 49: ...l history and network call log Local History Check the local history via phone interface 1 Press Menu History Local History to enter into the call log page 2 User Left Right navigation keys to switch...

Page 50: ...telephony system supports this functionalities and your accounts message has been enabled Your voice mailbox messages which are usually stored on a media server of your local or hosted VoIP telephony...

Page 51: ...hod 3 Press Save soft key to save the change or Back to return to the previous menu Note Please contact your system administrator for the connecting code Different systems have different codes To some...

Page 52: ...w Voice Mail 2 You can view the amount of the voice mail that includes new or old voice mail 3 Choose the account and then press the Connect soft key then you are able to listen to your new and old me...

Page 53: ...ion keys to highlight the options You can read the message in the Inbox Sentbox Outbox Draftbox 3 Press enter soft key Use the Up Down navigation keys to choose a message 4 Press View soft key to read...

Page 54: ...he input method 3 Press Send soft key you are required to choose an account which is used to send out the message and the number you want to send to 4 Press Send soft key to send out the message or Ba...

Page 55: ...1 Choose Phone SMS 2 You are required to choose an account which is used to send out the message and the number you want to send to 3 Enter the Message content in the Message field 4 Press Confirm bu...

Page 56: ...Gigabit Color IP Phone Overview...

Page 57: ...anguage via Phone interface 1 Press Menu Setting Basic Settings Language 2 Scroll through the list of available languages 3 Press the Save soft key when the desired language is highlighted The languag...

Page 58: ...me or date is incorrect you can set the time manually or via the SNTP server which is used to synchronize the time To change the Time and Date via the Phone interface 1 Press Menu Setting Basic Settin...

Page 59: ...se Phone Preference Daylight Saving Time to do the relating changes 2 Choose Enable option and then you can set the Daylight Saving Time You can set daylight time by date or by week and then choose or...

Page 60: ...nterface 1 Press Menu Setting Basic Settings Time Date Format 2 Use the Switch soft key to choose a preferred time format 12 Hour or 24 Hour 3 Use the Navigation keys to choose a preferred date format...

Page 61: ...t key to save the changes NOTE 1 User can set the time information via web interface Choose Phone Preference choose the Corresponding options to configure 2 For more information about the function use...

Page 62: ...Type via Web interface 1 Choose Phone Preference Ring Type 2 Highlight the specific one in the pull down menu 3 Click confirm button to save the changes 4 You can also delete the specific one by click...

Page 63: ...oose Account Basic Ring Type option and highlight the preferred one for the chosen account in the pull down menu then click confirm button to save the changes You can adjust the volume of handset spea...

Page 64: ...rt Setting Field Name Description As Bridge If you select the Bridge mode then the two Fast Ethernet ports will be transparent As Router If you select the Router mode the SIP phone will work as a rout...

Page 65: ...s Save soft key to save the changes To configure PC Port settings via Web interface Choose Network Basic LAN to do the relating configuration you can consult your system administrator for more informa...

Page 66: ...ings Note 1 For more information details about Webserver Type please contact to your system administrator 2 IP phone also support Internet Protocol Version 6 To configure web server type via Web inter...

Page 67: ...nting it if authentication fails It is used for securing wireless 802 1x access points and is based on the Extensible Authentication Protocol EAP This IP phone can support 802 1X For the details pleas...

Page 68: ...etwork Advanced 802 1x to do the relating configuration VPN A virtual private network VPN is a computer network that uses a public telecommunication infrastructure such as the Internet to provide remo...

Page 69: ...nt classifications implementations and uses for VPNs If user want to enable VPN user must import the VPN configure file via web interface at first Configure VPN via web interface 1 Choose Network Adva...

Page 70: ...necting to the phone Configure Contrast via phone interface 1 Press Menu Setting Advanced Settings 2 Enter the password required scroll to Phone Setting option and select Contrast option 3 Press the n...

Page 71: ...ut cannot be hung up by your party To configure keypad lock via Phone interface 1 Press Menu Setting Advanced Settings 2 Enter the password required scroll to Phone Setting option and select Lock opti...

Page 72: ...was changed and the phone is not functioning anymore To maintain the configuration of the phone you need your system administrator or service provider s advice To reset to factory via phone interface...

Page 73: ...are prompted to confirm the change press OK to confirm the changes press Cancel to cancel the operation Note If you confirm to Reset to Factory all the setting including contact list call history acco...

Page 74: ...r the Current New and Confirm password 2 Click Confirm button to save the changes or Cancel button to cancel the changes Set AES Key If the downloaded configuration files have been AES encrypted the A...

Page 75: ...n Common AES Key MAC Oriented AES Key 2 Enter the corresponding contents 3 Click Confirm button to save the changes Auto Provision Configure Auto Provision via Web interface 1 Choose Upgrade Auto Prov...

Page 76: ...er the URL User Name and Password 4 Click the Save soft key to save the changes For more information about the parameters of the Auto Provision you can consult your system administrator Warning Please...

Page 77: ...o choose the corresponding file 3 Press Upload button to complete the operation 4 Also can click the Del button to delete the file Screensaver Configure Screen Saver via phone interface 1 Press Menu D...

Page 78: ...le 3 Press Upload button to complete the operation 4 Also can click the Del button to delete the file Note 1 Only png jpg and bmp format pictures can be supported 2 If the upload pictures less than 48...

Page 79: ...ustomizing Your Phone Theme 1 Theme 2 Theme 3 Theme 4 User also can change the Theme via web interface 1 Choose Phone Preference Phone Theme 2 Choose the theme in the drop down menu 3 Click Confirm bu...

Page 80: ...phone is inactive 0 is stand for black 1 is stand for gray Backlight Time If the user in backlight time does not do any operations the phone will automatically get into an energy saving mode Configur...

Page 81: ...rame 2 Use navigation key to choose the photo if you have enough permissions you can press the Remove soft key to delete this photo 3 User also can press the Play soft key to use the Digital Photo Fra...

Page 82: ...Auto answer allows an incoming call to be answered without requiring any action by the user This is a useful feature for people who have difficulty in using their hands or fingers who have a visual im...

Page 83: ...keys navigation keys and function keys on the keypad are editable Users can customize specific features for these keys according to their actual needs This function can only be set via the Web interfa...

Page 84: ...lso click the Reset to Default button to reset the softkeys interface Note We can add the Empty key more than once but others can only be chose once and can t be repeat If you have set up more than 4...

Page 85: ...oose Phone Dial Plan Replace Rule 2 Enter the desired Prefix Replace and Account 3 Press Add button to save the changes 4 You can also delete a specific one from the dial plan list 5 You can select a...

Page 86: ...from mobile phones Area codes usually indicate geographical areas within one country although the correlation to geographical area is becoming obsolete For non geographical numbers as well as mobile t...

Page 87: ...Synchronisation 2 Choose whether to enable this function from the pull down menu 3 Click the Confirm to save the change WatchDog When WatchDog function is Enabled phone will auto reboot after 10 secon...

Page 88: ...d Replace internal server net by the server IP address The variable URL supported mac MAC address ip IP address model model of the phone firmware firmware of the phone active_url SIP URI of current ac...

Page 89: ..._UP Reduce the volume key VOLUME_DOWN To mute the call key MUTE To hold the call key F_HOLD To end the call key X during the conversation To enter the DTMF number include Numeric or keys key 0 9 POUND...

Page 90: ...the idle screen of the currently active line The idle screen is using XML format The idle screen can have different background images as well There are six elements Background picture Clock Data Stat...

Page 91: ...he number directly by filling the SIP Server in the registered interface But the number which you dialed must be the same with SIP server If you have registered more than one account you can choose a...

Page 92: ...Contacts BlackList click the number which you want to dial out the phone will dial out 2 Or choose Contacts Phone CallInfo enter the number in the Dial a Number field select the line from the Outgoin...

Page 93: ...ress the headset button to answer it using the headset 2 If you are on an active call the LCD will prompt to display Incoming Call xxx Press Answer soft key to answer the call or Reject soft key to re...

Page 94: ...ress DND soft key again to deactivate DND mode You can find the incoming call record in the Call History User also can use DND code For more information about DND you can refer to DND Code Call Forwar...

Page 95: ...tion Call Hold This call function allows you to place an active call on hold In this case your IP PBX might play a melody or message to the other party while waiting Other calls can be received and ma...

Page 96: ...an conversation A press TRAN Button or Tran soft key to put B on hold then A can dial the third telephone number C and press the Tran soft key to call out A will turn to hold status and the LCD will d...

Page 97: ...n via web interface To enable local conference via web interface 1 Choose Account Account X Advance Conference Type there is a pull down menu choose Local Conf from the list 2 Press Confirm button to...

Page 98: ...is a pull down menu choose Network Conf from the list 2 Enter the Conference URI in the Conference URI field 3 Press Confirm button to save the changes To establish a network conference 1 Press the Co...

Page 99: ...that phone refreshes its registration The default interval is 3600 seconds Local SIP Port Local SIP port The default value is 5060 RPort The parameter allows you configuring the proxy to send respons...

Page 100: ...LS Transport Layer Security an IETF standards track protocol RFC 5246 was based on the earlier SSL specifications developed by Netscape Corporation Set Transport via wen interface 1 Choose Account Bas...

Page 101: ...Choose Transport option in the pull down menu you can choose the DNS SRV option 3 Click the Confirm button to save the change Network Setting Please refer to the previous part Network for more inform...

Page 102: ...nterval in Packet Interval field 3 Choose enable or disable the Overwrite Network option 4 Click the Confirm button to save the change Maintenance Tasks Administrator Mode The phone allows two modes t...

Page 103: ...e 1 Choose Phone Upgrade 2 Click Reboot button 3 You are prompted to confirm the change press Yes to confirm the changes press No to cancel the operation Note Any power interruption during the followi...

Page 104: ...e new firmware To update the firmware automatically refer to Auto Provision If the phone upgrade failed the phone interface will show as below you can obtain the IP address and then you can upgrade ag...

Page 105: ...n System Log Export If there are any errors happened in your phone you can export the system log and send to your system administrator for diagnosis To export the System Log 1 Choose Upgrade Configura...

Page 106: ...ouch interface Turn on Zero sp touch when the power is on via web interface 1 Choose Upgrade Auto Provision select ZeroActive option in the pull down menu choose enable to turn on this function 2 Ente...

Page 107: ...efault configuration for each key is N A which means the key hasn t been set for any functions N A Line Speed Dial BLF BLF List Voice Mail Pick Up Group Pickup Call Park Intercom DTMF Prefix Local Gro...

Page 108: ...u want to perform Speed Dial in the Value field 3 In the Line field select a line for which to apply this key 4 Press Confirm button to save the changes BLF You can configure the key for Busy Lamp Fie...

Page 109: ...choose one of the keys you want to make the assignment there is a pull down menu in the Type field choose Voice Mail from the list 2 Enter the number you want to set as the voice mail box in the Value...

Page 110: ...ve the call To assign the key as Call Park 1 Choose DSS Key Memory Key or Line Key choose one of the keys you want to make the assignment there is a pull down menu in the Type field and choose Call Pa...

Page 111: ...DSS Key Memory Key or Line Key choose one of the keys you want to make the assignment there is a pull down menu in the Type field and choose Prefix from the list and enter the number you want to show...

Page 112: ...e will turn to the contact search interface Broadsoft Group The keys can be configured as Broadsoft Group Then pressing this key under the idle status you can enter the Broadsoft Group interface To as...

Page 113: ...DSS Key Memory Key or Line Key choose one of the keys you want to make the assignment there is a pull down menu in the Type field and choose Transfer from the list 2 Enter the Number in the Value fiel...

Page 114: ...turn key you are allowed to dial out the last phone call you received To assign the key as Call Return 1 Choose DSS Key Memory Key or Line Key choose one of the keys you want to make the assignment th...

Page 115: ...simultaneously 4 Follow the voice prompts to listen to the recording To assign a DSS key as URL Record 3 Chooses Key Memory Key or Line Key choose one of the keys you want to make the assignment ther...

Page 116: ...ges Public Hold The key can be configured as a public hold key During a conversation all members belonging to that particular BLA group can use this key to hold a call To assign the key as Public Hold...

Page 117: ...bution is automatic call distribution equipment is according specific Transfer Rules and distribution strategy to switch the access call to the right person Presses DSSKey it will pop up a login box e...

Page 118: ...e To edit the Voice filed via Web interface 1 Choose Phone Voice 2 Set the following parameters shown in the table 3 Press Confirm button to save the changes or press Cancel button to cancel the chang...

Page 119: ...tacts and then set the ringing tone for each group To edit the Ring option via Web interface 1 Choose Phone Ring 2 Internal Ringer Text To set group name For example family 3 Internal Ringer File To c...

Page 120: ...frequency and time period of all the following tones Dial Ring Back Busy Congestion Call Waiting Dial Recall Record Info Stutter Message Auto Answer To edit the tone filed via Web interface 1 Choose P...

Page 121: ...Advanced Phone Functions Note 1 Please contact your system administrator for more information about the frequency and time period parameters You can enter up to 8 groups for each tone 2 If the freque...

Page 122: ...ake sure your handset is tightly connected with the phone Check whether you have muted the conversation or not Consult the outbound server details with your ISP Have DTMF problem Check which kind of D...

Page 123: ...of the page 2 Select the file to update and then click the Upgrade button Note Make sure the firmware you choose is provided by your service provider or the device will probably crash after the update...

Page 124: ...43 13 23 E mail tiptel tiptel online ch Internet www tiptel online ch Tiptel B V Camerastraat 2 NL 1322 BC Almere Telefoon 036 53 666 50 Fax 036 53 678 81 E mail info tiptel nl Internet www tiptel nl...

Reviews: