Yealink MeetingBoard 65 Quick Start Manual Download Page 6

4

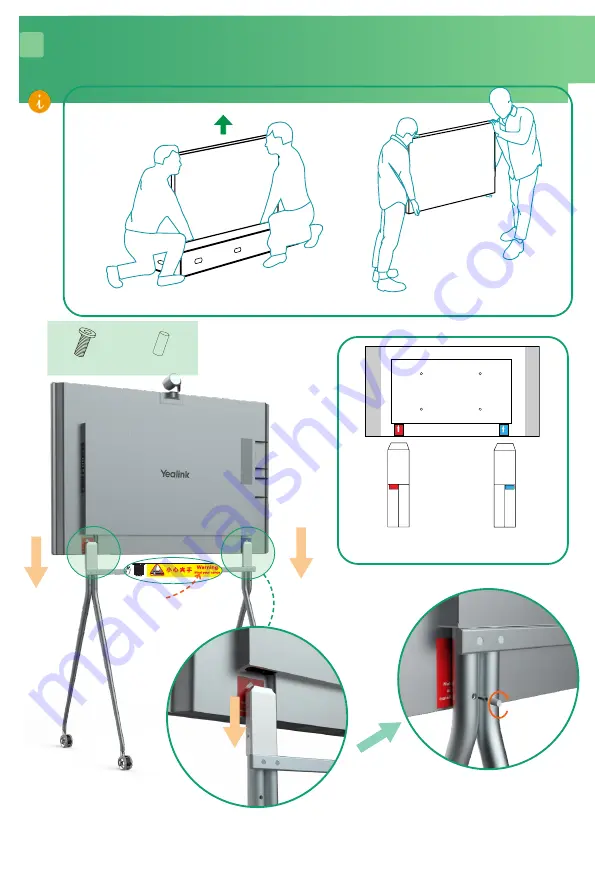
Unlock the scroll wheels to move after installing.

5

* Match the colors of the stickers on the back of the endpoint 

and the floor stand respectively.

Do not put your hands in the gap 

between the beam and the Meet

-

ingboard to prevent your hands 

from being pinched.

BACK

BACK

BACK

* We recommend 2 people working together to mount MeetingBoard Install 65, 4 people working together to mount MeetingBoard 86 
( MeetingBoard 86 can be carried by the handles on both sides).

1

2

BACK

Tighten the screws 
to prevent the 

floor stand from 

detaching from the 
endpoint.

(M6×12mm)

Rubber cap    

X 2

X 2

Summary of Contents for MeetingBoard 65

Page 1: ...Start Guide Floor Mounted V1 1 Please read this guide before installation to avoid unnecessary personal injury and damage to the endpoint For more information For more information please scan please scan Guide Video Guide Video ...

Page 2: ...Table of Contents English 1 Deutsch 7 Français 13 Español 19 ...

Page 3: ... the endpoint and accessories in this guide are for reference only Please use the accessories in the package and follow the guide for installation Yealink assumes no responsibility for any damage caused by improper installation methods 2 Endpoint Installation Take and place all components gently to avoid damage We recommend 2 people working together to mount MeetingBoard 65 4 people working togeth...

Page 4: ... Put the left and right legs as shown in the figure above to avoid installing it oppositely 2 Install the beam to the back of the floor stand M6 12mm Rubber cap X 4 X 4 Pay attention to the size of the positioning column do not insert it oppositely 1 2 BACK BACK BACK BACK BACK BACK BACK BACK ...

Page 5: ...is step 3 When installing or uninstalling OPS make sure that the end point is powered off Otherwise OPS may be abnormal MB CAM is optional If you have not purchased skip this step Install Windows OPS Optional 3 Remove the OPS cover Insert the OPS and tighten the screws 1 2 3 4 Install MB CAM Optional 4 Remove the top cover of the endpoint Insert camera Mount screws 1 2 3 4 ...

Page 6: ... floor stand respectively Do not put your hands in the gap between the beam and the Meet ingboard to prevent your hands from being pinched BACK BACK BACK We recommend 2 people working together to mount MeetingBoard Install 65 4 people working together to mount MeetingBoard 86 MeetingBoard 86 can be carried by the handles on both sides 1 2 BACK Tighten the screws to prevent the floor stand from det...

Page 7: ...ting the HDMI cable Meanwhile you can use the endpoint control PC by connecting both HDMI cable and USB cable USB cable USB Type B to Type A cable Need to bring your own HDMI cable Need to bring your own Switch Sig nal Source Volume down Volume up NFC Camera Lens Microphone LED Indicator strip Microphone LED Indicator strip Speaker Coming Soon Connect to an external display WPP20 USB flash drive B...

Page 8: ...nitialize the configuration The initialization opera tions vary with software versions 4 Power on 1 2 3 5 LED Status Status Roll green light from inside to outside at the same time Slow ly flash ing green Rolls green light from left to right Flashing red Off Solid green Solid red Description Booting Shutting down Sleep mode Firmware upgrading Factory resetting Abnormal Power off Not in a call Unmu...

Page 9: ...gen des Geräts und des Zubehörs in dieser Anleitung dienen lediglich als Referenz Verwenden Sie zur Installation nur das mitgelieferte Zubehör Für durch die Verwend ung von nicht zugehörigem Zubehör entstandene Schäden bei der Installation wird keine Haftung übernommen 2 Endpunkt Installation Behandeln Sie die Komponenten vorsichtig um Schäden zu vermeiden Wir empfehlen für die Montage des Meeting...

Page 10: ...M6 12mm X 4 Größe der Positioniersäule beacht en nicht verkehrt herum einführen 1 2 1 Platzieren Sie die linken und rechten Beine wie in der Abbildung oben gezeigt um eine entgegengesetzte Installation zu vermeiden 2 Installieren Sie den Träger auf der Rückseite des Stativs BACK BACK BACK BACK BACK BACK BACK BACK ...

Page 11: ...t bei der De installation des OPS ausgeschaltet ist Andernfalls kann es passieren dass OPS nicht nor mal läuft Die MB CAM ist optional Haben Sie diesen nicht erworben können Sie diesen Schritt überspringen Installieren Sie Windows OPS optional 3 Entfernen Sie die entsprechende Abdeckung am Gerät Schieben Sie den OPS in den Einschub und ziehen Sie die Schrauben fest 1 2 3 4 Installieren Sie die MB ...

Page 12: ...ts bzw Stativs Halten Sie die Lücke zwischen der Unterseite des Endpunkts und dem Balken nicht fest um zu verhindern dass Ihre Hände eingeklemmt werden BACK BACK BACK Wir empfehlen für die Montage des MeetingBoard 65 zwei und für das MeetingBoard 86 vier Personen das MeetingBoard 86 kann mit Handgriffen auf beiden Seiten getragen werden 1 2 BACK Ziehen Sie die Schrauben fest um zu verhindern dass ...

Page 13: ... HDMI und USB Kabel anschließen kann die umgekehrte Steuerung ermöglicht Ihnen den Computer Desktop per Touch screen umgekehrt zu steuern durchgeführt werden USB Kabel USB Typ B zu Typ A Ka bel Muss selbst mitgebracht werden HDMI Kabel Muss selbst mitge bracht werden Signalquel le ändern Lautstärke verringern Lautstärke erhöhen NFC Kameralinse Mikrofon LED Anzeigestreifen Mikrofon LED Anzeigestrei...

Page 14: ... abweichen 4 Stromversorgung an 1 2 3 5 LED Status Status In zwei Lichtleisten bewegt sich gleich zeitig ein grünes Licht von innen nach außen Blinkt lang sam grün In der Licht leiste bewegt sich ein grünes Licht von links nach rechts Blinkt rot Aus Dauerhaft grün Dauerhaft rot Beschrei bung Hochfahren Herunterfahen Sleep Mo dus Firmware Aktualisie rung und Erweiterung Zurück setzen auf Werksein s...

Page 15: ...es L apparence du point de terminaison et des accessoires dans ce guide est pure ment indicative Utilisez les accessoires de votre pack pour l installation Tout dommage au point de terminaison causé par des méthodes spéciales d installation relève de votre responsabilité 2 Installation du point de terminaison Manipulez et placez tous les composants délicatement pour éviter tout dommage Nous recomm...

Page 16: ...en caoutchouc X 4 X 4 Faites attention à la taille de la col onne de positionnement ne l insérez pas à l envers 1 2 1 Placez les pieds gauche et droit comme indiqué sur la figure ci dessus pour éviter de l installer de manière opposée 2 Installer la poutre à l arrière du support au sol BACK BACK BACK BACK BACK BACK BACK BACK ...

Page 17: ...que vous installez ou désinstallez le module OPS assurez vous que le point de terminaison est éteint Sinon le module OPS risque de ne pas focntionner correctement MB CAM est facultatif Si vous ne l avez pas acheté passez cette étape Installer Windows OPS facultatif 3 Retirez le couvercle du module OPS Insérez le module OPS et serrez les vis 1 2 3 4 Installer MB CAM facultatif 4 Retirez le couvercl...

Page 18: ...du point de terminaison et du support au sol Ne tenez pas l espace entre le bas de l extrémité et le faisceau pour éviter que vos mains ne soient pincées BACK BACK BACK Nous recommandons d effectuer le montage du MeetingBoard Installer 65 à 2 personnes et le montage du MeetingBoard 86 à 4 per sonnes vous pouvez transporter le MeetingBoard 86 par les poignées des deux côtés 1 2 BACK Serrez les vis ...

Page 19: ...us connectez le câble HDMI et USB le contrôle inverse vous permet de contrôler en sens inverse le bureau de l ordinateur par écran tactile peut être effectué Câble USB câble USB Type B vers Type A Besoin d apporter le vôtre Câble HDMI Be soin d ap porter le vôtre Commuter la source du signalVolume bas Volume haut NFC Objectif de la caméra Microphone Bande indicatrice LED Microphone Bande indicatri...

Page 20: ...configuration Les opérations d initialisation varient selon les versions du logiciel 4 Allumer 1 2 3 5 État de la LED État Lumière verte se déplaçant sur deux bandes lumineuses de l intérieur vers l extérieur en même temps Vert clignotant lentement se déplaçant sur une bande lumineuse de gauche à droite Rouge cligno tant Désactivé Vert fixe Rouge fixe Descrip tion Démarrage Arrêt Mode veille Mise ...

Page 21: ...el terminal y de los accesorios que aparecen en esta guía son solo para referencia Debe usar los accesorios incluidos en el paquete para realizar la instalación de lo contrario será responsable del posible daño causado al terminal por realizar métodos especiales en la instalación 2 Instalación de punto final Recomendamos al menos 2 personas para montar el sistema MeetingBoard 65 4 personas para mo...

Page 22: ...2mm Tapa de goma X 4 X 4 Preste atención al tamaño de la co lumna de posicionamiento no la inserte al revés 1 2 1 Coloque las patas izquierda y derecha como se muestra en la figura anterior para evitar instalarlo de manera opuesta 2 Instale la viga en la parte posterior del soporte de suelo BACK BACK BACK BACK BACK BACK BACK BACK ...

Page 23: ...ado omita este paso 3 Al instalar o desinstalar OPS asegúrese de que el terminal esté apagado De lo contrario OPS puede ser anormal MB CAM es opcional Si no lo ha comprado omita este paso Instalar Windows OPS Opcional 3 Retire la cubierta OPS Inserte el OPS y apriete los tornillos 1 2 3 4 Instalar MB CAM Opcional 4 Retire la cubierta superior del terminal 1 2 3 4 Tornillos de montaje Insertar cáma...

Page 24: ...del soporte de suelo respectivamente No sostenga el espacio entre la parte inferior del punto final y el haz para evitar que sus manos queden atrapadas BACK BACK BACK Recomendamos al menos 2 personas para montar el sistema MeetingBoard Instalación 65 4 personas para montar el sistema MeetingBoard 86 MeetingBoard 86 se puede transportar por las asas de ambos lados 1 2 BACK Apriete los tornillos par...

Page 25: ...te el cable HDMI y USB se puede realizar el control inverso le permite controlar de forma inversa el escritorio de la computadora mediante la pantalla táctil Cable USB cable USB tipo B a tipo A Necesitas traer el tuyo Cable HDMI Necesitas traer el tuyo Cambiar fuente de señal Bajar Volumen Subir Volumen NFC Lente de la cámara Micrófono Tira indicadora LED Micrófono Tira indicadora LED Altavoz próx...

Page 26: ...ón Las operaciones de inicialización varían dependiendo de las versiones de software 4 Potencia 1 2 3 5 Estado de LED Estado Dos tiras muestran luz verde desde adentro hacia afuera al mismo tiempo Verde intermitente lento La tira verde ondula de izquierda a derecha Rojo intermitente Apagado Verde fijo Rojo fijo Descripción Arrancando Apagando Modo reposo Actualización de firmware Restablecimiento ...

Page 27: ...commended placement of the OPS antenna is as follows with the highest signal strength HDMI the HDMI logo and High Definition Multimedia Interfoce are trademarks or registered trodemarks of HDMI Licensing LLC ...

Page 28: ...of the device shall meet the requirements of the input voltage of the device Pleaseusethe provided surge protection power socket only Before plugging or unplugging any cable make sure that your hands are completely dry Do not spill liquid of any kind on the product or use the equipment near water for example near a bathtub washbowl kitchen sink wet basement or near a swimming pool Do not tread on ...

Page 29: ...es entsprechen Bitte verwenden Sie ausschließlich den bereitgestellten Überspannungsschutz an der Steckdose Achten Sie vor dem Anschließen oder Abziehen des Kabels darauf dass Ihre Hände vollständig trocken sind Verschütten Sie keine Flüssigkeiten auf das Gerät und verwenden Sie es nicht in der Nähe von Wasser beispielsweise in der Nähe einer Badewanne Waschschüssel einem Spülbecken in einem feuch...

Page 30: ...igences de la tension d entrée de l appareil Veuillez uniquement utiliser la prise protégée contre les surtensions fournie Avant de brancher ou de débrancher tout câble assurez vous que vos mains sont complètement sèches Ne renversez aucun liquide sur le produit et n utilisez pas l équipement près de l eau par exemple près d une baignoire d un lavabo d un évier dans sous sol humide ou près d une p...

Page 31: ...izzati dal produttore L alimentazione del dispositivo deve rispondere ai requisiti del voltaggio d ingresso del dispositivo Si prega di utilizzare solo il dispositivo di protezione da sovratensione fornito Prima di collegare o scollegare un cavo accertarsi che le mani sia asciutte Non versare liquidi o prodotti e non usare il dispositivo in prossimità dell acqua ad esempio vicino a una vasca da ba...

Page 32: ...global market share of SIP phone shipments Global IP Desktop Phone Growth Excellence Leadership Award Report Frost Sullivan 2019 Technical Support Visit Yealink WIKI http support yealink com for firmware downloads product documents FAQ and more For better service we sincerely recommend you to use Yealink Ticketing system https ticket yealink com to submit all your technical issues YEALINK XIAMEN N...

Reviews: