background image


Yealink SIP-T48S Phone User Guide – WHC 3.0 

HV.Select Yealink T48S Phone User Guide 

Getting to know your phone 

Hardware Component Instructions 

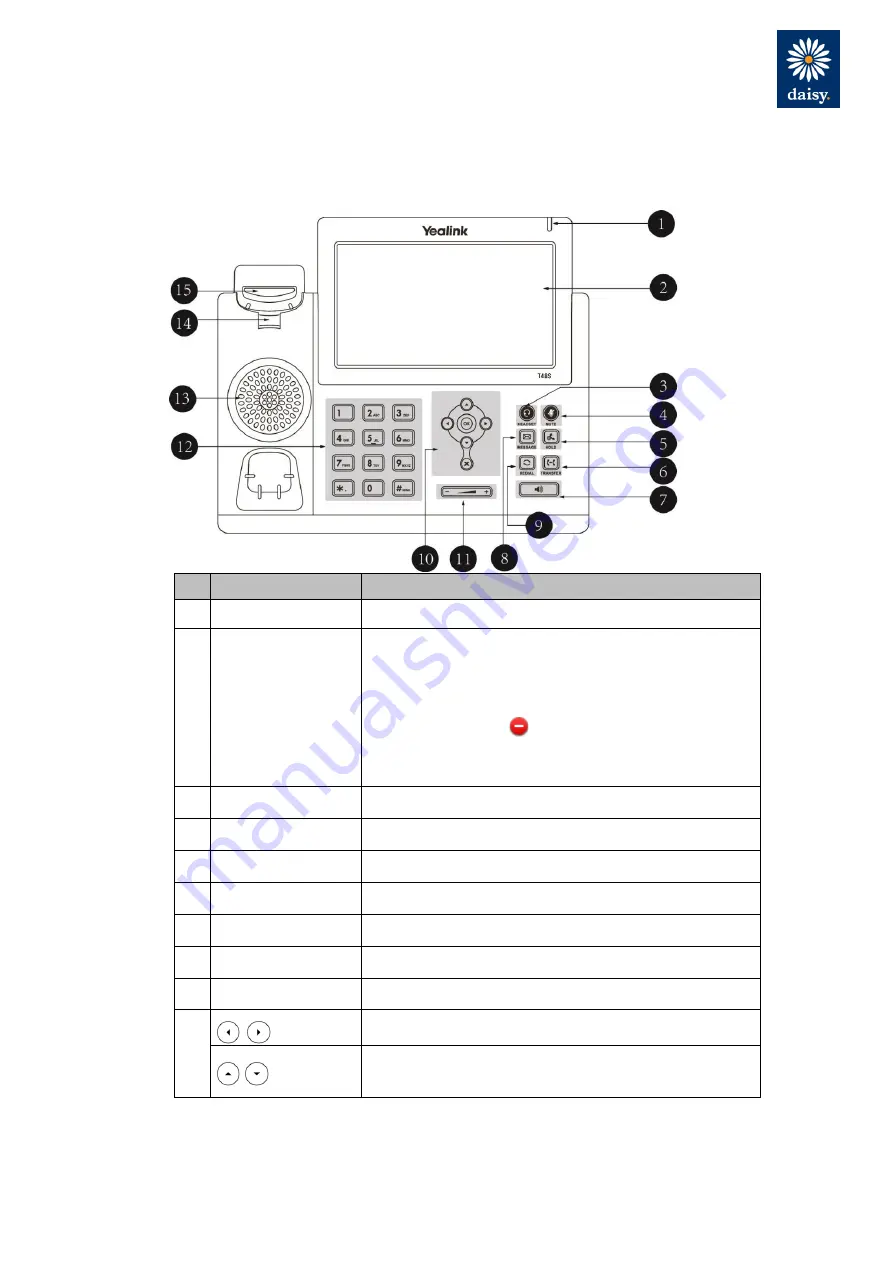
The main hardware components of the SIP-T48S IP phone are the LCD screen and the keypad. 


Item 

Description 

  Power Indicator LED  Indicates phone power and some feature statuses. 

  Touch Screen 

The screen is touch-sensitive. Tap to select and highlight 
screen items. 
Shows information about calls, messages, soft keys, 
time, date and other relevant data: 
• Call information—caller ID, call duration 
• Icons (for example,       ) 
• Missed call text or second incoming caller information 
• Prompt text (for example, “Saving config file

”) 

• Time and date 

  HEADSET Key 

Toggles and indicates the headset mode. 

  MUTE Key 

Toggles and indicates mute feature. 

  HOLD Key 

Places a call on hold or resumes a held call. 

  TRANSFER Key 

Transfers a call to another party. 

  Speakerphone Key 

Toggles the hands-free speakerphone mode. 

  MESSAGE Key 

Accesses voice messages. 

  REDIAL Key 

Redials a previously dialed number. 


Position the cursor within text you’re updating. 
Enable or disable fields. 


Turn pages or scroll through values for a field. 
Scroll through items. 
Access to History and Directory respectively. 

Summary of Contents for HV.Select T48S

Page 1: ...HV Select Yealink T48S Phone User Guide July 2018...

Page 2: ...o any other party without Daisy s prior permission in writing These obligations shall not apply to information which is published or becomes known legitimately from some source other than Daisy Versio...

Page 3: ...4 Phone Installation 5 Provisioning 8 Getting to know your phone 9 Hardware Component Instructions 9 Icon Instructions 10 Phone Display Views 11 Basic Call Features 13 Placing Calls 13 Answering Call...

Page 4: ...up your phone before you can use it This doesn t take long as it is easy to do Just follow the simple instructions in this user guide or the quick start guide included with the phone Got everything IP...

Page 5: ...999 or 112 made via HVS may not work in the event of power or broadband connection failure These failures may be caused by reasons outside our control Location information provided to the emergency s...

Page 6: ...etwork and power You have two options for power and network connections Your system administrator will advise you which one to use AC power Optional Power over Ethernet PoE AC Power Optional To connec...

Page 7: ...oE compliant switch or hub To connect the PoE 1 Connect the Ethernet cable between the Internet port on the phone and an available port on the in line power switch hub If in line power switch hub is p...

Page 8: ...to the network port that is providing network access the phone will do a series of firmware updates please allow the phone time to complete Your phone has provisioned correctly if this symbol is show...

Page 9: ...nformation caller ID call duration Icons for example Missed call text or second incoming caller information Prompt text for example Saving config file Time and date HEADSET Key Toggles and indicates t...

Page 10: ...rtically Hookswitch Picking up the handset from the handset cradle the hookswitch bounces and the phone connects to the line laying the handset down on the handset cradle the phone disconnects from th...

Page 11: ...s full A call cannot be recorded Recording starts successfully Recording cannot be started Recording cannot be stopped Bluetooth mode is on Bluetooth headset is both paired and connected The default c...

Page 12: ...and date are displayed on the right of the status bar 5 Line Keys 1 11 Use the Feature Management Portal to assign additional phone lines or Speed Dials to these keys 6 DSS Key Provides a quick acces...

Page 13: ...phone user interface 1 Press or press Menu Status 2 Press or to scroll through the list and view the specific information Time and Date The time and date is set by the Service Provider however you ca...

Page 14: ...ess 2 With the headset mode activated press the Answer soft key 3 With the headset mode activated press the line key the line key LED flashes green Transferring Calls You can transfer a call to anothe...

Page 15: ...erence on hold Press the Split soft key to split the conference call into two individual calls Press the New Call soft key to place a new call Press the Back soft key to return to the previous interfa...

Page 16: ...ess Directory Softkey 2 Select the desired remote group and then press the Enter soft key 3 The phone connects to load the corporate directory and then the corporate contact list appears on the LCD sc...

Page 17: ...ne and the power indicator LED will slow flash red The LCD screen will display a prompt message and appear an icon 1 When the phone user interface prompts receiving new voice mails and the power indic...

Page 18: ...he product is classed as Electrical or Electronic Equipment and should not be disposed with other household or commercial waste at the end of its working life The Waste of Electrical and Electronic Eq...

Page 19: ......

Reviews: