background image

12

GB

O R I G I N A L   I N S T R U C T I O N S

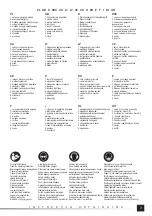
Assembly and disassembly of work tools (III)

Work tool in the form of a chisel, fl at chisel or punch is locked in the chuck by means of a rotating lock.

Pull off  the lock of tool chuck and turn it 180 degrees so that the lock does not interfere with sliding in and out a work tool to and 

from the chuck. 

Hexagonal chuck on one wall has a groove that allows turning the chuck’s lock and locking the work tool in the chuck. Slip the 

work tool into the chuck so that the groove is at the level of a lock. Then pull  off  the lock of  tool chuck and turn it 180 degrees so 

as to lock the possibility of sliding out the work tool from the chuck. Make sure of it by grabbing the tool and trying to slide it out of 

the chuck. If the attempt is successful, repeat the  work tool assembly procedure.   

PRODUCT USE

Before starting the work make sure that the housing and connecting cable with a plug are not damaged. If any damage is found, 

it is forbidden to continue the work!

Preparations

Select proper work tool: punch or chisel.

Clean the tool, apply a thin layer of grease on the chuck of selected tool.

Insert the work tool into the tool chuck of the product.

Insert the cable plug into the mains socket.

Put on hearing protectors, eye protection, work gloves. 

Starting and stopping the product

Take a posture guaranteeing your balance, grab the hammer with both hands and having made sure that the work tool does not 

touch anything, start the product by pressing and holding down the switch with your fi nger (IV).

Hold the tool in this position for several seconds to allow grease reaching all the elements of the drive mechanism and check at 

the same time whether the product shows any signs of abnormal operation. Too much noise, vibration level too high, suspicious 

odour or emergence of smoke. If no signs of abnormal operation are observed, the product may be used. 

After completion of work, switch off  the hammer by releasing the pressure on the switch. 

The switch may be locked in the ON position, which may be useful during long-term operation. In order to lock the switch, press 

the lock button with the switch pressed (IV). Lock is released by pressing the switch.  

Working with product

It is recommended that in the initial period of use, operation of tool is not too intensive, it will allow mechanical parts to run-in. It is 

also recommended to use longer breaks in order to cool the hammer. As the elements inside the hammer run in, you can increase 

the intensity of operation and shorten the breaks needed for cooling the tool.

Note! Sometimes it may happen that the hammer fails to transfer impact to the work tool, even though the engine works. Usually 

this may be caused by too thick oil. If the product is used at low temperature, let it work for approx. 5 minutes to warm it up.   

Lean the work tool against work surface, grab both grip handles of the hammer and start it with the switch. If the work tool has 

failed to start, push the hammer towards the work surface. This does not result from incorrect operation but the protection against 

operation with no load.

During the work, apply only pressure necessary for the correct operation of the tool. Applying too much pressure on the work tool 

may cause damage to the work tool and hammer drill mechanisms, and it will also reduce its effi  ciency.

If the product is  used to remove large-thickness surfaces, this operation should be carried out by layers. Each time, remove a 

layer of small thickness. 

Make regular breaks during the work.

Additional notes

Do not apply too much pressure on the processed material during operation and do not make sudden movements to prevent dam-

age to the work tool and drill. Make regular breaks during the work. Do not overload the tool, temperature of outside surfaces can 

never exceed 60 °C. After completed work, turn off  the drill, unplug the tool from the mains socket and carry out the maintenance 

and inspection operations. 

Declared total value of  vibration was measured by means of standardized test method and can be used to compare one tool with 

the other. Declared total value of vibration can be used in the initial exposure assessment. 

Note! Emission of vibration when working with the tool may vary from the declared value, depending on how the tool is used. 

Note! It is required to  determine safety measures to protect the operator, which are based on the exposure assessment in real 

conditions of use (including all elements of work cycle, such as for example time when tool is switched off  or idling and time of 

activation). 

Summary of Contents for 5436218

Page 1: ...VIMO SMOGTUVAS ATSKALD MAIS MURS BOURAC KLADIVO B RACIE KLADIVO BONT KALAP CS CIOCAN DEMOLATOR MARTILLO PARA DEMOLICI N MARTEAU DE DEMOLITION MARTELLO DEMOLITORE BOORHAMER PL GB D RUS UA LT LV CZ SK H...

Page 2: ...S A ul So tysowicka 13 15 51 168 Wroc aw Polska Rok produkcji Production year Produktionsjahr Pagaminimo metai Ra o anas gads Rok v roby Rok v roby 2018 Gy rt si v Anul produc iei utilajului A o de fa...

Page 3: ...usas su pagrindine rankena 2 elektrinis jungiklis 3 elektrinio jungiklio blokada 4 rankio laikiklis 5 rankio laikiklio blokada 6 papildoma rankena 7 maitinimo laidas su ki tuku 8 pramu tuvas 9 kaltas...

Page 4: ...recuencia nominal Tension et fr quence nominale Tensione e frequenza nominale Nominale spanning en frequentie OCHRONA RODOWISKA Symbol wskazuj cy na selektywne zbieranie zu ytego sprz tu elektrycznego...

Page 5: ...visszanyer se PROTEJAREA MEDIULUI Simbolul adun rii selective a utilajelor electrice i electronice Utilajele electrice uzate sunt materie prim repetat este interzis aruncarea lor la gunoi deoarece co...

Page 6: ...Nieprzestrzeganie ich mo e prowadzi do pora enia elektrycznego po aru albo do uszkodze cia a Poj cie narz dzie elektryczne u yte w instrukcjach odnosi si do wszystkich narz dzi nap dzanych pr dem elek...

Page 7: ...poprawnie pod czy U ycie odci gu py u zmniejsza ryzyko powa nych obra e cia a U ytkowanie narz dzia elektrycznego Nie przeci aj narz dzia elektrycznego U ywaj narz dzia w a ciwego do danej pracy Odpo...

Page 8: ...nowagi chwyci obur cz m ot i upewniwszy si e narz dzie robocze nie dotyka niczego uruchomi produkt naciskaj c i przytrzymuj c palcem w cznik IV Przytrzyma narz dzie w tym stanie kilkana cie sekund aby...

Page 9: ...ych od dolnej kraw dzi okienka inspekcyjnego Zalecane jest u ycie oleju silnikowego o klasie lepko ci SAE 20W 50 Uzupe nienie braku oleju nale y przeprowadzi w nast puj cy spos b Od czy wtyczk przewod...

Page 10: ...c current both wire tools and wireless ones OBSERVE THE FOLLOWING INSTRUCTIONS Place of work The place of work must be properly illuminated and clean Disorder and poor illumination may be a cause of a...

Page 11: ...accessories or storage of the tool It will permit to avoid accidental activation of the electric tool Store the tool away from children Do not allow untrained persons to operate the tool An electric t...

Page 12: ...y pressing the switch Working with product It is recommended that in the initial period of use operation of tool is not too intensive it will allow mechanical parts to run in It is also recommended to...

Page 13: ...nnection of the plug Check the oil level before the start of work Oil should be re lled every 20 days of operation assuming that the hammer works for about 3 4 hours per day ATTENTION Before any adjus...

Page 14: ...n Der Begri Elektrowerkzeug bezieht sich auf alle mit dem elektri schen Strom angetriebenen Werkzeuge sowohl mit der Netzleitung als auch ohne Netzleitung DIE NACHSTEHENDEN ANWEISUNGEN EINHALTEN Arbei...

Page 15: ...verwenden falls das Werkzeug damit ausgestattet wird Bitte sorgen Sie daf r damit sie sachgem angeschlossen sind Verwendung der Staubabsaugung vermindert die Gefahr der ernsthaften K rperverletzungen...

Page 16: ...en lassen damit das Schmierfett alleAntriebselemente sicher erreichen kann Dabei Ger t auf nicht normale Erscheinungen zu hoher L rm zu starke Vibrationen nicht normaler Geruch oder Rauch pr fen Werde...

Page 17: ...dass sich die Einf ll nung nach oben gerichtet be ndet Verschluss mit Schauglas l sen dabei darauf achten dass die Gummiabdichtung des Verschlusses nicht besch digt wird bzw verloren geht l nachf lle...

Page 18: ...18 RUS 2 YT 82100 230 50 1600 1 1900 65 15 6 94 3 0 105 3 0 2 14 59 1 5 II IP20 30...

Page 19: ...19 RUS...

Page 20: ...20 RUS II III 180 180 IV IV...

Page 21: ...21 RUS 5 60 C V 3 SAE 20W 50 20 3 4 0 3 MPa...

Page 22: ...22 UA 2 YT 82100 230 50 1600 1 1900 65 15 6 94 3 0 105 3 0 2 14 59 1 5 II IP20 30...

Page 23: ...23 UA...

Page 24: ...24 UA II III 180 180 IV IV 5...

Page 25: ...25 UA 60 C V 3 SAE 20W 50 20 3 4 0 3 MPa...

Page 26: ...taikoma visiems elektra varomiems renginiams maitinamiems elektros laid pagalba o taip pat bevieliniu b du LAIKYKIT S EMIAU I D STYT INSTRUKCIJ Darbo vieta Darbo vieta turi b ti gerai ap viesta ir lai...

Page 27: ...ojimas Neperkrauk elektrinio rankio Ketinam darb atlik jam tinkamu rankiu Taisyklingas rankio parinkimas atliekamam darbui u tikrins produktyvesn ir saugesn jo atlikim Nevartok elektrinio rankio jeigu...

Page 28: ...jungikl IV Prilaikyti rank iame stovyje keliolika sekund i kad tepalas patekt visus galios pavaros mechanizmo elementus tuo pa iu reikia patikrinti ar produktas tinkamai veikia ar n ra netinkamo veik...

Page 29: ...uo b du Atjungti maitinimo kabelio ki tuk nuo tinklo lizdo Atsukti k j tokiu b du kad alyvos pylimo anga b t nukreipta vir Atsukti pylimo angos ki tuk su patikros langeliu Reikia b ti atsargiam kad ne...

Page 30: ...astas visas ier ces kuras str d ar elektr bu ar vadiem vai bez vadiem J IEV RO APAK MIN TO INSTRUKCIJU Darba vieta Darba vieta j b t labi apgaismota un t ra Nek rt ba un tum s apgaismojums var b t par...

Page 31: ...ligzdas pirms regul anas aksesu ru main anas un ier ces glab anas Tas var sarg t no ie r ces gad juma iesl g anas Glab t ier ci b rniem nepieejam viet Neat aut str d t ar ier ci neapm c tiem cilv kiem...

Page 32: ...arbs ar produktu Ieteicams lai instrumenta lieto anas s kuma period darbs ar to neb tu p r k intens vs tas auj piestr d ties meh nisk m da m Ieteicams ar iev rot ilg kus p rtraukumus lai autu muram at...

Page 33: ...skuma sasnieg anai P rm r ga sp ka piem ro ana var izrais t bl v juma vai aizb a v t ota savienojuma boj jumu Pirms darba s k anas p r baudiet e as l meni E a j papildina vismaz ik p c 20 dien m pie e...

Page 34: ...oudem bez ohledu na to jestli jsou s p vodem nebo bez n ho DODR OVAT N E UVEDEN INSTRUKCE Pracovi t Pracovi t je t eba udr ovat dob e osv tlen a ist Nepo dek a patn osv tlen mohou b t p inou nehod Nen...

Page 35: ...ad kdy nefunguje jeho s ov sp na N ad kter nelze ovl dat pomoc s ov ho sp na e je nebezpe n a je t eba ho odevzdat do opravy Vyt hni z str ku z nap jec z suvky p ed se izov n m v m nou p slu enstv ne...

Page 36: ...t sp na stiskn te blokovac tla tko p stisknut m sp na i IV Pro odblokov n stiskn te sp na Pr ce s v robkem Zpo tku nepracujte s n ad m p li intenzivn umo n to zab hnut mechanick ch sou st B hem pr ce...

Page 37: ...kontrolujte hladinu oleje p ed zah jen m pr ce Olej dopl ujte ka d ch 20 dn pr ce s p edpokladem e ka d den budete s kladivem pracovat asi 3 4 hodiny POZOR Ve ker innosti zvazan z v m nou p slu enstv...

Page 38: ...ektrick n radie pou it v in trukciach sa t ka v etk ch zariaden poh an ch elektrick m pr dom a to s asne bu s pr vodom alebo bez pr vodu elektrickej energie DODR IAVA NI IE UVEDEN IN TRUKCIE Pracovisk...

Page 39: ...elektrick ho n radia Elektrick n radie nepre a uj Pre dan pr cu pou vaj spr vne n radie Spr vny v ber n radia pre dan pr cu zabezpe e pr ca bude produkt vnej ia a bezpe nej ia Nepou vaj elektrick n ra...

Page 40: ...ova i v robok nevykazuje iadne zn mky nespr vnej prev dzky Pr li ve ky hluk pr li vysok rove vibr ci podozriv z pach alebo dym Ak neboli zisten iadny pr znaky nespr vnej prev dzky m ete za a s pou van...

Page 41: ...aby sa nestratilo alebo nepo kodilo gumov tesnenie umiestnen pod z tkou Dopl te motorov olej a utiahnite z tku Z tku utiahnite iba s takou silou ak je potrebn pre z skanie tesnosti Pou it m nadmer nej...

Page 42: ...omos fesz lts g fogalom minden rammal hajtott vezet kes illetve vezet k n lk li berendez sekre vonatkozik MINDIG TARTSA BE AZ AL BBI UTAS T SOKAT Munkahely A munkahely legyen mindig j l kivil g tott s...

Page 43: ...laszt sa eredm nyesebb s biztons gosabb munkav gz shez vezet Soha ne haszn lja az elektromos berendez st amennyibe nem m k dik a kapcsol gombja Aberendez s melyet nem tud szab lyozni kapcsol gombbal...

Page 44: ...ljusson a meghajt s minden alkatr sz hez ugyan akkor ellen rizze hogy a g p nem mutat e valami olyan jelet hogy el van romolva T l nagy zaj t l nagyfok remeg s gyan s szag vagy f st megjelen se Ne nem...

Page 45: ...lap csot gy hogy az olajbe nt ny l s felfel legyen Csavarja ki az olajbe nt ny l s dug j t a betekint ablakb l vatosnak kell lenni hogy ne vesz tse el vagy ne s rtse meg a dug alatt tal lhat gumi t m...

Page 46: ...electrocutae la incendiu sau la leziuni No iunea scul electric folosit n instruc iuni se refer la toate sculele ac ionate cu curent electric at t cele alimentate cu energie prin cablu c t i cele f r...

Page 47: ...orect Utili zarea extractorului de praf mic oreaz riscul leziunilor serioase ale corpului t u Utlizarea sculei electrice Nu supra nc rca scula electric Utilizeaz scula corespunz toare lucrului care tr...

Page 48: ...oriul de lucru nu atinge nimic porni i scula ap s nd i in nd ap sat comutatorul cu degetul IV ine i scula n aceast pozi ie timp de c teva secunde pentru a permite unsorii s ajung la toate elementele a...

Page 49: ...i care Se recomand s folosi i ulei de motor din clasa de v scozitate SAE 20W 50 Umplerea cu ulei trebuie f cut astfel Introduce i techerul cablului de alimentare ntr o priz de re ea Orienta i scula as...

Page 50: ...de herramienta el ctrica que se aplica en las instrucciones se re ere a todas las herramientas alimentadas con corriente el ctrica tanto al mbricas como inal mbricas OBSERVENSE LAS SIGUIENTES INSTRUC...

Page 51: ...ienta que no se puede controlar por medio de su interruptor es peligrosa y debe repararse Desconecta el enchufe del contacto antes de cualquier ajuste cambio de accesorios o almacenamiento de la herra...

Page 52: ...ementos del mecanismo de accionamiento al mismo tiempo veri que si el producto muestra signos de funcionamiento anormal Demasiado ruido niveles de vibraci n demasiado altos olores sospechosos o la apa...

Page 53: ...hufe el cable de alimentaci n del tomacorriente Gire el mar tillo para que la entrada de aceite se apunta hacia arriba Desatornille el tap n de llenado con la ventana de inspecci n Tenga cuidado de no...

Page 54: ...respect de ces consignes peut conduire une com motion lectrique un incendie ou des blessures La notion d outil lectrique utilis e dans les notices d utilisation se r f re tous les outils aliment s pa...

Page 55: ...eurs de poussi res ou des bacs pour poussi res si l outil en est quip Connectez les correctement L utilisation d un extracteur de poussi re r duit le risque de blessures graves Utilisation de l outil...

Page 56: ...re en sorte que l outil ne touche rien de travail ex cutez le produit en appuyant sur le commutateur de doigt IV Tenez l outil dans cet tat pour le lubri ant plusieurs secondes pour atteindre tous les...

Page 57: ...manque d huile doit tre e ectu e comme suit D brancher le cordon d alimentation de la prise murale Tour ner le marteau de telle sorte que l entr e d huile vers le haut D visser le bouchon de rempliss...

Page 58: ...mancato rispetto delle istruzioni di cui sotto pu causare una scossa elettrica un incendio o lesioni La nozione dispositivo elettrico riportata nei manuali d uso si riferisce a tutti i dispositivi az...

Page 59: ...itivo idoneo al tipo di lavorazione Il dispositivo idoneo al tipo di lavorazione permette di utilizzare il dispositivo in modo pi e ciente e sicuro Non utilizzare il dispositivo elettrico se l inserit...

Page 60: ...premendo e mantenendo premuto l interruttore IV Tenere l utensile in questo stato per una decina di secondi perche il grasso possa raggiungere tutti gli elementi del meccanismo di azionamento Inoltre...

Page 61: ...ne E consigliabile usare olio per motori a combustione con la classe di viscosita SAE 20W 50 L olio deve essere rabboccato nel seguente modo Estrarre la spina del cavo di alimentazione dalla presa del...

Page 62: ...risch gereedschap dat wordt gebruikt in de instructies verwijst naar alle apparaten die worden aangedreven door elektrische stroom zowel bedraad als draadloos NALEVEN VAN ONDERSTAANDE INSTRUCTIES Werk...

Page 63: ...ers of stofbakken indien van toepassing Zorg ervoor dat dit correct wordt vastgemaakt De toepassing van een stofafzuiging vermindert het risico op ernstige verwondingen Gebruik van het elektrische app...

Page 64: ...schap en smeer de houder van het gekozen gereedschap met een dunne laag smeer Steek het gereedschap in de gereedschaphouder van het product Steek de stekker in het stopcontact Zet gehoor en oogbescher...

Page 65: ...Indien er geen olie zichtbaar is door het venster wanneer de boorhamer met het gereed schap naar boven gericht staat moet de olie worden aangevuld Het olieniveau moet ongeveer 3 mm boven de onderrand...

Page 66: ...66 GR YT 82100 V 230 z 50 W 1600 min 1 1900 J 65 min 1 15 6 94 3 0 dB 105 3 0 dB 14 59 1 5 m s2 II IP20 30 mm 30...

Page 67: ...67 GR RCD RCD...

Page 68: ...68 GR 180O 180O V IV...

Page 69: ...69 GR 5 60 O C V 3 SAE 20W 50 20 3 4 0 3 MPa...

Page 70: ...EN 55014 2 2015 EN 61000 3 2 2014 EN 61000 3 3 2013 i spe niaj wymagania dyrektyw Numer seryjny dotyczy wszystkich numer w seryjnych urz dze wymienionych w deklaracji Dwie ostatnie cyfry roku w kt ry...

Page 71: ...ollowing products meet requirements of the following European Standards Technical Specifications and fulfill requirements of the following European Directives 2006 42 EC Machinery and safety elements...

Page 72: ...2 2015 EN 61000 3 2 2014 EN 61000 3 3 2013 i satisfac cerin ele Directivelor europene urm toare Num r de serie se refer la toate numere de serie ale articolelor specificate n aceast declara ie Ultime...

Reviews: