YASKAWA E7 Drive Installation Manual Download Page 13

Electrical Installation  2 - 12
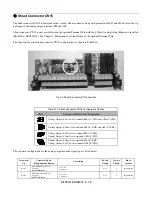
Control Wiring

Control Circuit Wire Sizes

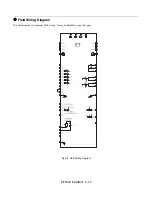
The auto mode speed reference (speed command) field wiring connection is made to E7 Drive terminals A1 or A2 (signal 
positive), AC (signal common) and G (shield). Keep this lead length as short as possible to maintain signal quality. Insulated
twisted shielded pair wire (2 conductor # 18 ga, Belden 8760 or equivalent) is required. Do not run these wires in the same
conduit as other AC power or control wires. The shield must be connected on this end only, stub and isolate the other end. The
A2 signal employed is 4 to 20 mA with parameter H3-08 set for “2: 4 - 20 mA”. For 0 to 10 VDC, parameter H3-08 is set for
“0: 0 - 10 VDC” and the E7 control board DIP switch S1-2 must be in the OFF position. (See Fig 2.4).

For remote operation, keep the length of the control wiring to 50m or less. Separate the control wiring from high-power lines
(input power, motor leads or relay sequence circuits) to reduce noise induction from peripheral devices.

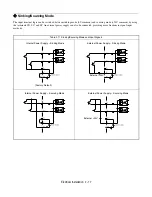
When setting speed commands (frequency references) from an external speed potentiometer (and not from the Digital Opera-
tor), use shielded twisted-pair wires and ground the shield to terminal E(G), as shown in Fig 2.3

Terminal numbers and wire

sizes are shown in Table 2.7.

Fig 2.3  Analog Input Terminal Configuration

Table 2.7  Terminal Numbers and Wire Sizes (Same for all Drives)

Terminals

Terminal 

Screws

Tightening 

Torque

lb-in

(N•m)

Possible 

Wire Sizes

AWG (mm

2

)

Recommended 

Wire Size AWG 

(mm

2

)

Wire Type

S1, S2, S3, S4, S5, S6, S7

SN, SC, SP, +V, A1, A2, 

AC, MI, M2, M3, M4, 

MA, MB, MC, FM, AC, 

AM, R+, R-, S+, S-, IG

Phoenix 

type 

*3

4.2 to 5.3

(0.5 to 0.6)

Stranded 

wire:

26 to 16

(0.14 to 1.5)

18

(0.75)

• Shielded, twisted-pair wire

*1

• Shielded, polyethylene-covered, 

vinyl sheath cable

E(G)

M3.5

7.0 to 8.8

(0.8 to 1.0)

20 to 14

(0.5 to 2

*2

)

12

(1.25)

*1.

Use shielded twisted-pair cables to input an external speed command. 

*2.

Yaskawa recommends using straight solderless terminals on digital inputs to simplify wiring and improve reliability.

*3.

Yaskawa recommends using a thin-slot screwdriver with a 3.5 mm blade width.

Signal

Terminal Connections

0-10Vdc

A1 to AC

4-20mA

or

0-10Vdc

A2 to AC

E(G )

+V   +15V D C , 20m A

A 1  0-10V D C  (20K     )

A 2  H 3-08
       4-20m A  (250K    )
       [0 to +10V  (20K    )]
A C

E7

Ω

Ω

Ω

4 to 20m A

P

P

External

Frequency

R eference

2k

Ω

2k

(P=Pair)

External

Frequency

Reference

E (G)

2k

Ω

2k

P

P

4 to 20m A

+V +15VDC, 20mA

A1 0-10VDC (20k 

Ω)

A2   H3-08
       4-20m A (250K 

Ω)

       [0 to +10V (20K 

Ω)]

AC

Summary of Contents for E7 Drive

Page 1: ...ent reflects the most recent information provided by Yaskawa regarding these specific wire size tables This document is subject to change without notice The latest version of this document can be obta...

Page 2: ...chapter describes wiring terminals main circuit terminal connections main circuit terminal wiring specifications control circuit terminals and control circuit wiring specifications Terminal Block Conf...

Page 3: ...0 40 HP 480V and larger AC MP AM S6 V IG R M5 FM R RP S1 S4 SP S7 M4 V S3 SC S A2 M2 SN M6 AC A1 E G E G MC MB S5 M1 AC MA M3 S2 S AC MP AM S6 V IG R M5 FM R RP S1 S4 SP S7 M4 V S3 SC S A2 M2 SN M6 AC...

Page 4: ...T3 M4 13 3 1 5 14 2 1 22P2 3 R L1 S L2 T L3 1 2 B1 B2 U T1 V T2 W T3 M4 13 3 1 5 12 3 3 23P7 5 R L1 S L2 T L3 1 2 B1 B2 U T1 V T2 W T3 M4 13 3 1 5 10 5 3 25P5 7 5 R L1 S L2 T L3 1 2 B1 B2 U T1 V T2 W...

Page 5: ...39 2 4 0 X 2P 80 X 2P U T1 V T2 W T3 R1 L11 S1 L21 T1 L31 M10 199 22 5 3 0 X 2P 85 X 2P 3 M8 88 5 10 0 2 0 67 4 M10 199 22 5 2 0 X 2P 67 4 X 2P r l1 s l2 M4 12 4 1 4 14 2 1 2090 125 R L1 S L2 T L3 1...

Page 6: ...W T3 M4 13 3 1 5 14 2 1 14 2 1 45P5 7 5 R L1 S L2 T L3 1 2 B1 B2 U T1 V T2 W T3 M4 13 3 1 5 12 3 5 14 2 47P5 10 R L1 S L2 T L3 1 2 B1 B2 U T1 V T2 W T3 M4 13 3 1 5 10 5 5 12 3 5 49P0 4011 15 20 R L1...

Page 7: ...10 0 4 0 107 2 M12 347 39 2 2 0 67 4 r l1 s200 l2200 s400 l2400 M4 12 4 1 4 14 2 1 4110 200 R L1 S L2 T L3 1 M12 347 39 2 2 0 X 2P 67 4 X 2P U T1 V T2 W T3 R1 L11 S1 L21 T1 L31 M12 347 39 2 1 0 X 2P 5...

Page 8: ...5 C copper wire or equivalent IMPORTANT Determine the wire size for the main circuit so that line voltage drop is within 2 of the rated voltage Line voltage drop is calculated as follows Line voltage...

Page 9: ...n Circuit Terminal Functions 208 240Vac and 480Vac Purpose Terminal Designation Model CIMR E7U_ _ _ _ 208 240Vac 480Vac Main circuit power input R L1 S L2 T L3 20P4 to 2110 40P4 to 4300 R1 L11 S1 L21...

Page 10: ...to use recommended fuses circuit breakers See Appendix E may result in damage to the wiring Drive and or personal injury 2 Control power is supplied internally from the main circuit DC power supply f...

Page 11: ...uses circuit breakers See Appendix E may result in damage to the wiring Drive and or personal injury 2 Control power is supplied internally from the main circuit DC power supply for all Drives 3 Consu...

Page 12: ...than 100 2 480Vac Drives should have a ground connection with resistance of less than 10 3 Do not share the ground wire with other devices such as motors or large current electrical equipment 4 Alway...

Page 13: ...Digital Opera tor use shielded twisted pair wires and ground the shield to terminal E G as shown in Fig 2 3 Terminal numbers and wire sizes are shown in Table 2 7 Fig 2 3 Analog Input Terminal Configu...

Page 14: ...3 Wiring Checks After all wiring is completed perform the following checks 1 Is all wiring correct 2 Have all wire clippings screws or other foreign material been removed from the Drive enclosure 3 Ar...

Page 15: ...100 0 to 10 V 20 k A2 Multi function analog input 4 to 20 mA 100 0 to 10Vdc 100 H3 0 Function set by H3 09 4 to 20 mA 250 0 to 10 V 20k AC Analog common E G Shield wire optional ground line connectio...

Page 16: ...ble 2 9 DIP Switch S1 Name Function Setting S1 1 RS 485 and RS 422 terminating resistance OFF No terminating resistance ON Terminating resistance of 110 Factory Default OFF S1 2 Input method for analo...

Page 17: ...iguration for the analog output monitor signal type is listed below Table 2 10 Shunt Connector CN15 Configuration Options CN15 Analog Output Monitor Configurations Voltage Output 0 10Vdc for terminals...

Page 18: ...ng the terminals SN SC and SP An external power supply can also be connected providing more freedom in signal input methods Table 2 11 Sinking Sourcing Mode and Input Signals Internal Power Supply Sin...

Page 19: ...Electrical Installation 2 18 Terminal Connections Connections to Drive terminals are shown in Fig 2 6 Fig 2 6 Terminal Connections 24...

Page 20: ...trol circuit terminals 3 If using an optional external power supply ensure it is a UL Listed Class 2 power supply source 4 Use twisted pair or shielded twisted pair cables for control circuits to prev...

Page 21: ...Electrical Installation 2 20 Field Wiring Diagram Use this diagram to document field wiring It may be helpful to copy this page Fig 2 8 Field Wiring Diagram...

Reviews: