background image

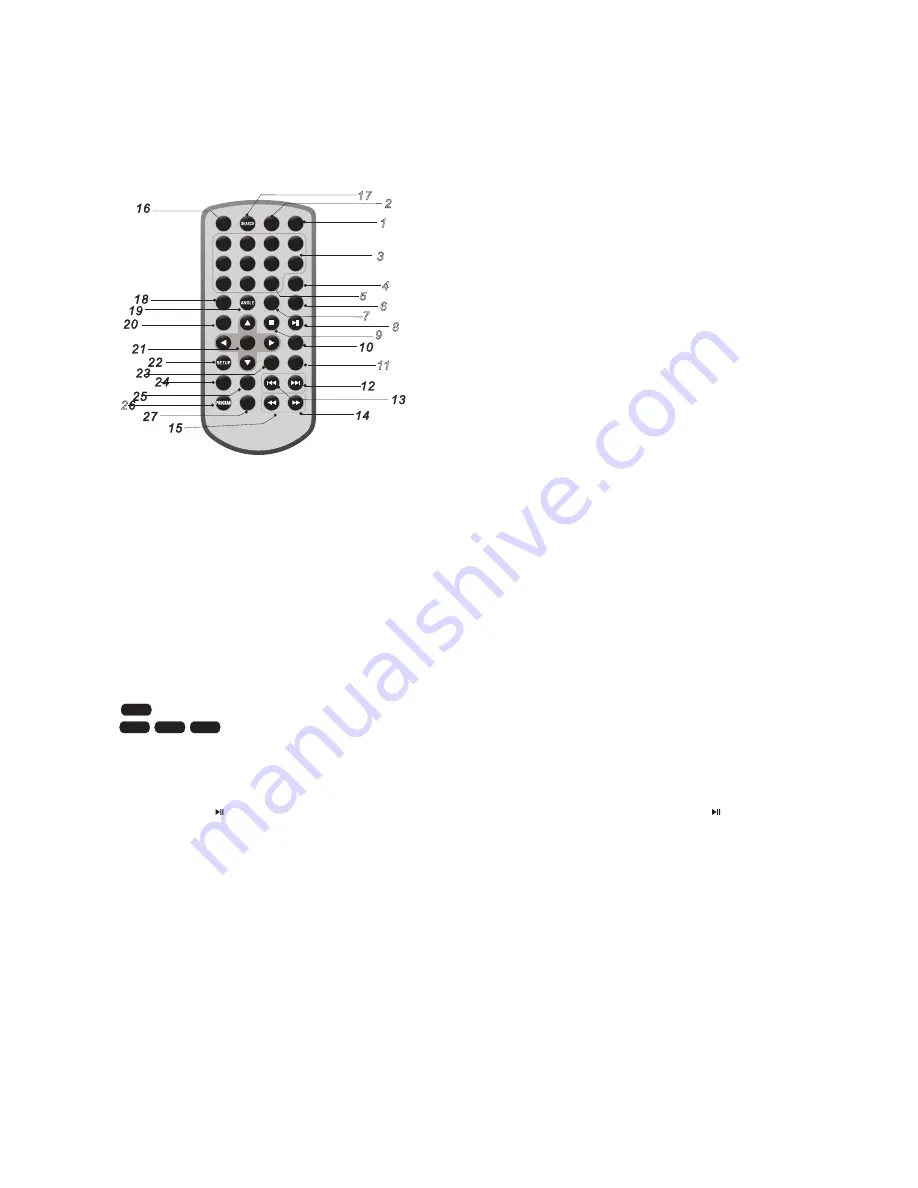
Identification of Controls 

Remote control unit 

1

2

3

4

5

6

7

8

9

0

1

0+

R E P E

A

T

T I T L E

E N T E R

M O D E

S U

B

T I T L

E

A

U DI O

M U T

E

S O U

R

CE

S T E

P

D I S P L AY

M E N U

/ P B C

VO L

+

V O L

-

S

L

OW

ZO O

M

 %


!

"

#

$

%

&

'


1. SOURCE 

DVD/CARD/USB. 

2. MUTE 

Disable audio output. 

3.0-9 NUMBER BUTTON 

Selects numbered items in a menu. 

4. DISPLAY 

To display the playtime and status information. 

5. 10+ BUTTON 

In order to select track 10 or greater, first press 10+. For example: to select track 12, first press 10+ and then press 2. 

6. MENU/PBC 

Return to DVD root menu (DVD). 
PBC on/off switch (VCD). 

7. AUDIO 


, 8 ,

 Press AUDIO repeatedly during playback to hear a different audio language or audio track, if available. 

M P 3


+ ,


8 + ,

 Press AUDIO repeatedly during playback to hear a different audio channels (left, right, mix, stereo). 

8. PLAY/PAUSE 

Press PLAY/PAUSE once to pause playback; pressing PLAY/PAUSE a second time will resume playback. 

9. STOP 

When this button is pressed once, the unit begins recording from the stop point. This is the point from which playback will 
resume if PLAY ( ) is pressed again. However, if the STOP button is pressed again instead of the PLAY ( ) button, 
there will be no resume function. 

10. MODE 

Set LCD parameter (adjust brightness, contrast, and saturation). 

11. VOL+ 

Adjust volume. 

12. Forward Skip 

Go to next chapter/track. 

13. Reverse Skip 

Go to the beginning of the previous chapter/track. 

14. 

 BUTTON 

Pressing the '

' BUTTON allows you to skip ahead at five different speeds (X2->X4->X8->X16->X32->PLAY). Press the 

PLAY button to resume normal playback. 

Summary of Contents for PDV109

Page 1: ...Safety Precautions P3 Identification of Controls P4 P6 Main Unit P4 Remote control unit P5 P6 SETUP Menu Setting P7 P9 General Page P7 Audio Setup Page P7 P8 Video Setup Page P8 Preference Page P8 P9...

Page 2: ...vice must remain easily accessible Unplug the adapter from the outlet when the unit is not in use Dispose of batteries in an environmentally responsible manner CAUTION Danger of explosion if battery i...

Page 3: ...ry case Warning The length of any USB cable connected to the USB port must not exceed 250 mm Notes on Copyrights It is forbidden by law to copy broadcast show broadcast via cable play in public or ren...

Page 4: ...DVD if available Up Fast forward Down Fast reverse Left Previous track Right Next track 6 STOP 7 SETUP 8 PLAY PAUSE 9 OPEN 10 SD MMC MS 11 USB 12 HEADPHONE SOCKET 13 AV OUT 14 COAXIAL 15 ON OFF 16 DC...

Page 5: ...le MP3 8 Press AUDIO repeatedly during playback to hear a different audio channels left right mix stereo 8 PLAY PAUSE Press PLAY PAUSE once to pause playback pressing PLAY PAUSE a second time will res...

Page 6: ...ss Slow button repeatedly to enter slow playback and cycle between different speeds The speeds are 1 2 1 4 1 8 1 16 and normal 26 PROGRAM 8 8 The program function enables you to store your favourite t...

Page 7: ...and want both sides of the picture to be trimmed or formatted to fit your TV screen 4 3 LETTERBOX If you have a normal TV In this case a wide picture will be displayed with black bands on the upper an...

Page 8: ...L Mono Left mono sound will send output signals to left speaker and right speaker R Mono Right mono sound will send output signals to left speaker and right speaker Mix Mono Left and right mixed mono...

Page 9: ...ternative scenes Default Back to the factory setting Password Setup Page Password Setup Page PASSWORD SETUP PAGE GOTO PASSWORD SETUP PAGE PASSWORD MODE ON PASSWORD ON OFF Password mode Set password mo...

Page 10: ...ponse 20 Hz to 20 kHz 1 dB Signal to noise ratio more than 80 dB ANALOG OUT connectors only Dynamic range More than 85 dB DVD CD Accessories Remote control Car adapter AC DC adapter Note Design and sp...

Reviews: