background image

model no. 060-2288-0  |  contact us: 1.866.523.5218

model no.  060-2288-0  |  contact us: 1.866.523.5218

13

A

ssembl

y

2

1

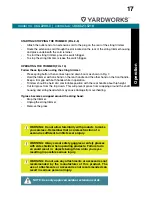
ATTACHING GRASS DEFLECTOR

• 

Remove supplied screw (4) with a cross-head screwdriver from the trimmer head.

• 

Fit the grass deflector into the slots on trimmer head.

• 

Turn counterclockwise to lock grass deflector (1) into place (2).

• 

Line up the screw hole (3) in the grass deflector (1) with the centre hole in the trimmer. 

• 

install supplied screw (4) and tighten by turning clockwise with a cross-head screwdriver. 

3

4

Summary of Contents for 060-2288-0

Page 1: ...model number 060 2288 0 contact us 1 866 523 5218 IMPORTANT Read and follow all safety rules and operating instructions before using this product Instruction Manual Electric Grass Trimmer...

Page 2: ...d 9000 RPM no load Cutting path 12 30 5 cm Line diameter 0 065 1 65 mm Weight 5 lb 3 oz 2 4 kg Technical Data 2 Know your trimmer 3 Symbols 4 SAFETY INFORMATION 5 Electrical information 7 EXPLODED VIE...

Page 3: ...model no 060 2288 0 contact us 1 866 523 5218 3 Know Your Grass Trimmer 1 Cord retainer 2 Rear handle 3 Switch trigger 4 Split boom 5 Front handle 6 Grass deflector 7 Edger guide 3 4 5 1 2 6 7...

Page 4: ...r Protection Always wear eye protection with side shields marked to comply with ANSI Z87 1 Wet Conditions Alert Do not expose to rain or use in damp locations Keep Bystanders Away Keep all bystanders...

Page 5: ...clothing can get caught and draw you into moving parts ALWAYS WEAR EYE PROTECTION ALWAYS remove the extension cord plug from the electrical outlet when making adjustments changing parts or cleaning A...

Page 6: ...l fit into a polarized extension cord only one way If the plug does not fit fully into the extension cord reverse the plug If the plug still does not fit obtain a correct polarized extension cord A po...

Page 7: ...ood of injury when used at the pace for which it was designed The grass trimmer should be stored indoors in a dry high or locked location out of children s reach when not in use MAKE all adjustments w...

Page 8: ...is wired at the factory for 120 v operation Connect to a 120 v 15 a circuit and use a 15 a time delayed fuse or circuit breaker To avoid shock or fire if the extension cord is worn cut or damaged in...

Page 9: ...4 m 0 6 18 16 16 6 10 18 16 14 10 12 16 16 14 12 16 14 12 Not Recommended Make sure your extension cord is properly wired and in good electrical condition Always replace a damaged extension cord or ha...

Page 10: ...model no 060 2288 0 contact us 1 866 523 5218 10 Exploded View 1 2 3 4 6 7 5...

Page 11: ...5218 11 Parts List Item Description Part No Qty 1 Handle assembly 31109719 1 2 Auxiliary handle 31111719 1 3 Fastening clamp 34101185 4 1 4 Guide 33303719 1 5 Guard assembly 31110719 1 6 Spool assemb...

Page 12: ...18 for assistance PACKING LIST Trimmer Assembly Grass Deflector Assembly with Screw Operator s Manual Auxiliary handle WARNING If any parts are damaged or missing do not operate this product until the...

Page 13: ...screwdriver from the trimmer head Fit the grass deflector into the slots on trimmer head Turn counterclockwise to lock grass deflector 1 into place 2 Line up the screw hole 3 in the grass deflector 1...

Page 14: ...ew pre wound spool 2 Insert the end of one line through the opening 4 in the spool housing Insert the other side of the line through the other opening 5 3 Align the tabs on the spool cover with the sl...

Page 15: ...ur grass trimmer 1 Remove the spool from the trimmer head 2 Cut a length of cutting line to approximately 20 6 1 m long and fold it in half 3 Loop the V end of the cutting line into the small notch on...

Page 16: ...nob 2 until locked into position 3 Before operating the grass trimmer make sure the auxiliary handle 1 is tightly locked into position 4 Turn the auxiliary handle adjustment knob 2 clockwise to lock t...

Page 17: ...e held at a comfortable position with the rear handle about hip height Cut tall grass from the top down This will prevent grass from wrapping around the shaft housing and string head which may cause d...

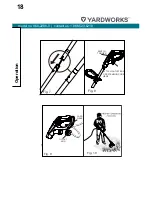
Page 18: ...18 model no 060 2288 0 contact us 1 866 523 5218 Fig 7 Fig 8 SWITCH TRIGGER ATTACH OUTLET END OF EXTENSION CORD HERE Fig 9 CORD WRAP OUTLET END Operation Fig 10...

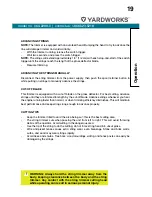
Page 19: ...pool retainer button in while pulling on strings to manually advance the strings CUT OFF BLADE This trimmer is equipped with a cut off blade on the grass deflector For best cutting advance strings unt...

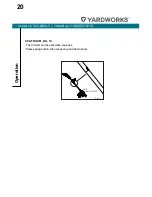
Page 20: ...20 Operation model no 060 2288 0 contact us 1 866 523 5218 SPLIT BOOM FIG 11 The trimmer can be split when you pack Press spring button then connect up and down boom Fig 11 SPLIT BOOM COUPLER...

Page 21: ...side of the grass trimmer with a dry soft cloth Do not hose down or wash the grass trimmer with water Scrape the guard and spool area to remove dried clippings and mud Brush or blow dust debris and gr...

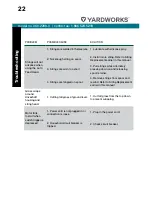
Page 22: ...ort 3 Pull strings while alternately pressing down on and releasing spool retainer 4 Strings are tangled on spool 4 Remove strings from spool and rewind Refer to String Replacement earlier in this man...

Page 23: ...des grass bags and tires These parts are warranted to the original purchaser to be free from defects in material and workmanship for a period of one hundred twenty 120 days from the date of retail pur...

Reviews: