


TURNING
• Release the drive control bar.
• Move throttle control to “SLOW” position.
• Place shift lever indicator in “F” (forward) position. Tines will
not turn.
• Lift handle to raise tines out of ground.
• Swing the handle in the opposite direction you wish to turn,
being careful to keep feet and legs away from tines.
• When you have completed your turn-around, release the drive
control bar and lower handle. Place shift lever in (till) position
and move throttle control to desired speed. To begin tilling,
hold drive control bar against the handle.
CULTIVATING
Cultivating is loosening or digging around growing plants to disrupt
weeds and aerate soil. Less than 2” (50mm) depth is always desirable.
• Place shift lever indicator in forward rotating (
) till
position when cultivating soft ground or tilling pre-tilled soil.
• Move both the depth stake pin lever and the drag stake pin
lever to the unlock position (See
Figure 5a, Illustration 2 &
Figure 8
). Hold the depth stake limiter to pull the depth stake
Figure 9
IMPORTANT: Always release drive control bar before
moving shift lever into another position.
STOPPING THE TINES AND DRIVE
• Release drive control bar to stop movement.
• Move shift lever to “N” (neutral) position.
TRANSPORT AROUND THE YARD
CAUTION: Before lifting or transporting, allow tiller
engine and muffler to cool. Disconnect spark plug
wire. Drain gasoline from fuel tank.
• Release the depth stake pin. Move the depth stake down to the
second top hole for transporting the tiller. Place depth stake
pin in hole of depth stake to lock in position. This prevents
tines from scuffing the ground.
• Place shift lever indicator in “F” (forward) position for transporting.
• Hold the drive control bar against the handle to start tiller
movement. Tines will not turn.
• Move throttle control to desired speed.
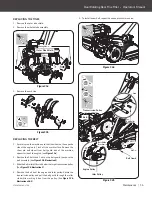
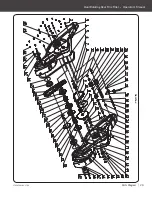
Nut A
Nut B
Outer Side Shields
The type of soil and working conditions will determine the actual
setting of the tilling depth. In some soils, the desired depth is
reached first pass over garden. In other soils, the desired depth
is obtained by going over the garden two or three times. In later
case, the depth regulator rod should be lowered before each
succeeding pass over the garden. Passes should be made across
the length and width of the garden alternately. Do not try to dig
too deeply in the first pass. If the machine jumps or bucks, allow
the unit to move forward at a lightly faster rate.
If the tiller stops forward motion and tries to dig in one spot, rock
the handles from side to side to start it moving forward again.
Rocks which are turned up should be removed from the garden area.
• Move the depth stake pin lever to the unlock position (See
Figure
5a, Illustration 2
). Hold the depth stake limiter to pull the depth
stake up for increasing tilling depth. Place depth stake pin in the
hole of the depth stake to lock in position at desired depth.
• Place shift lever indicator in counter rotating (
) till
position when tilling hard soil.
• Hold the drive control bar against the handle to start tilling
movement. Tines and wheels will both turn.
• Move throttle control to “FAST” position for deep tilling. To
cultivate, throttle control can be set at any desired speed,
depending on how fast or slow you wish to cultivate.
up for increasing tilling depth. Place depth stake pin in the hole
of the depth stake to lock in position at desired depth. lower
drag stake to the “Lowered position” (See
Figure 8
) and lock it
in position.
• Hold the drive control bar against the handle to start cultivating
movement. Tines and wheels will both turn.
• Move the throttle control to the fast position for deep cultivating.
To cultivate, throttle control can be set at any desired speed,
depending on how fast or slow you wish to cultivate.
• Always lower the drag stake when using the forward rotating
tine drive.
OUTER SIDE SHIELDS
To protect small plants from being buried while tilling, the back
edges of the outer side shields are slotted so that the shields
can be raised for deep tilling and lowered for shallow tilling. (See
Figure 9
) To move the shield to the desired position (both sides),
loosen nut A and nut b, move the shield, and retighten the nuts.
14
Dual Rotating Rear Tine Tiller
»
Operator’s Manual
YT4565PM02 - 1704
Operation
|
32850US25M102.indd 14
2017/3/27 10:22:07