background image

3

Hotline: 1-866-902-9690

INSTRUCCIONES DE SEGURIDAD

IMPORTANTE
Favor de leer estas instrucciones por completo antes de montar el aparato y de usarlo.

DESCRIPCIÓN DE LOS SÍMBOLOS

Los símbolos se utilizan en este manual a fin de atraer su atención a los posibles riesgos. Los símbolos de
seguridad y las explicaciones que los acompañan deben comprenderse a la perfección. Las advertencias
en sí no evitan los riesgos y no pueden sustituir los métodos adecuados de evitar accidentes.

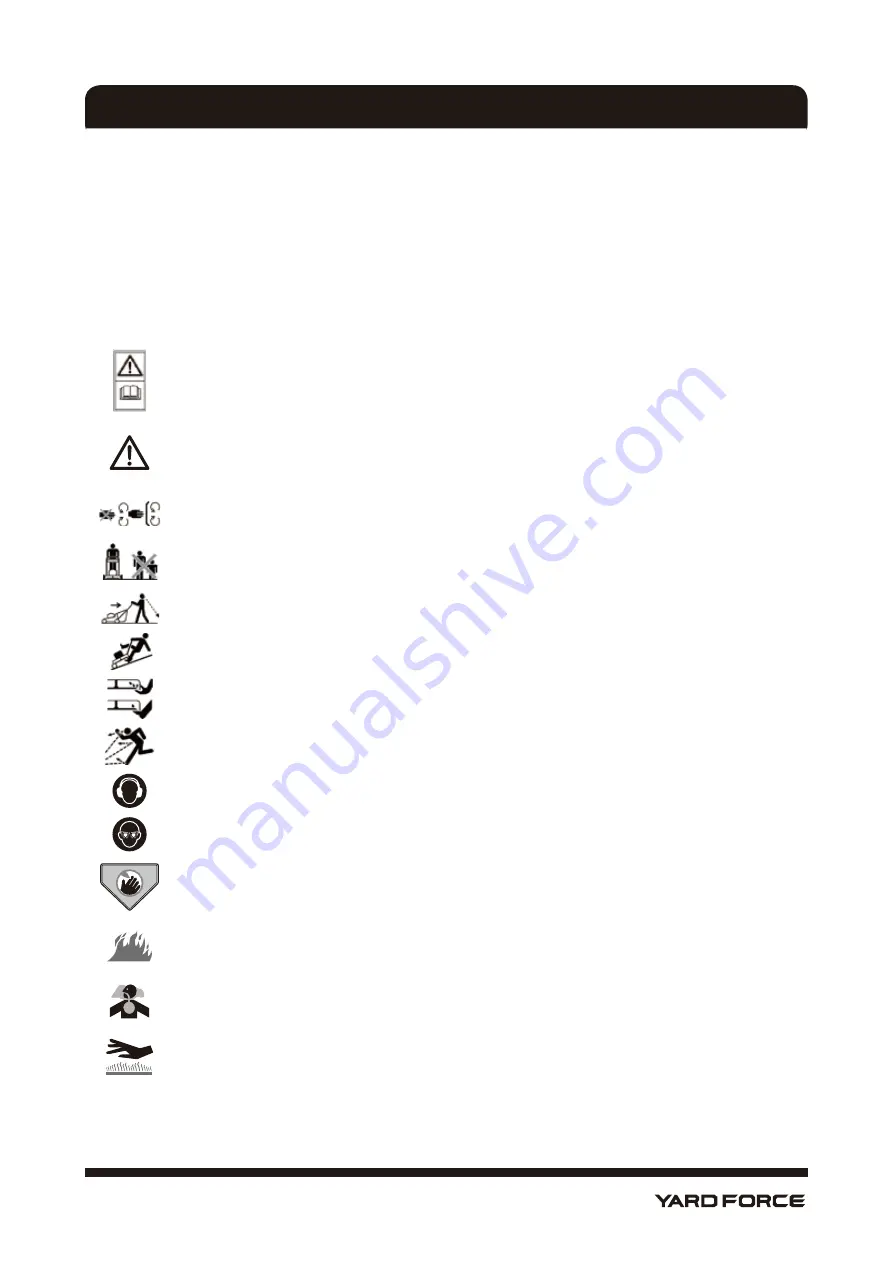
SÍMBOLOS DE ADVERTENCIA EN EL APARATO

¡ADVERTENCIA! Para reducir el riesgo de lesiones, el usuario debe leer el manual instructivo.

Este símbolo, cuando precede un comentario de seguridad, indica una precaución, una
advertencia o un peligro. Ignorar esta advertencia puede causar un accidente para usted o
para los demás. A fin de limitar el riesgo de lesión, incendio o electrocución, aplique siempre
las recomendaciones indicadas.

No abra ni retire los escudos de seguridad mientras el motor esté en funcionamiento.

Mantenga a las personas alejadas.

Mire hacia atrás cuando retroceda.

Peligro en pendientes pronunciadas.

Seccionamiento de dedos de los pies o de las manos - cuchilla rotativa de la podadora.

Objetos lanzados o voladores - exposición de todo el cuerpo.

Use protección en sus oídos.

Use protección en sus ojos.

PELIGRO: MANTENER MANOS Y PIES ALEJADOS.

ADVERTENCIA: LA GASOLINA ES INFLAMABLE

Deje que el motor se enfríe al menos durante dos minutos antes de volver a cargarlo con
gasolina.

ADVERTENCIA: MONÓXIDO DE CARBONO

Nunca encienda un motor en interiores o una área con poca ventilación. El escape del motor
contiene monóxido de carbono, un gas inodoro y mortal.

ADVERTENCIA: SUPERFICIE CALIENTE

Las piezas del motor, especialmente el silenciador, se calientan en extremo durante el
funcionamiento. Deje que el motor y el silenciador se enfríen antes de tocarlos.

Summary of Contents for YF22-3N1SPVS-SC

Page 1: ...rom our facility For immediate help with assembly or for additional product information visit www YardForceUSA com or email support MerotecUSA com You will need this manual for safety instructions operating procedures and Warranty The original sales receipt is required for warranty service YF22 3N1SPVS SC 22 3 IN 1 SELF PROPELLED LAWN MOWER OPERATOR S MANUAL ...

Page 2: ...66 902 9690 YF22 3N1SPVS SC Original Instructions TABLE OF CONTENTS Safety instructions 3 Parts list 6 Intended use 8 Assembly 9 Adjustment 14 Operation 15 Storing and maintenance 19 Trouble shooting 24 Warranty 25 ...

Page 3: ...tion go to www P65warnings ca gov Symbols are used in this manual to attract your attention to possible risks The safety symbols and the explanations which accompany them must be perfectly understood The warnings themselves do not prevent the risks and cannot be a substitute for proper methods of avoiding accidents WARNING SYMBOLS ON THE MACHINE WARNING To reduce the risk of injury user must read ...

Page 4: ...while the engine is running or when the engine is hot If gas is spilled do not attempt to start the engine but move the machine away from the area of spillage and avoid creating any source of ignition until gas vapours have dissipated Replace all fuel tank and container caps securely 4 Replace faulty mufflers 5 Before using always visually inspect to see that the blades blade bolts and cutter asse...

Page 5: ...set parking brake and stop engine 26 Do not mow in reverse unless absolutely necessary 27 Tragic accidents can occur if the operator is not alert to the presence of children Children are often attracted to the machine and the mowing activity Never assume that children will remain where you last saw them 28 Keep children out of the operating area and under the watchful care of a responsible adult o...

Page 6: ...6 Hotline 1 866 902 9690 KNOW YOUR LAWN MOWER PARTS LIST Fig 1 1 2 3 4 5 6 7 8 9 19 16 17 18 15 14 13 12 11 10 20 21 ...

Page 7: ...ndle knob and bolt 18 Handle quick release lever 19 Cord clip 20 Lower handle 21 Engine On Off control bar PARTS LIST Carefully remove the lawn mower from its packaging and check that the following parts are included A Grass bag with holder 1 pc B Handle quick release lever 2 sets C Handle Knob and Bolt 2 sets D Manual 1 pc E Side discharge chute 1 pc F Main mower deck with upper handle 1 pc G Cor...

Page 8: ...rcial trade or industrial applica tions Our warranty will be voided if the machine is used in commercial trade or industrial businesses or for equivalent purposes INTENDED USE Fig 2 A F B C H I K WARNING If any parts are damaged or missing do not operate this lawn mower until the missing parts are replaced Failure to heed this warning could result in serious personal injury NOTE Always recycle the...

Page 9: ...ory with the exception of those parts left disassembled for shipping purposes All parts such as nuts washers bolts etc necessary to complete the assembly have been placed in the parts bag To ensure safe and proper operation of your lawn mower all parts and hardware you assemble must be tightened securely Use the correct tools as necessary to ensure proper tightness TO REMOVE LAWN MOWER FROM CARTON...

Page 10: ... fixing blocks on the lower handle tube 1 and upper handle fixing blocks 2 Screw the bolt in and clamp it to fix the lower handle 4 The handle height can be adjusted at three positions L M and H by rotating the height adjust fixing block make sure the arrows are aligned with same position of both height adjust fixing blocks then you can choose the handle height level you want See Fig 5 5 Push up o...

Page 11: ...side discharge chute while the engine is running 1 Lift the rear chute flap with one hand and hook in the grass bag make sure the mulch plug be removed 2 Release the rear chute flap to secure the grass bag in position INSTALLING THE MULCHING PLUG As shown in Fig 9 Fig 9 Mulching plug 1 Remove the grass bag 2 Push the plastic mulching plug into the discharge chute until it is locked in position 3 R...

Page 12: ... grade of oil and gas before starting the engine NOTE Running the engine with a low oil level will cause engine damage It is recommend that high detergent premium quality 4 stroke engine oil used Using non detergent oil can shorten the engine s service life and using 2 stroke oil will damage the engine CAUTION Always use high quality detergent oil classified SAE30 oil or equivalent such as SAE 5W ...

Page 13: ... is shipped without oil or gas The engine must be filled with the correct grade of oil and gas before starting the engine WARNING Refuel in a well ventilated area with the engine stopped Do not smoke or allow flame or sparks in the area where the engine is refueled or where gas is stored Avoid repeated or prolonged contact with skin or inhalation of vapour WARNING Gasoline with up to 10 ethanol ga...

Page 14: ...height is centrally adjusted with height adjusting handle Different cutting heights can be selected Pull the height adjusting handle out and select the desired cutting height The handle snaps into the desired position From position 1 to position 7 the cutting heights range from 1 25 to 3 75 31 95 mm SETTING REQUIRED FUNCTION NOTE This lawn mower has three functions Change functions by changing the...

Page 15: ... gas TO START THE ENGINE NOTE Due to protective coatings on the engine a small amount of smoke may be present during the initial use of the lawn mower This is normal NOTE NOTE Your engine is equipped with an automatic choke system No priming or choking is required before starting 1 The engine equipped with an automatic choke system No priming or choking is required before starting for your mower 2...

Page 16: ...ush the self propelling bar to the handle NOTE Always keep the self propelling control bar completely against the main handle Operating with the self propelling bar away from the main handle will cause damage to the transmission 2 To stop forward motion without stopping the engine release the self propelled drive control bar while still holding the engine on off control bar down against the handle...

Page 17: ...pel cable tension kit stop nut upper bolt Note The cable must be loose with the self propel drive bar in the released position otherwise the machine may creep when the drive control handle is disengaged Note Self propelled speed can change on slopes Note After releasing the drive control if the mower will not roll backwards push the mower forward slightly to disengage the drive wheels TO CLEAN A F...

Page 18: ...rm grip on the upper handle with engine on off control bar and self propelled drive control bar closed and walk along with it self propelling to start mowing WORKING TIPS 1 Walk never run with the mower and be very careful when mowing uneven or rough ground 2 Mow across slopes never up and down 3 Be careful when changing the direction of the mower on a slope 4 Do not mow excessively steep slopes 5...

Page 19: ...ollected into grass bag the discharge opening and inside the mower casing must be cleared of any blockage STORING AND MAINTENANCE WARNING Before performing any maintenance or cleaning work switch off the engine and wait until the blade has come to a stop CLEANING GENERAL CLEANING The lawn mower should be cleaned thoroughly every time after it has been used Always clean your lawn mower immediately ...

Page 20: ...the filter cartridge 3 To loosen debris gently tap the filter cartridge on a hard surface If the filter cartridge is excessively dirty replace with a new one Note Never clean the air filter cartridge with gas or inflammable solvents Clean the air filter cartridge only with compressed air or by tapping it 4 Install the filter cartridge 5 Close the cover and secure it properly by snapping tabs back ...

Page 21: ...at the blade only be changed by someone qualified and authorized to do so Hold the blade and unscrew the blade bolt counter clockwise using a wrench Remove the washer and the blade Fit a new blade or re sharpen the blade Place the blade on the two studs on the blade flange and then replace the washer and bolts Make sure the blade is correctly located and then firmly tighten the bolt Do not over ti...

Page 22: ... manual safe for future reference It is recommended that the following maintenance schedule is adhered to This will ensure the lawn mower operates correctly and is safe to use 12 hours of use 24 hours of use 36 hours of use Air filter Clean Clean Clean Spark plug Check Clean Clean Engine oil Check Check and Add Check and Add TRANSPORTING THE LAWN MOWER Empty the gas tank Always let the engine run ...

Page 23: ... leak from the fuel tank Fuel is extremely ammable and explosive A fire or explosion from fuel can burn you and others 2 Store the mower in the vertical position only when the level of fuel in the fuel tank is no higher than what is recommended in this Operator s Manual 3 Do not store the mower in a position that is beyond the vertical 90 position Otherwise fuel may escape from the fuel tank 4 Do ...

Page 24: ...nning machine vibrates heavily Screws are loose Blade fasteners are loose Blade is unbalanced Tighten screws Tighten blade fasteners Replace blade Engine does not start Engine on off control bar not pressed Spark plug is defective Cutting blade is worn or damaged Fuel tank is empty Engine may be flooded Press start stop lever Replace spark plug Replace it through the customer service centre Refill...

Page 25: ...damages arising from any of the above nor does it cover repairs made or attempted by unauthorized persons This warranty is void if the product is used for commercial rental or industrial purposes Certain parts attachments and accessories are subject to normal wear and tear and are excluded from the warranty Service and Warranty Claims Process Contact the Yard Force Support Center toll free at 866 ...

Page 26: ......

Page 27: ...n desde nuestras instalaciones Para ayuda inmediata con el montaje o para información adicional sobre el producto visite www YardForceUSA com o envíe un e mail a support MerotecUSA com Necesitará este manual para consultar las instrucciones de seguridad procedimientos operativos y la garantía Es necesario tener a la mano el recibo de compra original para el servicio de garantía GUARDE ESTE MANUAL ...

Page 28: ...90 Instrucciones originales YF22 3N1SPVS SC ÍNDICE Instrucciones de seguridad 3 Lista de las piezas 6 Uso previsto 8 9 Montaje 9 Ajuste 14 Operación 15 Almacenamiento y mantenimiento 20 Resolución de problemas 25 Garantía 26 ...

Page 29: ...esgo de lesión incendio o electrocución aplique siempre las recomendaciones indicadas No abra ni retire los escudos de seguridad mientras el motor esté en funcionamiento Mantenga a las personas alejadas Mire hacia atrás cuando retroceda Peligro en pendientes pronunciadas Seccionamiento de dedos de los pies o de las manos cuchilla rotativa de la podadora Objetos lanzados o voladores exposición de t...

Page 30: ...pre inspeccione visualmente para ver que las cuchillas los pernos de las cuchillas y el montaje de las cuchillas no estén dañados o desgastados Cambie y reponga las cuchillas desgastadas o dañadas y los pernos en conjunto para conservar el equilibrio 6 En máquinas con múltiples cuchillas tenga cuidado ya que una cuchilla rotativa puede causar que las otras cuchillas giren también OPERACIÓN 1 No op...

Page 31: ...na y la actividad de poda Nunca suponga que los niños se quedarán donde los vio por última vez 28 Mantenga a los niños alejados de la zona de operación y bajo estricta supervisión por parte de un adulto responsable que no sea quien esté podando 29 Muévala en la dirección recomendada por el fabricante cuando pase por pendientes Tenga precaución cuando la opere cerca de algún barranco 30 Un mal paso...

Page 32: ...6 Hotline 1 866 902 9690 CONOZCA SU PODADORA LISTA DE LAS PIEZAS Fig 1 1 2 3 4 5 6 7 8 9 19 16 17 18 15 14 13 12 11 10 21 20 ...

Page 33: ...o del manubrio 18 Manejar palanca de liberación rápida 19 Abrazadera de cordón 20 Manubrio inferior 21 Barra de control de encendido y apagado del motor LISTA DE LAS PIEZAS Con cuidado saque la podadora de su embalaje y cheque que contenga las siguientes piezas A Bolsa recolectora de paso con soporte 1 pieza B Manejar palanca de liberación rápida 2 sets C Perilla y perno del manubrio 2 sets D Manu...

Page 34: ...en aplicaciones comerciales o indus equivalentes USO PREVISTO ADVERTENCIA Si cualquiera de las piezas está dañada o perdida no opere esta podadora hasta que las haya reemplazado No seguir esta advertencia podría resultar en lesiones personales graves NOTA Recicle siempre el embalaje de acuerdo con los programas de reciclaje locales ADVERTENCIA Este artículo requiere que dos personas lo levanten pa...

Page 35: ...sarmadas para fines del envío Todas las piezas como tuercas arandelas pernos etc necesarias para terminar el montaje están en la bolsa de las piezas Con el fin de asegurar una operación segura y adecuada de su podadora todas las piezas y el hardware que usted monte deben apretarse correctamente Use las herramientas correctas según sea necesario para asegurar que todo quede apretado de forma adecua...

Page 36: ...or 1 y los bloques de fijación de la manija superior 2 Atornille el perno y fíjelo para fijar el mango inferior 4 La altura del mango se puede ajustar en tres posiciones L M y H girando el bloque de fijación de ajuste de altura asegúrese de que la flecha esté alineada con la misma posición de ambos bloques de fijación de ajuste de altura luego puede elegir el nivel de altura del mango que desea Ve...

Page 37: ...hador o el conducto de descarga lateral mientras el motor esté encendido 1 Levante la solapa del conducto trasero con una mano y enchufe la bolsa recolectora de pasto asegúrese de que el tapón acolchador se retire 2 Libere la solapa del conducto trasero para fijar la bolsa recolectora en su lugar INSTALAR EL TAPÓN ACOLCHADOR As shown in Fig 9 Fig 9 1 Retire la bolsa recolectora de pasto 2 Empuje e...

Page 38: ...NOTA Hacer funcionar el motor con un bajo nivel de aceite puede dañarlo Se recomienda un aceite de motor de cuatro tiempos de calidad superior con alta detergencia Usar aceite sin detergente puede acortar la vida útil del motor y usar aceite de motor de dos tiempos daña el motor PRECAUCIÓN Use siempre aceite de motor de alta calidad clasificado como aceite SAE30 o equivalente como SAE 5W 30 que su...

Page 39: ...CAUCIÓN Para evitar que el motor se dañe el motor se entrega sin aceite ni gasolina El motor debe llenarse con la cantidad correcta de aceite y gasolina antes de encenderlo ADVERTENCIA Recargue el combustible en una zona bien ventilada con el motor apagado No fume ni permita presencia de llamas o chispas en la zona en donde esté recargando combustible o donde almacena la gasolina Evite contacto re...

Page 40: ...ntralmente con la manija de ajuste de altura de corte Se pueden seleccionar diferentes alturas de corte Jale la manija de ajuste hacia afuera y seleccione la altura de corte deseada La manija se encaja en la posición deseada De la posición 1 a la 7 las alturas de corte van desde 1 25 a 3 75 31 95 mm AJUSTAR LA FUNCIÓN REQUERIDA NOTA Esta podadora tiene tres funciones Modifique las funciones cambia...

Page 41: ...ubrimientos protectores del motor puede observarse una pequeña cantidad de humo al iniciar el uso de la podadora Esto debe considerarse como normal NOTA Su motor está equipado con un sistema cebador automático No es necesario cebar ni asfixiar el motor antes de encenderlo 1 El motor está equipado con un sistema cebador automático No es necesario cebar ni asfixiar el motor antes de encender la poda...

Page 42: ... empuja la barra autopropulsora hacia el manubrio NOTA Mantenga siempre la barra de control autopropulsada completamente contra el mango principal Operar con la barra autopropulsada lejos del mango principal causará daños a la transmisión 2 Para detener el movimiento hacia adelante sin apagar el motor suelte la barra de control de mecanismo autopropulsor al tiempo que sigue sosteniendo la barra de...

Page 43: ... Kit de tensión de cable autopropulsada tuerca de parada perno superior Nota El cable debe estar suelto con la autopropulsión barra de transmisión en la posición liberada de lo contrario el La máquina puede deslizarse cuando la palanca de control de está desconectado Nota la velocidad autopropulsada puede cambiar en pendientes NOTA Después de soltar el control de transmisión si el cortacésped no r...

Page 44: ...unto con la barra de control de encendido y apagado del motor y la barra de control del mecanismo autopropulsor cerrados y camine junto con su mecanismo autopropulsor para empezar a podar CONSEJOS DE TRABAJO 1 Camine nunca corra con la podadora y tenga mucho cuidado al podar en superficies disparejas o accidentadas 2 Pode transversalmente a la pendiente no hacia arriba y hacia abajo 3 Tenga cuidad...

Page 45: ...ctora de paso La solapa del conducto trasero cae automáticamente después de retirar la bolsa de pasto y se cierra la apertura de la descarga trasera 2 Vacíe la bolsa y reinstálela NOTA Si queda algún residuo en el conducto de descarga límpielo con un cepillo No retire los restos de pasto de la carcasa de la podadora o de la cuchilla con la mano ni con sus pies Use las herramientas adecuadas como u...

Page 46: ...las cuchillas Al checar incline la podadora hacia su lado izquierdo el opuesto al cuello de llenado de aceite NOTA Antes de poner la podadora de lado drene por completo el tanque de combustible usando una bomba extractora de gasolina No incline la podadora más de 90 grados MANTENIMIENTO DE LA BUJÍA Según se muestra en la fig 20 0 027 0 033 Fig 20 1 Cuando el motor se haya enfriado jale la cubierta...

Page 47: ... de cada uso cheque el nivel del aceite y agregue aceite adicional si el nivel no está entre los niveles mínimo y máximo CAMBIAR LA CUCHILLA Por razones de seguridad solo deberá afilar balancear y montar la cuchilla en un taller de servicio autorizado Para resultados óptimos se recomienda que la cuchilla se inspeccione una vez al año ADVERTENCIA Antes de que retire la bolsa recolectora de pasto de...

Page 48: ...r se enfríe por completo 2 Asegúrese de que la bolsa recolectora de pasto esté vacía 3 Limpie los restos de debajo de la estación de la podadora 4 Almacene la podadora sobre una superficie plana y nivelada con la podadora en posición vertical 5 Almacene en un lugar seguro que no sea accesible para niños ni a personas que no están familiarizadas con la operación ALMACENAR LA PODADORA POR PERIODOS E...

Page 49: ... hasta que se haya consumido la gasolina remanente en el tanque Vacíe el aceite del motor del motor tibio Retire la cubierta de la bujía Limpie las aletas de enfriamiento del cilindro y la carcasa Use el embalaje original para envíos siempre que sea posible INSTRUCCIONES DE CARACTERÍSTICAS DE ALMACENAMIENTO VERTICAL 1 Asegúrese de que el nivel de combustible en el tanque de combustible no sea supe...

Page 50: ... fuga del tanque de combustible El combustible es extremadamente inflamable y explosivo Un incendio o una explosión de combustible pueden arder usted y otros 2 Guarde la podadora en posición vertical solo cuando el nivel de combustible en el tanque de combustible no sea superior al se recomienda en este Manual del operador 3 No almacene la podadora en una posición que esté más allá de la posición ...

Page 51: ...lla no está balanceada Apriete los tornillos Apriete los amarres de la cuchilla Cambie la cuchilla El motor no arranca La palanca de encendido apagado no está activada La bujía está defectuosa La cuchilla de corte está desgastada o dañada El tanque de combustible está vacío El motor podría estar inundado Active la palanca de encendido apagado Cambie la bujía Cámbiela a través del centro de servici...

Page 52: ...eparaciones hechas o tentativas de reparación realizadas por o industriales Ciertas piezas y accesorios están sujetos al desgaste normal y se excluyen de esta garantía Proceso de servicio y reclamos de garantía Para servicio y soporte con la garantía póngase en contacto con el centro de soporte de Yard Force llamando a la línea gratuita al 866 902 9690 de lunes a viernes de 8 30 AM a 5 00 PM hora ...

Page 53: ...quí para ayudarle y atender todas sus necesidades Póngase en contacto con el departa mento de servicio al cliente para ayuda con Montaje o uso del producto Piezas faltantes o dañadas Resolución de problemas También puede visitar nuestro sitio web para ver las preguntas frecuentes los pasos de resolución de problemas descarga abrir y vídeos tutoriales Las piezas de recambio y los acceso rios se pue...

Reviews: