DC Inverter U-match Series Floor Ceiling Type Unit
7
charging, keep the refrigerant tank in an upright position. After charging,
stick a label on the air conditioner saying no excessive charging.
(4) The following tools will be used: 1) Liquid-level gauge; 2) Screwdriver; 3)
Electric driven rotary hammer; 4) Drill; 5) Pipe expander; 6) Torque
wrench; 7) Open-end wrench; 8) Pipe cutter; 9) Leak detector; 10)
Vacuum pump; 11) Pressure gauge; 12) Universal meter; 13) Hexagon
wrench; 14) Tapeline.
2.1.2 Selection of Installation Location
WARNING!
(1) If the outdoor unit will be exposed in strong wind, it must be securely located,
otherwise it may fall down.
(2) Install the air conditioner at a place where the inclination is less than 5°.
(3) Do not install the unit at a place with direct sunlight.
(4) Do not install the unit at a place with leakage of inflammable gas.
Selection of Installation Location for Indoor Unit (Select a location
pursuant to the following condition).
(1) Air inlet and outlet of the indoor unit should be away from obstacles to
make sure the unit’s air flow can reach the entire room. Do not install the
unit in a kitchen or a laundry.
(2) Install the unit in a room without naked flame, fire source or the risk of
getting the refrigerant on fire.
(3) Select a location that can withstand 5 times the unit weight without
increasing operating noise and vibration.
(4) The installation location must be level.
(5) The indoor piping length and wiring length should be within the allowable
range.
(6) Select a place that can easily drain condensate and connect to the drain
system of the air conditioner.
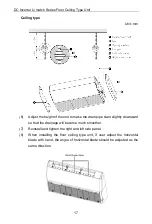
(7) If hoisting screw bolts are to be used, check whether the installation
location is safe enough. If not safe, reinforce the location before
installation.
(8) Indoor unit, power cord, connecting wires and communication cords


