background image


4

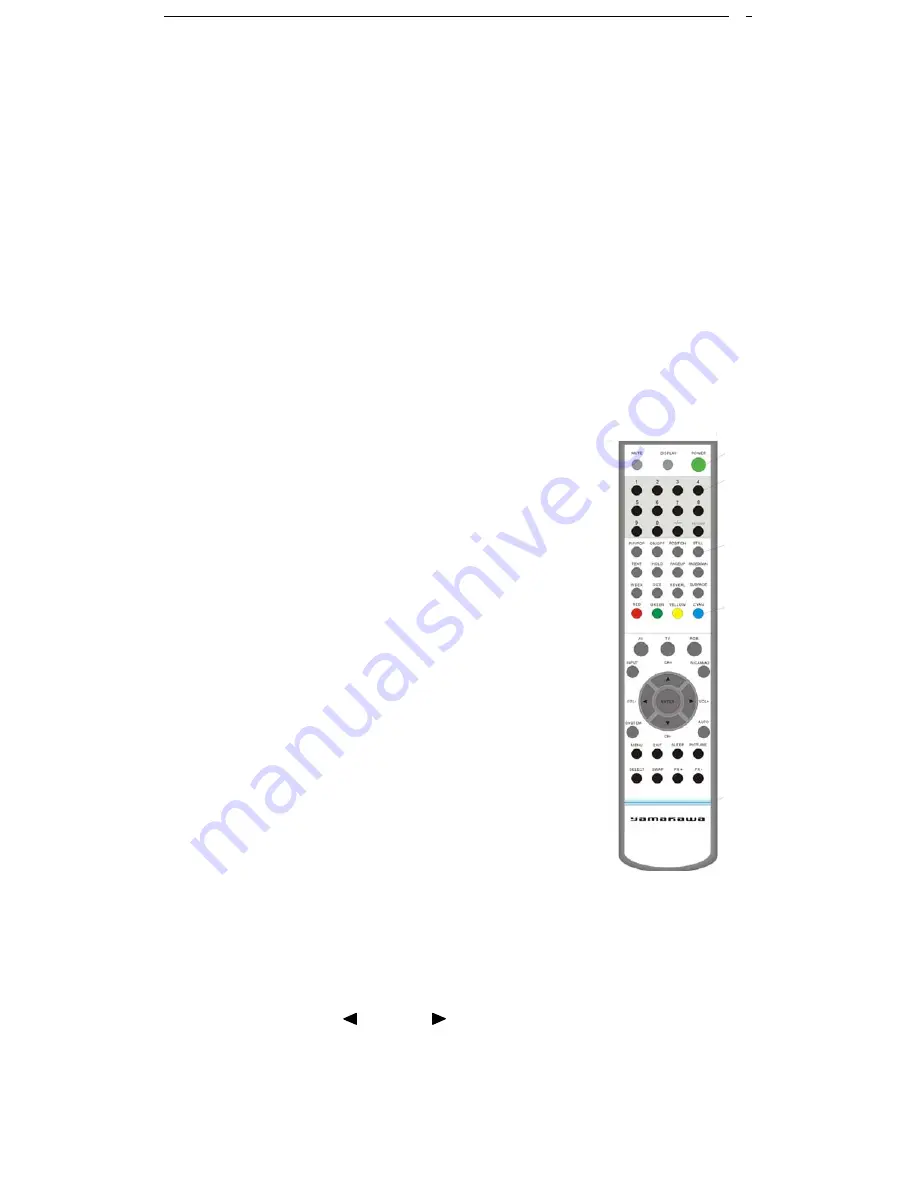
5 - Remote control functions 

1) POWER : to switch TV on / off. 
2) MUTE : to mute or restore the sound. 
3) DISPLAY : to display the functions on the screen. 
4) INPUT : to activate the LCD on Tuner, AV1 and AV2 mode. 
5) SYSTEM : to change the reception system of the multistandard programs. 
6) NICAM /A2 : To activate mono or stereo sound. 
7) AUTO : automatic channel search. 
8) PROG+ :to switch on channel.In MENU mode,enables to move the cursor up. 
9) PROG- : to switch on channel.In MENU mode,enables to move the cursor down. 
10) VOL- : to decrease the volume and also to modify the cursor direction. 
11) VOL+ : to increase the volume and also to modify the cursor direction. 
12) MENU :   

Press once to adjust the image.   
Press twice to adjust channels.   
Press three times to get the generalities Menu. 

13) EXIT : to exit from the MENU. 
14) PAGE UP : to go to the following page. 
15) PAGE DOWN :to go to the previous page. 
16) TEXT : to display teletext. 
17) MIX : combination of image and teletext. 
18) HOLD : pause. 
19) PICTURE : to return to the image. 
20) INDEX : presentation page. 
21) SIZE : to enlarge the picture. 
22) REVEAL : to display or hide concealed information. 
23) SUBPAGE : to return to the page. 
24) RED-GREEN-YELLOW-CYAN : direct access to headings. 


Remote Controller 

Connection steps


Make sure that the power of the LCD-TV is off; 


Connect the SCART cable to the corresponding interface on the LCD-TV; 


Turn on the power; 


Use key 

INPUT

 to set the video input mode of the LCD-TV to SCART mode; 


You can use key     

VOL/VOL    

to adjust the volume directly. And you can use 

key 

MUTE

 on the remote control to turn off the sound; 


You can use key 

POWER

 to turn off the LCD-TV.


Summary of Contents for LM-17W / LT-17W

Page 1: ...HDTV compatible LCD TV LM 17W LT 17W User s Guide ...

Page 2: ...Contents Enhanced Features 3 General Safety Precautions 4 Control descripttion 5 Connector 6 Remote Controller 7 Teletext 10 Specifications 12 Trouble Shooting 13 Accessories List 14 ...

Page 3: ...olor differentiation around edges between different colors Improved Response Circuit This self developed circuit improves the response time of the picture and delivers more clear images Noise Reduction Technique To fix the background noise problem we have developed a noise reduction technique that will minis the background noise of the TV signal Environmental Low power consumption will prolong the...

Page 4: ...tended to be used with Listed ITE power supply marked LPS or Listed power unit marked Class 2 rated output 12 VDC 4 0A Make sure that the power cord and the other cords are securely connected 4 Do not use the sharp tool such as pin or pencil to avoid the scratch on the LCD surface 5 Do not use the solvent such as benzene to clean the monitor It will damage to LCD surface 6 Unplug the LCD during li...

Page 5: ... VOL VOL CH CH Menu Power OSD Control Step 1 Start press the MENU key to enable the OSD MENU Step 2 Press the CH CH Move menu Bar to be adjusted Step 3 Press the VOL VOL key to adjust the value Step 4 Press MENU key to exit ...

Page 6: ...3 Connector Remarks POWER INPUT LINE OUTPUT AV AUDIO IN PC AUDIO IN SCART 1 SCART 2 S VIDEO INPUT AV INPUT PC INPUT TV INPUT ...

Page 7: ...ust channels Press three times to get the generalities Menu 13 EXIT to exit from the MENU 14 PAGE UP to go to the following page 15 PAGE DOWN to go to the previous page 16 TEXT to display teletext 17 MIX combination of image and teletext 18 HOLD pause 19 PICTURE to return to the image 20 INDEX presentation page 21 SIZE to enlarge the picture 22 REVEAL to display or hide concealed information 23 SU...

Page 8: ...u want When you press key INPUT each time TV SCART CVBS SVIDEO RGB will appear on the screen in a cycle note The display of the input mode will disappear in 3 seconds Base operation continue Audio control 1 Press key VOL to turn up the volume and there is a bar with numbers on the screen indicating the loudness 2 Press key VOL to turn down the volume and also there is a bar with numbers on the scr...

Page 9: ... press the key number 8 2 If you want to choose a channel bigger than 9 please press key at first and then press the number you want for example select channel 45 1 Press key 2 Press key number 4 3 Press key number 5 note Use the second way to select a channel you should finish all steps in 4 seconds Use key to switch between stations 0 9 and 10 199 3 Auto search TV proglams surely that you have U...

Page 10: ...Size Button Press Size to change display size normal large top large bottom normal Reveal Button Press Reveal to reveal hidden words e g quiz page answers Press again to hide Red Green Yellow Cyan Buttons These four buttons correspond to the differently coloured subjects Hold Button Press Hold to remain the Teletext page when viewing multi page information Press again to return to automatic page u...

Page 11: ...isplayed at the Bottom right of the screen Enter desired sub page number before the page number disappears To select page 6 enter 0 0 0 and 6 Text Button Press Text to enter Teletext mode and only the text page can be visible Mix Button Press Mix to enter Teletext mode and both the TV picture and text page can be visible Picture Button Press Picture to turn off the Teletext NICAM A2 Usually set to...

Page 12: ...50cd m Response Time 20ms Resolution 1280 x 768 75Hz Features OSD Controls Brightness Contrast Horizontal Vertical Position Multilanguage Program Number Audio Volume Tone and Balance Control Inputs Audio Stereo Line in Composite Video adaptive 4H comb filter S Video Scart TV TV Tuner 75Ω Aerial Jack Pre set channel 100 Systems PAL BG DK I SECAM BG DK NTSC Teletext Europe 10 Page Output 2x3W Speake...

Page 13: ... neon light and electric Stripe show on the screen May be result in the electric wave disturb from other TV Computer and Game machine or Radio Double or multiple display image Maybe result in the radio electric wave echo from mountain or building check the direction of the antenna Disturbed the snow flare image The line connecting with Antenna may be broken or loss Remote controller out of working...

Page 14: ...11 Accessories List Contents Amount Power Cable 1 Adapter 1 Audio Cable 1 Remote Controller 1 User s Manual 1 2x AAA Batteries 1 ...

Reviews: