4-43
CRANKCASE AND CRANKSHAFT
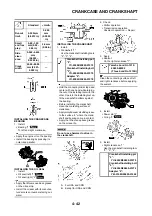
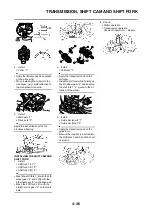
• Apply molybdenum disulfide grease
to the surface "a" where the crank-
shaft and bearing come in contact.
• Use two plain washers (Yamaha
genuine: 90201-243K3) "5" or the
ones of a size as shown one on the
other. (Except for USA and CDN)
• Install so that the plain washers do
not deviate from the crankshaft cen-
ter. (Except for USA and CDN)
• When installing the crankcase, the
connecting rod should be posi-
tioned at TDC (top dead center).
• Install while checking that the dowel
pin is in place.
A. For USA and CDN
B. Except for USA and CDN
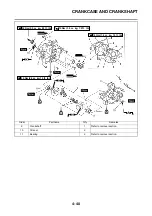
6. Install:
• Clamp "1"
• Bolt (crankcase) "2"
Tighten the crankcase tightening
bolts in stage, using a crisscross pat-
tern.
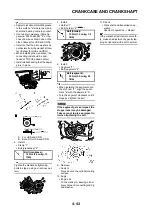
7. Install:
• Holder "1"
• Bolt (holder) "2"
8. Install:
• Segment "1"
• Bolt (segment) "2"
• When installing the segment onto
the shift cam "3", align the punch
mark "a" with the dowel pin "b".
• Turn the segment clockwise until it
stops and tighten the bolt.
If the segment gets an impact, the
stopper lever may be damaged.
Take care not to give an impact to
it when tightening the bolt.
9. Remove:
• Sealant
Forced out on the cylinder mating
surface.
10. Apply:
• Engine oil
To the crank pin, bearing, oil de-
livery hole and connecting rod big
end washer.
11. Check:
• Crankshaft and transmission op-
eration.
Unsmooth operation
→
Repair.
If the crankshaft will not turn smooth-
ly, make an adjustment by gently tap-
ping its right end with a soft hammer.
Bolt (crankcase):
14 Nm (1.4 m•kg, 10
ft•lb)
Bolt (holder):
10 Nm (1.0 m•kg, 7.2
ft•lb)
Bolt (segment):
30 Nm (3.0 m•kg, 22
ft•lb)
Summary of Contents for YZ125 2016
Page 4: ......
Page 12: ...1 2 LOCATION OF IMPORTANT LABELS EUROPE...
Page 13: ...1 3 LOCATION OF IMPORTANT LABELS AUS NZ ZA...
Page 61: ...3 18 CHASSIS...
Page 165: ......
Page 166: ...PRINTED IN JAPAN E PRINTED ON RECYCLED PAPER...


