background image

SPECIFICATIONS

9-2

2

3

4

5

6

7

8

9

4th: 

1.040 (26/25)

5th: 

0.821 (23/28)

Chassis:

Frame type: 

Diamond

Caster angle: 

26.00 

Trail: 

96 mm (3.8 in)

Front tire:

Type: 

With tube

Size: 

130/80-18M/C 66P

Manufacturer/model: 

BRIDGESTONE/TW31

Rear tire:

Type: 

With tube

Size: 

180/80-14M/C 78P

Manufacturer/model: 

BRIDGESTONE/TW34

Loading:

Maximum load: 

179 kg (395 lb) (CAL)
180 kg (397 lb) (U49)

* (Total weight of rider, passenger, cargo

and accessories)

Tire air pressure (measured on cold
tires):

Loading condition: 

0

90 kg (0

198 lb)

Front: 

125 kPa (1.25 kgf/cm

2

, 18 psi)

Rear: 

125 kPa (1.25 kgf/cm

2

, 18 psi)

Loading condition: 

90

179 kg (198

395 lb) (CAL)

90

180 kg (198

397 lb) (U49)

Front: 

150 kPa (1.50 kgf/cm

2

, 22 psi)

Rear: 

175 kPa (1.75 kgf/cm

2

, 25 psi)

Front wheel:

Wheel type: 

Spoke wheel

Rim size: 

18x2.50

Rear wheel:

Wheel type: 

Spoke wheel

Rim size: 

14M/C x MT4.50

Front brake:

Type: 

Single disc brake

Operation: 

Right hand operation

Specified brake fluid: 

DOT 4

Rear brake:

Type: 

Drum brake

Operation: 

Right foot operation

Front suspension:

Type: 

Telescopic fork

Spring/shock absorber type: 

Coil spring/oil damper

Wheel travel: 

160.0 mm (6.30 in)

Rear suspension:

Type: 

Swingarm

Spring/shock absorber type: 

Coil spring/gas-oil damper

Wheel travel: 

150.0 mm (5.91 in)

Electrical system:

Ignition system: 

CDI

Charging system: 

CDI magneto

Battery:

Model: 

YB7C-A

Voltage, capacity: 

12 V, 7.0 Ah

Headlight:

Bulb type: 

Halogen bulb

10D-9-15.book  2 ページ  2011年3月7日 月曜日 午後3時6分

Summary of Contents for TW200B

Page 1: ...10D 28199 15 TW200BC OWNER S MANUAL Read this manual carefully before operating this vehicle LIT 11626 25 04 TW200B...

Page 2: ...EAU10042 Read this manual carefully before operating this vehicle This manual should stay with this vehicle if it is sold Q...

Page 3: ...he motorcycle To maintain these high standards it is important that you and your Yamaha dealer pay close attention to the recommended maintenance schedules and operating instructions contained within...

Page 4: ...injury hazards Obey all safety messages that follow this symbol to avoid possible injury or death A WARNING indicates a hazardous situation which if not avoided could result in death or serious injury...

Page 5: ...AL 2011 by Yamaha Motor Corporation U S A 1st edition February 2011 All rights reserved Any reprinting or unauthorized use without the written permission of Yamaha Motor Corporation U S A is expressly...

Page 6: ...General maintenance and lubrication chart 7 5 Removing and installing the cowling and panels 7 9 Checking the spark plug 7 10 Canister for California only 7 12 Engine oil and oil filter element 7 12...

Page 7: ...b 7 36 Supporting the motorcycle 7 37 Front wheel 7 37 Rear wheel 7 39 Troubleshooting 7 40 Troubleshooting chart 7 42 MOTORCYCLE CARE AND STORAGE 8 1 Matte color caution 8 1 Care 8 1 Storage 8 3 SPEC...

Page 8: ...ls on your vehicle They contain important information for safe and proper operation of your vehicle Never remove any labels from your vehicle If a label becomes difficult to read or comes off a replac...

Page 9: ...wner s manual for proper loading 3JJ 28446 A1 2 California only 3 WARNING This unit contains high pressure nitrogen gas Mishandling can cause explosion Read owner s manual for instructions Do not inci...

Page 10: ...LOCATION OF IMPORTANT LABELS 1 3 1 1 10D 9 15 book 3...

Page 11: ...7 8 9 1 Read owner s manual before servicing battery Electrolyte will damage metal parts or paint If electrolyte spills wash area with fresh water immediately Be sure to connect breather hose after in...

Page 12: ...ze motorcycles in traf fic is the predominating cause of automobile motorcycle accidents Many accidents have been caused by an automobile driver who did not see the motorcycle Making yourself conspicu...

Page 13: ...erwise they could catch on the control levers footrests or wheels and cause injury or an accident Always wear protective clothing that covers your legs ankles and feet The engine or exhaust sys tem be...

Page 14: ...table models only and check the condition and pres sure of your tires Never attach any large or heavy items to the handlebar front fork or front fender These items including such cargo as sleeping bag...

Page 15: ...operator from his or her normal riding position This improper position limits the free dom of movement of the opera tor and may limit control ability therefore such accessories are not recommended Us...

Page 16: ...e the location for the straps carefully so the straps will not rub against painted surfaces during transport The suspension should be com pressed somewhat by the tie downs if possible so that the moto...

Page 17: ...5 6 8 7 1 Fuel tank cap page 4 5 2 Fuel cock page 4 7 3 Helmet holder page 4 9 4 Luggage strap holder page 4 10 5 Drive chain slack adjusting plate page 7 26 6 Air filter element page 7 15 7 Starter...

Page 18: ...view 1 2 6 5 4 3 7 8 1 Carrier page 4 10 2 Battery page 7 31 3 Engine oil level check window page 7 12 4 Brake pedal page 4 5 5 Fuse page 7 33 6 Owner s tool kit page 7 2 7 Luggage strap holder page...

Page 19: ...2 3 4 5 6 7 8 1 Clutch lever page 4 4 2 Left handlebar switches page 4 3 3 Speedometer unit page 4 2 4 Main switch steering lock page 4 1 5 Indicator lights page 4 2 6 Right handlebar switches page 4...

Page 20: ...10661 OFF All electrical systems are off The key can be removed WARNING EWA10061 Never turn the key to OFF or LOCK while the vehicle is moving Otherwise the electrical systems will be switched off whi...

Page 21: ...is switched on EAU11630 Speedometer unit The speedometer unit is equipped with a speedometer an odometer and a tripmeter The speedometer shows riding speed The odometer shows the total distance trave...

Page 22: ...push the switch in after it has re turned to the center position EAU12500 Horn switch Press this switch to sound the horn EAU12660 Engine stop switch Set this switch to before starting the engine Set...

Page 23: ...is equipped with a clutch switch which is part of the igni tion circuit cut off system See page 4 11 EAU12871 Shift pedal The shift pedal is located on the left side of the motorcycle and is used in c...

Page 24: ...pull it off To install the fuel tank cap 1 Insert the fuel tank cap into the tank opening with the key inserted in the lock and then turn the cap 1 3 turn clockwise 2 Turn the key 1 3 turn clockwise a...

Page 25: ...ed surfaces or plastic parts ECA10071 4 Be sure to securely close the fuel tank cap WARNING EWA15151 Gasoline is poisonous and can cause injury or death Handle gaso line with care Never siphon gaso li...

Page 26: ...ge to the fuel system or vehicle performance problems EAU13561 Fuel cock The fuel cock supplies fuel from the tank to the carburetor while filtering it al so The fuel cock has three positions OFF With...

Page 27: ...choke knob Starting a cold engine requires a richer air fuel mixture which is supplied by the starter choke Move the knob in direction a to turn on the starter choke Move the knob in direction b to tu...

Page 28: ...EAU46021 Shock absorber assembly WARNING EWA10221 This shock absorber assembly con tains highly pressurized nitrogen gas Read and understand the fol lowing information before handling the shock absorb...

Page 29: ...ch is part of the ignition circuit cut off system which cuts the ignition in certain situations See the following section for an expla nation of the ignition circuit cut off sys tem WARNING EWA10241 T...

Page 30: ...ng when the trans mission is in gear and the side stand is up but the clutch lever is not pulled It prevents starting when the trans mission is in gear and the clutch le ver is pulled but the sidestan...

Page 31: ...he engine has stalled 10 Move the sidestand up 11 Keep the clutch lever pulled 12 Push the start switch Does the engine start The system is OK The motorcycle can be ridden The neutral switch may not b...

Page 32: ...ing this vehicle check the following points ITEM CHECKS PAGE Fuel Check fuel level in fuel tank Refuel if necessary Check fuel line for leakage 4 6 Engine oil Check oil level in engine If necessary ad...

Page 33: ...e sure that operation is smooth Correct if necessary 7 23 Brake pedal Make sure that operation is smooth Lubricate pedal pivoting point if necessary 7 29 Brake and clutch levers Make sure that operati...

Page 34: ...not ask a Yamaha dealer to check the elec trical circuit 4 Turn the starter choke on and completely close the throttle See page 4 8 5 Start the engine by pushing the start switch If the engine fails...

Page 35: ...ired when the engine is warm EAU16671 Shifting Shifting gears lets you control the amount of engine power available for starting off accelerating climbing hills etc The gear positions are shown in the...

Page 36: ...gear Make sure not to shift the transmission into the neutral posi tion 6 Open the throttle part way and gradually release the clutch lever 7 Follow the same procedure when shifting to the next higher...

Page 37: ...m 600 mi of operation the engine oil must be changed the oil filter element and the oil strainer cleaned If any engine trouble should occur during the engine break in period immedi ately have a Yamaha...

Page 38: ...Turn off the engine when performing maintenance unless otherwise specified A running engine has moving parts that can catch on body parts or clothing and electrical parts that can cause shocks or fir...

Page 39: ...tools provided in the owner s tool kit are intended to assist you in the performance of preventive maintenance and minor repairs How ever additional tools such as a torque wrench may be necessary to...

Page 40: ...1 month 4000 mi 6000 km or 6 months 7000 mi 11000km or 12 months 10000 mi 16000km or 18 months 13000 mi 21000km or 24 months 16000 mi 26000km or 30 months 1 Fuel line Check fuel hoses for cracks or d...

Page 41: ...alifornia only Check control system for dam age Replace if necessary No ITEM ROUTINE INITIAL ODOMETER READINGS 600 mi 1000 km or 1 month 4000 mi 6000 km or 6 months 7000 mi 11000km or 12 months 10000...

Page 42: ...y and breather hose for proper opera tion 3 Clutch Check operation Adjust or replace cable 4 Front brake Check operation fluid level and for fluid leakage Adjust brake lever free play and replace brak...

Page 43: ...ssemblies for looseness Moderately repack with lith ium soap based grease every 10000 mi 16000 km or 18 months Repack 13 Chassis fasteners Check all chassis fitting and fas teners Correct if necessary...

Page 44: ...l strainer Clean 24 Front and rear brake switches Check operation 25 Control and meter cables Apply Yamaha chain and cable lube or engine oil thoroughly 26 Throttle grip Check operation Check throttle...

Page 45: ...eas Hydraulic brake system When disassembling the master cylinder or caliper cylinder always replace the brake fluid Check the brake fluid level regularly and fill as required Replace the oil seals on...

Page 46: ...e re moved and installed EAU18810 Cowling A To remove the cowling Remove the screw and then pull the cowling off as shown To install the cowling Place the cowling in the original posi tion and then in...

Page 47: ...y to check Since heat and deposits will cause any spark plug to slowly erode the spark plug should be removed and checked in accordance with the periodic mainte nance and lubrication chart In addition...

Page 48: ...ith a wire thickness gauge and if nec essary adjust the gap to specifica tion To install the spark plug 1 Clean the surface of the spark plug gasket and its mating surface and then wipe off any grime...

Page 49: ...in an upright posi tion A slight tilt to the side can result in a false reading 2 Start the engine warm it up for several minutes and then turn it off 3 Wait a few minutes until the oil set tles and...

Page 50: ...g cleaned 4 Remove the oil filter element drain bolt to drain the oil from the oil filter element 5 Remove the oil filter element cover by removing the bolts 6 Remove the oil filter element and O ring...

Page 51: ...he engine and exhaust sys tem have cooled down NOTICE ECA11620 In order to prevent clutch slip page since the engine oil also lubricates the clutch do not mix any chemical additives Do not use oils wi...

Page 52: ...pply oil of the recommended type to the entire surface of the sponge material and then squeeze the ex cess oil out TIP The sponge material should be wet but not dripping 6 Pull the sponge material ove...

Page 53: ...t system 1 Remove the tailpipe by removing the screw and the gasket and then pulling it out of the muffler 2 Tap the tailpipe lightly and then use a wire brush to remove any carbon deposits from the s...

Page 54: ...profes sional knowledge and experience EAU44734 Checking the engine idling speed Check the engine idling speed and if necessary have it corrected by a Yamaha dealer EAU21384 Checking the throttle grip...

Page 55: ...roper tire pressure may cause se vere injury or death from loss of control The tire air pressure must be checked and adjusted on cold tires i e when the temperature of the tires equals the ambient tem...

Page 56: ...odel by Yamaha Motor Co Ltd WARNING EWA10562 It is dangerous to ride with a worn out tire When a tire tread begins to show crosswise lines have a Yamaha dealer replace the tire immediately The replace...

Page 57: ...istics and a short ened tire life EAU22043 Adjusting the clutch lever free play The clutch lever free play should mea sure 10 0 15 0 mm 0 39 0 59 in as shown Periodically check the clutch le ver free...

Page 58: ...w in direction a To decrease the brake lever free play turn the adjusting screw in direc tion b 4 Tighten the locknut and then slide the rubber cover back to its original position WARNING EWA10630 Aft...

Page 59: ...a To lower the brake pedal turn the ad justing bolt in direction b 3 Tighten the locknut WARNING EWA11231 After adjusting the brake pedal height the brake pedal free play must be adjusted Brake pedal...

Page 60: ...tion is not smooth have a Yamaha dealer check the vehicle EAU22273 Brake light switches The brake light which is activated by the brake pedal and brake lever should come on just before braking takes...

Page 61: ...ed with a wear indicator which allows you to check the brake shoe wear without having to dis assemble the brake To check the brake shoe wear check the position of the wear indicator while applying the...

Page 62: ...ys clean up spilled fluid immediately As the brake pads wear it is normal for the brake fluid level to gradually go down A low brake fluid level may indi cate worn brake pads and or brake sys tem leak...

Page 63: ...dealer before ad justing the drive chain slack 1 Loosen the brake pedal free play adjusting nut 2 Loosen the axle nut 3 To tighten the drive chain turn the drive chain slack adjusting plate on each si...

Page 64: ...fter washing the motorcycle riding in the rain or riding in wet areas 1 Remove all dirt and mud from the drive chain with a brush or cloth TIP For a thorough cleaning have a Yamaha dealer remove the d...

Page 65: ...nstalled Even though the cover is installed correctly it does not completely protect the cable from water entry Therefore use care not to pour water directly onto the cover or cable when washing the v...

Page 66: ...ld be lubricated if necessary WARNING EWA10731 If the sidestand does not move up and down smoothly have a Yamaha dealer check or repair it Otherwise the sidestand could contact the ground and distract...

Page 67: ...imes to check if the front fork compresses and rebounds smoothly NOTICE ECA10590 If any damage is found or the front fork does not operate smoothly have a Yamaha dealer check or re pair it EAU23283 Ch...

Page 68: ...ns sul furic acid which causes severe burns Avoid any contact with skin eyes or clothing and al ways shield your eyes when working near batteries In case of contact administer the fol lowing FIRST AID...

Page 69: ...that are harmful to the battery ECA10611 7 Place the battery in the battery compartment and then hook the battery band onto the holder 8 Connect the breather hose to the battery and make sure that it...

Page 70: ...ositive lead before connecting the negative lead ECA16840 4 After installation make sure that the battery leads are properly con nected to the battery terminals and that the breather hose is properly...

Page 71: ...ss part of the headlight bulb to keep it free from oil otherwise the transpar ency of the glass the luminosity of the bulb and the bulb life will be adversely affected Thor oughly clean off any dirt a...

Page 72: ...d then connect the coupler 7 Place the headlight unit in the orig inal position and then install the bolts 8 Install the cowling 9 Have a Yamaha dealer adjust the headlight beam if necessary EAU24133...

Page 73: ...cing a turn signal light bulb 1 Remove the turn signal light lens by removing the screw 2 Remove the burnt out bulb by pushing it in and turning it counter clockwise 3 Insert a new bulb into the socke...

Page 74: ...ilable by placing a jack un der the frame in front of the rear wheel 2 Raise the front wheel off the ground by using a motorcycle stand To service the rear wheel Raise the rear wheel off the ground by...

Page 75: ...o the left side of the wheel hub so that the projections mesh with the slots 3 Lift the wheel up between the fork legs TIP Make sure that there is enough space between the brake pads before insert ing...

Page 76: ...ve chain from the rear sprocket TIP The drive chain does not need to be disassembled in order to remove and install the wheel 8 Remove the spacers the drive chain slack adjusting plates and the wheel...

Page 77: ...operation Any problem in the fuel compression or ignition systems for example can cause poor starting and loss of power The following troubleshooting chart represents a quick and easy procedure for ch...

Page 78: ...PERIODIC MAINTENANCE AND ADJUSTMENT 7 41 1 2 3 4 5 6 7 8 9 heaters or furnaces Gasoline or gasoline vapors can ignite or ex plode causing severe injury or property damage 10D 9 15 book 41...

Page 79: ...a Yamaha dealer check the vehicle Remove the spark plug and check the electrodes 3 Ignition Wet Dry Wipe off with a dry cloth and correct the spark plug gap or replace the spark plug Have a Yamaha de...

Page 80: ...ning 1 Cover the muffler outlet with a plastic bag after the engine has cooled down 2 Make sure that all caps and covers as well as all electrical couplers and connectors including the spark plug cap...

Page 81: ...clean sponge and then rinse thoroughly with clean water Use a toothbrush or bottlebrush for hard to reach areas Stubborn dirt and insects will come off more easily if the area is covered with a wet c...

Page 82: ...reat them with a suitable care product Avoid using abrasive polishing compounds as they will wear away the paint TIP Consult a Yamaha dealer for ad vice on what products to use Washing rainy weather o...

Page 83: ...cylinder wall with oil WARNING To prevent dam age or injury from sparking make sure to ground the spark plug electrodes while turning the engine over EWA10951 e Remove the spark plug cap from the spar...

Page 84: ...SO stan dard MA Engine oil quantity Without oil filter element removal 1 00 L 1 06 US qt 0 88 Imp qt With oil filter element removal 1 10 L 1 16 US qt 0 97 Imp qt Air filter Air filter element Wet ele...

Page 85: ...179 kg 198 395 lb CAL 90 180 kg 198 397 lb U49 Front 150 kPa 1 50 kgf cm2 22 psi Rear 175 kPa 1 75 kgf cm2 25 psi Front wheel Wheel type Spoke wheel Rim size 18x2 50 Rear wheel Wheel type Spoke wheel...

Page 86: ...brake light 12 V 8 0 W 27 0 W 1 Front turn signal position light 12 V 27 W 8 0 W 2 Rear turn signal light 12 V 27 0 W 2 Meter lighting 12 V 3 4 W 1 Neutral indicator light 12 V 3 4 W 1 High beam indi...

Page 87: ...FORMATION EAU26390 Key identification number The key identification number is stamped into the key Record this num ber in the space provided and use it for reference when ordering a new key EAU26400 V...

Page 88: ...needed when ordering spare parts from a Yamaha dealer EAU48061 Vehicle Emission Control Informa tion label The Vehicle Emission Control Informa tion label is affixed at the location in the illustratio...

Page 89: ...ay open an investigation and if it finds that a safety defect exists in a group of vehicles it may order a recall and remedy campaign However NHTSA cannot become involved in individual problems betwee...

Page 90: ...rporated into any new ve hicle for the purpose of noise control prior to its sale or delivery to the ultimate purchaser or while it is in use or 2 the use of the vehicle after such device or element o...

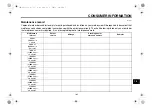
Page 91: ...w is printed only as a reminder that maintenance work is required It is not acceptable proof of maintenance work Maintenance interval Date of service Mileage Servicing dealer name and address Remarks...

Page 92: ...ER INFORMATION 10 6 1 2 3 4 5 6 7 8 9 10 28000 mi 46000 km or 54 months 31000 mi 51000 km or 60 months Maintenance interval Date of service Mileage Servicing dealer name and address Remarks 10D 9 15 b...

Page 93: ...spected and registered for warranty by an authorized Yamaha motorcycle dealer In order for this warranty to remain in effect this inspection and registration must take place within ten 10 days after t...

Page 94: ...nd upon your request at any later date Each Yamaha motorcycle dealer is held responsible for his setup service and warranty repair work Is the warranty transferable to second owners Yes The remainder...

Page 95: ...o pay anything for covered repairs There s no deductible to pay and repairs aren t pro rated You don t have any out of pocket expenses for covered repairs In addition Travel and Recreation Interruptio...

Page 96: ...ll have strong factory backed protection even after your Yamaha Limited Warranty expires A special note If visiting your dealer isn t convenient contact Yamaha with your Primary ID number your frame n...

Page 97: ...placing 7 34 Helmet holder 4 9 High beam indicator light 4 2 Horn switch 4 3 I Identification numbers 10 1 Ignition circuit cut off system 4 11 Indicator lights 4 2 K Key identification number 10 1 L...

Page 98: ...switch 4 3 V Valve clearance 7 18 Vehicle Emission Control Information label 10 2 Vehicle identification number 10 1 W Warranty extended 10 9 Warranty limited 10 7 Wheel bearings checking 7 31 Wheel...

Page 99: ...idence knowing your Genuine Yamaha Accessories will fit right and perform right right out of the box Yamalube Take care of your Yamaha with legendary Yamalube oils lubricants and care products They re...

Page 100: ...PRINTED ON RECYCLED PAPER YAMAHA MOTOR CO LTD PRINTED IN JAPAN 2011 03 0 1 1 E...

Reviews: