background image

4

SOFTWARE for MAGICSTOMP     Installation Guide

Installing the driver on a Windows 2000 
system

1

Start the computer and use the “Administrator” account to log into Windows 
2000.

2

Select [My Computer | Control Panel | System | Hardware | Driver Signing | 
File Signature Verification], and check the radio button to the left of “Ignore -
Install all files, regardless of file signature” and click [OK].

3

Insert the included CD-ROM into the CD-ROM drive.

4

Disconnect the MAGICSTOMP’s power adaptor then use the supplied USB 
cable to connect the USB jack on your computer (or USB hub), to the USB 
jack on the MAGICSTOMP. Next, connect the MAGICSTOMP’s power 
adaptor (switches the MAGICSTOMP on), and the “Found New Hardware 
Wizard” automatically appears on the computer’s display. Click [Next].

5

Check the radio button to the left of “Search for a suitable driver for my 
device. (Recommended).” Click [Next].
The window that appears enables you to select a location in which to install 
the driver.

6

Check the “CD-ROM drives” box and uncheck all other items. Click [Next].

n

The system may ask you to insert a Windows CD-ROM while it 
checks for the driver. Specify the “USBdrv2k_” directory of the CD-
ROM drive (such as D:\USBdrv2k_\) and continue the installation.

7

When the installation is complete, the system displays “Completing the 
Found New Hardware Wizard.” Click [Finish].

n

Some computers may take about ten seconds or more to show this 
screen after the installation is complete. 

8

Restart the computer. The driver has been installed.

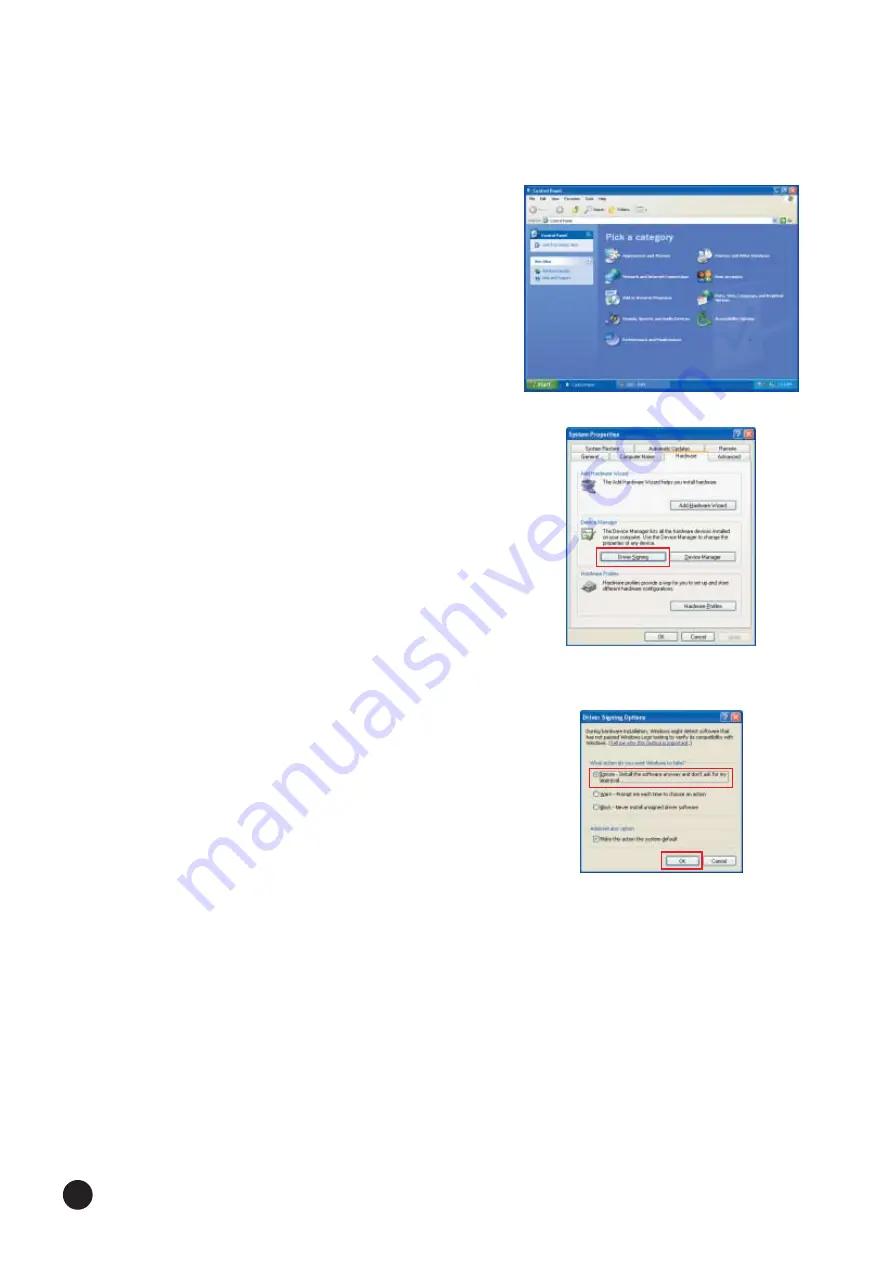
Installing the driver on a Windows XP 
system

1

Start the computer.

2

Select [Start] 

 [Control Panel]. If the control panel appears as shown 

below, click “Switch to Classic View” in the upper left of the window.
All control panels and icons will be displayed.

3

Select [Start] 

 [Hardware] 

 [Driver Signing]. 

4

The “Driver Signing” dialog box appears.
Select the radio button located to the left of “Ignore - Install the software 
anyway and don’t ask for my approval”.

Click the [OK] button to close System Properties, and then click “X” in the 
upper right of the window to close the Control Panel.

5

Insert the included CD-ROM into the CD-ROM drive.

6

Disconnect the MAGICSTOMP’s power adaptor then use the supplied USB 
cable to connect the USB jack on your computer (or USB hub), to the USB 
jack on the MAGICSTOMP. Next, connect the MAGICSTOMP’s power 
adaptor (switches the MAGICSTOMP on), and the “Found New Hardware 
Wizard” automatically appears on the computer’s display. 

7

Check the radio button to the left of “Search for a suitable driver for my 
device. (Recommended).” Click [Next]. The system starts the installation.

8

When the installation is complete, the system displays “Completing the 
Found New Hardware Wizard.” Click [Finish].

n

Some computers may take about ten seconds or more to show this 
screen after the installation is complete.

9

Restart the computer. The driver has been installed.

Summary of Contents for Sound Editor ver. 2.10

Page 1: ... and mark in this Owner s Manual are the trademarks or registered trademarks of Opcode Systems Inc The company names and product names in this Installation Guide are the trademarks or registered trademarks of their respective companies Future upgrades of application and system software and any changes in specifications and functions will be announced separately 2004 Yamaha Corporation All rights r...

Page 2: ...the computer 2 Insert the included CD ROM into the CD ROM drive 3 Disconnect the MAGICSTOMP s power adaptor then use the supplied USB cable to connect the USB jack on your computer or USB hub to the USB jack on the MAGICSTOMP Next connect the MAGICSTOMP s power adaptor switches the MAGICSTOMP on and the Add New Hardware Wizard automatically appears on the computer s display n For Windows Me users ...

Page 3: ...ive such as D USBdrv_ and continue the installation n When using the Windows 98 specify the USBdrv_ directory of the CD ROM drive such as D USBdrv_ and continue the installation 7 When the system detects the driver on the CD ROM and is ready for installation it displays the following screen Make sure that the YAMAHA USB MIDI Driver is listed and click Next The system starts the installation 8 When...

Page 4: ...Finish n Some computers may take about ten seconds or more to show this screen after the installation is complete 8 Restart the computer The driver has been installed Installing the driver on a Windows XP system 1 Start the computer 2 Select Start Control Panel If the control panel appears as shown below click Switch to Classic View in the upper left of the window All control panels and icons will...

Page 5: ...d follow the steps below to start the Sound Editor for MAGICSTOMP application and set the necessary settings 1 From the Start menu select Program YAMAHA SGP Tools Sound Editor for MAGICSTOMP Sound Editor for MAGICSTOMP 2 The Sound Editor for MAGICSTOMP starts After the MAGICSTOMP Setup tool bar shown below appears click on the MAGICSTOMP Setup button 3 Clicking the MAGICSTOMP Setup buttons opens t...

Page 6: ... Installation Guide Now that setup is complete you can use the Sound Editor for MAGICSTOMP These settings are saved when you quit the Sound Editor for MAGICSTOMP so the next time you start the application setup is not required ...

Page 7: ...rnational folder OMS folder copy the OMS Setup for Yamaha folder to the OMS Applications folder drag and drop it to the folder In the OMS Setup for Yamaha folder you will find the OMS setup file for the MAGICSTOMP labeled USB MAGICSTOMP Use this setup file to setup OMS page9 USB MIDI Driver To operate the MAGICSTOMP from your computer via USB you ll need to install the appropriate driver software ...

Page 8: ...ou to restart your computer Click Restart The computer automatically restarts 8 After you restart your computer make sure that the following files are installed in the locations described below System Folder Control Panels YAMAHA USB MIDI Patch System Folder Extensions USB YAMAHA MIDI Driver System Folder OMS Folder YAMAHA USB MIDI OMS Driver Installing the Sound Editor for MAGICSTOMP 1 Start the ...

Page 9: ...our Macintosh Mac OS version MIDI data cannot be transmitted received even if the setup becomes available In this situation connect your Macintosh to the MAGICSTOMP via the USB cable and follow the procedure below to re create the setup file 1 Start OMS Setup and select New Setup from the File menu 2 The OMS Driver Search dialog appears Remove the check from the Modem and Printer check boxes and c...

Page 10: ...Editor for MAGICSTOMP In the MAGICSTOMP s case the default settings do not need to be changed For Windows select START Settings Control Panel MIDI USB Driver to open the driver setup window For the Mac select Apple menu Control Panels YAMAHA USB MIDI Patch to open the setup window The default settings are as follows Port number MIDI OUT terminal Thru Port number MIDI IN terminal Track Port number ...

Page 11: ...CSTOMP from your computer via USB the MAGICSTOMP does not operate correctly or no sound is heard Did you install the driver Windows page2 Macintosh page7 Is the USB cable connected correctly MAGICSTOMP s Owner s Manual Is the volume turned up on the MAGICSTOMP playback equipment or application Is the proper port selected in the Sound Editor for MAGICSTOMP Is the latest driver installed Is the effe...

Reviews: