background image

31

En

glish

SC2 Owner’s Manual

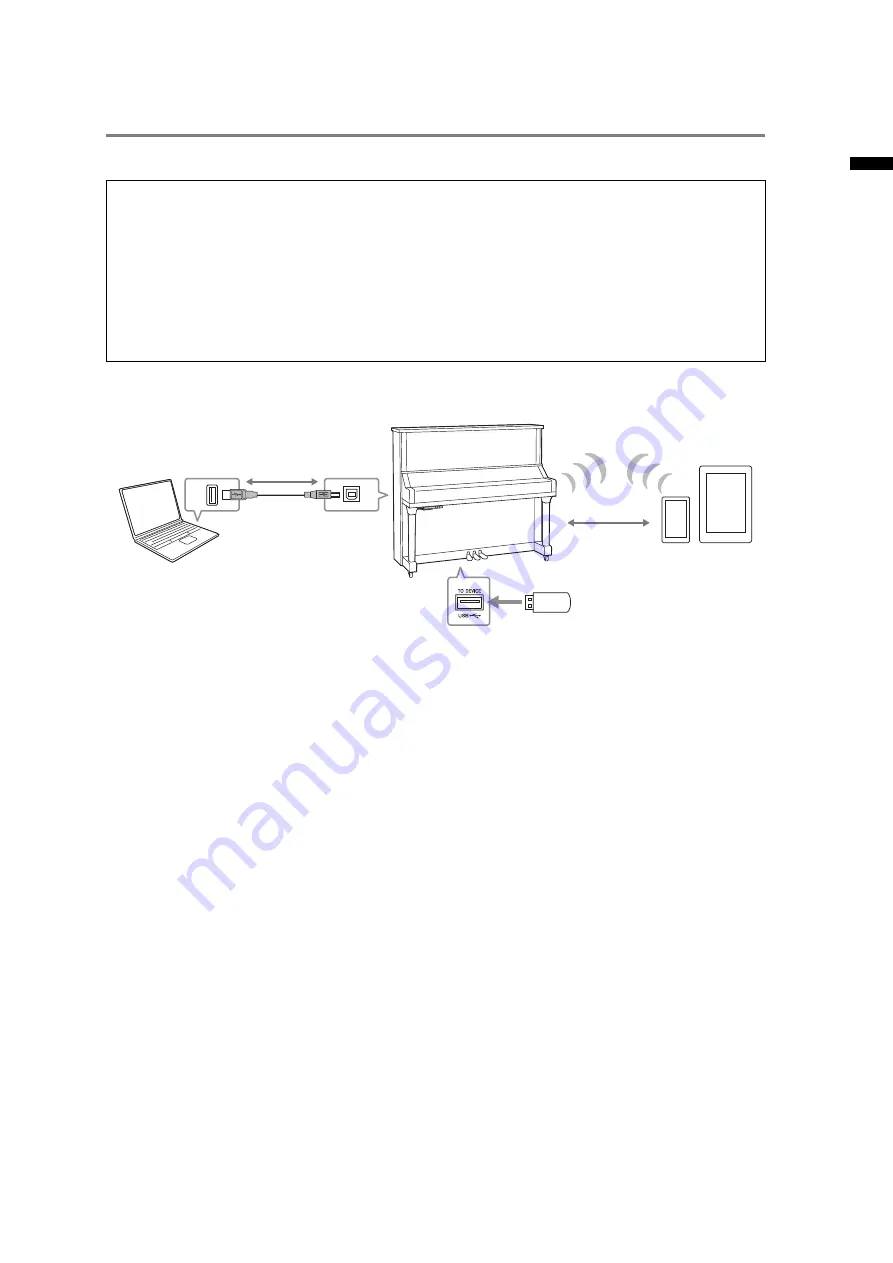
Connecting to a computer/smart device

Connecting this instrument to a computer or a smart device expands the possibility.

Connection example 

For details on connecting to a computer or transferring the MIDI Song to the computer, refer to the
“Computer-related Operations” on the website (page 10).

NOTICE

• Use an AB type USB cable of less than 3 meters. USB 3.0 cables cannot be used.

• If you are using a DAW (digital audio workstation) application with this instrument, set the Audio Loop Back 

(page 39) to off. Otherwise, a loud sound may occur, depending on the settings of the computer or the application 
software.

• Do not place your computer or smart device in an unstable position. Doing so may cause the device to fall and 

result in damage.

NOTE

• When using a USB cable to connect the instrument to your computer or smart device, make the connection directly without

passing through a USB hub.

• For information on setting up your sequence software, refer to the owner’s manual of the relevant software.

• When transmitting or receiving audio signals by using the computer operated by Windows, the Yamaha Steinberg USB

Driver should be installed to the computer. For details, refer to the “Computer-related Operations” on the website.

• Before using the USB [TO DEVICE] terminal, be sure to read “Precautions when using the USB [TO DEVICE] terminal” on

page 25.

• When you use the instrument along with an application on your smart device, we recommend that you set your device to

not emit radio waves (for example, by setting “Airplane Mode” to on).

• The instrument will begin transmission a short time after the computer or smart device is connected.

What you can do by connecting to a computer/smart device:

• Transmitting and receiving audio data (USB Audio Interface function, page 32)
• Using a smart device app (page 32)
• Transmitting and receiving MIDI data
• Saving the Song recorded on this instrument to the computer

NOTE

For details on transmitting/receiving MIDI data or saving the Song to a computer, refer to the “Computer-related 
Operations” on the website.

USB [TO DEVICE] 

terminal

Computer

USB cable

USB terminal

USB [TO HOST] 

terminal

USB wireless LAN adaptor

Wireless LAN

Smart device

Summary of Contents for Silent Piano SC2

Page 1: ...Avant d utiliser cet instrument lisez attentivement la section PRÉCAUTIONS D USAGE aux pages 7 8 Antes de utilizar el instrumento lea la sección PRECAUCIONES en las páginas 7 8 Achten Sie darauf vor Einsatz dieses Instruments die VORSICHTSMASSNAHMEN auf Seiten 7 8 durchzulesen Prima di utilizzare lo strumento assicurarsi di leggere la sezione PRECAUZIONI alle pagine 7 8 훋뾶쬂 툲 뾶 흖 ˊ 훎 툲 삳 푳푢 ...

Page 2: ...ffect works when the unit is operating as designed are not covered by the manufacturer s warranty and are therefore the owners responsibility Please study this manual carefully and consult your dealer before requesting service ENVIRONMENTAL ISSUES Yamaha strives to produce products that are both user safe and environmentally friendly We sincerely believe that our products and the production method...

Page 3: ...mpliance with these require ments provides a reasonable level of assurance that your use of this product in a residential environment will not result in harmful interference with other electronic devices This equipment generates uses radio frequencies and if not installed and used according to the instructions found in the users manual may cause interference harmful to the opera tion of other elec...

Page 4: ...los requisitos de alimentación etc se encuentran en la placa de denominación que está en la parte inferior de la unidad de control El número de serie se encuentra detrás de la unidad de control Debe anotar este número de serie en el espacio que se proporciona a continuación y conservar este manual como un registro permanente de su compra para facilitar la identificación en caso de robo Nº de model...

Page 5: ...corded to internal memory 23 Recording your performance to a USB flash drive Audio recording 24 Playing back an Audio Song recorded to the USB flash drive 24 Connecting USB devices 25 Playing back the Voice Demo Songs 26 Playing back the Preset Songs 27 Operations during playback 28 Adjusting the playback tempo 29 Chapter 4 Connecting to Other Devices 30 Connecting to external audio devices AUX IN...

Page 6: ...ble specified by the manufacturer or sold with the apparatus When a cart is used use caution when moving the cart apparatus combination to avoid injury from tip over 13 Unplug this apparatus during lightning storms or when unused for long periods of time 14 Refer all servicing to qualified service personnel Servicing is required when the apparatus has been damaged in any way such as power supply c...

Page 7: ... adaptor can result in damage to the instrument or overheating Check the electric plug periodically and remove any dirt or dust which may have accumulated on it Unplug the power cord from the AC outlet when cleaning the instrument This instrument contains no user serviceable parts Do not open the instrument or attempt to disassemble or modify the internal components in any way If it should appear ...

Page 8: ...s Before turning the power on or off for all components set all volume levels to minimum Be sure to set the volumes of all components at their minimum levels and gradually raise the volume controls while playing the instrument to set the desired listening level Do not insert a finger or hand in any gaps on the fallboard or instrument Also take care that the fallboard does not pinch your finger Nev...

Page 9: ...o this instrument page 22 are retained when the power is turned off However the saved data may be lost due to some failure an operation mistake etc Save your important data onto an external device such as a computer page 31 To protect against data loss through USB flash drive damage we recommend that you save your important data onto spare USB flash drive or an external device such as a computer a...

Page 10: ...Piano which can be used when the power is turned on For information on handling as an acoustic piano refer to the separate manual for the piano Online Materials downloadable from the website iPhone iPad Connection Manual only in English French German and Spanish Explains how to connect the instrument to smart devices such as an iPhone iPad etc Computer related Operations Includes instructions on c...

Page 11: ...strument also features advanced technologies such as Binaural Sampling Listening with headphones to a piano Voice enhanced through these methods gives the impression of being thoroughly immersed in the sound as if it was actually emanating from the piano Altogether it delivers real sound faithful to that of an actual acoustic piano such as the quick attack and the graceful resonance of a sustained...

Page 12: ...the degree to which pressing the damper pedal applies the half pedal effect page 35 when using the Silent Piano function Silencing pedal upright piano Activates the Silent Piano function by pressing and sliding to the left Sostenuto pedal grand piano Sustains the notes that are being played at the time you press and hold the pedal even after you release the keys letting you play additional non sus...

Page 13: ...ICE VALUE control Rotating this allows you to select desired Voices or adjust the setting values Pressing this control resets the Voice or setting values VOLUME control page 16 For adjusting the volume of the entire sound output from the PHONES jack DC IN 16V jack page 14 Upright piano For connecting the power cord This is connected to the DC IN jack on the rear of the piano when the instrument is...

Page 14: ...al storms make sure you unplug the AC power plug from the wall AC outlet 1 Connect the plugs of the AC adaptor in the order shown in the illustration Make sure to loop the power cord through the metal hook attached to the rear for upright pianos or the bottom for grand pianos of the piano 1 2 1 1 1 3 1 4 1 2 1 4 1 1 1 3 DC IN jack Hook is located on the rear of the piano AC adaptor Power cord AC p...

Page 15: ...r the hanger may be damaged Auto Power Off function To prevent unnecessary power consumption this unit features an Auto Power Off function that automatically turns the power off if the instrument is not operated for 30 minutes NOTICE When the instrument is communicating with other devices the power will not be turned off automatically Make sure to turn off the power by pressing the P Standby On sw...

Page 16: ...even when the Silent Piano function is active 1 Plug the headphones into the PHONES jack page 15 2 Rotate the VOLUME control to the far left position to set the volume to minimum 3 Press the P Standby On switch to turn the power on 4 For models equipped with a sostenuto pedal Pull the silencing lever towards you until you hear a click and feel the mechanism catch For models not equipped with a sos...

Page 17: ...hone use Listening this through headphones gives the impression of being immersed in the sound as if it was actually emanating from the piano This is available when the Binaural setting is turned on page 37 CFX Grand Yamaha s CFX concert grand piano sound with a wide dynamic range for maximum expressive control Suitable for playing in any music genre and style This is available when the Binaural s...

Page 18: ...he impression of being immersed in the sound as if it was actually emanating from the piano When the CFX Grand Voice is selected binaural sampled sound is produced Stereophonic Optimizer Piano Voices other than CFX Grand Stereophonic Optimizer is an effect which reproduces the natural sound distance like with the sound of Binaural Sampling even though you are listening to it on headphones When one...

Page 19: ...efault setting 0 no 1st beat accent NOTE One beat is equal to a quarter note on this unit When playing a song written in non quarter note units change the setting accordingly for example when playing a song in 3 2 time set Beat to 6 The metronome beat is automatically reset to the default value when the power is turned off Voice confirmation of current tempo value in English While holding down the...

Page 20: ...e relevant C0 A0 keys one by one in order For example to specify 95 press the A0 0 G 0 9 and E0 5 keys in order A numeric value is read out in English when a relevant key is pressed To increase or decrease the value by 1 or 10 While holding down the Metronome button press one of the keys shown below To reset the value to the default While holding down the Metronome button press the C1 key NOTE Whe...

Page 21: ...UE control while holding down the Metronome button Adjusting the metronome volume While holding down the Metronome button press one of the C4 G5 keys to set the metronome volume The higher the key the higher the volume level Default setting 15 D5 Min Max C4 1 G5 20 Highest key C7 D5 15 ...

Page 22: ...cording your performance to internal memory MIDI recording One Song can be recorded in the MIDI format to the internal memory of this unit The recorded MIDI Song is maintained in the internal memory even when the power is turned off NOTICE Note that recording to internal memory will overwrite any previously recorded data To prevent your important data from being overwritten and erased save the nec...

Page 23: ...l memory capacity has become full and all or the part of the data will not be saved 4 Press the R J Play Stop button or the Rec button to stop recording The R J Play Stop Metronome and Func lamps light up in orange in sequence and the performance data will be saved All lamps light in white when saving of the data is completed 1 Press the R J Play Stop button to start playback The R J Play Stop but...

Page 24: ... in the file name increases each time you record and when it reaches to USERAUDIO99 WAV the next recording overwrites USERAUDIO99 WAV To prevent your important data from being overwritten and erased copy the necessary data to a computer Even when vacant numbers file name exist in the USB flash drive by changing the file names or deleting files on a computer the recorded data is always named accord...

Page 25: ... the proper direction NOTICE Avoid connecting or disconnecting the USB device during playback recording or when accessing the USB device Failure to observe this may result in freezing of the operation of the instrument or corruption of the USB device and the data When connecting then disconnecting the USB device and vice versa make sure to wait a few seconds between the two operations NOTE If you ...

Page 26: ... Liszt R Schumann C 0 2 Bösendorfer Imperial Mädchens Wunsch 6 Chants polonaise S 480 R 145 F Liszt F F Chopin D0 3 Upright Piano Italienisches Konzert BWV 971 1st mov J S Bach D 0 4 Stage E Piano Original E0 5 DX E Piano Original F0 6 Vintage E Piano Original F 0 7 Harpsichord 8 Concerto a cembalo obbligato 2 violini viola e continuo No 7 BWV 1058 J S Bach G0 8 Celesta Danse de la Fée Dragée P I ...

Page 27: ...from the first again Playback in random order F 6 Continuously plays back all Songs in random order When all 50 Songs are played back the Random Playback starts again 1 While holding down the R J Play Stop button press one of the C2 C 6 keys to select the desired preset Song Playback of the selected preset Song starts For details on the key assignments of the preset Songs refer to the Song List pa...

Page 28: ...ng down the R J Play Stop button rotate the VOICE VALUE control Rotate the control to the left to rewind rotate it to the right to fast forward MIDI Songs and preset Songs are moved one measure back or forward while Audio Songs are moved one second NOTE Rewind and fast forward operations are not available for Demo Songs VOICE VALUE control R J Play Stop button During rewinding fast forwarding Flas...

Page 29: ...ring the Song to 120 changing the starting tempo to 110 10 faster will result in a midway tempo of 132 10 faster Audio Songs The playback speed of an Audio Song in the USB flash drive can be adjusted by stretching or compressing it Compared to an original speed of 100 it can be adjusted over the range of 75 125 During playback while holding down the Metronome button rotate the VOICE VALUE control ...

Page 30: ...eceived from the connected devices NOTE Use audio cables and adaptor plugs having no zero resistance Example of using the AUX IN jack You can use the VOLUME control on this unit to simultaneously adjust the volume of its electronic sound and the sound received through its AUX IN jack To set a proper balance of the levels adjust the output volume on the connected device NOTE By default this instrum...

Page 31: ...anual of the relevant software When transmitting or receiving audio signals by using the computer operated by Windows the Yamaha Steinberg USB Driver should be installed to the computer For details refer to the Computer related Operations on the website Before using the USB TO DEVICE terminal be sure to read Precautions when using the USB TO DEVICE terminal on page 25 When you use the instrument a...

Page 32: ...ds refer to the iPhone iPad Connection Manual on the website Connection with the USB wireless LAN adaptor UD WL01 UD WL01 sold separately may not be available depending on your area There are two types of connections with the USB wireless LAN adaptor UD WL01 described below Connecting by the Access Point mode The Access Point mode allows you to directly connect the USB wireless LAN adaptor and a s...

Page 33: ... button In this section the example operation steps below apply to all relevant functions Example This means While holding down the Func button press the A 1 or A 1 key Function Page Operation Sound On Off page 34 Keyboard Touch Sensitivity page 34 Master Tune page 34 Transpose page 35 Half Pedal Point page 35 Sound Reverb Type page 36 Reverb Depth page 36 Brilliance page 37 Binaural On Off page 3...

Page 34: ...me with moderate playing strength Medium Standard Touch Sensitivity Medium Hard Requires moderately strong playing for high volume Hard Requires strong playing to produce high volume Default setting Medium Master Tune Fine tunes the pitch of the entire instrument This lets you accurately match the keyboard pitch to that of other instruments or music on a portable music player A 1 Lowest key Off A ...

Page 35: ... recorded Songs cannot be transposed Your keyboard performance data will be transmitted with the transposed note numbers while MIDI note numbers received from an external MIDI device or computer will not be affected by the Transpose setting Half Pedal Point You can sets the degree to which pressing the damper pedal applies the half pedal effect The larger the value the wider the half pedal range L...

Page 36: ...sired Setting range 1 20 NOTE Reverb Depth is reset to the default value automatically when the power is turned off Reverb Type Description Default Setting Resets the setting to the default Recital Hall Simulates clear reverberation in a mid sized hall suitable for piano recital Concert Hall Simulates brilliant reverberation in a large hall for public orchestra performances Chamber Simulates the e...

Page 37: ...f you want to play the Audio Song recorded on this instrument through speakers make sure to turn these functions off before using Audio Recording VRM Virtual Resonance Modeling technology On an actual acoustic piano if you press the damper pedal and play a key not only does the string of the pressed key vibrate it also causes other strings and the soundboard to vibrate with each influencing the re...

Page 38: ...ound The Local Control Off setting is useful when you wish to play only an external sound source while playing the keys on this instrument Default setting On Auto Power Off Turns the Auto Power Off function page 15 on off If you do not want the power to be turned off automatically set this function to off Default setting On AUX IN Noise Gate The AUX IN Noise Gate function conveniently cuts unwante...

Page 39: ...only the sound played on the instrument to a computer or smart device set this to Off Default setting On NOTICE If you are using a DAW digital audio workstation application with this instrument set the Audio Loop Back function to off Otherwise a loud sound may occur depending on the settings of the computer or the application software NOTE The playback sound of an Audio Song on this instrument is ...

Page 40: ...ff page 39 Initializing the instrument While holding down the C7 key turn on the power by pressing the P Standby On switch This operation will initialize the Backup data The MIDI Song recorded to the internal memory will not be erased The R J Play Stop lamp flashes three times and then all lamps will light as the data is cleared NOTICE While the R J Play Stop lamp flashing i e data is being initia...

Page 41: ...ng sound from the piano body when using it in Silent Piano mode This is not a fault This is the sound of the acoustic piano s keystroke When I play a rapid series of notes in Silent Piano mode a loud sound is emitted that is not part of the performance This is not a fault The structure of the Silent Piano causes this to occur in some cases No Reverb effect is applied to the sound The Reverb depth ...

Page 42: ...pes Reverb Yes Brilliance Yes Stereophonic Optimizer Yes Songs MIDI Preset Number of Preset Songs 10 Voice Demo Songs 50 Classics Recording Number of Songs 1 Data Capacity approx 500 KB Format Recording SMF Format 0 Recording Playback Audio Recording Time max 80 minutes Song Format Playback WAV 44 1 kHz 16 bit stereo Recording WAV 44 1 kHz 16 bit stereo Functions Overall Controls Metronome Yes Tem...

Page 43: ...ude Wohltemperierte Klavier I No 1 J S Bach 22 A3 Menuett G dur BWV Anh 114 J S Bach 23 A 3 Piano Sonate No 15 K 545 1st mov W A Mozart 24 B3 Turkish March W A Mozart 25 C4 Piano Sonate op 13 Pathétique 2nd mov L v Beethoven 26 C 4 Für Elise L v Beethoven 27 D4 Piano Sonate op 27 2 Mondschein 1st mov L v Beethoven 28 D 4 Impromptu op 90 2 F P Schubert 29 E4 Frühlingslied op 62 6 J L F Mendelssohn ...

Page 44: ...ᅊ ᅊ ᅊ ᅊ ᅊ ᅊ ᅊ ᅊ ᅊ Other Functions 21 23 26 28 31 33 35 38 40 43 45 47 19 16 14 11 9 7 4 2 1 3 5 6 8 10 9 7 4 2 1 3 5 6 8 10 9 10 1 7 4 2 1 3 5 6 4 2 0 3 5 6 8 0 10 1 12 13 15 17 18 20 19 16 14 11 9 7 4 2 1 3 5 6 8 10 12 13 15 17 3 6 1 2 4 6 5 3 1 1 1 0 2 4 3 1 2 1 0 2 4 5 18 20 22 24 25 27 29 30 32 34 36 37 39 41 42 44 46 48 49 50 C0 C1 C2 C3 C4 C5 C6 C7 Default Continuous Playback Random Playback...

Page 45: ...nection Manual 10 L Local Control MIDI 38 M Master Tune 34 Metronome 19 MIDI recording 22 MIDI Song 23 N Noise Gate AUX IN 38 O Operation sound 34 P Pedal 12 Playback 23 24 26 27 Power 14 Preset Song 27 Q Quick Operation Guide 44 R Recording 22 24 Reverb 36 Rewind 28 S Silent Piano function 16 Smart device 31 Smart Pianist 11 Song 22 23 24 Song List 43 Stereophonic Optimizer 18 T Tempo metronome 2...

Page 46: ...46 SC2 Owner s Manual MEMO ...

Page 47: ...Manual Development Group 2018 Yamaha Corporation Published 04 2018 MW A0 YJ844A0 10 1 Naka ku Hamamatsu 430 8650 JAPAN ...

Reviews: