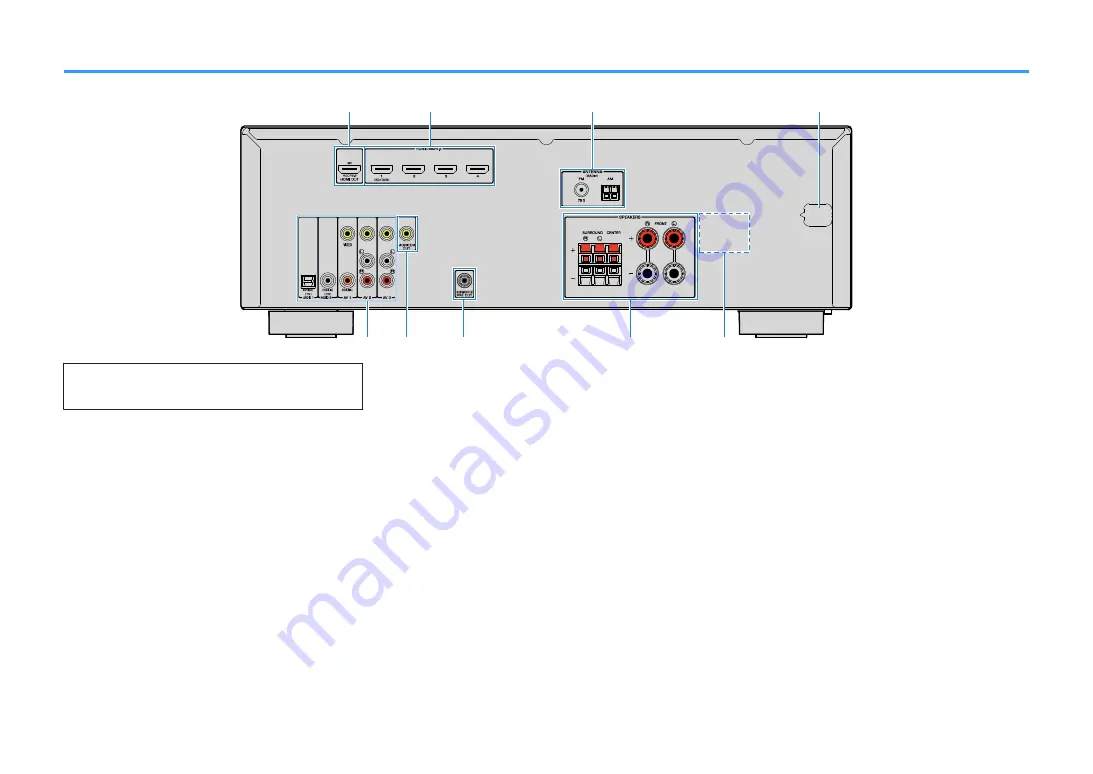
background image

Rear panel


8

9

5

7

2

1

3

6

4

▪ The area around the video/audio output jacks is marked in white

on the actual product to prevent improper connections.


1

HDMI OUT jack

For connecting to an HDMI-compatible TV and outputting
video/audio signals (p.18). When using ARC, TV audio

signal can also be input through the HDMI OUT jack.

2

HDMI 1–4 jacks

For connecting to HDMI-compatible playback devices and
inputting video/audio signals (p.19).

3

ANTENNA jacks

For connecting to FM and AM antennas (p.23).

4

Power cable

For connecting to an AC wall outlet (p.23).

5

AV jacks

AUDIO jacks

For connecting to video/audio playback devices and
inputting video/audio signals (p.20).

6

MONITOR OUT jacks

For connecting to a TV and outputting video signals
(p.18).


7

SUBWOOFER PRE OUT jack

For connecting to a subwoofer (with built-in amplifier)
(p.16).

8

SPEAKERS terminals

For connecting to speakers (p.16).

9

VOLTAGE SELECTOR

(Taiwan, Brazil and General models only)

Selects the switch position according to your local voltage
(p.23).

En

9

Summary of Contents for RX-V381

Page 1: ...AV Receiver Owner s Manual Read the supplied booklet Safety Brochure before using the unit EN ...

Page 2: ...the speaker settings automatically YPAO 25 Error messages 27 Warning messages 28 PLAYBACK 29 Basic playback procedure 29 Enjoying playback 29 Switching information on the front display 30 Selecting the input source and favorite settings with one touch SCENE 31 Selecting a registered scene 31 Registering a scene 31 Selecting the sound mode 32 Enjoying sound field effects CINEMA DSP 33 Enjoying unpr...

Page 3: ...format 4K MODE 66 Restoring the default settings INIT 67 Updating the firmware UPDATE Except for USA Canada Australia models 67 Checking the firmware version VERSION 67 APPENDIX 68 Frequently asked questions 68 Troubleshooting 69 First check the following 69 Power system and remote control 69 Audio 70 Video 72 FM AM radio 73 USB Except for USA Canada Australia models 73 Bluetooth 74 Error indicati...

Page 4: ...cifications and appearance are subject to change without notice This manual explains operations using the supplied remote control Notice Indicates precautions for use to avoid the possibility of malfunction damage to the unit Note Indicates instructions and supplementary explanations for optimum use Remote control The supplied remote control is used as follows Insert the batteries Insert the batte...

Page 5: ...HDCP 2 2 supported You can enjoy the high definition video quality of 4K with HDCP 2 2 that complies with the latest copyright protection Selecting the HDMI 4K signal format 4K MODE p 66 The ECO mode power saving function allows you to create an eco friendly home theater system When the ECO mode is enabled you can reduce the unit s power consumption ECO Mode p 61 Sequential operation of a TV AV re...

Page 6: ... p 37 Easy operation with a TV screen You can operate the USB storage device view information or easily configure the settings using the on screen menu Auto Rename function The unit creates an input source name displayed on the front display automatically according to the connected HDMI compatible device Input Rename p 62 Useful applications The useful application for connections and operations of...

Page 7: ...g with a Bluetooth device by holding down for 3 seconds p 42 6 PRESET keys Select a preset FM AM radio station p 40 7 FM and AM keys Switch between FM and AM p 37 8 TUNING keys Select the radio frequency p 37 9 Front display Displays information p 8 PHONES jack For connecting headphones A INPUT keys Select an input source B TONE CONTROL key Adjusts the high frequency range and low frequency range ...

Page 8: ...r Light up while the unit is connecting to a Bluetooth device 6 SLEEP Lights up when the sleep timer is on 7 MUTE Blinks when audio is temporarily muted 8 Volume indicator Indicates the current volume 9 ECO Lights up when the eco mode p 61 is enabled Cursor indicators Indicate the remote control cursor keys currently operational A Information display Displays the current status such as input name ...

Page 9: ...utting video audio signals p 19 3 ANTENNA jacks For connecting to FM and AM antennas p 23 4 Power cable For connecting to an AC wall outlet p 23 5 AV jacks AUDIO jacks For connecting to video audio playback devices and inputting video audio signals p 20 6 MONITOR OUT jacks For connecting to a TV and outputting video signals p 18 7 SUBWOOFER PRE OUT jack For connecting to a subwoofer with built in ...

Page 10: ... SETUP key Displays the setup menu p 51 7 Menu operation keys Cursor keys Select a menu or the parameter ENTER Confirms a selected item RETURN Returns to the previous screen 789 External device operation keys Let you perform playback operations when USB is selected as the input source or control playback of the HDMI Control compatible playback device Note The playback devices must support HDMI Con...

Page 11: ...TV playback devices p 18 4 Connecting the FM AM antennas p 23 5 Connecting the power cable p 23 6 Selecting an on screen menu language p 24 7 Optimizing the speaker settings automatically YPAO p 25 This completes all the preparations Enjoy playing movies music radio and other content with the unit En 11 ...

Page 12: ...otice U S A and Canada models only Under its default settings the unit is configured for 8 ohm speakers When connecting 6 ohm speakers set the unit s speaker impedance to 6 Ω MIN For details see Setting the speaker impedance p 15 Except for U S A and Canada models Use speakers with an impedance of at least 6 W Use a subwoofer with built in amplifier Be sure to connect the front left and right spea...

Page 13: ...fer either in the left or right side n5 1 channel system Virtual CINEMA FRONT We recommend this speaker layout when the speakers can t be placed in back of the room 1 2 3 9 4 5 Speaker type Abbr Function Front L R 1 2 Produce front left right channel sounds stereo sounds Center 3 Produces center channel sounds such as movie dialogue and vocals Surround L R 4 5 Produce surround left right channel s...

Page 14: ...Other speaker layouts The following speaker layouts are also available n3 1 channel system 1 2 3 9 n2 1 channel system 1 2 9 En 14 ...

Page 15: ...to an AC wall outlet 2 While holding down STRAIGHT on the front panel press z power power z STRAIGHT 3 Check that SP IMP is displayed on the front display 1 2 PARTY VIRTUAL VOL MUTE ENHANCER STEREO TUNED SLEEP OUT ECO CHARGE ADAPTIVE DRC ZONE 2 A ZONE 3 B SP IMP 8 MIN 4 Press STRAIGHT to select 6 Ω MIN 5 Press z power to set the unit to standby mode and remove the power cable from the AC wall outl...

Page 16: ...ble Speaker cables x the number of speakers Audio pin cable x1 for connecting a subwoofer 9 5 4 3 2 1 1 2 1 2 3 4 3 4 The unit rear 10 mm 3 8 Audio pin cable Use a subwoofer with built in amplifier Subwoofer Surround L Surround R Center Front R Front L 10 mm 3 8 Precaution for connecting of the speaker cables Improper connecting of the speaker cables may cause short circuit and also damage the uni...

Page 17: ...e gap on the side upper right or bottom left of the terminal 4 Tighten the terminal FRONT a a b d c red black Using a banana plug U S A Canada Australia Taiwan Brazil and General models only 1 Tighten the speaker terminal 2 Insert a banana plug into the end of the terminal FRONT a b Banana plug nConnecting center surround speakers 1 Remove approximately 10 mm 3 8 of insulation from the ends of the...

Page 18: ...gnal quality degradation The unit s HDMI jacks support the HDMI Control Audio Return Channel ARC and 3D and 4K Ultra HD video transmission through output features Use high speed HDMI cables to enjoy 3D or 4K Ultra HD videos nVideo jacks VIDEO jacks Transmit analog video signals Use a video pin cable Video pin cable nAudio jacks OPTICAL jacks Transmit digital audio signals Use a digital optical cab...

Page 19: ...settings on the unit For details on the settings see Information on HDMI p 79 About Audio Return Channel ARC ARC allows audio signals to travel both ways If you connect a TV that supports ARC to the unit with a single HDMI cable you can output video audio to the TV or input TV audio to the unit When using ARC connect a TV with an HDMI cable that supports ARC nComposite video connection When connec...

Page 20: ... 4 jacks you need to connect your TV to the HDMI OUT jack of the unit p 19 nComposite video connection Connect a video device to the unit with a video pin cable and an audio cable digital coaxial or stereo pin cable Choose a set of input jacks on the unit depending on the audio output jacks available on your video device Output jacks on video device Input jacks on the unit Video Audio Composite vi...

Page 21: ...PLA DISPLA DISPLA DISPLA DISPLA DISPLA DISPLA DISPLA DISPLA DISPLA DISPLA DISPLA DISPLA DISPLA DISPLA DISPLA DISPLA DISPLA DISPLA DISPLA DISPLA DISPLA DISPLA DISPLA DISPLA DISPLA DISPLA DISPLA DISPLA DISPLA DISPLA DISPLA DISPLA DISPLA DISPLA DISPLA DISPLA DISPLA DISPLA DISPLA DISPLA DISPLA DISPLA DISPLA DISPLA DISPLA DISPLA DISPLA DISPLA DISPLA DISPLA DISPLA DISPLA DISPLA DISPLA DISPLA DISPLA DISP...

Page 22: ... AV 1 3 or AUDIO 1 2 as the input source by pressing INPUT the audio played back on the audio device will be output from the unit Connecting to the jack on the front panel Use the AUX jack on the front panel to temporarily connect devices such as portable audio players to the unit Before making a connection stop playback on the device and turn down the volume on the unit AUX TONE CONTROL STRAIGHT ...

Page 23: ...g the power cable Warning Taiwan Brazil and General models only Make sure you set VOLTAGE SELECTOR of the unit BEFORE plugging the power cable into an AC wall outlet Improper setting of VOLTAGE SELECTOR may cause damage to the unit and create a potential fire hazard Before connecting the power cable Set the switch position of VOLTAGE SELECTOR according to your local voltage Voltages are AC 110 120...

Page 24: ...hen your TV is connected to the unit via HDMI If not carry out operations while viewing the front display 3 Press SETUP 4 Use the cursor keys to select Language and press ENTER Setup Speaker HDMI Sound ECO Function Language Back RETURN 5 Use the cursor keys to select the desired language Language English 日本語 Français Deutsch Español Русский Italiano 中文 6 To exit from the menu press SETUP Note The ...

Page 25: ... quiet as possible Do not connect headphones Do not stand between the speakers and the YPAO microphone during the measurement process about 3 minutes 1 Press z receiver power to turn on the unit 2 Turn on the TV and switch the TV input to display video from the unit HDMI OUT jack Note Operations with TV screen are available only when your TV is connected to the unit via HDMI If not carry out opera...

Page 26: ... message such as W 1 appears see Error messages p 27 or Warning messages p 28 A speaker with a problem is indicated by blinking of the speaker indicators in the front display If multiple warnings are given when operating with the front display use the cursor keys q w to check the other warning messages 6 Confirm the results displayed on the screen and press ENTER 7 Use the cursor keys e r to selec...

Page 27: ...cted Exit YPAO turn off the unit and then check the speaker connections E 2 No Sur SP E 2 NO SUR SP One of the surround speakers cannot be detected E 5 Noisy E 5 NOISY The noise is too loud Keep the room quiet and retry YPAO If you select PROCEED YPAO takes the measurement again and ignores any noise detected E 7 No MIC E 7 NO MIC The YPAO microphone has been removed Connect the YPAO microphone to...

Page 28: ...A speaker cable may be connected with the reverse polarity Check the cable connections of the problem speaker If the speaker is connected incorrectly Turn off the unit reconnect the speaker cable If the speaker is connected correctly Depending on the type of speakers or room environment this message may appear even if the speakers are connected correctly In this case you can ignore the message W 2...

Page 29: ...E YELLOW GREEN RED PROGRAM VOLUME MUTE Input selection keys 3 Start playback on the external device or select a radio station Refer to the instruction manual for the external device For details on the following operations see the corresponding pages Listening to FM AM radio p 37 Playing back music stored on a Bluetooth device p 42 Playing back music stored on a USB storage device Except for USA Ca...

Page 30: ...e displayed item can also be applied separately to each input source Currently input source Item HDMI AV AUDIO AUX Bluetooth Input input source name DSP Program sound mode name Audio Decoder decoder name USB Song song title Artist artist name Album album name DSP Program sound mode name Audio Decoder decoder name TUNER Frequency frequency DSP Program sound mode name Audio Decoder decoder name U K ...

Page 31: ...By default the following settings are registered for each scene SCENE Input HDMI1 AUDIO1 AUDIO2 TUNER Sound program MOVIE Sci Fi STRAIGHT STRAIGHT STEREO 5ch Stereo Compressed Music Enhancer Off On Off On SCENE link playback On On Off Off Note The SCENE link playback function allows you to automatically turn on the TV or start playback of an external device connected to the unit via HDMI in conjun...

Page 32: ...back Select a sound program suitable for music or stereo playback by pressing PROGRAM repeatedly p 34 I want to enjoy multichannel playback from 2 channel sources Select a surround decoder in the Option menu p 47 I want to enjoy unprocessed sounds in original channels Switch to the straight decode mode by pressing STRAIGHT p 35 I want to enjoy enhanced bass sounds Enable Extra Bass by pressing BAS...

Page 33: ...ation of expansiveness on both sides powerful space expanded widely to the left and right The restrained depth creates a clear and powerful space while also maintaining the articulation of the sounds and the separation of the channels Drama This program features stable reverberations that match a wide range of movie genres from serious dramas to musicals and comedies The reverberations are modest ...

Page 34: ...nd vibrant sound Music Video This program allows you to enjoy videos of pop rock and jazz concerts as if you were there yourself Immerse yourself in the hot concert atmosphere thanks to the vividness of the singers and solos on stage a presence sound field that emphasizes the beat of rhythm instruments and a surround sound field that reproduces the space of a big live hall nSound programs suitable...

Page 35: ...nd decoder The previously selected surround decoder is selected You can change the surround decoder in Sur Decode p 47 in the Option menu TUNING PRESET MUTE TUNING MEMORY TOP MENU HOME POP UP MENU DISPLAY RETURN SETUP OPTION ENTER FM AM VOLUME PROGRAM USB STRAIGHT ENHANCER BASS BLUETOOTH INPUT BD DVD TV CD SCENE RADIO SLEEP BLUE YELLOW GREEN RED PROGRAM STRAIGHT ENHANCER BASS BD DVD TV CD SCENE RA...

Page 36: ... Enhancer adds depth and breadth to the sound allowing you to enjoy a dynamic sound close to the original sound before it was compressed This function can be used along with any other sound modes 1 Press ENHANCER Each time you press the key Compressed Music Enhancer is enabled or disabled MUTE STEREO TUNED SLEEP OUT ECO CHARGE ADAPTIVE DRC VIRTUAL Enhancer On VOL ENHANCER ENHANCER lights up Note C...

Page 37: ...et to 50 kHz for FM and 9 kHz for AM Depending on your country or region set the frequency steps to 100 kHz for FM and 10 kHz for AM 1 Set the unit to standby mode 2 When holding down STRAIGHT on the front panel press z power power z STRAIGHT PROGRAM 3 Press PROGRAM repeatedly to select TU VOL MUTE ENHANCER STEREO TUNED SLEEP OUT ECO CHARGE ADAPTIVE DRC VIRTUAL TU FM50 AM9 4 Press STRAIGHT to sele...

Page 38: ...tion for an FM radio station is unstable switching to monaural may improve it You can watch videos input from external devices while listening to radio by selecting the video input jack in Video Out Video Out p 50 in the Option menu Registering favorite radio stations presets You can register up to 40 radio stations as presets Once you have registered stations you can easily tune into them by sele...

Page 39: ...on 2 Hold down MEMORY for a few seconds The first time that you do register a station the selected radio station will be registered to the preset number 01 Thereafter each radio station you select will be registered to the next empty unused preset number after the most recently registered number TUNING PRESET MUTE TUNING MEMORY TOP MENU HOME POP UP MENU DISPLAY RETURN SETUP OPTION ENTER FM AM VOLU...

Page 40: ...o radio stations are registered nClearing preset stations Clear radio stations registered to the preset numbers 1 Press FM AM to select TUNER as the input source 2 Press OPTION 3 Use the cursor keys to select Preset and press ENTER MUTE ENHANCER STEREO TUNED SLEEP OUT ECO CHARGE ADAPTIVE DRC VIRTUAL Preset VOL 4 Use the cursor keys q w to select CLEAR 5 Use the cursor keys e r to select a preset s...

Page 41: ...t time DSP Program Sound mode name Audio Decoder Decoder name Frequency Frequency Note Program Service Program Type Radio Text and Clock Time are not displayed if the radio station does not provide the Radio Data System service nReceiving traffic information automatically When TUNER is selected as the input source the unit automatically receives traffic information To enable this function follow t...

Page 42: ...or more than 3 seconds Searching appears on the front display Note You can also use the Option menu to pair a Bluetooth device Press OPTION and then use the cursor keys to select Pairing If another Bluetooth device is already connected disconnect the Bluetooth connection before you perform a pairing operation To cancel pairing press MEMORY 3 Turn on the Bluetooth function on your device 4 From the...

Page 43: ...ate the unit to search and connect the Bluetooth device only the most recently connected device In that case follow one of the procedures below Switch the input source to Bluetooth Press ENTER while the input source is Bluetooth Otherwise press OPTION and use the cursor keys to select Connect If you cannot connect the device please perform pairing again 2 Operate the Bluetooth device to play back ...

Page 44: ... extension cables Playback of USB storage device contents Follow the procedure below to operate the USB storage device contents and start playback You can control the USB memory device with the menu displayed on the TV screen Note Operations with TV screen are available only when your TV is connected to the unit via HDMI _ underscore will be displayed for characters not supported by the unit 1 Pre...

Page 45: ...ng 2 30 5 30 Album Artist 2 1 1 Status indicators Display the current repeat random settings p 46 and playback status such as play pause 2 Playback information Displays the artist name album name song title and elapsed time Use the following remote control keys to control playback TUNING PRESET MUTE TUNING MEMORY TOP MENU HOME POP UP MENU DISPLAY RETURN SETUP OPTION ENTER FM AM VOLUME PROGRAM USB ...

Page 46: ... menu operations press RETURN Texts in parentheses denote indicators on the front display 3 Use the cursor keys e r to select a setting Setting Function Off Off Turns off the repeat function One One Plays back the current song repeatedly c appears on the TV screen All All Plays back all songs in the current album folder repeatedly v appears on the TV screen Random Random Plays back songs in random...

Page 47: ... Program PRG Select the sound programs and stereo playback p 33 Sur Decode SrDec Select which surround decoder is used when Sur Decode is selected as the program p 35 DSP Level DSP Level Adjusts the sound field effect level p 48 Adaptive DRC A DRC Sets whether the dynamic range from maximum to minimum is automatically adjusted when the volume is adjusted p 48 Enhancer Enhancer Enables disables Com...

Page 48: ...ess TONE CONTROL to select Treble or Bass then press PROGRAM to make an adjustment If you set an extreme value sounds may not match those from other channels nDSP Surround DSP Surround Configures the sound field program and surround settings DSP Level DSP Level Adjusts the sound field effect level Setting range 6 dB to 0 dB to 3 dB 1 dB increments Adaptive DRC A DRC Sets whether the dynamic range ...

Page 49: ...formation about the video audio signal Choices Format FORMAT Audio format of the input signal Channel CHANNEL The number of source channels in the input signal front surround LFE For example 3 2 0 1 means 3 front channels 2 surround channels and LFE Sampling SAMPLING The number of samples per second of the input digital signal Bitrate BITRATE The amount of data per second of the input bitstream si...

Page 50: ...he selected audio source For example you can watch the video while listening to the radio Input sources AUDIO TUNER USB Bluetooth AUX Settings Off Off Does not output video HDMI 1 4 AV 1 3 Outputs video input through the corresponding video input jacks En 50 ...

Page 51: ...perations while viewing the front display 1 Press SETUP 2 Use the cursor keys to select a menu and press ENTER Setup Speaker HDMI Sound ECO Function Language Back RETURN 3 Use the cursor keys to select an item and press ENTER Speaker Configuration Distance Level Equalizer Test Tone Note To return to the previous screen during menu operations press RETURN 4 Use the cursor keys e r to select a settin...

Page 52: ...audio p 57 TV Audio Input Selects an audio input jack of the unit to be used for TV audio input p 57 Standby Sync Selects whether to use HDMI control to link the standby behavior of the TV and the unit p 58 ARC Enables disables ARC p 58 SCENE Enables disables SCENE link playback p 58 Sound DSP Parameter Panorama Enables disables the broadening effect of the front sound field p 59 Center Width Adju...

Page 53: ...put source name displayed on the front display p 62 Input Skip Set which input source is skipped when operating the INPUT key p 63 Dimmer Adjusts the brightness of the front display p 63 Memory Guard Prevents accidental changes to the settings p 63 Remote Color Key Set the unit s functions for the RED GREEN YELLOW BLUE key of the remote control p 64 Language Select an on screen menu language p 64 ...

Page 54: ...y components from other channels Front Selects the size of the front speakers Settings Small Select this option for small speakers The subwoofer will produce front channel low frequency components configurable in Crossover Large Select this option for large speakers The front speakers will produce all of the front channel frequency components Note Front is automatically set to Large when Subwoofer...

Page 55: ... or unclear switch the subwoofer phase Settings Normal Does not reverse the subwoofer phase Reverse Reverses the subwoofer phase Extra Bass Enables disables Extra Bass When Extra Bass is enabled you can enjoy enhanced bass sounds regardless of the size of the front speakers and the presence or absence of the subwoofer Settings Off Disables Extra Bass On Enables Extra Bass Note You can also use BAS...

Page 56: ...ment Off Does not use the equalizer Note PEQ is available only when the YPAO has been performed p 25 n Manual equalizer adjustment 1 Set EQ Select to GEQ 2 Use the cursor keys q w to select Channel and the cursor keys e r to select the desired speaker channel 3 Use the cursor keys q w to select the desired band frequency and the cursor keys e r to adjust the gain Setting range 6 0 dB to 6 0 dB 4 T...

Page 57: ...ected to the unit Settings Off Disables the audio output from the speakers On Enables the audio output from the speakers HDMI OUT TV Enables disables the audio output from a TV connected to the HDMI OUT jack Settings Off Disables the audio output from the TV On Enables the audio output from the TV nTV Audio Input Selects an audio input jack of the unit to be used for TV audio input when HDMI Contr...

Page 58: ...gnals input to the unit via ARC are not supported by the unit set ARC to Off and use the TV s speakers nSCENE Enables disable SCENE link playback when HDMI Control is set to On When SCENE link playback is enabled HDMI Control compatible devices connected to the unit via HDMI automatically works as follows with a scene selection TV turning on and displaying video from the playback device Playback d...

Page 59: ...o strengthen the surround sound field This setting is effective when bPLII Music is selected Setting range 3 to 0 to 3 Center Image Adjusts the center orientation level broadening effect of the front sound field Higher to strengthen the center orientation level less broadening effect and lower to weaken more broadening effect This setting is effective when Neo 6 Music is selected Setting range 0 0...

Page 60: ...bitstream audio Dolby Digital and DTS signals playback Settings Maximum Produces audio without adjusting the dynamic range Standard Optimizes the dynamic range for regular home use Min Auto Sets the dynamic range for clear sound even at night or at low volumes When playing back Dolby TrueHD signals the dynamic range is automatically adjusted based on the input signal information Max Volume Sets th...

Page 61: ... have not operated the unit for the specified time Default U K and Europe models 20 minutes Other models Off Note Just before the unit enters standby mode AutoPowerStdby appears and then countdown starts in the front display nECO Mode You can reduce the unit s power consumption by setting the eco mode to On After setting be sure to press ENTER to restart the unit When the eco mode is enabled you c...

Page 62: ...vice 3 To check a created name press ENTER Note During selecting Auto the created name is saved even after the device connection is terminated To reset to the default setting switch the setting to Manual at once and then set it again to Auto 4 To change another input source name repeat steps 1 to 3 5 To exit from the menu press SETUP Procedure to rename manually 1 Use the cursor keys q w to select...

Page 63: ...d input source On Skips the selected input source nDimmer Adjusts the brightness of the front display Setting range 4 to 0 higher to brighten Note The front display may become dark when ECO Mode p 61 is set to On nMemory Guard Prevents accidental changes to the settings Settings Off Does not protect the settings On Protects the settings until Off is selected Note When Memory Guard is set to On the...

Page 64: ... GREEN HDMI4 YELLOW AV 2 BLUE AUX Program Assigns the functions of sound mode to each key RED MOVIE GREEN MUSIC YELLOW STEREO BLUE SUR DECODE For example if you press the RED key repeatedly you can select your favorite sound program from the sound programs MOVIE p 33 suitable for the video source Language Select an on screen menu language Note Default settings are underlined Settings English Engli...

Page 65: ...unit s remote control ID p 66 TU Asia Taiwan and General models only Changes the FM AM tuning frequency setting p 66 TV FORMAT Switches the video signal type of HDMI output p 66 4K MODE Selects the HDMI 4K signal format p 66 INIT Restores the default settings p 67 UPDATE Updates the firmware p 67 VERSION Checks the version of firmware currently installed on the unit p 67 Changing the speaker imped...

Page 66: ...0 kHz steps FM50 AM9 Select this when you want to adjust the FM frequency by 50 kHz steps and AM by 9 kHz steps Switching the video signal type TV FORMAT VOL MUTE ENHANCER STEREO TUNED SLEEP OUT ECO CHARGE ADAPTIVE DRC VIRTUAL TV FORMAT NTSC Switch the video signal type of HDMI output so that it matches to the format of your TV Since the unit automatically selects the video signal type so that it ...

Page 67: ... our website For details refer to the information supplied with updates nFirmware update procedure Do not perform this procedure unless firmware update is necessary Also make sure you read the information supplied with updates before updating the firmware 1 Save the downloaded firmware to the root folder of a USB memory device 2 Press PROGRAM on the front panel to select UPDATE 3 Connect the USB m...

Page 68: ... and playback devices refer to the instruction manuals for each device I want to change the input source name By default input source names such as HDMI1 and AV 1 are displayed on the front display when an input source is selected If you want to rename them as you like use Input Rename p 62 in the Setup menu You can also select a name from the presets such as Blu ray and DVD I want to prevent acci...

Page 69: ...d down z power on the front panel for more than 15 seconds to reboot the unit If the problem persists disconnect the power cable from the AC wall outlet and plug it again The power turns off standby mode immediately The unit was turned on while a speaker cable was shorted Twist the bare wires of each speaker cable firmly and reconnect to the unit and speakers p 17 The unit enters standby mode auto...

Page 70: ...th the input selection keys Signals that the unit cannot reproduce are being input Some digital audio formats cannot be played back on the unit To check the audio format of the input signal use Signal Info in the Option menu p 49 The cable connecting the unit and playback device is defective If there is no problem with the connection replace with another cable The volume cannot be increased The ma...

Page 71: ...onnected to the unit A TV that does not support ARC is connected to the unit only with an HDMI cable Use a digital optical cable to make an audio connection p 19 If the TV is connected to the unit with an audio cable The TV audio input setting does not match the actual connection Use TV Audio Input in the Setup menu to select the correct audio input jack p 57 If you are trying to use ARC ARC is di...

Page 72: ... Option menu p 49 For information about video signals supported by the unit see HDMI signal compatibility p 81 The TV does not support HDCP High bandwidth Digital Content Protection Refer to the instruction manuals for the TV and check the TV s specifications The number of devices connected to the HDMI OUT jack is over the limit Disconnect some of the HDMI devices No image contents required the HD...

Page 73: ...AM radio signal is weak Adjust the AM antenna orientation Select the station manually p 37 Use an outdoor AM antenna Connect it to the ANTENNA AM jack together with the supplied AM antenna AM radio stations cannot be registered as presets Auto Preset has been used Auto Preset is for registering FM radio stations only Register AM radio stations manually p 38 USB Except for USA Canada Australia mode...

Page 74: ...Delete the pairing information of the device and then perform pairing again p 42 This unit can be paired with eight devices If pairing with a ninth device is performed the pairing information with the earliest connection date will be deleted This unit is not registered on the device s Bluetooth connection list Perform paring again p 42 No sound is produced or the sound is interrupted during playba...

Page 75: ...y and connect to the unit and speakers properly Internal Error An internal error has occurred Contact the nearest authorized Yamaha dealer or service center No content There are no playable files in the selected folder Select a folder that contains files supported by the unit Not found The Bluetooth device is not found Place the Bluetooth device within 10 m 32 ft of the Bluetooth receiver Perform ...

Page 76: ...oped to offer a high definition home theater experience with the quality of the studio master by DTS Inc DTS HD Master Audio can carry up to eight channels of 96 kHz 24 bit audio up to six channels of 192 kHz 24 bit audio simultaneously This technology is used for audio on BD Blu ray Disc DTS Neo 6 DTS Neo 6 enables 6 channel playback from 2 channel sources There are two modes available Music mode...

Page 77: ... provides a secure audio video interface For further information on HDMI visit the HDMI website at http www hdmi org x v Color x v Color is a technology that the HDMI specification supports It is a more extensive color space than sRGB and allows the expression of colors that were not hitherto possible While remaining compatible with the color gamut of sRGB standards x v Color expands the color spa...

Page 78: ...g on the model or manufacturer of the USB storage device nBluetooth devices Bluetooth devices that support A2DP can be used Yamaha does not assure the connections of all Bluetooth devices File formats nUSB Except for USA Canada Australia models The unit supports WAV PCM format only MP3 WMA and MPEG 4 AAC files 1 or 2 channel audio only The unit is compatible with sampling rate of up to 48 kHz Digi...

Page 79: ...ISPLA DISPLA DISPLA DISPLA DISPLA DISPLA DISPLA DISPLA DISPLA DISPLA DISPLA DISPLA DISPLA DISPLA DISPLA DISPLA DISPLA DISPLA DISPLA DISPLA DISPLA DISPLA DISPLA DISPLA DISPLA DISPLA DISPLA DISPLA DISPLA DISPLA DISPLA DISPLA DISPLA DISPLA DISPLA DISPLA DISPLA DISPLA DISPLA DISPLA DISPLA DISPLA DISPLA DISPLA DISPLA DISPLA DISPLA DISPLA DISPLA DISPLA DISPLA DISPLA DISPLA DISPLA DISPLA DISPLA DISPLA DI...

Page 80: ...nput to display the video from the unit 7 Check the followings On the unit The input to which the playback device is connected is selected If not select the input source manually On the TV The video from the playback device is displayed 8 Check that the unit is properly synchronized with the TV by turning off the TV or adjusting the TV volume with the TV remote control Note If HDMI Control does no...

Page 81: ...o change the input assignment for SCENE TV HDMI signal compatibility nAudio signals Audio signal type Audio signal format Compatible media example 2ch Linear PCM 2ch 32 to 192 kHz 16 20 24 bit CD DVD Video DVD Audio Multichannel Linear PCM 8ch 32 to 192 kHz 16 20 24 bit DVD Audio BD Blu ray disc HD DVD DSD 2 to 5 1ch 2 8224 MHz 1 bit SACD Bitstream Dolby Digital DTS DVD Video Bitstream High defini...

Page 82: ...ademarks of DTS Inc DTS Inc All Rights Reserved HDMI the HDMI Logo and High Definition Multimedia Interface are trademarks or registered trademarks of HDMI Licensing LLC in the United States and other countries x v Color x v Color is a trademark of Sony Corporation The Bluetooth word mark and logos are registered trademarks owned by Bluetooth SIG Inc and any use of such marks by Yamaha Corporation...

Page 83: ...4K 60 50Hz 10 12bit 3D Video ARC Audio Return Channel HDMI Control CEC Auto Lip Sync Deep Color x v Color HD audio playback 21 9 Aspect Ratio BT 2020 Colorimetry HDR Compatible Video Format Repeater Mode VGA 480i 60 Hz 576i 50 Hz 480p 60 Hz 576p 50 Hz 720p 60 Hz 50 Hz 1080i 60 Hz 50 Hz 1080p 60 Hz 50 Hz 24 Hz 4K 60Hz 50Hz 30 Hz 25 Hz 24 Hz Audio Format Dolby TrueHD Dolby Digital Plus Dolby Digital...

Page 84: ...d Canada models 1 kHz 0 9 THD 8 Ω Front L R 85 W 85 W Center 85 W Surround L R 85 W 85 W Rated Output Power 1 channel driven U S A and Canada models 1 kHz 0 9 THD 8 Ω Other models 1 kHz 0 9 THD 6 Ω Front L R 100 W ch Center 100 W ch Surround L R 100 W ch Maximum Effective Output Power 1 channel driven U S A and Canada models 1 kHz 10 THD 8 Ω Front L R Center Surround L R 130 W ch 1 kHz 10 THD 6 Ω ...

Page 85: ...p 75 Ω Video Maximum Input Level 1 5 Vp p or more Video Signal to Noise Ratio 50 dB or more FM Section Tuning Range U S A and Canada models 87 5 MHz to 107 9 MHz Asia Taiwan Brazil and General models 87 5 87 50 MHz to 108 0 108 00 MHz Other models 87 50 MHz to 108 00 MHz 50 dB Quiet Sensitivity IHF 1 kHz 100 MOD Mono 3 μV 20 8 dBf Signal to Noise Ratio IHF Mono 65 dB Stereo 64 dB Harmonic Distorti...

Page 86: ...9 W Maximum Power Consumption Taiwan Brazil and General models 470 W Dimensions W x H x D 435 x 151 x 315 mm 17 1 8 x 6 x 12 3 8 Weight 7 4 kg 16 3 lbs The contents of this manual apply to the latest specifications as of the publishing date To obtain the latest manual access the Yamaha website then download the manual file En 86 ...

Page 87: ...Yamaha Global Site http www yamaha com Yamaha Downloads http download yamaha com Manual Development Department 2016 Yamaha Corporation Published 01 2016 NV A0 YH631A0 EN1 ...

Reviews: