background image

English

47

Remote Control Features

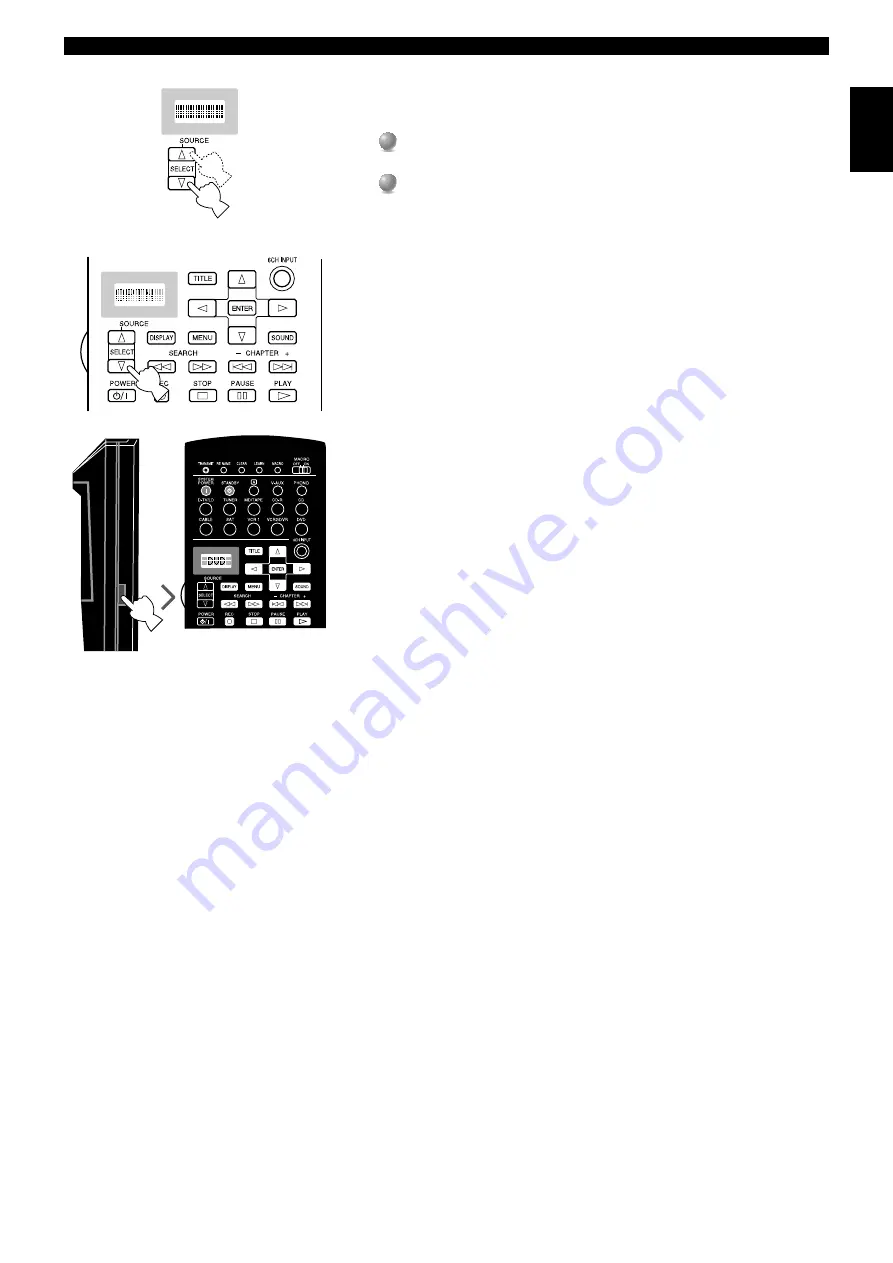
SOURCE SELECT

You can control another component independently from the input you selected by
pressing an input button.

1

1

Press 

SOURCE SELECT


h

 or 

g

 to choose a component and set the remote

control to be used for it.

2

2

The display window will show one of the following: 

V-AUX

TAPE

,

PHONO

TUNER

MD

CD

VCR 1

VCR 2

DVD

CD-R

CABLE

 (Cable

TV), 

SAT

 (Satellite TV), 

A

TV/LD

 (digital and regular TV/LD player),

OPTN

 (Option).

About OPTN

OPTN

 is an extra component control area to be programmed with other remote

control functions. (You cannot setup the manufacturer code in this area.)

Light up function

The buttons which are active and the display window light up for 10 seconds after
pressing 

LIGHT

.

Summary of Contents for RX-V3000RDS

Page 1: ...APE CD R TUNER CD PHONO VCR 2 DVR EFFECT 6CH INPUT EON PTY SEEK MODE START RDS MODE TUNING MODE MEMORY S VIDEO VIDEO L R OPTICAL AUDIO MAN L AUTO FM AUTO NAN LMONO FM AM PRESET TUNING DSP PROGRAM EDIT VIDEO AUX RX V3000RDS Natural Sound AV Receiver Ampli Tuner Audio Video OWNER S MANUAL MODE D EMPLOI BEDIENUNGSANLEITUNG BRUKSANVISNING MANUALE DI ISTRUZIONI MANUAL DE INSTRUCCIONES GEBRUIKSAANWIJZIN...

Page 2: ...rasp the plug do not pull the cord 11 Do not clean this unit with chemical solvents this might damage the finish Use a clean dry cloth 12 Only the voltage specified on this unit must be used Using this unit with a higher voltage than specified is dangerous and may cause fire damage to this unit and or personal injury YAMAHA will not be held responsible for any damage resulting from use of this uni...

Page 3: ...Settings 21 Speaker Output Levels 22 Basic Operation 24 Basic Playback 25 AM FM Tuner 29 Basic Recording 35 Advanced Operation 36 SET MENU Items 37 Remote Control Features 46 Adjusting the Levels of the Effect Speakers 57 Setting the Sleep Timer 57 Additional Information 58 Digital Sound Field Processing DSP 59 CINEMA DSP 61 DSP Parameter 64 Appendix 68 Troubleshooting 69 Specifications 73 ...

Page 4: ...xclusive digitally created listening environments known as digital sound fields Choosing a sound field program is like transporting yourself to such venues as an outdoor arena a European church or a cozy jazz club Take some time now to read more about these features and enjoy the new experiences this unit brings to your home theater Introduction Features Dolby Digital and DTS decoder Dolby Digital...

Page 5: ...r store the remote control in the following types of conditions high humidity or temperature such as near a heater stove or bath or dusty places or in places subject to extremely low temperatures Remote Control Alkaline Batteries 3 LR6 Quick Reference Guide AM Loop Antenna Power Cord FM Antenna Reset button STANDBY ON NATURAL SOUND AV RECEIVER RX V3000RDS INPUT MODE INPUT VOLUME SILENT PHONES SPEA...

Page 6: ... to the remote control 2 Remote Control Sensor 3 INPUT MODE Selects the type of audio signal for the selected source 4 INPUT selector Selects a source component 5 VOLUME Controls the output level of all audio channels This does not affect the REC OUT level 6 PHONES Outputs audio signals for private listening using headphones When you connect headphones no signals are output to the PREOUT jacks or ...

Page 7: ...oys these RDS data services in turn a EON Press this button to select a desired program type NEWS INFO AFFAIRS SPORT when you want to call a radio program of that program type automatically s PTY SEEK MODE START Selects the desired program type and begins searching for a station Display Indicators 1 Processor indicators When any function of DTS VIRTUAL Dolby Digital Dolby PROLOGIC DSP Dolby Digita...

Page 8: ...FRONT REAR REAR CENTER CENTER MAIN A OR B A B 8ΩMIN SPEAKER 8ΩMIN SPEAKER 8ΩMIN SPEAKER 8ΩMIN SPEAKER 8ΩMIN SPEAKER 16ΩMIN SPEAKER 3 8 q w 9 4 6 0 7 1 2 5 Rear panel 1 Audio component jacks 2 Video component jacks 3 Antenna input terminals 4 Speaker terminals 5 AC OUTLETS Use these outlets to supply power to your other audio video component 6 IMPEDANCE SELECTOR 7 DIGITAL OPTICAL COAXIAL jacks 8 6C...

Page 9: ... volume level e EFFECT Switches the effect speakers Center Front Rear and Rear Center on and off r PARAMETER SET MENU Selects the PARAMETER mode or SET MENU mode t Cursor buttons Selects and adjusts DSP program parameters and SET MENU items according to the position of PARAMETER SET MENU y STANDBY Turns off the power u SYSTEM POWER Turns on the power i Display Displays the input or operation statu...

Page 10: ... Audio Components 10 Connecting Video Components 12 Connecting Speakers 14 Connecting Subwoofers 16 Connecting an External Decoder 17 Connecting External Amplifiers 17 Others 18 On Screen Displays OSD 19 OSD Modes 19 Selecting the OSD Mode 19 Speaker Placement 20 Speaker Settings 21 Speaker Output Levels 22 Before You Begin 22 Dolby Surround Test 22 DSP Test 23 ...

Page 11: ...er is useful for playback of 6 channel Digital Surround Six Speaker Configuration Hi Fi DSP This configuration is used the most for audio playback with HiFi DSP It does not position the dialogue sound as well as a seven or eight speaker configuration However it creates a dynamic DSP Digital Sound Field Processor sound field which adds depth to the sound For this speaker configuration change SET ME...

Page 12: ...ure to put the cap back in place This cap protects the jack from dust The OPTICAL jacks on this unit conform to the EIA standard If you use a fiber optic cable that does not conform to this standard this unit may not function properly Connecting a turntable These jacks are for connecting a turntable with an MM or high output MC cartridge If you have a turntable with a low output MC cartridge use a...

Page 13: ...UTPUT INPUT INPUT GROUND OPTICAL OUTPUT OPTICAL INPUT OPTICAL INPUT OPTICAL OUTPUT COAXIAL OUTPUT Digital Digital Digital Digital Digital Analog Analog Analog Analog Analog Analog MD TAPE recorder CD recorder CD player Turntable to from External Amplifier to from External Controller from External Decoder ...

Page 14: ...so separated into three for each signal The labels of the component video jacks may be different depending on the component e g Y CB CR Y PB PR Y B Y R Y etc Component video signals provide the best quality in picture reproduction If your video component has an S video output or component video output you can connect it to this unit Connect the S video signal output jack on your video component to...

Page 15: ...PUT VIDEO OUTPUT S VIDEO OUTPUT COMPONENT OUTPUT COMPONENT OUTPUT AUDIO OUTPUT AUDIO OUTPUT AUDIO OUTPUT OPTICAL OUTPUT OPTICAL OUTPUT Digital Analog Video Video Video Video Video Video Component Video Component Video Component Video Analog Analog VIDEO OUTPUT Digital Digital Digital Analog Analog CABLE COAXIAL OUTPUT SAT OPTICAL OUTPUT L R L R L R L R L R DVD player DTV LD player Cable TV SAT VCR...

Page 16: ...ve or ridge To make sure you always connect speakers with the correct polarity determine the difference between the cables of your speaker cord make a note of which cable you plan to use for which polarity and and always connect the speaker cords consistently 1 1 Strip off 9 mm 3 8 in of an inch of insulation from the ends of the cables 2 2 Twist the exposed wires of the cable together to prevent ...

Page 17: ...R 4ΩMIN SPEAKER 4ΩMIN SPEAKER 4ΩMIN SPEAKER 8ΩMIN SPEAKER FRONT REAR REAR CENTER CENTER MAIN A OR B A B 8ΩMIN SPEAKER 8ΩMIN SPEAKER 8ΩMIN SPEAKER 8ΩMIN SPEAKER 8ΩMIN SPEAKER 16ΩMIN SPEAKER Right Front Speaker Left Front Speaker Rear Center Speaker Right Rear Speaker Left Rear Speaker To other component Subwoofer system Right Main B Speaker Left Main B Speaker Right Main A Speaker Left Main A Speak...

Page 18: ...ntage of this dynamic sound be sure to set the 1C REAR L R SP item in the SET MENU to LARGE and connect your Rear speakers and Subwoofer as described below 1 1 Connect the right input terminal on your Subwoofer to the REAR R terminal and the right input terminal on your Subwoofer to the REAR R terminal with speaker cords 2 2 Connect the left input terminal on your Subwoofer to the REAR L terminal ...

Page 19: ...t to increase the power output to the speakers or want to use another amplifier connect an external amplifier to the PRE OUT MAIN IN terminals as follows R L CENTER R L q w e t y r q FRONT jacks Front Effect channel line output jacks w REAR Surround jacks Rear channel line output jacks e SUBWOOFER jacks Main Center and Rear channel frequencies below 90 Hz are output through these jacks You can als...

Page 20: ... unit to a wall outlet when all connections are complete Caution Do not use other AC power cords than the one provided AC OUTLETS Use these to connect the power cords from your other components to this unit The power to the switched outlets is controlled by this unit s STANDBY ON SYSTEM POWER or STANDBY on the remote These outlets will supply power to any connected unit whenever this unit is turne...

Page 21: ...ignal is not output through the REC OUT selector and will not be recorded with any video signal The SET MENU TEST DOLBY SUR and TEST DSP appear regardless of the OSD mode Selecting the OSD Mode 1 1 When you turn on the power the video monitor and front panel display shows the level of the main volume for a few seconds and then switches to show the current sound field program 2 2 Press ON SCREEN on...

Page 22: ...ect and Rear speakers When you use a projection screen Place the speakers as shown in the illustration The Main speakers should be placed about one quarter of the way up from the bottom of the screen Place the Center speaker in the center and directly under the screen The Center speaker provides precise dialogue localization When you use a projection screen with your system the Front Effect speake...

Page 23: ... and NONE Selects the Main channel output mode according to the size of the Main speakers The possible settings are LARGE and SMALL Selects the Rear channel output mode according to the size of the Rear speakers The possible settings are LRG large SML small and NONE Selects the Rear Center channel output according to the size of the Rear Center speaker The possible settings are LRG large SML small...

Page 24: ...creased the sound volume level of the Center Rear and Rear Center speakers up to 10dB set the 1G MAIN LEVEL item to this setting decreases the Main speaker volume level to about one third the normal level After you set the 1G MAIN LEVEL item in the SET MENU to 10dB adjust the levels for the Center Rear and Rear Center speakers again FL L R L C RC R FR RR EFFECT LEVEL L SUR 0dB TEST DOLBY SUR EFFEC...

Page 25: ...e tone from the right speaker The OSD shows which speaker is reproducing the tone You cannot adjust the output level of the left and right Front Effect speakers separately You can hear the test tone only from the Right Front Effect speaker by pressing g and the Left Front Effect speaker by pressing h You can return to the original mode by releasing the buttons The tonal quality of the speakers can...

Page 26: ...layback 25 Power Control 25 Selecting a Source 26 Input Modes and Indications 27 Selecting a Sound Field Program 28 AM FM Tuner 29 Connecting the Antennas 29 Automatic Tuning 30 Tuning to Preset Stations 30 Presetting Stations 31 Exchanging Preset Stations 32 Receiving RDS Stations 33 Basic Recording 35 Preparations 35 ...

Page 27: ... its current operational status in memory before the power is turned off By connecting a commercially available timer to this unit you can easily playback or record a source at any time you wish STANDBY SYSTEM POWER VOLUME EFFECT STANDBY ON NATURAL SOUND AV RECEIVER RX V3000RDS INPUT MODE INPUT VOLUME SILENT PHONES SPEAKERS B A PROCESSOR DIRECT BASS EXTENSION BASS TREBLE REC OUT VIDEO AUX VCR 1 SA...

Page 28: ...ect a broadcast station on the source component Refer to the operation instructions for the component 3 3 Adjust VOLUME or VOLUME on the remote control Caution If the power of the component connected to the VCR 1 VCR 2 DVR MD TAPE and CD R OUT jacks is turned off reproduced sound may be distorted or the volume may be lowered In these cases turn on the component BGV Back Ground Video function The B...

Page 29: ...set the input mode to AUTO or DTS If you switch the input mode to ANALOG while playing a source encoded with a DTS signal this unit reproduces no sound If you play a source encoded with a DTS signal and set the input mode to AUTO there will be a moment of noise while the unit recognizes the DTS signal and turns on the DTS decoder This is not a malfunction You can avoid this by setting the input mo...

Page 30: ...Signals for Rear channels are output from the Main speakers You can also listen to HP Headphone CINEMA DSP by connecting your headphones to the PHONES jack while the DSP sound fields are on When high rate 96 kHz sampling digital signals are output from source component the Virtual CINEMA DSP and HP CINEMA DSP cannot operate on the source sounds Note This unit is not set in the virtual CINEMA DSP m...

Page 31: ... 1 1 Press the tab to unlock the terminal hole 2 2 Insert the AM loop antenna lead wires to the AM ANT and GND terminals 3 3 Lift the tab to its original position to lock the lead wires Lightly pull on the lead wires to confirm a good connection 4 4 Attach the loop antenna to the antenna stand 5 5 Orient the AM loop antenna so that the best reception is obtained Notes The AM loop antenna should be...

Page 32: ...ff in the display If the colon appears in the display next to the AM or FM indicator press PRESET TUNING to turn it off 2 2 Turn the Multi jog knob clockwise or counterclockwise to tune to the desired station manually Hold on the knob to continue the tuning search Automatic tuning is effective when the radio signals are strong and have no interference However manual tuning is best for weaker signa...

Page 33: ...ually presetting stations This unit can store up to 40 stations 8 stations x 5 groups Using this feature you can easily tune to any preset station by selecting the preset station number 1 1 Tune to a station 2 2 Press MEMORY MAN L AUTO FM The MEMORY indicator flashes for about five seconds 3 3 Turn the Multi jog knob clockwise or counterclockwise to select a preset station number Note You must sel...

Page 34: ...reset Stations 2 2 Press and hold PRESET TUNING EDIT for more than 3 seconds E 1 flashes in the display 3 3 Tune to the A5 preset station number See Tuning to Preset Stations A 5 flashes in the display 4 4 Press PRESET TUNING EDIT again The stations stored at the two preset locations are exchanged Notes The memory back up circuit prevents the stored data from being lost even if this unit is set to...

Page 35: ...ffered by the transmitting station in the order shown below Illumination of the red indicator next to the RDS mode indicator shows that the corresponding RDS mode is now selected Notes When an RDS station is being received do not press RDS MODE until one or more RDS mode indicators light up on the display If you press the button before the indicators light up on the display the mode cannot be chan...

Page 36: ... stations that are scheduled to broadcast a program of the required type and switches from the station being currently received to the new station when the broadcasts starts Note This function can only be used when an RDS station that offers the EON data service is being received When such a station is being received the EON indicator lights up on the display 1 1 Make sure that the EON indicator l...

Page 37: ...cord between other component connected to this unit Operating BASS and TREBLE BASS EXTENSION BALANCE VOLUME and DSP programs do not affect the recorded signal Special considerations when recording DTS software The DTS signal is a digital bitstream Attempting to digitally record the DTS bitstream will result in noise being recorded Therefore if you want to use this unit to record sources that have ...

Page 38: ...RAMETER INI Parameter Initialization 43 10 DOLBY D SET Dolby Digital Set 44 11 DTS SET 44 12 6 1 ES AUTO 44 13 DELAY TIME 45 14 DISPLAY SET 45 15 MEMORY GUARD 45 Remote Control Features 46 Using the Remote Control 46 Each Component Control Area 48 Setting the Manufacturer Code in the Remote Control 51 Programming a New Remote Control Function 52 Using the Macro Feature 53 Changing the Source Name ...

Page 39: ...akers Selects the output level for your Main channels Matches the Subwoofer level with the level of the other speakers Adjusts the sound balance for Left and Right channels Adjusts the tonal balance of the headphones Matches the Center speaker tonal quality with the Main speakers Changes the name of the inputs Assigns the I O terminals to the designated input sources Selects the initial input mode...

Page 40: ...item from the table of SET MENU then press or to enter the setting of that item The last item you adjusted appears on the display Some items have sub items 3 3 Press or to change the setting of the item 4 4 Press h or g repeatedly or a DSP program button to exit the SET MENU PARAMETER SET MENU Cursor buttons SET MENU 1 4 1 SPEAKER SET 2 LOW FREQ TEST 3 L R BALANCE 4 HP TONE CTRL OSD On Screen Disp...

Page 41: ... of left and right Main channel signals is directed to the left and right Main speakers Select the SMALL setting if you have small Main speakers The Main channel low frequency signals of 90 Hz and below are directed to the speakers selected with the 1E LFE BASS OUT item Note When you select the MAIN setting for the 1E LFE BASS OUT item the Main channel low frequency signals of 90 Hz and below are ...

Page 42: ...MAIN setting if you do not use a Subwoofer The LFE signals are directed to the Main speakers Select the BOTH setting if you use a Subwoofer and you want to mix the Main channel low frequency sound signals with the LFE signals Note The low frequency signals of 90Hz and below from all Main Center Rear and Rear Center channels are directed to the LFE channel when you select the small speaker setting ...

Page 43: ...lected test tones above 90 Hz will not be output from the Subwoofer The test tone will not necessarily be output from the selected speakers The output mode of the test tone depends on the settings of the 1 SPEAKER SET items in the SET MENU 3 3 Press g repeatedly to go to FREQ and press or to select the frequency you want to use 4 4 Adjust the Subwoofer volume using the controls on the Subwoofer so...

Page 44: ...r Press TEST before starting the procedure above TEST DOLBY SUR appears and the test tone starts alternating among the speakers Once you begin the procedure above the test tone remains at the Center speaker and you can hear how the sound changes as you adjust the various frequency levels To turn off the test tone generator press TEST repeatedly until the current DSP program appears 6 INPUT RENAME ...

Page 45: ...ograms within the selected program group are initialized Repeat this step to initialize other DSP program groups Notes The asterisk mark next to a DSP program group number indicates that you have changed the parameter values in one or more DSP programs within that group The parameter values of the DSP programs do not change if you initialize a program group that does not have the asterisk mark Whe...

Page 46: ...ng to sources at extremely low volume levels 11 DTS SET 11 LFE LEVEL Use this feature to adjust the output level of the LFE low frequency effect channel when playing back DTS encoded software This setting is effective only when this unit decodes DTS signals The LFE signal carries the low frequency special effect sound which is only added to certain scenes You can adjust the levels from 10 dB to 10...

Page 47: ... delay time from 0 ms to 5 ms for the Center speaker and from 0 ms to 30 ms for the Rear Center speaker Increasing the delay 1 ms simulates moving the speakers about 30 cm one foot farther away from the listening position 14 DISPLAY SET BLUE BACK AUTO OFF You can set the OSD background to blue if the video source is not being reproduced or the power of the source component is off OSD SHIFT This se...

Page 48: ... is for controlling this unit You can use functions within this area no matter which component control area is selected Component Control Area The component control area is the shaded area shown below Each component has different functions for operation buttons in the component control area The component which was chosen by pressing an input button can be controlled and the display window shows th...

Page 49: ... The display window will show one of the following V AUX TAPE PHONO TUNER MD CD VCR 1 VCR 2 DVD CD R CABLE Cable TV SAT Satellite TV A TV LD digital and regular TV LD player OPTN Option About OPTN OPTN is an extra component control area to be programmed with other remote control functions You cannot setup the manufacturer code in this area Light up function The buttons which are active and the dis...

Page 50: ... CD area CD R button CD R area POWER REC PAUSE DISPLAY SEARCH STOP PLAY PAUSE Numeric buttons 1 to 9 Numeric button 10 Numeric button 0 TV VOL TV INPUT and TV MUTE function if you have set up the manufacturer code for the TV Area Set 10KEY POWER DISPLAY SEARCH STOP PLAY CLEAR INDEX Skip Search PAUSE Stop Numeric buttons 1 to 9 Numeric button 10 Numeric button 0 DISC Disc Skip TV VOL TV INPUT and T...

Page 51: ...TV MUTE TV VOL CH You can control your VCR if you have set up the code for VCR1 Numeric buttons 1 to 9 Numeric button 10 or 0 Enter Set 10KEY DVD button DVD area VCR1 and VCR2 DVR button VCR areas 4 4 Set the manufacturer code for VCR before using the remote control TITLE SOUND SEARCH PLAY PAUSE STOP CLEAR POWER MENU DISPLAY Menu cursor ENTER Return Numeric buttons 1 to 9 Numeric button 10 Numeric...

Page 52: ...e code for VCR1 Numeric buttons 1 to 9 Recall Numeric button 0 Enter TV VOL TV INPUT and TV MUTE function if you have set up the manufacturer code for the TV Area Å button ex LD area 6 6 You can control other components that are not connected to this unit Å cannot be used as an Input selector POWER STOP PLAY PAUSE CLEAR DISPLAY SEARCH SOUND CHAPTER Chapter Search Numeric buttons 1 to 9 Numeric but...

Page 53: ...er component immediately press ENTER and repeat steps 1 to 4 Note If you have already programmed a remote control function to a button the function takes priority over the set up manufacturer code s function Controlling a different component from the source component input you selected 1 1 Repeat steps 1 and 2 of the procedure in Setting the Manufacturer Code in the Remote Control 2 2 Select a Lib...

Page 54: ...w when programming is not done correctly Repeat step 4 until OK appears in the display 6 6 Repeat Steps 4 and 5 to program additional functions 7 7 Press LEARN again to exit the Learn mode Notes If you do not press any button within 30 seconds the learning process is canceled This remote control transmits infrared rays If the other remote control also uses infrared rays this remote control can lea...

Page 55: ... components to AC OUTLETS on the rear panel 2 If the macro you select includes power on off functions the component may turn off if it is already on when you press the macro button For example if your TV is on and you press the SYSTEM POWER macro button the TV turns off 3 The components for which playback can be started are any YAMAHA remote control compatible MD recorders CD players CD recorders ...

Page 56: ... Press the macro button on which you want to program the Macro If you want to change the source component use SOURCE SELECT h g or input buttons When you use input buttons input is selected as a Macro step whereas SOURCE SELECT h g only changes the component The display window shows the button you chose for programming the macro and the component name in alternation 3 3 Press the buttons of the fu...

Page 57: ...nt to clear a learned function or press MACRO to clear a programmed macro using a ball point pen or similar object 3 3 Press and hold CLEAR using a ball point pen or similar object and at the same time press the button from which you want to clear the learned function or macro for about 3 seconds C NG appears in the display window if the operation is unsuccessful Should this occur try doing step 3...

Page 58: ...d hold CLEAR again for about 3 seconds C NG appears in the display window if the operation is unsuccessful 4 4 Press CLEAR to confirm clearing Once you clear a learned function or macro from a button the button reverts to its factory preset function or macro Notes If the remote control is without batteries for more than twenty minutes or if worn out batteries remain in the unit the contents of the...

Page 59: ... speakers cannot be adjusted Setting the Sleep Timer Use this feature to automatically turn off the main unit after the amount of time you set The Sleep Timer is useful when you plan to fall asleep while the main unit is reproducing or recording a source The Sleep Timer also automatically turns off external components connected to AC OUTLETS The Sleep Timer can only be set using the remote control...

Page 60: ...8 Additional Information Digital Sound Field Processing DSP 59 Understanding Sound Fields 59 Hi Fi DSP Programs 60 CINEMA DSP 61 Sound Design of CINEMA DSP 61 CINEMA DSP Programs 62 DSP Parameter 64 Changing Parameter Settings 64 Parameter Descriptions 64 Resetting to the Factory Preset Value 67 ...

Page 61: ...urces in a full circle around the listener The DSP sound field programs can be classified in two types based on the sound field processing method programs that use early reflections only and programs that use both early reflections and reverberation E R Early Reflection Each sound field is distinguished by the structure of the reflected sound The increased processing capability of DSP technology e...

Page 62: ...d field created by the refectory dining hall of a beautiful medieval Gothic monastery located in Royaumont on the outskirts of Paris Village Gate This is the sound field at a jazz club in New York It is in a basement and has a relatively spacious floor area The listener s virtual seat is at the center left of the hall The Bottom Line This is the sound field at stage front in The Bottom Line a famo...

Page 63: ...ograms provide the same quality of sound and sound localization that six channel soundtracks do The built in Dolby Digital decoder brings the professional quality sound designed for movie theaters into your home With this unit s Movie Theater program you can recreate a dynamic sound that gives you the feeling of being at a public theater in your living room using the Dolby Digital technology Dolby...

Page 64: ...al in two channels DOLBY DIGITAL functions when the input signal is encoded with Dolby Digital in more than two channels DTS DIGITAL SUR functions when the input signal is encoded with DTS Note No sound will be output from the Main speakers when a monaural source is played with sound field Program Groups 7 Game and 8 12 CINEMA DSP Input Program Group 7 8 9 10 11 12 ENTERTAINMENT CONCERT VIDEO TV T...

Page 65: ...roductions Sci Fi This program clearly reproduces the broad and expansive cinematic space from the soundtracks of the latest science fiction films Adventure This program is ideal for precisely reproducing the sound design of the newest 70 mm and multichannel soundtrack films The sound field is made to be similar to that of the newest movie theaters so the reverberations of the sound field itself a...

Page 66: ... You can adjust the values of certain digital sound field parameters so the sound fields are recreated accurately in your listening room Not all of the following parameters are found in every program INIT DLY Initial Delay P INT DLY for the presence sound field Control Range 1 99 msec Function This parameter changes the apparent distance from the source sound by adjusting the delay between the dir...

Page 67: ... room with acoustically absorbent surfaces is referred to as dead while a room with highly reflective surfaces is referred to as live The LIVENESS parameter lets you adjust the early reflection decay rate and thus the liveness of the room S DELAY Surround Delay Control Range 0 49 msec The range depends on the signal format Function This parameter adjusts the delay between the direct sound and the ...

Page 68: ...This parameter adjusts the amount of time it takes for the dense subsequent reverberation sound to decay by 60 dB at 1 kHz This changes the apparent size of the acoustic environment over an extremely wide range Description Set a longer reverberation time for dead sources and listening room environments and a shorter time for live sources and listening room environments REV DELAY Reverberation Dela...

Page 69: ...nel in 8 channel stereo mode FR DELAY Front Right Delay Control Range 0 50 msec Function These parameters adjust the sound delay for each channel in 8 channel stereo mode Level Sound Source REV LEVEL Time Resetting to the Factory Preset Value To reset a parameter to the factory preset value Select the parameter you want to reset Then press and hold or until the value stops at the factory preset va...

Page 70: ...Introduction Preparations Basic Operation Advanced Operation Additional Information Appendix 68 Appendix Troubleshooting 69 Specifications 73 ...

Page 71: ... connected to the MD TAPE OUT or CD R OUT jacks of this unit is turned off The protection circuitry has been activated because of short circuit etc The SLEEP timer came on The sound is muted The effect is off A Dolby Surround or DTS decoding sound field program is being used with material not encoded with Dolby Surround or DTS DISPLAY OFF is selected BLUE BACK is OFF at DISPLAY SET What to Do Plug...

Page 72: ...WFR or MAIN when 2 channel encoded software is played The 1E LFE BASS OUT item in the SET MENU is set to SWFR or BOTH and your system does not include a subwoofer The output mode selection for each channel MAIN CENTER or REAR in the SET MENU does not match your speaker configuration The power to the component connected to the REC OUT jacks of this unit is off The 15 MEMORY GUARD item in the SET ME...

Page 73: ...is multipath interference The station is too weak This unit has been unplugged for a long period Weak signal or loose antenna connections Noises result from lightning fluorescent lamps motors thermostats and other electrical component A television set is being used nearby What to Do Check the antenna connections Try using a high quality directional FM antenna Set TUNING MODE to the manual tuning m...

Page 74: ...wo remote controls is too far or near The signal coding or modulation of the other remote control is not compatible with this remote control Memory capacity is full The internal microcomputer has frozen The learning process is incomplete What to Do Replace the batteries with new ones and press RESET inside the battery compartment Press RESET inside the battery compartment The remote control will f...

Page 75: ...ms Phono 2 5 mV 47 kohms Main In 1 V 47 kohms Output Level REC OUT 150 mV 1 kohms PRE OUT 1 V 1 2 kohms SUB WOOFER 4 V 1 2 kohms Video Section Video Signal Type PAL Composite Video Signal Level 1 Vp p 75 ohms S Video Signal Level Y 1 Vp p 75 ohms C 0 286 Vp p 75 ohms Component Video Signal Level Y 1 Vp p 75 ohms PB CB PR CR 0 7 Vp p 75 ohms Signal to Noise Ratio 50 dB Frequency Response MONITOR OU...

Page 76: ... BEI HAMBURG F R OF GERMANY YAMAHA ELECTRONIQUE FRANCE S A RUE AMBROISE CROIZAT BP70 CROISSY BEAUBOURG 77312 MARNE LA VALLEE CEDEX02 FRANCE YAMAHA ELECTRONICS UK LTD YAMAHA HOUSE 200 RICKMANSWORTH ROAD WATFORD HERTS WD1 7JS ENGLAND YAMAHA SCANDINAVIA A B J A WETTERGRENS GATA 1 BOX 30053 400 43 VÄSTRA FRÖLUNDA SWEDEN YAMAHA MUSIC AUSTRALIA PTY LTD 17 33 MARKET ST SOUTH MELBOURNE 3205 VIC AUSTRALIA ...

Page 77: ...oup A B C D E Preset Set 10KEY POWER DISPLAY SEARCH Skip Search STOP PLAY PAUSE Stop Numeric buttons 1 to 9 Numeric button 10 Numeric button 0 DISC Disc Skip TV VOL TV INPUT and TV MUTE function if you have set up the manufacturer code for the TV Area CLEAR INDEX Set 10KEY POWER REC PAUSE DISPLAY SEARCH Skip Search Numeric buttons 1 to 9 Numeric button 10 Numeric button 0 Set 10KEY STOP PLAY PAUSE...

Page 78: ... set up the manufacturer code for the TV Area POWER Numeric buttons 1 to 9 Recall Numeric button 0 MENU Menu cursor ENTER You can control your VCR if you have set up the code for VCR1 DISPLAY CH Enter TV VOL TV INPUT and TV MUTE function if you have set up the manufacturer code for the TV Area POWER STOP PLAY PAUSE Numeric buttons 1 to 9 Numeric button 10 Numeric button 0 Chapter Time TV VOL TV IN...

Reviews: