background image

En

104

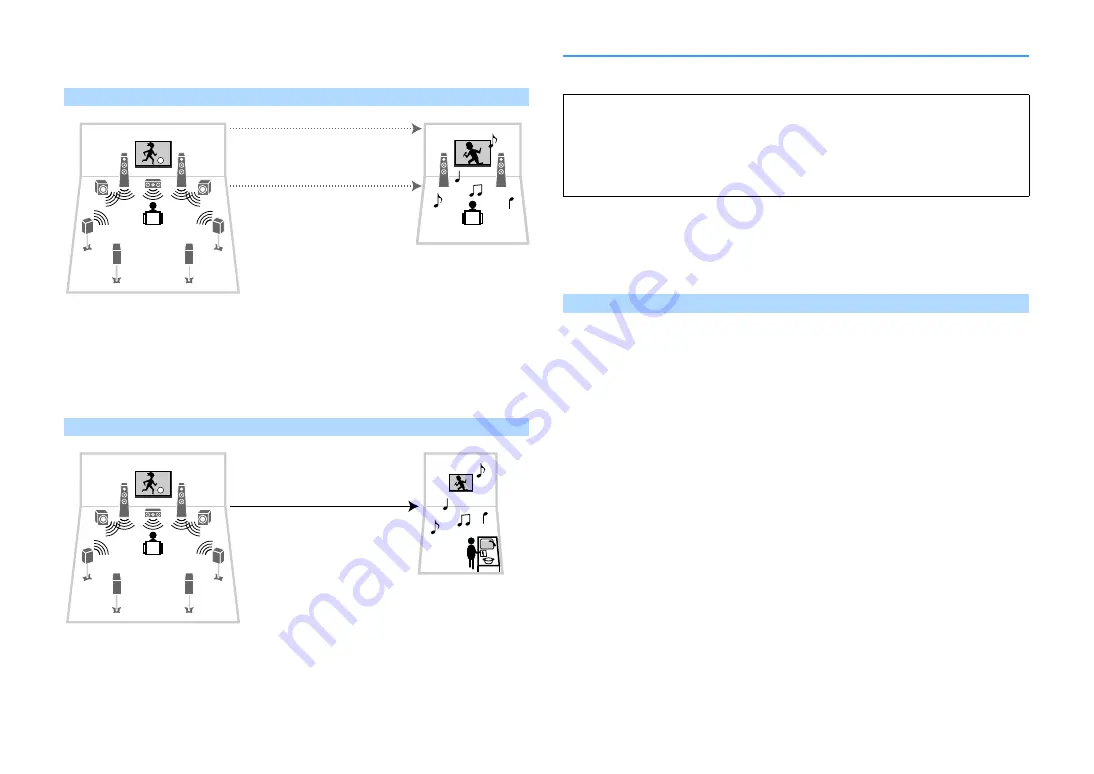
Enjoying videos/music in other rooms

You can enjoy videos/music using TVs placed in other rooms.

Enjoying videos/music using a TV and speakers

Connections

TV (for analog video playback): p.105

TV (for digital video playback): p.106

Speakers (connecting to the unit directly): p.39

Speakers (using an external amplifier): p.105

Enjoying videos/music using only a TV

Connection

TV: p.106

Preparing the multi zone system

Connect the device that will be used in other rooms to the unit.

Connecting speakers to play back audio

Connect speakers to play back audio in Zone2 or Zone3. The connection method varies 

depending on the amplifier being used (the unit or an external amplifier).

Using the unit’s internal amplifier

Connect the speakers placed in Zone2 or Zone3 to the unit with speaker cables. For details, see 

“Connecting Zone2/3 speakers” (p.39).

Living room (main zone)

Guest room 

(Zone2 or Zone3)

Audio (SPEAKERS or ZONE OUT)

Video (ZONE OUT or HDMI)

Living room (main zone)

Kitchen 

(Zone2 or Zone4)

Video/audio (HDMI)

Caution

• Remove the unit’s power cable from the AC wall outlet before connecting speakers or an external 

amplifier.

• Ensure that the bare wires of the speaker cable do not touch one another or come into contact with 

the unit’s metal parts. Doing so may damage the unit or the speakers. If the speaker cables short 
circuit, “Check SP Wires” will appear on the front display when the unit is turned on.

Summary of Contents for RX-A3060

Page 1: ...AV Receiver Owner s Manual EN Read the supplied booklet Safety Brochure before using the unit ...

Page 2: ...ng the power cable 50 7 Selecting an on screen menu language 51 8 Configuring the necessary speaker settings 52 9 Optimizing the speaker settings automatically YPAO 53 Multi Position 55 Angle Height 56 Measuring at one listening position single measure 56 Measuring at multiple listening positions multi measure 59 Checking the measurement results 62 Reloading the previous YPAO adjustments 62 Error ...

Page 3: ...rom a web browser web control 111 Top menu screen 112 Control screen 112 Settings screen 113 Viewing the current status 114 Switching information on the front display 114 Viewing the status information on the TV 114 Configuring playback settings for different playback sources Option menu 115 Option menu items 115 CONFIGURATIONS 120 Configuring input sources Input menu 120 Input menu items 121 Conf...

Page 4: ...162 Audio 164 Video 166 FM AM radio 167 Bluetooth 168 USB and network 169 Error indications on the front display 171 Glossary 172 Audio information audio decoding format 172 Audio information others 174 HDMI and video information 174 Network information 175 Yamaha technologies 175 Supported devices and file formats 176 Supported devices 176 File formats 176 Video signal flow 177 Video conversion t...

Page 5: ...this book The illustrations of the mainunitused in this manual areofthe RX A3060 U S A model unless otherwise specified In this manual illustrations of English menu screens are used as examples Some features are not available in certain regions Due to product improvements specifications and appearance are subject to change without notice This manual explains operations using the supplied remote co...

Page 6: ...se the supplied remote control Batteries Insert the batteries the right way round Operating range of the remote control Point the remote control at the remote control sensor on the unit and remain within the operating range shown below 30 30 Within 6 m 20 ft ...

Page 7: ... TV audio input from the TV and the transmission of HDMI Control signals Various wireless connection methods p 65 The unit supports the Wi Fi feature that allows the unit to connect to your wireless router access point without a network cable connection In addition Wireless Direct enables connecting a mobile device to the unit directly without router Home Audio Network with MusicCast p 73 The unit...

Page 8: ... concert halls and performance spaces around the world CINEMA DSP allows this data to be applied to create sound fields This unit contains a wide variety of sound programs using CINEMA DSP By selecting a sound program that is appropriate to the content of the playback source such as movies music or games you can maximize the acoustical effectiveness of that specific content For example a sound pro...

Page 9: ...oundreflectionfromthe wallsorceiling YPAO R S C is technology that reduces only the unwanted reflections and produces the acoustic perfection for your listening environment YPAO Volume YPAO Volume automatically adjusts the high and low frequency levels at any volume level so that you hear natural sounds even at low volume YPAO 3D measurement The direction angle of front surround and presence speak...

Page 10: ...ore processing After processing High quality video processing From low quality digital video to BD Blu ray disc images any content can be played back as a high quality image p 139 Motion adaptive and edge adaptive deinterlacing Multi cadence including 3 2 pull down detection Up to 6 presets that can be applied separately to each input source You can also apply fine touches such as detail enhanceme...

Page 11: ...2 channel 3 dimensional sound field Example Multi zone function The multi zone function p 103 allows you to play back different input sources in the room where the unit is installed main zone and in other rooms such as Zone2 The following shows examples of use Enjoying music using speakers in another room While enjoying multichannel playback in your living room you can listen to music through the ...

Page 12: ...djustment Playback control including music selection for some sources X For details search for AV CONTROLLER on the App Store or Google Play AV SETUP GUIDE for tablet AV SETUP GUIDE is an application that assists you with cable connections between AV receiver and source devices as well as AV receiver setup This application guides you through the various settings such as speaker connections TV and ...

Page 13: ...CT key Enables disables Pure Direct p 82 f INPUT knob Selects an input source g Front panel door For protecting controls and jacks p 14 h VOLUME knob Adjusts the volume Opening the front panel door To use controls or jacks behind the front panel door gently press the bottom ofthe door to open it Keepthedoor closed whennotusingcontrolsorjacksbehindthefrontpaneldoor Be careful not to trap your finge...

Page 14: ...one p 108 ZONE CONTROL Changes the zone that is controlled by the keys and knobs on the front panel p 108 j INFO WPS key Selects the information displayed on the front display p 114 Enters the wireless network connection setup WPS push button configuration by holding down for 3 seconds p 67 k MEMORY key Registers FM AM radio stations as preset stations p 84 Registers USB network contents as shortc...

Page 15: ...Music Enhancer p 82 is working l CINEMA DSP indicator RX A3060 CINEMA DSP HD lights up when CINEMA DSP p 78 is working CINEMA DSP lights up when CINEMA DSP HD3 is activated RX A2060 CINEMA DSP lights up when CINEMA DSP p 78 is working CINEMA DSP n lights up when CINEMA DSP 3D is activated m STEREO Lights up when the unit is receiving a stereo FM radio signal TUNED Lights up when the unit is receiv...

Page 16: ...L 2 COAXIAL 1 PHONO GND AC IN FM 75ȍ ANTENNA 4 RADIO OPTICAL 1 2 ZONE OUT PRE OUT ZONE 2 F PRESENCE ZONE 3 R PRESENCE SPEAKERS CENTER FRONT SURROUND BACK SURROUND R PRESENCE R 5 6 L R R R L L L F PRESENCE ZONE 2 ZONE 3 BI AMP EXTRA SP1 R L SINGLE AM PRE OUT SUBWOOFER CENTER FRONT SURROUND SUR BACK SINGLE FRONT REAR EXTRA SP2 RS 232C TRIGGER OUT 1 2 12V 0 1A MAX TOTAL NETWORK 3 NET Y PB PR PR PB Y ...

Page 17: ...ting video signals p 45 h TRIGGER OUT 1 2 jacks For connecting to devices that support the trigger function p 50 i REMOTE IN OUT jacks For connecting to an infrared signal receiver emitter that allows you to operate the unit and other devices from another room p 107 j NETWORK jack For connecting to a network with a network cable p 49 k Wireless antenna For connecting to a network device wirelessly...

Page 18: ...o PRESET Select a preset station TUNING Select the radio frequency External device operation keys Letyouplaybackandperformotheroperationsforexternaldevices when an input source other than TUNER is selected p 158 k Sound mode keys Select a sound mode p 77 l INFO key Selects the information displayed on the front display p 114 m SLEEP key Pressing thiskey repeatedly will specifythe time 120min 90 mi...

Page 19: ... 49 5 Connecting other devices p 50 6 Connecting the power cable p 50 7 Selecting an on screen menu language p 51 8 Configuring the necessary speaker settings p 52 9 Optimizing the speaker settings automatically YPAO p 53 10 Connecting to a network device wirelessly p 65 11 Connecting to the MusicCast network p 73 This completes all the preparations Enjoy playing movies music radio and other conte...

Page 20: ...ral 3 dimensional sound fields when front presence speakers are connected but no rear presence speakers Caution Under its default settings the unit is configured for 8 ohm speakers When connecting 6 ohm speakers set the unit s speaker impedance to 6 Ω MIN In this case you can also use 4 ohm speakers as the front speakers For details see Setting the speaker impedance p 27 E 1 2 3 9 4 6 T Y 5 9 R 7 ...

Page 21: ...ad speaker channels For details on how to place overhead speakers presence speakers see Presence speaker layout p 26 7 2 2 5 2 4 system using both surround back and rear presence speakers This speaker system brings out the full performance of the unit and allows you to enjoy a highly natural 3 dimensional sound field with any contents X The surround back speakers and rear presence speakers do not ...

Page 22: ...ayout FrontPresence RearPresence settinginthe Setup menu before performing YPAO p 52 7 2 2 system using surround back speakers This speaker system uses the front presence speakers to produce a natural 3 dimensional sound field and also allows you to enjoy extended surround sounds using the surround back speakers X When using front presence speakers installed to the ceiling or when using the Dolby ...

Page 23: ...d to the ceiling or when using the Dolby Enabled speakers as the presence speakers configure the Layout Front Presence setting in the Setup menu before performing YPAO p 52 RX A3060 only This speaker system creates rear Virtual Presence Speaker VPS using the front center and surround speakers to produce a natural 3 dimensional sound field 7 1 system using surround back speakers This speaker system...

Page 24: ...ystem 5 1 system front 5 1 channel using surround speakers We recommend using this speaker system when you cannot place speakers in the rear side of the room X When placing surround speakers in thefront side set Layout Surround in the Setup menuto Front before performing YPAO p 52 4 5 9 ...

Page 25: ...t place speakers in the rear side of the room X When using front presence speakers installed to the ceiling or when using the Dolby Enabled speakers as the presence speakers configure the Layout FrontPresence settinginthe Setup menubeforeperformingYPAO p 52 2 1 system X Add the center speaker to configure a 3 1 system ...

Page 26: ...ity effectively Overhead Install the presence speakers to the ceiling above the listening position It delivers realistic overhead sound effects and sound field with excellent linkage of front and rear sound spaces effectively Y For details on the installation position of ceiling speakers see Notes on installation of ceiling speakers p 27 Dolby Enabled SP Use the Dolby Enabled speakers as the prese...

Page 27: ... FPR FPL FR FL C Caution Be sure to use speakers that are made for ceiling use and take anti drop measures Ask a qualified contractor or dealer personnel for installation works Setting the speaker impedance Under its default settings the unit is configured for 8 ohm speakers When using a 6 ohm speaker for any channel set the speaker impedance to 6 Ω MIN In this case you can also use 4 ohm speakers...

Page 28: ...epending on the input signal and CINEMA DSP If you have nine speakers use two of them as surround back speakers 1 or rear presence speakers 2 If you have seven speakers use two of them as surround back speakers 3 or front presence speakers 4 If you have five speakers use two of them as surround speakers 5 or front presence speakers 6 X You can also connect up to 2 subwoofers with built in amplifie...

Page 29: ...3 Insertthebarewiresofthecableintothegapontheside upperrightorbottomleft oftheterminal 4 Tighten the terminal Using a banana plug U S A Canada Australia Brazil and General models only 1 Tighten the speaker terminal 2 Insert a banana plug into the end of the terminal Connecting the subwoofer with built in amplifier Use an audio pin cable to connect the subwoofer 1 2 ZONE OUT PRE OUT ZONE 2 F PRESEN...

Page 30: ...al amplifiers for front speakers to have more high quality sounds Example Example Example Bi amp connection Combining with an external power amplifier Hi Fi amplifier multichannel amplifier etc to build an extended system Using the excess internal amplifiers for stereo speakers in another room External power amplifier Main zone Zone2 Bi amp connection Power amp channel expansion Multi zone configu...

Page 31: ...urround back Front presence Rear presence Front 7 2 4 ext Front 34 11 Surround back Front presence Rear presence 7 2 4 ext FP RP 34 9 Surround back Front presence Front 1 room 7 2 2 ext Front 1Zone 35 7 Surround back Front 2 rooms 7 2 ext Front 2Zone 35 7 Surround back 7 2 Bi Amp 36 7 Front presence 5 2 2 Bi Amp 36 7 Surround back 1 room 7 2 Bi Amp 1Zone 37 11 Surround back Front presence Rear pre...

Page 32: ... Connect to 12 FRONT 3 CENTER 45 SURROUND 67 SURROUND BACK ER not used TY not used 9 SUBWOOFER 1 2 Zone2 speakers EXTRA SP 1 2 1 1 2 3 4 6 9 9 7 5 Main zone Zone2 Speaker Connect to 12 FRONT 3 CENTER 45 SURROUND 67 SURROUND BACK ER EXTRA SP 1 TY not used 9 SUBWOOFER 1 2 Zone2 speakers EXTRA SP 2 2 1 1 E 2 3 4 6 9 9 7 5 R Main zone Zone2 ...

Page 33: ...external amplifier for Zone3 p 105 Speaker Connect to 12 FRONT 3 CENTER 45 SURROUND 67 SURROUND BACK ER not used TY not used 9 SUBWOOFER 1 2 Zone2 speakers EXTRA SP 1 Zone3 speakers EXTRA SP 2 1 2 3 4 6 9 9 7 5 1 2 1 2 Zone2 Zone3 Main zone Speaker Connect to 12 FRONT 3 CENTER 45 SURROUND 67 SURROUND BACK ER EXTRA SP 1 TY R PRESENCE PRE OUT via external power amplifier 9 SUBWOOFER 1 2 1 3 4 5 9 9 ...

Page 34: ...al amplifiers for Zone2 and Zone3 p 105 Speaker Connect to 12 FRONT PRE OUT via external power amplifier 3 CENTER 45 SURROUND 67 SURROUND BACK ER EXTRA SP 1 TY EXTRA SP 2 9 SUBWOOFER 1 2 1 3 4 5 9 9 2 E R 6 7 Y T via external amp Speaker Connect to 12 FRONT 3 CENTER 45 SURROUND 67 SURROUND BACK ER F PRESENCE PRE OUT via external power amplifier TY R PRESENCE PRE OUT via external power amplifier 9 ...

Page 35: ...not used 9 SUBWOOFER 1 2 Zone2 speakers EXTRA SP 2 2 1 1 E 2 3 4 6 9 9 7 5 R via external amp Main zone Zone2 Speaker Connect to 12 FRONT PRE OUT via external power amplifier 3 CENTER 45 SURROUND 67 SURROUND BACK ER not used TY not used 9 SUBWOOFER 1 2 Zone2 speakers EXTRA SP 1 Zone3 speakers EXTRA SP 2 1 2 3 4 6 9 9 7 5 1 2 1 2 Zone2 Zone3 Main zone via external amp ...

Page 36: ...amp connection 3 CENTER 45 SURROUND 67 SURROUND BACK ER not used TY not used 9 SUBWOOFER 1 2 1 3 4 5 9 9 2 6 7 Bi amp Speaker Connect to 12 FRONT and EXTRA SP 1 bi amp connection 3 CENTER 45 SURROUND 67 not used ER EXTRA SP 2 TY not used 9 SUBWOOFER 1 2 1 3 4 5 9 9 2 E R Bi amp ...

Page 37: ...nnect to 12 FRONT and EXTRA SP 1 bi amp connection 3 CENTER 45 SURROUND 67 SURROUND BACK ER not used TY not used 9 SUBWOOFER 1 2 Zone2 speakers EXTRA SP 2 2 1 1 2 3 4 6 9 9 7 5 Bi amp Main zone Zone2 Speaker Connect to 12 FRONT and EXTRA SP 1 bi amp connection 3 CENTER 45 SURROUND 67 SURROUND BACK ER F PRESENCE PRE OUT via external power amplifier TY R PRESENCE PRE OUT via external power amplifier...

Page 38: ...UT PRE OUT jacks for connecting an external amplifier for Zone3 p 105 Speaker Connect to 12 FRONT and EXTRA SP 1 bi amp connection 3 CENTER 45 SURROUND 67 not used ER EXTRA SP 2 TY R PRESENCE PRE OUT via external power amplifier 9 SUBWOOFER 1 2 1 3 4 5 9 9 2 E R Y T via external amp via external amp Bi amp ...

Page 39: ... zone Zone2 or Zone3 to be assigned to the EXTRA SP 1 2 jacks in Power Amp Assign p 131 in the Setup menu You can also connect Zone2 and Zone3 speakers using an external amplifier p 105 Caution Before making bi amp connections remove any brackets or cables that connect a woofer with a tweeter Refer to the instruction manual of the speakers for details If you are not making bi amp connections make ...

Page 40: ...and turn off the external power amplifier before connecting them When using the PRE OUT jacks do not connect speakers to the corresponding SPEAKERS terminals When using a pre main amplifier that does not have the volume control bypass turn up the volume of the pre main amplifier enough and fix it In this case do not connect other devices except the unit to the pre main amplifier HDMI OUT ARC ZONE ...

Page 41: ... Channel ARC and 3D and 4K Ultra HD video transmission features Use high speed HDMI cables to enjoy 3D or 4K Ultra HD videos Video jacks To input output only video signals use the following jacks COMPONENT VIDEO jacks Transmit video signals separated into three components luminance Y chrominance blue Pb and chrominance red Pr Use a component video cable with three plugs VIDEO jacks Transmit analog...

Page 42: ... s remote control To use HDMI Control and ARC you need to configure the HDMI settings on the unit For details on the settings see Information on HDMI p 179 HDMI OUT ARC ZONE OUT 1 2 1 BD DVD AV 1 AV 2 R L AV 1 AV 2 AV 3 AV 4 AUDIO 1 AUDIO 2 AUDIO 3 2 TV 1 BD DVD OPTICAL 4 OPTICAL 3 COAXIAL COAXIAL 2 COAXIAL 1 PHONO GND FM 75ȍ ANTENNA 4 RADIO OPTICAL ZONE OUT PRE OUT ZONE 2 F PRESENCE ZONE 3 R PRES...

Page 43: ...OAXIAL COAXIAL 2 COAXIAL 1 HONO GND FM 75ȍ ANTENNA 4 RADIO OPTICAL ZONE OUT PRE OUT ZONE 2 F PRESENCE ZONE 3 R PRESENCE SURROUND SURROUND R 5 6 L R AM PRE OUT SUB FRONT SURROUND SUR BACK SINGLE F Y PB PR PR PB Y AV 1 A MONITOR OUT ZONE OUT Y HDCP2 2 AUDIO 1 2 TV OPTICAL 1 AUDIO OPTICAL R L Y PB PR COMPONENT VIDEO PB PR Y MONITOR OUT ZONE OUT O O L R L R P R P B Y Y PR PB The unit rear Video input ...

Page 44: ...s to another input source X If you make more than one audio connection for one input source an audio signal played back on the unit will be determined according to the Audio Select setting p 119 in the Option menu HDMI connection Connect a video device to the unit with an HDMI cable If you select the input source by pressing AV 1 7 on the remote control the video audio played back on the video dev...

Page 45: ...1 BD DVD OPTICAL 4 OPTICAL 3 COAXIAL COAXIAL 2 COAXIAL 1 PHONO GND FM 75ȍ ANTENNA 4 RADIO OPTICAL 1 2 ZONE OUT PRE OUT ZONE 2 F PRESENCE ZONE 3 R PRESENCE SPEAKERS SURROUND BACK SURROUND R PRESENC R 5 6 L R R L ZONE 2 ZONE 3 F PR SINGLE AM PRE OUT SUBWOOFER CENTER FRONT SURROUND SUR BACK SINGLE FRONT REAR EXTRA SP2 TRIGG OUT 1 2 12V 0 1A MAX TOTAL Y PB PR PR PB Y PR PB Y PR PB AV 1 COMPONENT VIDEO...

Page 46: ...evice Audio output jacks on the unit Digital coaxial AV 1 2 COAXIAL AUDIO 3 COAXIAL Digital optical AV 3 OPTICAL AUDIO 1 2 OPTICAL Analog stereo AV 1 4 AUDIO AUDIO 1 3 AUDIO Turntable PHONO PHONO When connecting a turntable The PHONO jack of the unit is compatible with an MM cartridge To connect a turntable with a low output MC cartridge use a boosting transformer Connecting the turntable to the G...

Page 47: ...d to prepare an HDMI cable that matches the output jacks on your device The VIDEO AUX HDMI IN jack does not support HDCP 2 2 Composite video analog stereo connection Connect a playback device such as game consoles and camcorders to the unit with a video pin cable and a stereo pin cable Ifyou select V AUX astheinput source bypressingV AUX the video audio played back onthe device will be output from...

Page 48: ...P2 2 AV 5 AV 6 AV 7 IN R R L AV 1 AV 2 AV 3 AV 4 AUDIO 1 AUDIO 2 AUDIO 3 2 TV 1 BD DVD OPTICAL 4 OPTICAL 3 COAXIAL COAXIAL 2 COAXIAL 1 PHONO GND FM 75ȍ ANTENNA 4 RADIO OPTICAL 1 2 ZONE OUT PRE OUT ZONE 2 F PRESENCE ZONE 3 R PRESENCE SPEAKERS SURROUND BACK SURROUND R PRESENCE R 5 6 L R R L L ZONE 2 ZONE 3 F PRESENCE SINGLE AM PRE OUT SUBWOOFER CENTER FRONT SURROUND SUR BACK SINGLE FRONT REAR EXTRA ...

Page 49: ... the network parameters manually p 142 You can check whether the network parameters such as IP address are properly assigned to the unit in Network p 152 in the Information menu Y Some security software installed on your PC or the firewall settings of network devices such as a router may block the access of the unit to the network devices or the Internet In these cases configure the security softw...

Page 50: ...the power cable into an AC wall outlet Improper setting of VOLTAGE SELECTOR may cause damage to the unit and create a potential fire hazard After all the connections are complete connect the supplied power cable to the unit and then to an AC wall outlet DMI AV 4 HDCP2 2 AV 5 AV 6 AV 7 IN OUT REMOTE 1 2 SPEAKERS CENTER FRONT SURROUND BACK R PRESENCE R R L L L ZONE 2 ZONE 3 F PRESENCE SINGLE SUBWOOF...

Page 51: ... menu press ON SCREEN X The information on the front display is provided in English only 9 0 ENT MEMORY 10 5 6 8 7 1 2 3 4 MOVIE ENHANCER TUNING PRESET BAND DISPLAY RETURN ENTER ON SCREEN OPTION TOP MENU MUTE PROGRAM VOLUME POP UP MENU PURE DIRECT STRAIGHT INFO SLEEP MUSIC PARTY HDMI OUT TUNER BLUETOOTH MAIN ZONE 2 3 4 MODE SCENE 4 3 2 1 AV AUDIO 5 6 7 V AUX 1 2 3 4 1 2 3 PHONO SUR DECODE USB NET ...

Page 52: ...sing the surround speakers for front 5 1 channel system Virtual CINEMA FRONT select Configuration Layout Surround p 132 then select Front When using the presence speakers for Dolby Atmos or DTS X playback select Configuration Layout Front Presence p 133 then select your front presence speaker layout If you are using the rear presence speakers also select its layout in Rear Presence 7 To exit from ...

Page 53: ...e volume to half If the crossover frequency is adjustable set it to maximum 4 Place the YPAO microphone at your listening position and connect it to the YPAO MIC jack on the front panel X Place the YPAO microphone at your listening position same height as your ears We recommend the use of a tripod as a microphone stand You can use the tripod screws to stabilize the microphone The following screen ...

Page 54: ...ning position single measure p 56 9 0 ENT MEMORY 10 5 6 8 7 1 2 3 4 MOVIE ENHANCER TUNING PRESET BAND DISPLAY RETURN ENTER ON SCREEN OPTION TOP MENU MUTE PROGRAM VOLUME POP UP MENU PURE DIRECT STRAIGHT INFO SLEEP MUSIC PARTY HDMI OUT TUNER BLUETOOTH MAIN ZONE 2 3 4 MODE SCENE 4 3 2 1 AV AUDIO 5 6 7 V AUX 1 2 3 4 1 2 3 PHONO SUR DECODE USB NET SOURCE RECEIVER TVVOL TV CH TV INPUT MUTE CODE SET 9 0 ...

Page 55: ...r if you want others to enjoy surround sound You can take measurements at up to 8 different positions in the room The speaker settings will be optimized to suit the area defined by those positions multi measure No default Select this option if your listening position will always be fixed Take the measurements at only one position The speaker settings will be optimized to suit that position single ...

Page 56: ...Enables the angle height measurement The unit will measure angle of each speaker and height of the presence speakers at the listening position and correct the speaker parameters so that CINEMA DSP can create more effective sound fields No default Disables the angle height measurement 9 0 ENT MEMORY 10 5 6 8 7 1 2 3 4 MOVIE ENHANCER TUNING PRESET BAND DISPLAY RETURN ENTER ON SCREEN OPTION TOP MENU ...

Page 57: ...ame way perform the angle measurement for the positions 2 and 3 Microphone base Pole Microphone base 9 0 ENT MEMORY 10 5 6 8 7 1 2 3 4 MOVIE ENHANCER TUNING PRESET BAND DISPLAY RETURN ENTER ON SCREEN OPTION TOP MENU MUTE PROGRAM VOLUME POP UP MENU PURE DIRECT STRAIGHT INFO SLEEP MUSIC PARTY HDMI OUT TUNER BLUETOOTH MAIN ZONE 2 3 4 MODE SCENE 4 3 2 1 AV AUDIO 5 6 7 V AUX 1 2 3 4 1 2 3 PHONO SUR DEC...

Page 58: ...AO Volume p 116 in the Option menu 6 Disconnect the YPAO microphone from the unit This completes optimization of the speaker settings Caution The YPAO microphone is sensitive to heat so should not be placed anywhere where it could be exposed to direct sunlight or high temperatures such as on top of AV equipment 9 0 ENT MEMORY 10 5 6 8 7 1 2 3 4 MOVIE ENHANCER TUNING PRESET BAND DISPLAY RETURN ENTE...

Page 59: ... When the measurements at the positions you want to measure are completed use the Cursor keys to select CANCEL and press ENTER When you have taken measurements at 8 listening positions the following screen appears automatically when angle height measurement is disabled Proceed to Step 5 when angle height measurement is enabled Proceed to Step 4 9 0 ENT MEMORY 10 5 6 8 7 1 2 3 4 MOVIE ENHANCER TUNI...

Page 60: ...and 3 6 Set the YPAO microphone at the top of the pole and perform the fourth angle measurement The following screen appears on the TV when the fourth angle measurement finishes Microphone base Pole Microphone base 9 0 ENT MEMORY 10 5 6 8 7 1 2 3 4 MOVIE ENHANCER TUNING PRESET BAND DISPLAY RETURN ENTER ON SCREEN OPTION TOP MENU MUTE PROGRAM VOLUME POP UP MENU PURE DIRECT STRAIGHT INFO SLEEP MUSIC ...

Page 61: ...mpletes optimization of the speaker settings Caution The YPAO microphone is sensitive to heat so should not be placed anywhere where it could be exposed to direct sunlight or high temperatures such as on top of AV equipment 9 0 ENT MEMORY 10 5 6 8 7 1 2 3 4 MOVIE ENHANCER TUNING PRESET BAND DISPLAY RETURN ENTER ON SCREEN OPTION TOP MENU MUTE PROGRAM VOLUME POP UP MENU PURE DIRECT STRAIGHT INFO SLE...

Page 62: ...se polarity Size Size of each speaker cross over frequency of the subwoofer Large The speaker can reproduce low frequency signals effectively Small The speaker cannot reproduce low frequency signals effectively Distance Distance from the listening position to each speaker Level Output level adjustment for each speaker b c a Angle Horizontal Horizontal angle of each speaker at the listening positio...

Page 63: ...nected Surround speakers need to be connected in order to use surround back speakers Follow the on screen instructions to exit YPAO turn off the unit and then reconnect the speakers E 7 No MIC The YPAO microphone has been removed Connect the YPAO microphone to the YPAO MIC jack firmly and follow the on screen instructions to start the measurement again E 8 No Signal The YPAO microphone cannot dete...

Page 64: ...he speaker is connected correctly Depending on the type of speakers or room environment this message may appear even if the speakers are connected correctly In this case you can ignore the message W 2 Over Distance A speaker is placed more than 24 m 80 ft from the listening position Select Distance in Result p 62 and move the speaker identified by 24 00m 80 0ft within 24 m 80 ft of the listening p...

Page 65: ...ess router access point Connect a mobile device to the unit directly You can use the application for smartphone tablet AV CONTROLLER p 12 to control the unit from mobiles devices or enjoy music files stored on mobiles devices on the unit For details on connection see Connecting a mobile device to the unit directly Wireless Direct p 71 Y You cannot use Wireless Directsimultaneously with the wired n...

Page 66: ...the TV and switch the TV input to display video from the unit HDMI OUT jack Y Operations with TV screen are available only when your TV is connected to the unit via HDMI 3 Press ON SCREEN 4 Use the Cursor keys to select Setup and press ENTER 5 Use the Cursor keys e r to select Network 6 Use the Cursor keys q w to select Network Connection and press ENTER 7 Use the Cursor keys q w and ENTER to chec...

Page 67: ... the front display If Not connected appears repeat from Step 1 or try another connection method The name of the unit Tap here to start setup The network currently selected About WPS WPS Wi Fi Protected Setup is a standard established by the Wi Fi Alliance which allows easy establishment of a wireless home network ENTER RETURN POP UP MENU TOP MENU INPUT MUTE TVVOL TV CH TV 3 2 1 AUDIO 2 4 3 1 6 V A...

Page 68: ...wireless connection by searching for an access point For details on settings see Searching for an access point p 69 Manual Setting You can set up a wireless connection by entering the required information such as SSID manually For details on settings see Setting up the wireless connection manually p 69 PIN Code You can set up a wireless connection by entering the unit s PIN code into the wireless ...

Page 69: ...TV You need to setup the SSID network name encryption method and security key for your network 1 Use the Cursor keys and ENTER to enter the SSID of the access point and select NEXT 2 Use the Cursor keys q w and ENTER to check the security method of the access point and select NEXT Settings None WEP WPA2 PSK AES Mixed Mode 9 0 ENT MEMORY 10 5 6 8 7 1 2 3 4 MOVIE ENHANCER TUNING PRESET BAND DISPLAY ...

Page 70: ...wireless router access point For details on settings refer to the instruction manual of the wireless router access point 3 Use the Cursor keys e r to select CONNECT and press ENTER to start the connection process When the connection process finishes Completed appears on the TV screen If Not connected appears repeat from Step 1 or try another connection method 4 To exit from the menu press ON SCREE...

Page 71: ...nd select OK X The checkmark indicates the current setting 8 Use the Cursor keys q w and ENTER to check the desired security method and select NEXT Settings None WPA2 PSK AES Y If you select None the connection may be insecure since the communication is not encrypted 9 0 ENT MEMORY 10 5 6 8 7 1 2 3 4 MOVIE ENHANCER TUNING PRESET BAND DISPLAY RETURN ENTER ON SCREEN OPTION TOP MENU MUTE PROGRAM VOLU...

Page 72: ...ilable access points 3 When you are prompted for a password enter the security key displayed in Step 10 12To exit from the menu press ON SCREEN 9 0 ENT MEMORY 10 5 6 8 7 1 2 3 4 MOVIE ENHANCER TUNING PRESET BAND DISPLAY RETURN ENTER ON SCREEN OPTION TOP MENU MUTE PROGRAM VOLUME POP UP MENU PURE DIRECT STRAIGHT INFO SLEEP MUSIC PARTY HDMI OUT TUNER BLUETOOTH MAIN ZONE 2 3 4 MODE SCENE 4 3 2 1 AV AU...

Page 73: ...obile device and tap Setup X If you have already connected other MusicCast compatible devices to the network tap Settings and then Add New Device 3 Operate the MusicCast CONTROLLER application following the on screen instructions then hold down CONNECT on the front panel of the unit for 5 seconds 4 Operate the MusicCast CONTROLLER application followingthe onscreen instructionsto setup the network ...

Page 74: ...can also select an HDMI output jack by selecting a scene p 75 When OUT 1 2 is selected the unit outputs video signals at the highest resolution supportedbybothTVs orprojectors connectedtotheunit Forexample ifyouhave connected a 1080p TV to the HDMI OUT 1 jack and a 720p TV to the HDMI OUT 2 jack the unit outputs 720p video signals If the HDMI OUT 2 jack is assigned to Zone2 or Zone4 p 147 you can ...

Page 75: ...NTER SCENE SCENE key Input Input p 74 AV 1 AUDIO 1 NET RADIO TUNER Audio Select p 119 Auto Auto HDMI Output HDMI Output p 74 OUT 1 2 OUT 1 2 OUT 1 2 OUT 1 2 Mode DSP Program p 77 Sci Fi STRAIGHT 9ch Stereo 9ch Stereo Pure Direct Mode p 137 Auto Auto Auto Auto Enhancer p 82 Off On On On Enhancer Hi Res Mode p 118 On On On On 1 2 3 4 9 0 ENT MEMORY 10 5 6 8 7 1 2 3 4 MOVIE ENHANCER TUNING PRESET BAN...

Page 76: ...cene assignments Input HDMI Output and Mode you can also include the following setting items as the scene assignments in Detail p 123 in the Scene menu SBL SBR SW1 SL SR C L R Set Complete SCENE1 Sound Tone Control YPAO Volume Adaptive DRC Extra Bass Surround CINEMA DSP 3D Mode Dialogue Lift Dialogue Level Subwoofer Trim Video Video Mode Video Adjustment Volume Master Volume Lipsync Lipsync Delay ...

Page 77: ...rround programs and surround decoders in the DSP Program menu p 124 The sound mode can be applied separately to each input source You can check which speakers are currently outputting sound by looking at the speaker indicators on the unit s front panel p 15 or at the Audio Signal screen in the Information menu p 151 About Dolby Atmos Dolby Atmos contents are decoded as Dolby TrueHD or Dolby Digita...

Page 78: ...IC SL SR C L R SW1 FPL FPR Hall in Vienna CLASSICAL CINEMA DSP RX A3060 or CINEMA DSP n RX A2060 lights up Sound program category Sound program Standard This program creates a sound field that emphasizes the surround feeling without disturbing the original acoustic positioning of multichannel audio Its design is based on the concept of the ideal movie theater in which the audience is surrounded by...

Page 79: ... optimum level and emphasizes the depth and clarity of human voices to offer the reverberations of an orchestra box in front the listener at the same time as providing the acoustic positioning and feeling of presence on the stage The surround sound field is relatively moderate but the data for concert hall effects are used to represent the inherent beauty of music The listener will not be fatigued...

Page 80: ...hannel speaker system with stereo headphones by connecting the headphones to the PHONES jack and selecting a sound program or a surround decoder Village Vanguard The Jazz club is on 7th Avenue New York This small club with the low ceiling makes the powerful reflections converge toward the stage located in the center Warehouse Loft The warehouse resembles some lofts in Soho Sound reflects off the c...

Page 81: ...suitable for all sources A real acoustic space including overhead will be created especially when object based audio such as Dolby Atmos content is played Neural X Use the DTS Neural X decoder suitable for all sources A real acoustic space including overhead will be created especially when object based audio such as DTS X content is played Neo 6 Cinema Uses the DTS Neo 6 decoder or DTS ES Matrix d...

Page 82: ... in operation Playing back digitally compressed formats such as MP3 etc with enriched sound Compressed Music Enhancer Compressed Music Enhancer adds depth and breadth to the sound allowing you to enjoy a dynamic sound close to the original sound before it was compressed This function can be used along with any other sound modes In addition Compressed Music Enhancer enhances the quality of uncompre...

Page 83: ...direction of the FM AM antennas Setting the frequency steps Brazil Asia and General models only At the factory the frequency step setting is set to 50 kHz for FM and 9 kHz for AM Depending on your country or region set the frequency steps to 100 kHz for FM and 10 kHz for AM 1 Set the unit to standby mode 2 When holding down STRAIGHT on the front panel press MAIN ZONE z 3 Press PROGRAM repeatedly t...

Page 84: ...p 84 to tune into the desired radio station 2 Hold down MEMORY for seconds The first time that you do register a station the selected radio station will be registered to the preset number 01 Thereafter each radio station you select will be registered to the next empty unused preset number after the most recently registered number X To select a preset number for registering press MEMORY once after ...

Page 85: ...io Data System broadcasting station X We recommend using Auto Preset to tune into the Radio Data System broadcasting stations p 87 2 Press INFO Each time you press the key the displayed item changes About 3 seconds later the corresponding information for the displayed item appears VOLUME STEREO TUNED 01 FM 98 50MHz Preset VOLUME STEREO TUNED Program Type Info Item name VOLUME STEREO TUNED CLASSICS...

Page 86: ...t Found appears for about 3 seconds when no traffic information stations are found Program Service Program service name Program Type Current program type Radio Text Information on the current program Clock Time Current time DSP Program Sound mode name Audio Decoder Decoder name VOLUME STEREO TUNED TP FM101 30MHz TrafficProgram Finished Traffic information station frequency 9 0 ENT MEMORY 10 5 6 8 ...

Page 87: ...ion Browse Moves to the browse screen preset station list Screen Off Closes the screen display and shows the background Press one of the Menu operation keys to redisplay it b c a Menu Submenu Function Utility Memory Registers the current station to the preset number selected in the list Auto Preset Automatically registers FM radio stations with strong signals up to 40 stations Clear Preset Clear t...

Page 88: ...V X If the unit detects the Bluetooth device previously connected the unit automatically connects to the Bluetooth device after Step 1 To establish another Bluetooth connection first terminate the current Bluetooth connection To terminate the Bluetooth connection perform one of the following operations Perform the disconnect operation on the Bluetooth device Select an input source other than Bluet...

Page 89: ... finishes audio played back on the unit will be reproduced from the Bluetooth speakers headphones 6 To exit from the menu press ON SCREEN X To terminate the Bluetooth connection perform the disconnect operation on the Bluetooth speakers headphones Y AirPlay and DSD audio cannot be delivered When the Pure Direct mode is enabled input sources other than the network sources and USB cannot be delivere...

Page 90: ...see Supported devices and file formats p 176 Connecting a USB storage device 1 Connect the USB storage device to the USB jack X If the USB storage device contains many files it may take time to loadthe them In this case Loading appears in the front display Y Stop playback of the USB storage device before disconnect it from the USB jack Connect a USB memory device directly to the USB jack of the un...

Page 91: ...s during playback playback stops automatically You can register your favorite items as shortcuts and access them directly by selecting the shortcut numbers p 110 9 0 ENT MEMORY 10 5 6 8 7 1 2 3 4 MOVIE ENHANCER TUNING PRESET BAND DISPLAY RETURN ENTER ON SCREEN OPTION TOP MENU MUTE PROGRAM VOLUME POP UP MENU PURE DIRECT STRAIGHT INFO SLEEP MUSIC PARTY HDMI OUT TUNER BLUETOOTH MAIN ZONE 2 3 4 MODE S...

Page 92: ... Page Down 10 Pages Up Moves 10 pages forward backward 10 Pages Down Return Returns to the higher level list Now Playing Moves to the playback screen Screen Off Closes the screen display and shows the background Press one of the Menu operation keys to redisplay it a e c b d Menu Function Browse Moves to the browse screen Screen Off Closes the screen display and shows the background Press one of th...

Page 93: ...lays back the current song repeatedly c appears on the TV screen All All Plays back all songs in the current album folder repeatedly v appears on the TV screen 9 0 ENT MEMORY 10 5 6 8 7 1 2 3 4 MOVIE ENHANCER TUNING PRESET BAND DISPLAY RETURN ENTER ON SCREEN OPTION TOP MENU MUTE PROGRAM VOLUME POP UP MENU PURE DIRECT STRAIGHT INFO SLEEP MUSIC PARTY HDMI OUT TUNER BLUETOOTH MAIN ZONE 2 3 4 MODE SCE...

Page 94: ...h music server For a PC with Windows Media Player installed The setting procedure may vary depending on the PC and Windows Media Player version The following procedure is a setup example for Windows Media Player 12 and Windows Media Player 11 For Windows Media Player 12 1 Start Windows Media Player 12 on your PC 2 Select Stream then Turn on media streaming 3 Click Turn on media streaming 4 Select ...

Page 95: ...iles such as images and hidden files during playback playback stops automatically You can register your favorite items as shortcuts and access them directly by selecting the shortcut numbers p 110 9 0 ENT MEMORY 10 5 6 8 7 1 2 3 4 MOVIE ENHANCER TUNING PRESET BAND DISPLAY RETURN ENTER ON SCREEN OPTION TOP MENU MUTE PROGRAM VOLUME POP UP MENU PURE DIRECT STRAIGHT INFO SLEEP MUSIC PARTY HDMI OUT TUN...

Page 96: ...2 Menu Function 1 Page Up Moves to the previous next page of the list 1 Page Down 10 Pages Up Moves 10 pages forward backward 10 Pages Down Return Returns to the higher level list Now Playing Moves to the playback screen Screen Off Closes the screen display and shows the background Press one of the Menu operation keys to redisplay it a e c b d Menu Function Browse Moves to the browse screen Screen...

Page 97: ...e Plays back the current song repeatedly c appears on the TV screen All All Plays back all songs in the current album folder repeatedly v appears on the TV screen 9 0 ENT MEMORY 10 5 6 8 7 1 2 3 4 MOVIE ENHANCER TUNING PRESET BAND DISPLAY RETURN ENTER ON SCREEN OPTION TOP MENU MUTE PROGRAM VOLUME POP UP MENU PURE DIRECT STRAIGHT INFO SLEEP MUSIC PARTY HDMI OUT TUNER BLUETOOTH MAIN ZONE 2 3 4 MODE ...

Page 98: ...nd the playback screen is displayed X To return to the previous screen press RETURN You can register your favorite items as shortcuts and access them directly by selecting the shortcut numbers p 110 9 0 ENT MEMORY 10 5 6 8 7 1 2 3 4 MOVIE ENHANCER TUNING PRESET BAND DISPLAY RETURN ENTER ON SCREEN OPTION TOP MENU MUTE PROGRAM VOLUME POP UP MENU PURE DIRECT STRAIGHT INFO SLEEP MUSIC PARTY HDMI OUT T...

Page 99: ...d backward 10 Pages Down Return Returns to the higher level list Now Playing Moves to the playback screen Screen Off Closes the screen display and shows the background Press one of the Menu operation keys to redisplay it a e c b d Menu Function Bookmark On Adds the current station to the Bookmarks folder p 100 Browse Moves to the browse screen Screen Off Closes the screen display and shows the bac...

Page 100: ... PC and enter the vTuner ID Y To use this feature you need to create your personal account Create your account using your e mail address 4 Register your favorite radio stations Click the Add icon next to the station name X To remove the station from the My__Favorites folder select My__Favorites in the Home screen and then click the Remove icon next to the station name You can switch the language E...

Page 101: ... using the AirPlay password p 113 Playback of iTunes iPod music contents Follow the procedure below to play back iTunes iPod music contents on the unit 1 Turn on the unit and start iTunes on the PC or display the playback screen on the iPod If the iTunes iPod recognizes the unit the AirPlay icon appears Y If the icon does not appear check whether the unit and PC iPod are connected to the router pr...

Page 102: ...ume the volume may be unexpectedly loud This could result in damage to the unit or speakers If the volume suddenly increases during playback stop playback on the iTunes iPod immediately Menu Function Screen Off Closes the screen display and shows the background Press one of the Menu operation keys to redisplay it a c b 9 0 ENT MEMORY 10 5 6 8 7 1 2 3 4 MOVIE ENHANCER TUNING PRESET BAND DISPLAY RET...

Page 103: ...ince there are many possible ways to use the unit in a multi zone configuration we recommend that you consult with your nearest authorized Yamaha dealer or service center about the multi zone connections that best meet your requirements Enjoying music in other rooms You can enjoy music using speakers placed in other rooms Connections Speakers connecting to the unit directly p 39 Speakers using an ...

Page 104: ...varies depending on the amplifier being used the unit or an external amplifier Using the unit s internal amplifier Connect the speakers placed in Zone2 or Zone3 tothe unit with speaker cables For details see Connecting Zone2 3 speakers p 39 Living room main zone Guest room Zone2 or Zone3 Audio SPEAKERS or ZONE OUT Video ZONE OUT or HDMI Living room main zone Kitchen Zone2 or Zone4 Video audio HDMI...

Page 105: ...a component video cable connect the video monitor to the MONITOR OUT ZONE OUT COMPONENT VIDEO jacks with a component video cable To assign the MONITOR OUT ZONE OUT jacks to the video monitor for Zone2 or Zone3 set Monitor Out Assign p 146 in the Setup menu to Zone2 or Zone3 HDMI OUT ARC ZONE OUT 1 2 HDMI 1 BD DVD AV 1 AV 2 AV 3 AV 4 HDCP2 2 AV 1 AV 2 AV 3 AV 4 AUDIO 2 AUDIO 3 1 BD DVD OPTICAL 4 3 ...

Page 106: ... 2 jack by setting Audio Output p 147 in the Setup menu to On or Off default You can also use speakers placed in Zone2 to output audio p 39 HDMI OUT ARC ZONE OUT 1 2 HDMI 1 BD DVD AV 1 AV 2 AV 3 AV HDCP AV 1 AV 2 AV 3 AV 4 1 AUDIO 2 AUDIO 3 1 BD DVD OPTICAL 4 AL 3 COAXIAL COAXIAL 2 COAXIAL FM 75ȍ ANTENNA 4 RADIO OPTICAL ZONE OUT PRE OUT ZONE 2 F PRESENCE ZONE 3 R PRESENCE SURRO SURROUND R 5 6 L R ...

Page 107: ...al receiver HDMI OUT ARC ZONE OUT 1 2 HDMI 1 BD DVD AV 1 AV 2 AV 3 AV 4 HDCP2 2 AV 5 AV 6 AV 7 IN OUT REMOTE 1 AV 2 AV 3 AV 4 DVD AXIAL COAXIAL TENNA RADIO OPTICAL 1 2 ZONE OUT PRE OUT ZONE 2 F PRESENCE ZONE 3 R PRESENCE SPEAKERS CENTER SURROUND BACK SURROUND R PRESENCE R 5 6 L R R L L ZONE 2 ZONE 3 F PRESENCE SINGLE AM PRE OUT SUBWOOFER CENTER FRONT SURROUND SUR BACK SINGLE FRONT REAR EXTRA SP2 T...

Page 108: ...io p 98 Playing back iTunes iPod music with AirPlay p 101 Y You can also use the web control p 111 to control Zone2 Zone3 or Zone4 AirPlay is available in Zone2 and Zone3 only when AirPlay playback is ongoing in the main zone X The Zone2 Zone3 input automatically switches in conjunction with the input source selected in the main zone when Main Zone Sync is selected as the Zone2 Zone3 input with th...

Page 109: ...oms party mode The party mode allows you to play back in all zones the same music that is being played back in the main zone During the party mode stereo playback is automatically selected for all zones Utilize this function when you want to use main zone music as background music for a house party 1 Press PARTY Each time you press the key the party mode is turned on or off When the party mode is ...

Page 110: ...tered item is turned off or not connected to the network The registered network content is temporarily unavailable or out of service The registered item file has been deleted or moved to another location A Bluetooth connection cannot be established When you register music files stored on a USB storage device or a PC NAS the unitmemorizestherelativepositionofthemusicfilesin thefolder If youhave add...

Page 111: ...of the unit in the address bar of the web browser Example X You can check the IP address of the unit in Network p 152 in the Information menu You can bookmark the unit s IP address in the browser or create a shortcut link p 113 to access the web control screen quickly in the future However if you are using a DHCP server the IP address of the unit may change each time the unit is turned on If you h...

Page 112: ... Reloads the current status of the unit Control screen a PLAY INFO Selects an input source or controls playback for the selected zone b TOP MENU Moves to the top menu screen c SCENE Selects a scene for the selected zone d POWER Turns on off the power for the selected zone e VOLUME Adjusts the volume or mutes the audio output for the selected zone You can also select the increments used for volume ...

Page 113: ...are Updates the firmware of the unit by using the firmware you have downloaded on the PC Follow the on screen instructions to start the firmware update Create Link Creates a shortcut link to the desired control screen Tips Displays tips for use of the web control Licenses Displays the licenses of the software used in the unit b BACK Moves to the top menu screen c RELOAD Reloads the current status ...

Page 114: ...SERVER AirPlay Song song title Artist artist name Album album name DSP Program sound mode name Audio Decoder decoder name VOLUME Audio Decoder Info Item name VOLUME Surround AV1 Information NET RADIO Song song title Album album name Station station name DSP Program sound mode name Audio Decoder decoder name MusicCast DSP Program sound mode name Audio Decoder decoder name Currently input source Ite...

Page 115: ...lume YPAO Vol Enables disables YPAO Volume 116 Adaptive DRC A DRC Sets whether the dynamic range from maximum to minimum is automatically adjusted when the volume is adjusted 116 Dialogue Dialog Dialogue Level Dialog Lvl Adjusts the volume of dialogue sounds 117 DTS Dialogue Control DTS Dialog Adjusts the volume of dialogue sounds for DTS X contents 117 Dialogue Lift Dialog Lift Adjusts the percei...

Page 116: ...ic range from maximum to minimum is automatically adjusted when the volume level is adjusted When it is set to On it is useful for listening to playback at a low volume at night Settings If On is selected the dynamic range becomes narrow at a low volume and wide at a high volume Input Settings Input Settings Input Trim In Trim Corrects volume differences between input sources 119 Audio Select A Se...

Page 117: ...en one of the following conditions is met One of the sound programs except for 2ch Stereo and 9ch Stereo is selectedwhen front presence speakers are used Virtual Presence Speaker VPS p 78 is working You may hear dialogue sounds from the surround speakers depending on the listening position Setting range 0 to 5 The bigger the value the higher the position Lipsync Adjustment Lipsync Adj Adjusts the ...

Page 118: ... PCM and FLAC using Compressed Music Enhancer Settings Video Processing Video Process Configures the video signal processing settings Video Mode V M Enables disables the video signal processing resolution aspect ratio and video adjustments settings configured in Processing p 139 in the Setup menu Settings Video Adjustment Video Adjust Selects a video adjustment setting from presets you have config...

Page 119: ...ereo and monaural for FM radio reception Settings Auto Auto Automatically selects the audio input jack in the following priority order 1 HDMI input 2 Digital input COAXIAL or OPTICAL 3 Analog input AUDIO HDMI HDMI Always selects HDMI input No sounds are produced when no signals are input through the HDMI jack Coax Opt Coax Opt Always selects digital input COAXIAL or OPTICAL No sounds are produced ...

Page 120: ... to select an input source to be configured and press the cursor key q The input source of the unit also changes X You can still switch the input source by using cursor keys e r after Step 3 4 Use the cursor keys q w to select an item and press ENTER X To return to the previous screen during menu operations press RETURN 5 Use the cursor keys to select a setting and press ENTER 6 To exit from the m...

Page 121: ...ENTER to rename and select ENTER to confirm the entry X To clear the entry select CLEAR 6 Use the cursor keys to select OK and press ENTER X To restore the default setting select RESET 7 To exit from the menu press ON SCREEN Decoder Mode Sets the format of digital audio playback to DTS For example if the unit does not detect DTS audio and outputs noise set Decoder Mode to DTS Input sources AV 1 7 ...

Page 122: ...ne menu You can change the settings of the SCENE function p 75 using the TV screen 1 Press ON SCREEN 2 Use the cursor keys to select Scene and press ENTER 3 Use the cursor keys e r to select a scene to be configured and press the cursor key q 4 Use the cursor keys q w to select an item and press ENTER 5 Use the cursor keys and ENTER to change the setting 6 To exit from the menu press ON SCREEN Off...

Page 123: ...Volume from the assignments for SCENE2 TV and include Volume in the assignments for SCENE4 RADIO Choices Default Input HDMI Output Mode selected Sound Surround Video Volume Lipsync Speaker Setup not selected Item Function Page Save Registers the current settings in the selected scene 123 Load Loads the settings registered for the selected scene You can also configure the SCENE link playback settin...

Page 124: ...ct OK and press ENTER X To restore the default setting select RESET 5 To exit from the menu press ON SCREEN Reset Restores the default settings p 75 for the selected scene Configuring sound programs surround decoders DSP Program menu You can change the settings of the sound programs and surround decoders using the TV screen 1 Press ON SCREEN 2 Use the cursor keys to select DSP Program and press EN...

Page 125: ...d and presence sound field generation 1 ms to 99 ms Higher to enhance the delay effect and lower to reduce it Surround Initial Delay Adjusts the delay between the direct sound and surround sound field generation 1 ms to 49 ms Higher to enhance the delay effect and lower to reduce it Surround Back Initial Delay Adjusts the delay between the direct sound and surround back sound field generation Room...

Page 126: ... 0 to 5 Higher to enhance the front side and lower to enhance the rear side Left Right Balance Adjusts the left and right volume balance 5 to 0 to 5 Higher to enhance the right side and lower to enhance the left side Height Balance Adjust the height volume balance using the presence speakers 0 to 5 to 10 Higher to enhance the upside and lower to enhance the downside The presence speakers do not pr...

Page 127: ...ress ON SCREEN 2 Use the cursor keys to select Setup and press ENTER 3 Use the cursor keys e r to select a menu 4 Use the cursor keys q w to select an item and press ENTER X To return to the previous screen during menu operations press RETURN 5 Use the cursor keys to select a setting and press ENTER 6 To exit from the menu press ON SCREEN ...

Page 128: ...d and their size 132 Surround Back Selects whether or not surround back speakers are connected and their size 133 Front Presence Selects whether or not front presence speakers are connected and their size 133 Rear Presence Selects whether or not rear presence speakers are connected and their size 133 Subwoofer 1 Subwoofer 2 Selects whether or not a subwoofer is connected to the SUBWOOFER 1 or SUBW...

Page 129: ...ing resolution aspect ratio and video adjustments 139 HDMI HDMI Control Enables disables HDMI Control You can also configure the relevant settings such as ARC and TV audio input 140 Audio Output Selects a device to output audio 141 Standby Through Select whether to output videos audio input through HDMI jacks to the TV when the unit is in standby mode 141 Network Network Connection Selects the net...

Page 130: ...splayed on the front display or TV screen 146 Monitor Out Assign Select the zone for which the MONITOR OUT ZONE OUT jacks are used 146 HDMI OUT2 Assign Select the zone for which the HDMI OUT 2 ZONE OUT jack is used 147 Party Mode Set Enables disables switching to the party mode for each zone 147 Function Input Assignment Assigns the COMPONENT VIDEO COAXIAL and OPTICAL jacks to another input source...

Page 131: ... parameters to Pattern1 Basic Select this option when you use the basic speaker configuration up to 9 channel plus rear presence speakers p 21 7 2 1Zone Select this option when you use Zone2 or Zone3 speakers in addition to the 7 2 system in the main zone p 32 You can select a zone to be assigned to the EXTRA SP 1 jacks default Zone2 7 2 2 1Zone Select this option when you use Zone2 or Zone3 speak...

Page 132: ...ion when you use the 7 2 4 system including bi amp front speakers and front presence and rear presence channel expansion using an external amplifier p 37 5 2 4 Bi Amp ext RP RX A3060 only Select this option when you use the 5 2 4 system including bi amp front speakers and rear presence channel expansion using an external amplifier p 38 Large Select this option for large speakers The front speakers...

Page 133: ...y default 80 Hz Small x2 Select this option when two small speakers are connected The subwoofer or front speakers will produce surround back channel low frequency components lower than the specified crossover frequency default 80 Hz None Select this option when no surround back speakers are connected The surround speakers will produce surround back channel audio Large Select this option for large ...

Page 134: ...layout when 2 subwoofers are used Settings X This setting is not available when Subwoofer 1 or Subwoofer 2 is set to None Rear Select this option when surround speakers are placed on the rear side of the room Front Select this option when surround speakers are placed on the front side of the room Virtual CINEMA FRONT p 80 works in this case Front Height Select this option when front presence speak...

Page 135: ...o select a speaker and press ENTER X To restore the default settings for all speakers select PEQ Data Clear and then OK To copy the parametric equalizer values acquired with Auto Setup p 53 to the Manual fields for fine adjustment select PEQ Data Copy and then an equalizer type 4 Use the cursor keys e r to select a center frequency from the 7 preset bands 4 for subwoofer and the cursor keys q w to...

Page 136: ...automatic adjustment does not work depending on the TV connected to the unit In this case adjust the delay manually in Adjustment Off Does not output test tones On Outputs test tones automatically when you adjust the speaker balance or equalizer Disable Disable the Lipsync adjustment for the selected input source Enable Enables the Lipsync adjustment for the selected input source Auto Adjusts the ...

Page 137: ...hether to automatically adjust the CINEMA DSP effect level Settings Maximum Produces audio without adjusting the dynamic range Standard Optimizes the dynamic range for regular home use Minimum Auto Sets the dynamic range for clear sound even at night or at low volumes When playing back Dolby TrueHD signals the dynamic range is automatically adjusted based on the input signal information Off Sets t...

Page 138: ...using the surround speakers When VSBS is enabled the unit creates VSBS when no surround back speakers are connected Settings X VSBS is effective only when 6 1 or 7 1 channel content is played back Object Decode Mode Enables disables playback of object based audio signals such as Dolby Atmos or DTS X contents Settings X If audio output is not available when Dolby Atmos or DTS X signals are input se...

Page 139: ...6p signals are converted into 720p 1080i 1080p or 2160p 4K signals Adjustment Configures the video adjustments when Video Mode is set to Processing You can register the video adjustments as presets up to 6 Setup procedure 1 Use the cursor keys q w to select a preset number and press ENTER 2 Use the cursor keys q w to select an item 3 Use the cursor keys e r to select a setting and press ENTER 4 To...

Page 140: ...gs Y To use HDMI control you need to perform the HDMI Control link setup p 179 after connecting HDMI Control compatible devices TV Audio Input Selects an audio input jack of the unit to be used for TV audio input when HDMI Control is set to On The unit s input source automatically switches to TV audio when the TV input is switched to its built in tuner Settings AUDIO 1 3 Default AUDIO 1 Y When usi...

Page 141: ...io signals when the unit is turned on Standby Through Select whether to output videos audio input through HDMI jacks to the TV when the unit is in standby mode If this function is set to On or Auto you can use the input selection keys AV 1 7 and V AUX to select an HDMI input even when the unit is in standby mode the standby indicator on the unit blinks Settings Off Disables ARC On Enables ARC Off ...

Page 142: ...rk with a commercially available network cable p 49 Wireless Wi Fi Select this option when you want to connect the unit to a network via the wireless router access point For details on settings see Connecting the unit to a wireless network p 66 Wireless Direct Select this option when you want to connect a mobile device to the unit directly For details on settings see Connecting a mobile device to ...

Page 143: ...ER 5 To save the changes use the cursor keys to select OK and press ENTER 6 To exit from the menu press ON SCREEN Network Name Edits the network name the unit s name on the network displayed on other network devices Setup procedure 1 Press ENTER to enter the name edit screen 2 Use the cursor keys and ENTER to rename and select ENTER to confirm the entry X To clear the entry select CLEAR 3 Use the ...

Page 144: ...This setting is not available when Network Standby p 143 is set to Off Audio Send Configures the Bluetooth settings when the unit is used as the Bluetooth audio transmitter Transmitter Enables disables the Bluetooth audio transmitter function When this function is enabled you can enjoy audio played back on the unit using Bluetooth speakers headphones p 89 Settings Off Disables the Bluetooth functi...

Page 145: ...withvolumecontroltotheunit disablethe volume adjustment for the corresponding zone Settings X This setting is not available depending on the Power Amp Assign setting p 131 Max Volume Sets the Zone2 or Zone3 limit value of the volumes Setting range 30 0 dB to 15 0 dB 5 0 dB increments 16 5 dB X This setting is available only when Volume is set to Variable Initial Volume Sets the Zone2 or Zone3 init...

Page 146: ...Rename Changes the zone name for Zone4 displayed on the front display or TV screen You can change the zone name in the same manner as Zone Rename in Main Zone Set p 145 Monitor Out Assign Select the zone for which the MONITOR OUT ZONE OUT COMPONENT VIDEO and VIDEO jacks are used Settings Main Zone2 Zone3 Y To watch videos played back on a video device on the zone video monitor you need to connect ...

Page 147: ... Function Configures the functions that make the unit easier to use Input Assignment Assigns the COMPONENT VIDEO COAXIAL and OPTICAL jacks to another input source Procedure Example assigning the OPTICAL jack to the input source AV 2 1 Use the cursor keys to select the cell at the intersection of AV 2 and Optical and press ENTER 2 Use the cursor keys to select and press ENTER 3 To exit from the men...

Page 148: ...ooth USB Settings Manual Switches the output level for electronic signal transmission manually when Trigger Mode is set to Manual This setting can also be used to confirm proper function of the external device connected via the TRIGGER OUT jack Choices On Displays short messages on the TV screen Off Does not display short messages on the TV screen Piano Displays the piano image on the TV screen wh...

Page 149: ...electronic signal transmission is synchronized with the input switching in Zone2 Zone3 When Trigger Mode is set to Power electronic signal transmission is synchronized with power status of Zone3 When Trigger Mode is set to Source electronic signal transmission is synchronized with input switching in Zone3 Zone4 When Trigger Mode is set to Power electronic signal transmission is synchronized with p...

Page 150: ... restart the unit Settings Y When ECO Mode is set to On the front panel display may become dark If you want to play audio at high volume set ECO Mode to Off Language Select an on screen menu language Settings English Japanese French German Spanish Russian Italian Chinese X The information on the front display is provided in English only Off Does not set the unit to standby mode automatically 20 Mi...

Page 151: ...ont surround LFE For example 5 1 3 2 0 1 means 5 1ch in total 3 front channels 2 surround channels and LFE When DTS X content is played back For example 7 1 4 denotes standard 7 1 channel plus 4 for overhead speaker channels Sampling The number of samples per second of the input digital signal Bitrate The amount of data per second of the input bitstream signal Dialogue The dialogue normalization l...

Page 152: ...ary DNS server DNS Server S The IP address of the secondary DNS server MAC Address Ethernet MAC address MAC Address Wi Fi vTuner ID vTuner ID Network Name Network name the unit s name on the network p 143 MusicCast Network The status of the MusicCast network connection Wired Wireless The status of the wired or wireless connection SSID When using wireless Wi Fi network connection The SSID of the wi...

Page 153: ...ge SPEAKER IMP Changes the speaker impedance setting 154 REMOTE SENSOR Turns on off of the remote control sensor on the main unit 154 REMOTE CON AMP Selects the unit s remote control ID 154 TUNER FRQ STEP Brazil Asia and General models only Changes the FM AM tuning frequency setting 154 TV FORMAT Switches the video signal type 155 MONITOR CHECK Removes the limitation on HDMI video output 155 4K MO...

Page 154: ...ontrol 1 To select ID1 hold down the cursor key e and SCENE 1 together for 3 seconds To select ID2 hold down the cursor key e and SCENE 2 together for 3 seconds Changing the FM AM tuning frequency setting TUNER FRQ STEP Brazil Asia and General models only Change the FM AM tuning frequency setting of the unit depending on your country or region Settings 6 Ω MIN Select this option when you connect 6...

Page 155: ...ing up recovering the settings RECOV BACKUP Creates backup of the settings of the unit or recovers the settings from the backup Backup recovery procedure 1 Press STRAIGHT repeatedly to select BACKUP or RECOVERY and press INFO to start the process Choices YES Enables the monitor check function Outputs video signals with a resolution supported by the TV only SKIP Disables the monitor check function ...

Page 156: ...NETWORK and press INFO to start firmware update Choices X If the unit detects newer firmware over the network the corresponding message will be displayed after ON SCREEN is pressed In this case you can also update the unit s firmware by following the procedure in Updating the unit s firmware via the network p 160 Checking the firmware version VERSION Check the version of firmware currently install...

Page 157: ... If there are multiple remote control codes register the first code in the list If that does not work try the other codes 2 Press CODE SET SOURCE blinks twice Perform each of the following steps within 1 minute Otherwise the setting will be canceled If this happens repeat from Step 2 3 Press TV z 4 Use the Numeric keys to enter the 4 digit remote control code Once the remote control code is succes...

Page 158: ...Y and numeric keys You can operate the unit after pressing RECEIVER lights up in orange and an external device after pressing SOURCE lights up in green For example if you register the remote control code of your external device on TUNER you can operate the unit s built in FM AM radio after pressing RECEIVER and the external device after pressing SOURCE Y Thesekeys workonlyif thecorrespondingfuncti...

Page 159: ...ngs a Press CODE SET b Press RECEIVER c Use the Numeric keys to enter 9981 ENTER RETURN POP UP MENU TOP MENU INPUT MUTE TVVOL TV CH TV 3 2 1 AUDIO 2 4 3 1 6 V AUX 7 5 AV BLUETOOTH NET PHONO USB TUNER 4 3 2 1 8 7 6 5 9 0 MAIN ZONE 2 3 4 4 1 2 3 SCENE MUTE OPTION ON SCREEN DISPLAY MODE MOVIE MUSIC INFO SLEEP ENT PRESET TUNING VOLUME PROGRAM HDMI OUT PARTY BAND SUR DECODE STRAIGHT ENHANCER PURE DIREC...

Page 160: ... not operate the unit or disconnect the power cable or network cable during firmware update Firmware update takes about 20 minutes or more depending on your Internet connection speed If the unit is connected to the wireless network network update may not be possible depending on the condition of the wireless connection In this case update the firmware using the USB memory device p 156 For details ...

Page 161: ...ces such as BD DVD players to the unit enable HDMI Control on each device and perform the HDMI Control link setup This setup is required every time you add a new HDMI Control compatible device to your system For information on how HDMI Control works between your TV and playback devices refer to the instruction manuals for each device I want to turn off the on screen messages displayed during opera...

Page 162: ...e than 10 seconds to initialize and reboot the unit If the problem persists disconnect the power cable from the AC wall outlet and plug it again The power turns off standby mode immediately The unit was turned on while a speaker cable was shorted Twist the bare wires of each speaker cable firmly and reconnect to the unit and speakers p 29 The unit enters standby mode automatically The sleep timer ...

Page 163: ...ntrol to control the unit the key lights up in orange The remote control IDs of the unit and the remote control are not identical Change the remote control ID of the unit or the remote control p 154 External devices cannot be controlled using the remote control The remote control is set to control the unit Press SOURCE to set the remote control to control external devices the key lights up in gree...

Page 164: ...s defective If there is no problem with the connection replace with another speaker cable The speaker is malfunctioning To check it replace with another speaker If the problem persists the unit may be malfunctioning No sound is coming from the subwoofer The playback source does not contain LFE or low frequency signals To check if the subwoofer is working properly use Test Tone in the Setup menu p ...

Page 165: ...e front speakers work on multichannel audio The playback device is set to output 2 channel audio such as PCM only To check it use Audio Signal in the Information menu p 151 If necessary change the digital audio output setting on the playback device Noise hum is heard The unit is too close to another digital or radio frequency device Move the unit further away from the device The cable connecting t...

Page 166: ...back contents that require HDCP 2 2 compatible devices both the TV and playback device must support HDCP 2 2 The playback device that supports HDCP 2 2 is connected to the VIDEO AUX HDMI IN jack To play back contents that require HDCP 2 2 compatible devices connect the playback device to the HDMI AV 1 7 jack p 44 The number of devices connected to the HDMI OUT jack is over the limit Disconnect som...

Page 167: ...ostats or other electrical equipment It is difficult to completely eliminate noise It may be reduced by using an outdoor AM antenna Radio stations cannot be selected automatically Your area is too far from the FM station transmitter Select the station manually p 84 Use an outdoor antenna We recommend using a sensitive multi element antenna The AM radio signal is weak Adjust the AM antenna orientat...

Page 168: ...egistered on the Bluetooth device is not working for some reason Delete the connection information on the Bluetooth device and then establish a connection between the Bluetooth device and the unit again p 88 No sound is produced or the sound is interrupted during playback The volume of the Bluetooth device is set too low Turn up the volume of the Bluetooth device The Bluetooth device is not set to...

Page 169: ...int Move the unit and the wireless router access point in a location where there are no obstacles between them Wireless network is not found Microwave ovens or other wireless devices in your neighborhood might disturb the wireless communication Turn off these devices Access to the network is restricted by the firewall settings of the wireless router access point Check the firewall setting of the w...

Page 170: ...the radio station The iPod does not recognize the unit when using AirPlay The unit is connected to a multiple SSID router Access to the unit might be restricted by the network separation function on the router Connect the iPod to the SSID which can access the unit The application for smartphone tablet AV CONTROLLER does not detect the unit The unit and smartphone tablet are not in the same network...

Page 171: ...Wait until the message disappears If the message stays more than 3 minutes turn off the unit and turn it on again RemID Mismatch The remote control IDs of the unit and the remote control are not identical Change the remote control ID of the unit or the remote control p 154 Remote Off The unit cannot be operated from remote control because the remote control sensor on the main unit is turned off Us...

Page 172: ... high definition home theater experience with the quality of the studio master Dolby TrueHD can carry up to eight channels of 96 kHz 24 bit audio up to six channels of 192 kHz 24 bit audio simultaneously This technology is used for audio on BD Blu ray discs DSD Direct Stream Digital DSD Direct Stream Digital technology stores audio signals on digital storage media such as SACD Super Audio CDs The ...

Page 173: ...ng upmixing and spatial remapping technology from DTS It is built in to DTS X to provide upmix of Neural X encoded and non encoded PCM data In DTS X for AVRs and Sound Bars Neural X can produce up to 11 x channels PCM Pulse Code Modulation PCM is a signal format under which an analog audio signal is digitized recorded and transmitted This technology is the basis of all other audio format This tech...

Page 174: ...hronization data signals are combined and transmitted with a single cable Deep Color Deep Color is a technology that HDMI specification supports Deep Color increases the number of available colors within the boundaries defined by the RGB or YCbCr color space Conventional color systems process the color using 8 bits Deep Color processes the color with 10 12 or 16 bits This technology allows HDTVs a...

Page 175: ...data contain the information of the height of the sound images CINEMA DSP HD3 feature achieves the reproduction of the accurate height of the sound images so that it creates the accurate and intensive stereoscopic sound fields in a listening room Compressed Music Enhancer The Compressed Music Enhancer feature compensates for missing harmonics in compression music formats such as MP3 As a result th...

Page 176: ... 3 or later Mac with OS X Mountain Lion or later and Mac and PC with iTunes 10 2 2 or later as of May 2016 Made for iPhone 6 Plus iPhone 6 iPhone 5s iPhone 5c iPhone 5 iPhone 4s iPad Air 2 iPad mini 3 iPad Air iPad mini 2 iPad mini iPad 3rd and 4th generation iPad 2 iPod touch 5th generation as of May 2016 File formats For information about specifications of each file refer to the instruction manu...

Page 177: ...resolution and the aspect ratio applied to HDMI output video processing in Video Mode p 139 in the Setup menu The unit does not convert 480 line and 576 line video signals interchangeably m Available HDMI out COMPONENT VIDEO out VIDEO out Resolution 480i 576i 480p 576p 720p 1080i 1080p 4K 480i 576i 480p 576p 720p 1080i 1080p 480i 576i HDMI in 480i 576i m m m m m m 480p 576p m m m m m 720p m m m m ...

Page 178: ...when the input source selected in the main zone is selected 6 Available when 2 channel PCM signals are input 7 To play back DSD audio in Zone2 Zone3 select Main Zone Sync as the Zone2 Zone3 input with the web control p 111 or use the party mode p 109 Video output m Available 8 Available when Monitor Out Assign p 146 in the Setup menu is set to Zone2 or Zone3 9 Available when HDMI OUT2 Assign p 147...

Page 179: ...available from the unit s remote control Starting playback on the playback device and turning on the TV with a scene selection p 75 Switching the TV input to display the on screen menu when ON SCREEN is pressed Controlling the playback device playback and menu operations without registering remote control codes p 158 Example To use HDMI Control you need to perform the following HDMI Control link s...

Page 180: ...ng on the TV We recommend using TV and playback devices from the same manufacturer so that HDMI Control works more effectively We do not assure the operation of all HDMI Control compatible devices Audio Return Channel ARC ARC allows you to input TV audio to the unit with the HDMI cable which transmits video signal to the TV Check the following after the HDMI Control settings 1 Select a TV program ...

Page 181: ...ice To decode audio bitstream signals on the unit set the input source device appropriately so that the device outputs the bitstream audio signals directly does not decode the bitstream signals on the playback device For details refer to the instruction manual for the playback device Audio signal type Audio signal format Compatible media example 2ch Linear PCM 2ch 32 to 192 kHz 16 20 24 bit CD DVD...

Page 182: ...L 4 OPTICAL 3 COAXIAL COAXIAL 2 COAXIAL 1 PHONO GND AC IN FM 75ȍ ANTENNA 4 RADIO OPTICAL 1 2 ZONE OUT PRE OUT ZONE 2 F PRESENCE ZONE 3 R PRESENCE SPEAKERS CENTER FRONT SURROUND BACK SURROUND R PRESENCE R 5 6 L R R R L L L F PRESENCE ZONE 2 ZONE 3 BI AMP EXTRA SP1 R L SINGLE AM PRE OUT SUBWOOFER CENTER FRONT SURROUND SUR BACK SINGLE FRONT REAR EXTRA SP2 RS 232C TRIGGER OUT 1 2 12V 0 1A MAX TOTAL NE...

Page 183: ...ries x v Color x v Color is a trademark of Sony Corporation DLNA and DLNA CERTIFIED are trademarks or registered trademarks of Digital Living Network Alliance All rights reserved Unauthorized use is strictly prohibited Windows Windows is a registered trademark of Microsoft Corporation in the United States and other countries Internet Explorer Windows Media Audio and Windows Media Player are either...

Page 184: ...o MONITOR OUT ZONE OUT Composite x 1 Component x 1 HDMI Output HDMI OUT x 2 HDMI OUT 1 2 5 5 barter to ZONE OUT ZONE2 ZONE4 Other jacks YPAO MIC x 1 REMOTE IN x 1 REMOTE OUT x 1 TRIGGER OUT x 2 RS 232C x 1 HDMI HDMI Features 4K UltraHD Video include 4K 60 50Hz 10 12bit 3D Video ARC Audio Return Channel HDMI Control CEC Auto Lip Sync 21 9 Aspect Ratio Deep Color x v Color BT 2020 Colorimetry HDR Hi...

Page 185: ...ES Matrix 6 1 DTS ES Discrete 6 1 DTS Digital Surround Post Decoding Format Dolby Surround Neural X DTS Neo 6 Music DTS Neo 6 Cinema Audio Section Rated Output Power 2 channel driven RX A3060 20 Hz to 20 kHz 0 06 THD 6 Ω Front L R 165 W 165 W Center 165 W Surround L R 165 W 165 W Surround Back L R 165 W 165 W Front Presence L R 165 W 165 W 20 Hz to 20 kHz 0 06 THD 8 Ω Front L R 150 W 150 W Center ...

Page 186: ...t SUBWOOFER 1 kHz 1 0 V 470 Ω ZONE OUT 1 0 V 470 Ω Maximum Output Level PRE OUT ZONE OUT 2 0 V or more Headphone Impedance 16 Ω or more Frequency Response AUDIO 2 etc 10 Hz to 100 kHz 0 3 dB RIAA Equalization Deviation PHONO 20 Hz to 20 kHz 0 0 5 dB Total Harmonic Distortion RX A3060 PHONO to PreOut 1 kHz 1 V 0 04 or less AUDIO 2 etc to Speaker Out 20 Hz to 20 kHz 75 W 8 Ω 0 04 or less RX A2060 PH...

Page 187: ...model 400 W Korea model 390 W Other models 490 W Standby Power Consumption HDMI Control Off Standby Through Off Network Standby Off 0 1 W HDMI Control On Standby Through On No Signals Network Standby Off 1 4 W HDMI Control Off Standby Through Off Network Standby On Bluetooth Standby Off Wired 2 1 W Wireless Wi Fi 2 1 W Wireless Direct 2 2 W HDMI Control Off Standby Through Off Network Standby On W...

Page 188: ...43 0344 0346 0348 0349 0350 0372 0382 0463 0470 0472 byd sign 0093 Candle 0008 0026 0050 0057 Capsonic 0337 Carena 0320 Carnivale 0050 Carrefour 0344 Carver 0010 Cascade 0320 0323 0343 Casio 0367 Cathay 0320 0349 0350 CCE 0183 0282 Celebrity 0055 0107 Celera 0039 Centurion 0320 0349 0350 Century 0339 CGE 0161 0171 Changhong 0039 Chimei 0273 Cimline 0323 0343 Citizen 0007 0008 0026 0050 0058 City 0...

Page 189: ...0271 0282 0320 0335 0338 0342 0344 0346 0347 0365 0382 0448 0456 0467 0482 0484 0487 Hornyphon 0320 0350 Hoshai 0340 Huanyu 0277 0342 Hygashi 0277 0282 0342 Hyper 0277 0282 0323 0342 0343 Hypson 0282 0320 0321 0337 0342 0348 0349 0350 Hyundai 0141 Iberia 0320 ICE 0277 0282 0320 0323 0337 0340 0342 0343 0350 ICeS 0277 Ilo 0148 0153 IMA 0058 Imperial 0161 0171 0320 0347 0350 0351 Indiana 0320 0349 0...

Page 190: ... Philips 0008 0009 0010 0011 0012 0032 0048 0049 0052 0122 0128 0134 0186 0187 0213 0221 0224 0226 0239 0256 0257 0259 0261 0263 0267 0280 0281 0287 0296 0299 0301 0303 0305 0313 0319 0320 0324 0333 0339 0342 0349 0350 0353 0357 0360 0380 0383 0452 0459 0460 Philips Magnavox 0011 0032 0033 Phoenix 0161 0277 0320 0339 0349 0350 Phonola 0277 0320 0339 0349 0350 Pilot 0007 0008 0050 Pioneer 0008 0026...

Page 191: ... 0350 Tesmet 0350 Tevion 0337 0343 Texet 0277 0282 0323 0342 Thomson 0162 0188 0189 0285 0320 0322 0342 0345 0350 Thorn 0320 0349 TMK 0008 0026 0031 TNCi 0030 Tokai 0282 0320 0350 Tokyo 0277 0342 Tomashi 0348 Toshiba 0018 0019 0040 0041 0046 0073 0100 0103 0108 0109 0111 0121 0132 0166 0208 0210 0214 0217 0260 0268 0282 0283 0293 0304 0306 0307 0329 0344 0355 0454 0491 Totevision 0007 Towada 0282 ...

Page 192: ...26 Inno Hit 1008 1009 1025 1028 1029 1030 Innovation 1024 Instant Replay 1068 Interbuy 1008 1031 Interfunk 1028 Intervision 1009 1026 Irradio 1008 1029 1031 ITT 1027 ITV 1009 1025 1031 JC Penney 1064 1065 1068 1070 1071 JCL 1068 JVC 1007 1018 1027 1039 1064 1065 1066 1067 1078 1089 1092 1093 1094 1095 1113 1208 1209 1212 1213 1215 1218 Kaisui 1008 1029 Karcher 1028 Kendo 1008 1024 1025 1030 Kenwoo...

Page 193: ...vision 1070 1071 Touch 1016 Towada 1008 1029 Towika 1008 1029 TVA 1030 Uher 1031 UltimateTV 1019 Ultravox 1009 Unitech 1070 United Quick Star 1009 1025 Universum 1026 1028 1031 Vector Research 1064 Video Concepts 1064 Videon 1024 Videosonic 1070 Viewsonic 1016 Voodoo 1016 Wards 1068 1069 1070 1071 Weltblick 1031 XR 1000 1068 1069 Yamaha 1064 1065 Yamishi 1008 1029 Yokan 1008 1029 Yoko 1008 1029 10...

Page 194: ... 2158 P B 2358 Pacific 2355 Panasonic 2011 2024 2034 2042 2058 2062 2066 2067 2093 2116 2117 2118 2119 2120 2121 2122 2123 2151 2159 2164 2166 2167 2172 2173 2175 2209 2214 2275 2277 2278 2281 2282 2283 2301 2374 2470 Parasound 2197 peeKTON 2364 Philips 2008 2012 2025 2044 2050 2051 2053 2060 2072 2108 2111 2147 2159 2163 2169 2174 2181 2185 2230 2261 2266 2267 2286 2287 2289 2295 2300 2302 2317 2...

Page 195: ...2043 Panasonic 2011 2034 2058 2062 2116 2117 2119 2120 2121 2123 Philips 2008 2044 2050 2051 2147 Pioneer 2017 2035 Pye 2144 Samsung 2000 2112 2216 Sansui 2073 Sanyo 2217 Sony 2004 2005 2007 2052 2068 2069 2074 2208 2210 2211 Sylvania 2239 Toshiba 2032 2036 2037 2039 2049 2054 2055 2076 Yamaha 2056 Cable ABC 3002 3003 3017 3066 3067 3086 3093 3119 3122 ADB 3020 Adelphia 3081 Alcatel 3016 Americast...

Page 196: ...ter 4007 4110 Chaparral 4075 CHEROKEE 4216 Chess 4212 4217 CityCom 4006 4215 4219 Clatronic 4013 CNT 4010 Comag 4080 4081 4082 4083 4086 Commlink 4005 Comtech 4050 Condor 4008 4024 4219 Connexions 4014 4024 Conrad 4024 4215 4218 4219 Conrad Electronic 4217 4219 Contec 4050 Coolsat 4096 Cosat 4048 Coship 4109 Crown 4011 Daeryung 4014 Daewoo 4057 4217 DDC 4007 Delega 4007 Dew 4050 Diamond 4051 Digia...

Page 197: ... 4051 Packsat 4216 Palcom 4007 Palladium 4011 4218 Palsat 4212 4218 Panasat 4222 4246 Panasonic 4006 4035 4036 4121 4124 4126 4198 4221 Panda 4006 4219 Pansat 4125 Patriot 4216 Paysat 4127 PCT 4110 Philco 4101 Philips 4006 4033 4053 4055 4061 4068 4071 4127 4196 4201 4202 4203 4206 4213 4216 Phoenix 4050 Phonotrend 4006 4005 4048 Pioneer 4046 4213 Polsat 4052 Predki 4013 Premiere 4048 4213 Priesne...

Page 198: ...22 4246 Uher 4212 UltimateTV 4070 Uniden 4079 4127 Unisat 4011 4050 4053 Unitor 4013 Universum 4015 4215 4219 US Digital 4016 Variosat 4015 Vega 4024 Ventana 4053 4055 Viewsat 4098 Visiosat 4013 4048 4216 4217 Voom 4019 Vortec 4001 Welltech 4212 WeTeKom 4212 4218 Wevasat 4006 Wewa 4006 Winersat 4013 Wisi 4006 4014 4015 4218 4219 Woorisat 4010 Worldsat 4216 Xrypton 4024 XSat 4217 Zehnder 4008 4209 ...

Page 199: ...Manual Development Department 2016 Yamaha Corporation Published 05 2016 AM A0 Yamaha Global Site http www yamaha com Yamaha Downloads http download yamaha com YH790A0 EN1 f YAMAHA ...

Page 200: ...t the switch position of VOLTAGE SELECTOR accOfding to your k calvoltage Voltages are AC t IQ 120 220 240 V 50 60Hz 1 Press CJ receiver power to turn on the unit 2 Turn on the TV and switch the TV input to display video from the unit HDMI OUT jack Lisez le l1vret fourni Brochure sur Ia secunte avant d utiliser l umte Ce document decnt installation d un systeme a 7_1 voies l installa lon d un syste...

Page 201: ...l unitepeutfacitementetreconnecteeaunreseausanslitau moyen de l applicatoon MusicCast CONTROLLER Pour de plus amples informations voir le livret separe Guide d installatk n MusicCast accompagnantl umte L ecran Wireless Accessory Configuration WAC illustre en 1 1 s afliche sur le tetev seur lors de Ia prem1ere mise sous tension de l unlt apr sl achat L aflichagedel 9cranpeutprendreplusieurs dizaine...

Page 202: ...sy to use app For more details and a lineup of MusicCast compatible products visit our website musicCasr Key features Seamlessly control all MusicCast compatible devices with the dedicated MusicCast CONTROLLER app Link a MusicCast compatible device to another device in a different room and play them back simultaneously Play back music from music streaming services The compatible music streaming se...

Page 203: ... or Google Play for Android devices and install it to your device For details refer to the instructions for this app in each store Connect the mobile device in which MusicCast CONTROLLER has been installed to the wireless router in your home Ifyour router supports multiple SSID s network names connect the mobile device to the first access point SSID 1 etc IJ Setting of the devices and playback Cre...

Page 204: ...compatible device for the CONNECT button 4 Set up the network Operate the MusicCast CONTROLLER app following the onscreen instructions to set up the network S Operate the MusicCast CONTROLLER app to playback Tip Ifyou want to install a MusicCast compatible device to a location that is out of range of the wireless router connect another MusicCast support device to the router with a network cable to...

Page 205: ...ice Cannot connect to the network The network parameters IP address have not been Enable the DHCP server function on your router obtained properly The setting of the wireless router has been changed Connect all MusicCast compatible devices to the network with the MusicCast CONTROLLER app The MusicCast CONTROLLER app cannot detect a MusicCast compatible device The mobile device is not connected to ...

Page 206: ...c tC l o t1 Jvllffij Jv 9 _ Jim Ltc1 MusicCast tJ Jl llffij tJ c Jf O Jv 9 fim tl Cl CONTROLLER C tf L C tc l o 0 SSID t JJl 9 Jim9 g t MusicCast t1Etm e fPJL SSID 0 Y r 7 JimL C tc l o http www yamaha com musiccast MusicCast a v 1 n f O c to Android GooglePiay j Google Inc O c ta iPhone iPad AirPlay j OOd3d Lf fO fth0 00l zcft tlL l G Apple Inc O c ta iPhone j 7 1 it f 0 5 1 t A t 5 ffl tlTl to Y...

Page 207: ......

Page 208: ...Download the free app today ANDROID APP ON Coogle play ...

Page 209: ...omputer Streaming Services D f PANDORA Rhopsoqy napster Do tRtltsnCHtt M P1 7 GSpotifyl E spotity cSiriusxm Wi Fi d WX 010 WX 030 AVreceiver Any Music Source Ci AM FM Tuner TV USB Stick CD Biu ray Disc Player Tumtable rm ...

Page 210: ...WX 010 WX 030 While Black ...

Page 211: ...e Pandora service on the unit follow the procedure below to set up your Pandora account You can register up to eight Pandora accounts on the unit For details see Editing the Pandora accounts p 4 1 Press NET repeatedly to select Pandora as the input source The following screen is displayed on the TV if you have not set up your Pandora account on the unit yet 2 Press ENTER 3 Use the cursor keys q w ...

Page 212: ...art of the name and select Search The auto complete list will appear on the right side of the screen during the name entry If you select an artist or a track from the list it will be added to your Pandora stations The playback of the selected station starts automatically and the playback screen is displayed To close the Create Station screen and return to the browse screen press RETURN 5 Perform t...

Page 213: ...key r and then use the cursor keys q w to select an item Press ENTER to confirm the selection To close the submenu press RETURN Submenus available in Utility vary depending on the selected item Playback screen 1 Playback indicators play pause 2 Playback information Displays the station name album name track title and elapsed total time Use the cursor keys q w to select scrollable information 3 Alb...

Page 214: ...ect Remove Account and press ENTER b Use the cursor keys to select a Pandora account to be removed and press ENTER c Use the cursor keys to select OK and press ENTER To switch to another Pandora account a Use the cursor keys q w to select Switch User and press ENTER b Use the cursor keys to select a Pandora account to be used and press ENTER The browse screen My Station list for the selected Pando...

Page 215: ... on the model Rhapsody account sign in If you have not signed in to your Rhapsody account yet the sign in screen appears when you select Rhapsody To start using the Rhapsody service on this unit follow the procedure below to sign in to your Rhapsody account 1 Press NET repeatedly to select Rhapsody as the input source The following screen is displayed on the TV if you have not signed in to your Rh...

Page 216: ...rom My Library To remove items from My Library select the item in My Library and then Remove from My Library in Utility Submenus available in Utility vary depending on the list Rhapsody Music Guide Select a song from the lists organized by category artist album etc Rhapsody Radio Select a network radio channel from the lists of the channels provided by Rhapsody Search Use the software keyboard to ...

Page 217: ...ches Display items Song song title Artist artist name Album album name DSP Program sound mode name Audio Decoder decoder name Removing the Rhapsody account Follow the procedure below to remove your Rhapsody account from this unit 1 Press ON SCREEN 2 Use the cursor keys to select Input and press ENTER 3 Use the cursor keys e r to select Rhapsody and press the cursor key q 4 Use the cursor keys q w ...

Page 218: ... 2015 Yamaha Corporation YH003A0 NS2EN ftYAMAHA YAMAHA CORPORATION ...

Page 219: ...ur Customer Agreement for complete terms at siriusxm com All fees and programming are subject to change To use this function the unit must be connected to the Internet For detail on connections and network settings refer to Owner s Manual The actual display may be partly different from display images used on this document depending on the model SiriusXM account sign in Follow the procedure below t...

Page 220: ...er to Owner s Manual 2 Get Spotify app and premium free trial Download the Spotify app for your mobile or tablet from your app store and take the Premium free trial 3 Playback of Spotify contents Start Spotify app on your mobile or tablet device log in to Spotify and start playing a track cTap on the Now Playing bar to reveal extra controls and tap the Speaker icon dSelect the unit network name of...

Page 221: ...usXM content is ongoing the playback screen is displayed 2 Use the cursor keys to select an item and press ENTER If a SiriusXM channel is selected playback starts and the playback screen is displayed To return to the previous screen press RETURN Browse screen a Playback indicator b List name c Contents list Displays the SiriusXM content Use the cursor keys q w to select an item and press ENTER to ...

Page 222: ...password Follow the procedure below to log in to SiriusXM with a different username and password 1 Press ON SCREEN 2 Use the cursor keys to select Input and press ENTER 3 Use the cursor keys e e r to select SiriusXM and press the cursor key q 4 Use the cursor keys q w to select Remove Account and press ENTER 5 Use the cursor keys to select OK and press ENTER Your SiriusXM account is removed from t...

Page 223: ......

Page 224: ...RX A3060 RX A2060 ...

Page 225: ...mponant operating and maintenance servicing instructions in the literature accompanying the appliance Read these instructions Keep these instructions Heed all warnings 4 Follow all instructions 5 Do not use this apparatus near water 6 Clean only with dry cloth Do not block any ventilation openings Install in accordance with the manufacturer s instructions Do not install near any heat sources such ...

Page 226: ...e this unit away from other electrical appliances motors or transformers to avoid humming sounds Do not expose this unit to sudden temperature changes from cold to hot and do not locate this unit in an environment with high humidity i e a room with a humidifier to prevent condensation inside this unit which may cause an electrical shock fire damage to this unit and or personal injury Avoid install...

Page 227: ...em at the web addresses listed below RX A1060 Owner s Manual http avpro global yamaha com manual avr rxa1060 en RX A3060 RX A2060 Owner s Manual http avpro global yamaha com manual avr rxa3060 en Manual Development Department 2016 Yamaha Corporation Published 03 2016 NV AO Printed in Malaysia I ZV38410 I ...

Page 228: ... Brasil Ltda Rua Fidencio Ramos 302 Cj 52 e 54 Torre B Vila Olimpia CEP 04551 010 Sao Paulo SP BRAZIL ARGENTINA Yamaha Music Latin America S A Sucursal de Argentina Olga Cossettini 1553 Piso 4 Norte Madero Este C1107CEK Buenos Aires Argentina PANAMA AND OTHER LATIN AMERICAN COUNTRIES I CARIBBEAN COUNTRIES Yamaha Music Latin America S A Torre Banco General Piso 7 Urbanizaci6n Marbella Calle 47 y Aq...

Page 229: ...w yamaha com VEC registration Yamaha is committed to doing it s part in protecting the environment and reducing the impact on our natural resources As a result this product is supplied with an electronic copy of the manual on the enclosed disc for use on your computer We appreciate your business and look forward to hearing from you soon Product registration applies to USA customers only Failure to...

Page 230: ...ve ovens whether such interference impairs the operation of the product or vice versa Consult the Owner s Manual for guidance on set up procedures for minimizing the risks of interference Any evidence of alteration erasing or forgery of proof of purchase documents will cause this warranty to be void This warranty covers only the Original Owner and is not transferable In Order to Obtain Warranty Se...

Reviews: