background image

En

USEFUL FEATURES............................................... 1

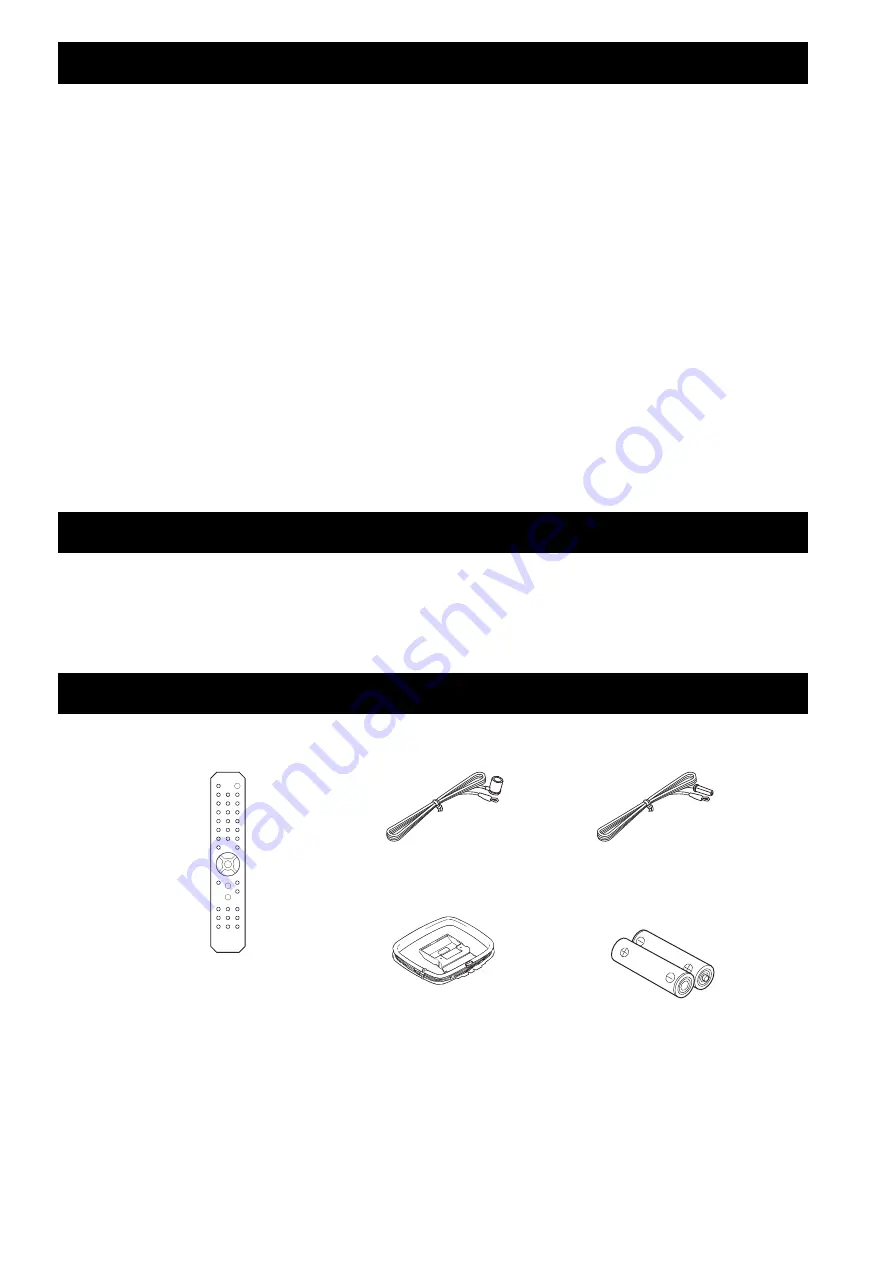
SUPPLIED ACCESSORIES.................................... 1

CONTROLS AND FUNCTIONS ............................ 2

Front panel.................................................................... 2
Front panel display ....................................................... 4
Rear panel..................................................................... 5
Remote control ............................................................. 6
Using the remote control .............................................. 8

CONNECTIONS ....................................................... 9

Connecting speakers and source components .............. 9
Connecting the FM/AM antennas .............................. 11
Connecting power cable ............................................. 11

PLAYBACK ............................................................ 12

Playing a source.......................................................... 12
Using the sleep timer .................................................. 12

LISTENING TO MUSIC FROM YOUR 

Bluetooth

 DEVICE...................................................13

Playing back from your 

Bluetooth

 device .................. 13

Connecting an already-paired device via 

Bluetooth

... 14

Disconnecting a 

Bluetooth

 connection ....................... 14

FM/AM TUNING ....................................................15

Using preset functions ................................................ 15

SETTING THE OPTION MENU FOR EACH 
INPUT SOURCE .....................................................19

Option menu items ..................................................... 19

TROUBLESHOOTING ..........................................20

SPECIFICATIONS .................................................23

About this manual

y

 indicates a tip for your operation.

• The instructions in this manual describe the operation of this unit with the supplied remote control. You can also use the buttons or 

knobs on the front panel if they have the same or similar names as those on the remote control.

This unit allows you to:

Enjoy clear audio sound wirelessly using 

Bluetooth


technology  (see page 13).

Listen to FM and AM radio stations (see page 15).

Use the remote control of this unit to operate a Yamaha 
CD player (see page 7).

Save power by using the AUTO POWER STANDBY 
function (see page 19).

Please check that you received all of the following parts.

CONTENTS

USEFUL FEATURES

SUPPLIED ACCESSORIES

Remote control

AM antenna

Batteries (x2) 

(AA, R6, UM-3)

FM antenna

*

One of the above is supplied depending on the region of purchase.

Summary of Contents for RS-202B

Page 1: ...UA EN OWNER S MANUAL Receiver ...

Page 2: ...pecified by the manufacturer 12 Use only with the cart stand tripod bracket or table specified by the manufacturer or sold with the apparatus When a cart is used use caution when moving the cart apparatus combination to avoid injury from tip over 13 Unplug this apparatus during lightning storms or when unused for long periods of time 14 Refer all servicing to qualified service personnel Servicing ...

Page 3: ...statements apply ONLY to those products distributed by Yamaha Corporation of America or its subsidiaries FOR CANADIAN CUSTOMERS To prevent electric shock match wide blade of plug to wide slot and fully insert CAN ICES 3 B NMB 3 B NOTICE This equipment has been tested and found to comply with the limits for a Class B digital device pursuant to part 15 of the FCC Rules These limits are designed to p...

Page 4: ...h Use a clean dry cloth 12 Only voltage specified on this unit must be used Using this unit with a higher voltage than specified is dangerous and may cause fire damage to this unit and or personal injury Yamaha will not be held responsible for any damage resulting from use of this unit with a voltage other than specified 13 To prevent damage by lightning keep the power cable and outdoor antennas d...

Page 5: ... TROUBLESHOOTING 20 SPECIFICATIONS 23 About this manual y indicates a tip for your operation The instructions in this manual describe the operation of this unit with the supplied remote control You can also use the buttons or knobs on the front panel if they have the same or similar names as those on the remote control This unit allows you to Enjoy clear audio sound wirelessly using Bluetooth tech...

Page 6: ...page 15 7 PRESET j i Selects a preset radio station when TUNER is selected as the input source see page 17 8 TUNING jj ii Selects the tuning frequency when TUNER is selected as the input source see page 15 9 Bluetooth indicator Indicates the status of the connection with the Bluetooth device see page 13 0 Front panel display Shows information about the operational status of this unit see page 4 CO...

Page 7: ...er set connected to the SPEAKERS A and or SPEAKERS B terminals on the rear panel each time the corresponding button is pressed see page 12 C BASS Increases or decreases the low frequency response Control range 10 dB to 10 dB D TREBLE Increases or decreases the high frequency response Control range 10 dB to 10 dB E INPUT l h Selects the input source you want to listen to F VOLUME control Increases ...

Page 8: ...en both sets of speakers are selected 4 TUNED indicator Lights up when this unit is tuned in to an FM or AM station with a strong signal 5 SLEEP indicator Lights up when the sleep timer is turned on see page 12 6 ST indicator Lights up when this unit is in stereo mode and tuning in an FM station with a stereo broadcast 7 kHz MHz indicators Lights up according to the current broadcast frequency kHz...

Page 9: ...onnect a CD player see page 9 4 LINE 1 2 jacks Used to connect audio components see page 9 5 LINE 3 jacks IN jacks Used to connect to audio output jacks of an audio component see page 9 OUT jacks Used to connect to audio input jacks of an audio component see page 9 6 SPEAKERS terminals Used to connect speakers see page 9 7 VOLTAGE SELECTOR Only for General model Rear panel 7 6 3 4 5 2 1 ...

Page 10: ...ENTER Selects and confirms items in the Option menu see page 19 9 MENU Turns the Option menu on and off see page 19 0 VOLUME Increases or decreases the sound output level A SPEAKERS A B Turns on or off the speaker set connected to the SPEAKERS A and or SPEAKERS B terminals on the rear panel each time the corresponding button is pressed see page 12 B DIMMER Select the brightness level of the front ...

Page 11: ...a Yamaha CD player E Yamaha CD player control buttons s Stops playback e Pauses playback p Starts playback DISC SKIP Skips to the next disc in a CD changer b Skips backward a Skips forward Ejects the disc w Rewinds playback f Fast forwards playback Even when using a Yamaha CD player certain components and features may not be available Refer to your component s owner s manual for more information B...

Page 12: ...r skin or gets into your eyes or mouth rinse it away immediately and consult a doctor Clean the battery compartment thoroughly before installing new batteries Do not use old batteries together with new ones This may shorten the life of the new batteries or cause old batteries to leak Do not use different types of batteries such as alkaline and manganese batteries together Batteries that look the s...

Page 13: ...e to use RCA cables to connect audio components Do not connect this unit or other components to the main power until all connections between components are complete Do not let bare speaker wires touch each other or any metal part of this unit This could damage this unit and or the speakers CONNECTIONS Connecting speakers and source components CAUTION Audio out CD recorder etc DVD player etc Audio ...

Page 14: ...sets of terminals allow the speaker to be split into two independent sections With these connections the mid and high frequency drivers are connected to one set of terminals and the low frequency driver to another set of terminals Connect the other speaker to the other set of terminals in the same way When making bi wire connections remove the shorting bridges or cables on the speaker y To use the...

Page 15: ...olarity Assembling the AM antenna Connecting the wire of the AM antenna Plug the power cable into an AC wall outlet after all other connections are complete Only for General model Before connecting the power cable make sure you set VOLTAGE SELECTOR of this unit according to your local voltage Improper setting of VOLTAGE SELECTOR may cause fire and damage to this unit Connecting the FM AM antennas ...

Page 16: ...e control For recording see page 5 Use this feature to automatically set this unit to standby mode after a certain amount of time The sleep timer is useful when you are going to sleep while this unit is playing or recording a source Press SLEEP repeatedly to set the time duration until the unit enters standby mode Each time you press SLEEP the time duration indicated on the front panel display cha...

Page 17: ...ator will blink y You can also enter pairing mode in either of the following two ways Press and hold down INPUT l or h on this unit for three seconds Select PAIRING from the Option menu and then press ENTER see page 19 2 Turn on the Bluetooth function on the Bluetooth device For details refer to the owner s manual of the Bluetooth device 3 From the Bluetooth connection list of the Bluetooth device...

Page 18: ...f this unit will indicate CONNECTED Bluetooth connections cannot be established from the Bluetooth device when this unit is in standby y You can use the Bluetooth control buttons on the remote control to control playback see page 7 If any of the following operations are performed while a Bluetooth connection is being used the Bluetooth connection will be disconnected Switch the audio source other ...

Page 19: ...nd the sound quality is not good set the FM band reception mode to monaural mode to improve reception Front panel Press FM MODE and then make sure the ST indicator is turned off see page 4 Remote control Enter FM MODE from the Option menu to select MONO monaural mode see page 19 You can register up to 40 radio stations as presets Once you have registered stations you can easily tune in to them by ...

Page 20: ... Press MEMORY MANUAL PRESET is displayed briefly on the front panel display and then the preset number to which the station will be registered is displayed y By holding down MEMORY for more than 2 seconds you can skip the following steps and automatically register the selected station to an empty preset number i e the preset number following the last preset number used 3 Press PRESET j i to select...

Page 21: ...below to clear a preset station 1 Press TUNER to select the tuner as the input source 2 Press BAND to select the FM AM band 3 Press MENU to enter the Option menu The Option menu for TUNER is displayed see page 19 4 Press to select CLEAR PRESET and then press ENTER 5 Select the desired preset station number by pressing repeatedly The selected preset number blinks on the front panel display y You ca...

Page 22: ...to select the FM AM band 3 Press MENU to enter the Option menu The Option menu for TUNER is displayed see page 19 4 Press to select CLEAR ALL PRESET and then press ENTER y To cancel the operation and return to the Option menu press 5 Press to select CLEAR OK and then press ENTER y To cancel without clearing the presets select CLEAR NO When all presets have been cleared CLEARED is displayed and the...

Page 23: ...LUME MAX VOL Sets the maximum volume level so that the volume will not be accidentally increased above a certain level Adjustable range 01 to 99 MAX INITIAL VOLUME INIT VOL Sets the volume at the time this unit is turned on When this parameter is set to OFF the volume level used when this unit was set to standby is applied Adjustable range OFF MUTE 01 to 99 MAX TUNER STEP TUNER STP Only for Asia a...

Page 24: ...t secure Secure the connections 9 Output has been muted Deactivate the mute function 6 The MAX VOL or INITIAL VOLUME setting is set too low Set the setting to a higher value 19 The component corresponding to the selected input source is turned off or is not playing Turn the component on and make sure it is playing The sound suddenly goes off The protection circuitry has been activated because of a...

Page 25: ...e CD player OVER HEAT appears on the front panel display This unit has become too hot Make sure the openings on the top panel are not blocked CHECK SP appears on the front panel display Speaker cables got shorted out Twist bare wires of speaker cables firmly and then connect to this unit and speakers properly Problem Cause Remedy See page Problem Cause Remedy See page Cannot make this unit paired ...

Page 26: ...he transmitter is too far away or the antenna input is poor Check the antenna connections Try using a high quality directional FM antenna 11 Switch to monaural mode 15 There is distortion and clear reception cannot be obtained even with a good FM antenna There is multipath interference Adjust the antenna position to eliminate the multipath interference The desired station cannot be tuned in automa...

Page 27: ...odels 530 to 1710 kHz 531 to 1611 kHz China Korea Australia and Europe models 531 to 1611 kHz GENERAL Power supply North America model AC 120 V 60 Hz General model AC 110 120 220 240 V 50 60 Hz China model AC 220 V 50 Hz Korea model AC 220 V 60 Hz Australia model AC 240 V 50 Hz Europe model AC 230 V 50 Hz Asia model AC 220 240 V 50 60 Hz Power consumption North America General China Korea Australi...

Page 28: ...ZU46020 Published 03 2016 IP A0 2016 Yamaha Corporation Manual Development Department Printed in Malaysia Yamaha Downloads http download yamaha com Yamaha Global Site http www yamaha com ...

Reviews: