background image

Setting Up

PSR-I300  Owner’s Manual

13

Se

tt

in

g

 Up

Settin

g

 the battery type

Depending on the battery to be installed, you may 
need to change the battery type setting, although 
“Alkaline (and manganese)” is set by default. After 
installing new batteries, call up Function number 063 
(page 57), and then set the Battery Type (recharge-
able or not).

Turning the Power On

1

Turn down the [MASTER VOLUME] dial to “MIN.”

2

Press the [

] (Standby/On) switch to turn the 

power on.
The Voice name appears on the display. Adjust 
the volume as desired while playing the key-
board.

3

Press and hold the [

] (Standby/On) switch for 

about a second to set the instrument to standby 
mode.

Setting the Auto Power Off 
function

To prevent unnecessary power consumption, this 
instrument turns off automatically if not operated for 
30 minutes by default. This non-operation time can 
be changed as desired. 

To chan

g

e the non-operation time 

which enables Auto Power Off

Press the [FUNCTION] button several times until 
“AutoOff” (Function 062; page 57) appears, and then 
use the [+/YES] or [-/NO] button to select the desired 
value.

Settin

g

s:

 OFF, 5, 10, 15, 30, 60, 120 (minutes)

Default value:

 30 (minutes)

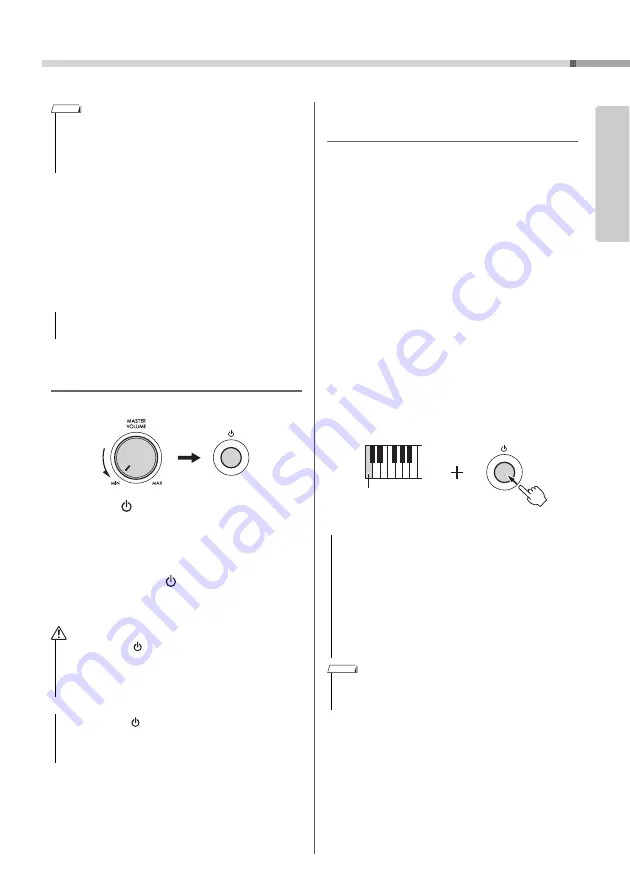
To cancel Auto Power Off when turnin

g


on the instrument

Turn the power on while holding down the lowest key 
on the keyboard. A message “oFF AutoOff” appears 
briefly, then the instrument starts up with the Auto 
Power Off function disabled. 

• This instrument cannot charge the batteries. Use only the 

specified charger device when charging.

• Power will be automatically drawn from the AC adaptor if an 

AC adaptor is connected while batteries are installed in the 
instrument.

• Failure to set the battery type may shorten the amount of 

the battery life. Make sure to set the battery type correctly.

• Even when the [

] (Standby/On) switch is in standby sta-

tus, electricity is still flowing to the product at the mini-
mum level. Remove the electric plug from the outlet when 
the instrument is not to be used for extended periods of 
time, or during electrical storms. 

• Press only the [

] (Standby/On) switch when turning the 

power on. Any other operations such as pressing the pedal 
are not allowed. Doing so may cause the instrument to 
malfunction.

NOTE

NOTICE

CAUTION

NOTICE

• Depending on the instrument status, the power may not 

turn off automatically, even after the elapse of the specified 
period of time. Always turn off the power manually when 
the instrument is not in use.

• When the instrument is not operated for a specified time 

while connected to an external device such as an amplifier, 
speaker or computer, make sure to turn off all connected 
devices including the instrument, in order to protect the 
devices from possible damage from power turning off 
automatically. Alternately, if you want to avoid doing this, 
simply disable the Auto Power Off function.

• Generally, the data and settings are maintained even when 

the power is turned off with the Auto Power Off function. For 
details, see page 53
.

The lowest key

NOTICE

NOTE

Summary of Contents for PSR-I300

Page 1: ...1 Setting Up Reference Appendix Before using the instrument be sure to read PRECAUTIONS on pages 5 7...

Page 2: ......

Page 3: ...is being affected by the interference Utilize power outlets that are on different branch circuit breaker or fuse circuits or install AC line filter s In the case of radio or TV interference relocate...

Page 4: ...n for replacement of the obsolete outlet 10 Protect the power cord from being walked on or pinched particularly at plugs convenience recepta cles and the point where they exit from the apparatus 11 On...

Page 5: ...g always hold the plug itself and not the cord Pulling by the cord can damage it and cause electric shocks or a fire If not using the product for long periods of time be sure to pull the power plug fr...

Page 6: ...y fall over and cause injury Before moving the product remove all connected cables to prevent damage to the cables or injury to anyone who might trip over them Use only the stand specified for the pro...

Page 7: ...as a computer page 52 Information About copyrights The copyright of the content 1 installed in this product belongs to Yamaha Corporation or its copyright holder Except as permitted by copyright laws...

Page 8: ...May not be included depending on your particular locale Check with your Yamaha dealer Formats and functions GM System Level 1 GM System Level 1 is an addition to the MIDI standard which ensures that...

Page 9: ...se Repeat 39 Listening Timing and Waiting 40 Learning How to Use Touch Control Touch Tutor 42 Hearing and Experiencing the Sound of the Chords Chord Study 43 Hear and Experience a Sound of a Single Ch...

Page 10: ...y 1 2 3 4 5 0 6 7 8 1 2 3 9 5 6 7 8 9 C1 C2 C3 C4 C5 C6 4 0 Voice List page 70 Song List page 81 Display page 15 Style List page 82 Riyaz page 83 As illustrated each note of the keyboard has a specif...

Page 11: ...button page 16 1 DSP button page 19 2 ARTICULATION button page 19 3 REGIST MEMORY button page 47 4 FUNCTION button page 54 5 MUSIC DATABASE button page 30 6 DUAL button page 17 7 SPLIT button page 17...

Page 12: ...g the AC adaptor with a removable plug make sure to keep the plug attached to the AC adaptor Using the plug alone can cause electric shock or fire If the plug is accidentally removed from the AC adapt...

Page 13: ...This instrument cannot charge the batteries Use only the specified charger device when charging Power will be automatically drawn from the AC adaptor if an AC adaptor is connected while batteries are...

Page 14: ...unction settings Function 031 page 56 Using the Music Rest Insert the music rest into the slots as shown Do not use the instrument for a long period of time at a high or uncomfortable volume level sin...

Page 15: ...iyaz or Song When the FUNCTION button page 54 is in use this indicates the Function number Indicates the current beat of playback Indicates notes you are currently playing or notes specified via the S...

Page 16: ...buttons Press the YES and NO buttons simultaneously to call up the default tempo value of the current Style Riyaz or Song To set the Time Signature Press and hold the METRONOME button to call up TimeS...

Page 17: ...s the SPLIT button to turn on Split The keyboard is divided into left and right hand areas You can play a Split Voice in the left hand area of the keyboard while playing a Main Voice and Dual Voice in...

Page 18: ...ch or downward to lower the pitch You can change the amount of pitch bend produced by the wheel in the Function Settings page 54 Func tion 003 Changing the Touch Response of the Keyboard 1 Soft Produc...

Page 19: ...RTICU LATION button Examples of the Articulation effect If you select the following voices you can realistically reproduce the specific playing techniques below Example 1 Voice number 005 S Art Lite S...

Page 20: ...via Function number 023 page 55 Chorus Makes the Voice sound richer warmer and more spacious Although the best suited Chorus type is called up by selecting a Song Style and Riyaz you can select anothe...

Page 21: ...umber buttons 0 9 or YES and NO buttons to select the desired type When you want to specify a Harmony Type refer to the Harmony Type list on page 86 to specify an Arpeggio Type refer to the Arpeggio T...

Page 22: ...ill continue To stop Arpeggio playback release the footswitch How to play the various Types Harmony Types 001 to 005 Press the right hand keys while playing chords in the auto accompaniment range of t...

Page 23: ...sound from the left speaker and the performance sound of the right Voice will sound from the right speaker in the initial Duo mode setting This out put setting can be changed from the DuoType setting...

Page 24: ...ssing one to three keys For information about chords refer to Chord Types for Style Playback page 27 or use the Chord Dic tionary function page 29 1 Press the FUNCTION button several times until FingT...

Page 25: ...with your right hand and chords with your left 5 Press the START STOP button to stop playback You can add intro ending and rhythm variations to Style playback by using Sections For details refer to pa...

Page 26: ...ding in measures differs depending on the selected Style 1 3 Same as Steps 1 3 in page 25 4 Press the MAIN AUTO FILL button to select Main A or Main B 5 Press the INTRO ENDING rit button Now you re re...

Page 27: ...y constituent notes are omitted When playing a chord which cannot be recognized by this instrument nothing is shown on the display In such a case only a specific part such as the rhythm will be played...

Page 28: ...E F m F G m7 b5 G A dim Bb m B dim7 FL3 C m Db D m7 b5 Eb E dim F m F dim7 G 1 5 G A dim Bb 7 B FL2 C m Db dim7 D 1 5 Eb E dim F 7 F G m G A m7 b5 Bb B dim FL1 C 7 Db D m Eb E m7 b5 F F dim G m G dim7...

Page 29: ...e section between and The notes you should play for the specified chord are shown in the keyboard display To call up possible inversions of the chord press the YES NO buttons 3 Following the notation...

Page 30: ...r the Style file STY from a computer to this instrument by connect ing this instrument to a computer For instructions refer to Computer related Oper ations page 8 on the website 2 Press the FUNCTION b...

Page 31: ...eset the value to the default tempo of the current Style or Song Using the Tap function While a Song Style or Riyaz is playing back press the TEMPO TAP button just twice at the desired tempo to change...

Page 32: ...Press the START STOP button to start looped playback At first only the Tabla sound plays back During playback enjoy creating sound variations via the following operations Adding a Tanpura phrase Press...

Page 33: ...ich have been handed down from through the generations as well as famous classical pieces Try playing the melodies of these songs Enjoy performing a piece with Style accompaniment automatic accompanim...

Page 34: ...se PAUSE playback of the Song You can change a Song s melody Voice to any other desired Voice 1 Select a Song 2 Select the desired Voice 3 Press and hold the VOICE button for longer than a second SONG...

Page 35: ...ack is muted or contains no data When songs other than a User Song is selected The L and R indicators always light regardless of whether a track contains data or not By turning the left and right hand...

Page 36: ...hen you want to practice all the way through the Song with the selected part Lesson 1 Listening Listen to the playback part you will play Remember it as best as you can Lesson 2 Timing Learn to play t...

Page 37: ...sson After a lead in playback of the current Step starts 5 Practice the phrase in the current Step Referring to the notation in the Song Book and the keyboard indications shown on the display play the...

Page 38: ...ing passing status entries for the entire Song or a specific Step of the Song To clear the passing status entries of all Steps Select the desired Song and then hold down the KEYS TO SUCCESS button for...

Page 39: ...by press ing the PHRASE REPEAT button again Practicing two or more Phrases By setting Phrase A as the start point and Phrase B as the end point you can practice two or more Phrases repeatedly During...

Page 40: ...ing and 3 Waiting will evaluate your per formance in four levels After the evaluation display has appeared the Lesson will start again from the beginning 5 Stop the Lesson mode You can stop the Lesson...

Page 41: ...to Success Lesson page 37 with the Listening Timing or Waiting Lesson page 40 1 Enable the Keys to Success Lesson Refer to Steps 1 3 on page 37 2 Select the desired Step via the YES NO buttons then pr...

Page 42: ...that the indications below appear as target values while you play The positions of and are displayed with a gap when your touch is softer or harder than the target value Your touch is harder than the...

Page 43: ...he keyboard indications shown on the dis play If you feel it difficult to play the notes use the Waiting function page 40 to have the Song automatically pause until you play the correct notes Press th...

Page 44: ...n press one of the keys in the top octave C5 B5 indicated to the right of ROOT on the panel just above the keys to change the tonic pitch of the Song For example if you press the D5 key for a Song in...

Page 45: ...from flashing 3 Play the keyboard to start recording If ACMP is turned on you can independently record just the rhythm sound of Style playback by pressing the START STOP button and then changing the...

Page 46: ...cording When playing back the recorded song pressing REC TRACK 1 or REC TRACK 2 button allows you to mute Track 1 or Track 2 Each time the but ton is pressed playback mute is switched 1 Press the SONG...

Page 47: ...1 RE2 S Art Lite Sitar 2 RE3 S Art Lite Sarangi RE4 S Art Lite Santoor RE5 S Art Lite Nylon Guitar Harmonics RE6 S Art Lite Distortion Guitar RE7 S Art Lite Slap Bass RE8 S Art Lite Gospel Choir RE9 S...

Page 48: ...the panel set ups you made with a single button press However there may be times that you want certain items to remain the same even when switching Registration Memory setups When you want to switch...

Page 49: ...ec onds and the current Master EQ type appears 2 Use the YES or NO button to select the desired Master EQ type Master EQ Types 1 Speaker Optimum for listening via the instru ment s built in speakers 2...

Page 50: ...VOLUME control of the instrument 6 Play the keyboard along with the sound of the audio device You can cancel or lower the volume of the melody part of audio playback For details refer to page 51 7 Aft...

Page 51: ...page 57 by executing steps 2 and 3 When the melody or vocal sound may not be canceled or lowered as expected 1 Press the FUNCTION button several times to call up SupprPan Function 046 page 57 while th...

Page 52: ...on a mix of the audio data and the sound of the instrument is sent to DAW which may cause howling and unexpected loud sounds USB cable USB terminal instrument computer USB TO HOST terminal NOTE File...

Page 53: ...ata via the following two methods Backup Clear This operation initializes the backup parameters and the Registration Memories While holding down the highest white key press the Standby On switch to tu...

Page 54: ...by 1 Yes On Press simultaneously to recall the default setting Decrement value by 1 No Off Function Number Function Name Display Range Settings Default Value Description Overall 001 Transpose Transpo...

Page 55: ...P2 appears on the display Riyaz page 32 021 Riyaz Volume RiyazVol 000 127 100 Determines the volume of the Riyaz while a Riyaz is selected page 32 Effects 022 Reverb Type Reverb 1 4 Hall 1 4 5 Cathedr...

Page 56: ...Determines the guide track number for your left hand lesson The setting is only effective for Songs in SMF format 0 transferred from a computer Select a Song you want to use for the lessons select th...

Page 57: ...oLVol 000 127 Determines the volume of the left section 055 Duo R Octave DuoROct 3 3 Determines the pitch of the right section in octave units 056 Duo L Octave DuoLOct 3 3 Determines the pitch of the...

Page 58: ...he auto accompaniment section of the keyboard and then play some keys in the right hand side to produce the Harmony effect For Types 006 026 turning auto accom paniment on or off has no effect However...

Page 59: ...uddenly and unexpectedly The protection circuit has been activated due to over current This may occur when an AC adaptor other than the one specified is used or an AC adaptor is damaged Use the specif...

Page 60: ...ttps www yamaha com F r Elise F r Elise is an all time classical favorite The beautiful well known melody is repeated a number of times In each step you won t be practicing alone You have a wonderful...

Page 61: ...Rest for the entire measure Dotted half note Half note Quarter note Triplet Eighth note Sixteenth note Dotted quarter note Dotted eighth note Time signature Notes and Rests View from the side View fr...

Page 62: ...y telling a story It might help to sing or hum the melody as you play Similar melody lines and rhythms are repeated in this song so there aren t as many sections to practice as you might think Enjoy l...

Page 63: ...Song Book Sample PSR I300 Owner s Manual 63 Appendix Song No 014 F r Elise Basic to here From here to here F r Elise Song No 004 Basic...

Page 64: ...f the right hand We ll start by ascending and descending the white and black keys Check out the illustrations until you understand how the fingers are supposed to move then get started You ll nd it ea...

Page 65: ...ise Song No 004 Basic Diligent Practice Time Right Now that we re warmed up let s try playing along with the orchestra in 3 4 time The melody will be built up little by little Compare each line notice...

Page 66: ...and It s important to spread your ngers widely from the start Don t play the black keys too strongly Left hand A E A E C M i d d l e Diligent Practice Time Connect the notes smoothly as if the left ha...

Page 67: ...key release timing if you sing along with the melody Don t panic and play too strongly where the left hand has to play short notes First Half Review You ve reached the halfway step Have you learned a...

Page 68: ...And again C M i d d l e Warm up Exercise The Jump Competition The rst note has a staccato dot Spread your ngers wide and jump quickly to the next note Left hand EEEEE The only note in this step is E M...

Page 69: ...o you won t have to rush Second Half Review Try playing all the way through the second half As we did after the rst half if there are places you can t play with con dence go back and review the steps...

Page 70: ...2 0 127 19 Theatre Organ 63 0 121 20 16 2 Organ 64 0 120 20 16 4 Organ 65 0 113 20 Chapel Organ 66 0 112 20 Pipe Organ 67 0 112 21 Reed Organ ACCORDION 68 0 112 22 Musette Accordion 69 0 113 22 Tradit...

Page 71: ...Clarinet 141 0 112 69 Oboe 142 0 112 70 English Horn 143 0 112 71 Bassoon 144 8 96 74 S Art Lite Flute Voice No Bank Select MIDI Program Change 1 128 Voice Name MSB 0 127 LSB 0 127 145 0 114 74 Sweet...

Page 72: ...247 0 112 57 Trumpet Trombone 248 0 113 63 Fat Synth Brass 249 0 112 88 Octave Lead 250 0 0 87 Super 5th Lead SOUND EFFECT 251 0 0 121 Fret Noise 252 0 0 122 Breath Noise 253 0 0 123 Seashore 254 0 0...

Page 73: ...0 37 18 Percussive Organ 2 354 0 0 19 Rock Organ 355 0 64 19 Rotary Organ 356 0 65 19 Slow Rotary Organ 357 0 66 19 Fast Rotary Organ 358 0 0 20 Church Organ 1 359 0 32 20 Church Organ 3 360 0 35 20...

Page 74: ...61 French Horn 1 470 0 6 61 French Horn Solo 471 0 32 61 French Horn 2 472 0 37 61 Horn Orchestra Voice No Bank Select MIDI Program Change 1 128 Voice Name MSB 0 127 LSB 0 127 473 0 0 62 Brass Section...

Page 75: ...Gamelan Gongs 586 0 99 113 Stereo Gamelan Gongs 587 0 100 113 Rama Cymbal Voice No Bank Select MIDI Program Change 1 128 Voice Name MSB 0 127 LSB 0 127 588 0 0 114 Agogo 589 0 0 115 Steel Drums 590 0...

Page 76: ...t B 0 A Tabla Tu C 1 Open Baya C 1 Mid Baya D 1 Press Baya D 1 Bend Baya Slow E 1 Bend Baya Fast F 1 Click F 1 Open Click G 1 G Low Tabla Tarang G 1 G Low Tabla Tarang A 1 A Low Tabla Tarang A 1 A Low...

Page 77: ...Ti 01 E 5 F Tabla Ti 02 F 5 F Tabla Ri F 5 F Tabla Kat G 5 F Tabla Tu G 5 G Tabla Na A 5 G Tabla Tin A 5 G Tabla Center Tin B 5 G Tabla Ti 01 C 6 G Tabla Ti 02 C 6 G Tabla Ri D 6 G Tabla Kat D 6 G Tab...

Page 78: ...D 6 Dholak 2 Slide D 6 Dholak 2 Rim 1 E 6 Dholak 2 Rim 2 F 6 Dholak 2 Ring F 6 Dholak 2 Slap G 6 Key Instrument Indian Mix Kit Key Instrument C 0 Zarb Back mf D 0 Zarb Tom f D 0 Zarb Eshareh E 0 Zarb...

Page 79: ...D 1 D 1 E 1 F 1 F 1 G 1 G 1 A 1 A 1 B 1 C 2 C 2 D 2 D 2 E 2 F 2 F 2 G 2 G 2 A 2 A 2 B 2 C 3 Rooster C 3 D 3 Elephant D 3 E 3 Horse F 3 Cricket F 3 G 3 Cow G 3 A 3 Tiger A 3 B 3 Rattlesnake C 4 Monkeys...

Page 80: ...al F 3 Ride Cymbal Cup F 3 Tambourine G 3 Splash Cymbal G 3 Cowbell A 3 Crash Cymbal 2 A 3 Vibraslap B 3 Ride Cymbal 2 C 4 Bongo H C 4 Bongo L D 4 Conga H Mute D 4 Conga H Open E 4 Conga L F 4 Timbale...

Page 81: ...Liszt 053 Pomp and Circumstance E Elgar 054 Chanson du Toreador G Bizet 055 Jupiter the Bringer of Jollity G Holst 056 The Polovetsian Dances A Borodin 057 Die Moldau B Smetana 058 Salut d Amour op 1...

Page 82: ...64 LoveSong 65 6 8ModernEP 66 6 8SlowRock 67 OrganBallad 68 PopBallad 69 16BeatBallad DANCE 70 ClubBeat 71 SkyPop 72 AgagBeat 73 Electronica 74 FunkyHouse 75 RetroClub 76 USHipHop 77 MellowHipHop 78 C...

Page 83: ...6 8Ballad 183 XiQingLuoGu 184 YiZuMinGe 185 JingJuJieZou BALLROOM 186 VienneseWaltz Style No Style Name 187 EnglishWaltz 188 Slowfox 189 Foxtrot 190 Quickstep 191 Tango 192 Pasodoble 193 Samba 194 Cha...

Page 84: ...SA Pie 70 Norway 71 YesterBd 72 A Magic POP ROCK 73 UR Shape 74 Love Me 75 Ideal 76 SweetPop 77 Just Way 78 Speed 79 Cheerful 80 SwftShke 81 Watches 82 PrtTmLvr 83 S Party 84 MoonShdw 85 NikitSng 86 G...

Page 85: ...176 LoveAmor 177 Brasil 178 ChryPink 179 MyShadow 180 BosaWave 181 DntWorry 182 I m Pola 183 Mambo Jm 184 One Note 185 PasoCani 186 Beguine 187 Tijuana 188 Puntuali 189 Cielito 190 The Liar 191 Unfrg...

Page 86: ...wn two different notes the notes alternate in a trill continuously The trill speed differs depending on the selected type 007 Trill 1 6 note 008 Trill 1 8 note 009 Trill 1 12 note 010 Trill 1 16 note...

Page 87: ...B 082 Gospel 083 BalladEP 084 Strum1 085 Strum2 086 Strum3 087 Strum4 088 Pickin1 089 Pickin2 090 Funky 091 GtrChrd1 092 GtrChrd2 093 GtrChrd3 094 GtrArp 095 FngrPck1 096 FngrPck2 097 CleanGtr 098 Sl...

Page 88: ...British combo amp simulator Setting for TOP BOOST sound 10 British Combo Heavy British combo amp simulator Setting for heavy sound 11 British Legend Blues British stack amp simulator Setting for blues...

Page 89: ...independent feedback delays for L and R 35 Cross Delay The feedback of the two delayed sounds is crossed 36 Compressor Medium Compressor with medium setting 37 3Band EQ A mono EQ with adjustable LOW...

Page 90: ...INTRO ENDING rit MAIN AUTO FILL External Styles 10 Other Features Music Database 220 One Touch Setting OTS Yes Compatibility Style File Format SFF Riyaz Lite Preset Number of Riyaz Lites 15 Number of...

Page 91: ...atteries Six 1 5 V AA size alkaline LR6 manganese R6 or six 1 2 V AA size Ni MH rechargeable batteries HR6 Power Consumption 5 W When using PA 130 AC adaptor Auto Power Off Yes Included Accessories Mu...

Page 92: ...lization 53 INTRO 26 iPad 52 iPhone 52 K Key Transpose 54 Keyboard Display 15 Keys To Success 37 L Lesson 36 Listening 40 Local Control 56 M MAIN 26 Main Voice 16 Master EQ 49 Measure 15 Melody Suppre...

Page 93: ...3 Appendix Index U USB TO HOST 52 User Songs 45 V Voice 16 Voice List 70 Volume 14 Volume Dual Voice 55 Volume Harmony 55 Volume Main Voice 54 Volume Metronome 56 Volume Split Voice 55 W Waiting 40 X...

Page 94: ...revent any potential negative effects on human health and the environment which could otherwise arise from inappropriate waste handling For more information about collection and recycling of old produ...

Page 95: ...service please either visit the following website address printable file is available at our website or contact Customer Service at the address or telephone number identified below Website Address Yam...

Page 96: ......

Page 97: ...Norway Tel 47 6716 7800 ICELAND Hljodfaerahusid Ehf Sidumula 20 IS 108 Reykjavik Iceland Tel 354 525 5050 CYPRUS Nakas Music Cyprus Ltd Nikis Ave 2k 1086 Nicosia Tel 357 22 511080 Major Music Center...

Page 98: ...Memo...

Page 99: ...Memo...

Page 100: ...Yamaha Global Site https www yamaha com Yamaha Downloads https download yamaha com Published 04 2023 POIN A0 2023 Yamaha Corporation VFP1160...

Reviews: