background image

57

CHAPTER

6

Other Settings

When there is a blank part created at the beginning of the 
recorded song, turning on this function automatically 
skips the unwanted part and starts playback from the 
actual beginning of the song.

To inactivate this function,

 select [OFF] in step 

2

.

During playback of a song, keys normally move in 
accordance with the playback of the respective note’s 
key. In Quiet or Headphone mode, you can select an 
option of stopping this key movement. This enables you, 
for example, to play along with the song being played 
back, to add your own improvisation, or to create a four-
hand duet.

To inactivate this function,

 select [OFF] in step 

2

.

Tip:

 The shortcut button on the [Song] screen is also 

available. Tap on 

 to activate the function 

above, and on 

 to inactivate it.

You can start or stop playback of a song automatically at 
specific times. A maximum of 99 timer programs can be 
set.

Note:

 Be sure to set the date, time, and time zone in 

advance. (

 pg. 16 “Setting up the Current Date and 

Time”)

Skipping the Blank Part at 
the Beginning of a Song

1

Tap on 

 in the [Main] screen, 

and then on 

.

2

Tap on [Skip Space],and then press 

 to select [ON].

3

Tap on 

 to complete the 

operation.

Inactivating the Key 
Movement During Playback

1

Tap on 

 in the [Main] screen, 

and then on 

.

2

Tap on [Quiet Key], and then press 

 to select [ON].

3

Tap on 

 to complete the 

operation.

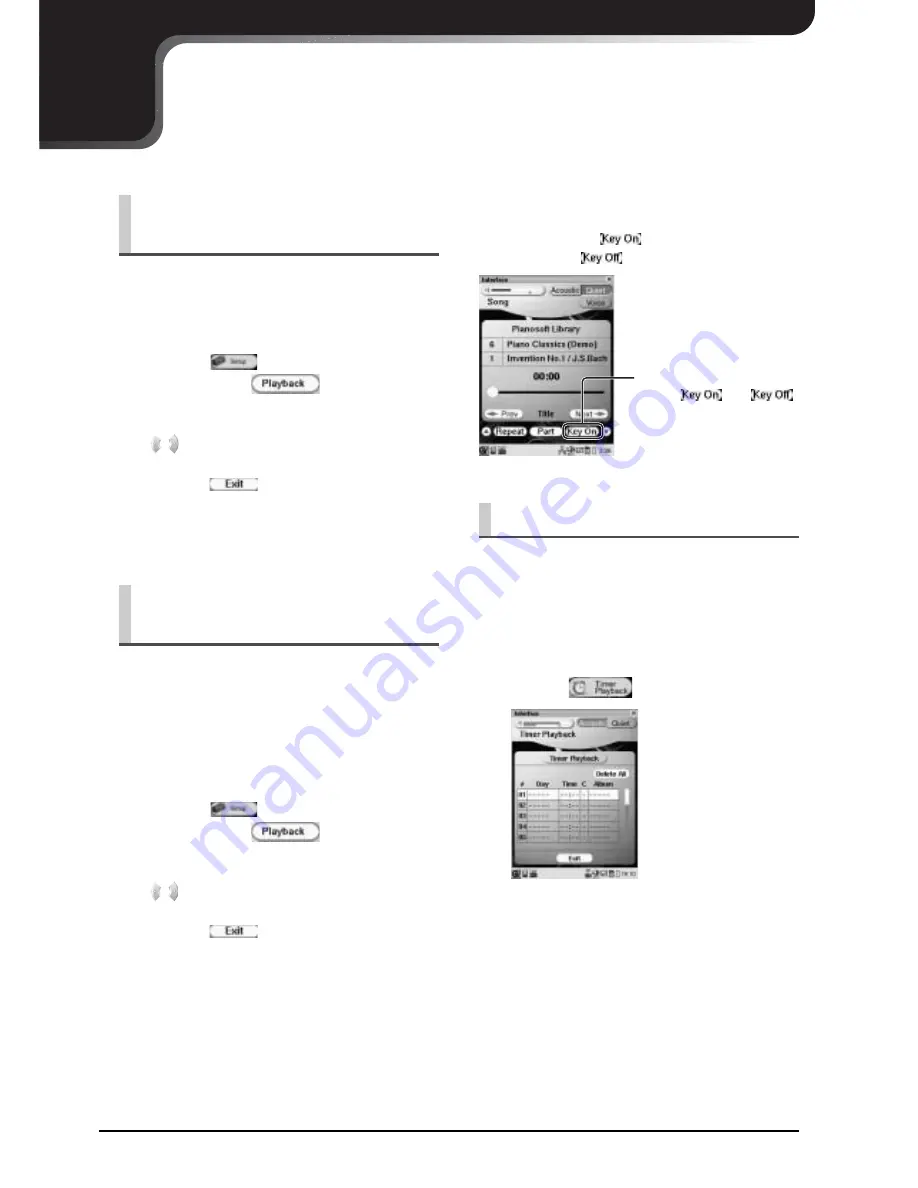
Using Timer Play

1

Tap on 

  in the [Main] screen.

Each time you tap on this 
button,  

and  

alternates.

Timer list screen

Summary of Contents for PRO/Mark IV

Page 1: ......

Page 2: ...letter L or coloured RED Alleen voor klanten in Nederland Bij dit produkt zijn batterijen geleverd Wanneer deze leeg zijn moet u ze niet weggooien maar inleveren als KCA The Control Unit is classified as a Class 1 laser product One of the labels below or similar is located on the inside of the CD drive unit Laser Diode Properties Material GaAlAs Wavelength 790 795 nm Laser Output Power at the lens...

Page 3: ...mes necessary contact a qualified service representative to perform the replacement Warning Do not attempt to recharge disassemble or incinerate this type of battery Keep all batteries away from children Dispose of used batteries promptly and as regulated by applicable laws Note In some areas the servicer is required by law to return the defective parts However you do have the option of having the...

Page 4: ...e of an extension cord is not recommended If you must use an extension cord the minimum wire size for a 25 cord or less is 18 AWG NOTE The smaller the AWG number the larger the current handling capacity For longer extension cords consult a local electrician 17 WARNING To reduce the risk of fire or electric shock do not expose this apparatus to rain or moisture 18 Care should taken that objects do ...

Page 5: ...ca rpb L installateur du présent matériel radio doit s assurer quel antenne est située ou pointée demanière à ce que cette dernière n émette pas de champs radioélectriques supérieurs aux limitess pécifiées par Santé Canada pour le grand public consulterl e Code de sécurité 6 disponible sur le site Web de Santé Canada à l adresse suivante www hc sc gc ca rpb Hereby Yamaha declares that this Wireles...

Page 6: ...ssurance that your use of this product in a residential environment will not result in harmful interference with other electronic devices This requirement generates uses radio frequencies and if not installed and used according to the instructions found in the users manual may cause interference harmful to the operation of other electronic devices Compliance with FCC regulations does not guarantee...

Page 7: ...English ...

Page 8: ......

Page 9: ...ng the source code to you The source code download is also available on the following website http www global yamaha com download disklavier_markiv Note that we shall bear no responsibility whatsoever for any damage arising from changes additions deletions made to the software for this product by a third party other than Yamaha or party authorized by Yamaha Note that re use of source code released...

Page 10: ...ll by the plug Never pull the cable Damaging the cable in this way is a potential fire and electric shock hazard The cover of the unit should be removed only by qualified service technicians Do not place liquid containers such as vases potted plants glasses cosmetic bottles medicines etc on top of the Disklavier Do not try to modify the Disklavier as this could lead to fire or electric shock hazar...

Page 11: ...ttery in a fire Also keep the battery away from open flames Never attempt to disassemble the battery pack Do not short circuit the terminals as they will become very hot and will damage the battery Do not drop or subject the battery to shock After storing the battery for a long period of time be sure to charge the battery completely prior to use Charge the battery properly according to the details...

Page 12: ...ompaniment to Commercial CD Songs PianoSmart 36 Video Synchronized Playback 36 Copying Song File from a Personal Computer to the Disklavier 37 CHAPTER 3 Piano Playing Features 39 Playing the Disklavier along with the Internal Metronome 39 Playing the Disklavier Accompanied by the Additional Voice s Performance Mode 39 Adding Expressive Effect to Your Play 40 Adding Chords to a Melody Line Harmony ...

Page 13: ...l Harmony Type List 78 CHAPTER 7 Enhancing the Disklavier Features by Hooking Up a MIDI Device 80 Hooking Up a MIDI Device 80 Setting Up the Disklavier for MIDI Data Reception MIDI IN 81 Setting Up the Disklavier for MIDI Data Transmission MIDI OUT 82 Setting Up the Disklavier for Keyboard Playing Data Transmission KBD OUT 83 CHAPTER 8 Internet Direct Connection IDC Service 84 What is Internet Dir...

Page 14: ...N button Pressing the button turns the Disklavier on or puts it in Standby mode Holding down the button shuts down the Disklavier B QUIET button Activates the Quiet Mode C Source Select buttons Starts or stops playback of the songs stored in the corresponding library medium User Selects the User Library PianoSoft Selects the PianoSoft Library CD Selects the loaded CD FD Selects the loaded floppy d...

Page 15: ...L1 2 jacks Accepts foot controls switches pg 61 P MIC LINE switch Switches the input sensitivity of the MIC LINE IN jack MIC Select this when you connect a microphone to the MIC LINE IN jack LINE Select this when you connect an external audio equipment to the MIC LINE IN jack Q INPUT VOLUME knob Adjusts the input volume R MIC LINE IN jack Accepts a microphone S To I O Center port Accepts the cable...

Page 16: ...camcorder E USB type B port Accept the USB cable from a computer F MIDI IN OUT terminals Accept the MIDI cable from the input output of a MIDI device G SYNC OUT L R jacks Accept the RCA cords from the microphone line input of a camcorder H Dip switches For service use I LED indicators For service use J SYSTEM INSTALL button For service use K RESET button For service use L OMNI OUT L R Multi purpos...

Page 17: ...etc P TO PIANO jacks Accept the cords from the Central Signal Processor Q USB Type A port For future use R LAN RJ 45 port Accepts the LAN cable from a personal computer S VIDEO OUT jack Accepts the video cable from composite video input of a TV T PC CARD PCMCIA type II slot For future use U CF CARD PCI slot The supplied CF wireless LAN card is attached to this slot at the factory Left side DIGITAL...

Page 18: ...s the Power Supply unit on off B AC OUTLET Accepts the power cable from the I O Center C AC IN Accepts the power cable from an AC outlet D AC OUTLET SWITCHED Accepts the Monitor speakers AC power cables E AC OUTLET unswitched Accepts the AC power cord of the cradle s AC power adaptor TO PD TO MD TO PS TO SENSOR GREEN TO I O BLUE CENTER Central Signal Processor Front Note The location of each unit ...

Page 19: ...CHAPTER 1 Getting Started 6 English F TO DRIVE terminal Accepts the power cord from the Key Drive KD unit G TO CSP terminal Accepts the power cable from the Central Signal Processor CSP Right side ...

Page 20: ...ouch screen or move the slider on a control bar H AC adapter jack Accepts the AC adaptor I PLAY button Starts playback J Song Select Fast Reverse Fast Forward buttons Pressing the button selects a song Holding down the button fast reverses forwards K Back button Returns to the previous screen L Screen protector Open or remove the protector when you tap on the touch screen To remove the screen prot...

Page 21: ...f the battery compartment lid Resets the Pocket Controller R Battery replacement switch pg 15 Preparing the Pocket Controller S Stylus pen For operating the touch screen T CF card slot Holds the CF wireless LAN card U Stereo headphone jack For future use V Microphone W IR port For future use X SD card slot Holds the SD card RESET Rear Top Left side ...

Page 22: ...Getting Started 9 A AC adaptor jack Accepts the AC adaptor B I O port Accepts the I O port on the Pocket Controller C ONE TOUCH button pg 68 Assigning a Specific Function to the ONE TOUCH Button ONE TOUCH Cradle ...

Page 23: ...e LINE2 volume at the three o clock position E Tweeter unit F POWER switch Turns the monitor speaker on off G AC power cable H INPUT LINE2 XLR connector phone jack Accepts the line output from the I O Center or external AV equipment I INPUT LINE1 RCA jack Accepts the line output from external AV equipment LOW HIGH LINE 1 2 Note The location of each unit differs depending on the model Monitor Speak...

Page 24: ...crew the supplied screws into the nuts 2 Hang the Media Center 3 Tighten the screws to secure the Media Center Screws M5 x 16 supplied Leave 5 mm of the shank Nuts Note When you hang the Media Center be sure to hold the unit securely with both hands preventing the unit from falling down ...

Page 25: ...13 Wiring the Disklavier 3 Hang the Monitor Speaker to the bracket 4 Screw the thumbscrews to secure the Monitor Speaker Horizontal installation Slant installation Hanger supplied Screws M5 x 16 supplied You can adjust the angle of the Monitor Speaker Bracket Note When you hang the Monitor Speaker be sure to hold the unit securely with both hands preventing the unit from falling down Thumbscrews M...

Page 26: ...re the cord equivalent to the supplied one that has L shaped phone jacks at both ends I O Center Media Center Cable Note The location of each unit differs depending on the model AC OUTLET 2A 480VA TOTAL SWITCHED PARALLEL LINE2 4dB LINE2 4dB PARALLEL L L R R LINE2 4dB INPUT INPUT Speaker cord Power Supply unit Monitor speaker left Monitor speaker right Speaker cord I O Center ...

Page 27: ...re hooked up at the factory TO PD TO MD TO SENSOR PD MD SENSOR Central Signal Processor TO PS GREEN TO I O BLUE CENTER AC OUTLET 2A 480VA AC OUTLET 2A 480VA TOTAL AC IN DIGITAL OUT TO PIANO PS PS AC power cord AC power adaptor To AC wall outlet Cradle Power cable Mini DIN cable RCA cords Central Signal Processor Power cable Power Supply unit I O Center Blue marks Green marks ...

Page 28: ...in use hold down for approximately two seconds to turn off the Pocket Controller When the Pocket Controller is not used for a long period of time remove the rechargeable battery Preparing the Pocket Controller 1 Remove the card slot protector and then insert the supplied CF wireless LAN card into the CF card slot 2 Set the battery replacement switch to the REPLACE BATTERY position 3 Put the rechar...

Page 29: ...tem Info Shows system information memory storage version For normal use modification of these setups are not required Initial Settings of the Pocket Controller PRC 100 Menu screen PRC 100 Menu icon Task Bar pg 19 Title Bar Calibrating the Touch Screen The following procedure calibrates the touch screen to improve the accuracy of the tapping operation Setting up the Current Date and Time Tap on Rec...

Page 30: ...Reboot on the menu that appears 3 Tap on The Main screen appears after approximately three minutes 4 Reset the Pocket Controller pg 18 Resetting the Pocket Controller 3 Tap on Hour Minutes to set the time 4 Tap on Time format and then select the desired format 5 Tap on and then on AM or PM if necessary 6 Tap on the Date button and then tap on current date on the mini calendar that appears 7 Tap on...

Page 31: ...th the stylus pen 4 Replace the battery compartment lid and then set the battery replacement switch back to the NORMAL OPERATION position 5 Press to turn the Pocket Controller on The Main screen appears after approximately two minutes NORMAL OPERATION REPLACE BATTERY RESET Pairing the Pocket Controller and the Disklavier For normal use this setup is not required 1 Make sure that other wireless equ...

Page 32: ...sk or erasing files Description of the Task Bar The task bar is always displayed at the bottom of the screen to show various information and status of the Pocket Controller Tapping on the icon shows the respective setup screen etc Shows the function menus such as Reboot etc Shows the wireless connection status Blue Excellent Green Good Yellow Average Red Poor No connection Tap to show the detailed...

Page 33: ...e is between 4 C and 52 C 40 F and 125 F Wipe CDs with a clean cloth before playback Remove the CD from the CD drive before turning the Disklavier off Floppy disk drive on the Media Center Eject button Access lamp Loading a CD Loading 1 Press on the Media Center to open the CD tray 2 Place the CD on the tray and then press to close the tray CDs The files should be formatted in ISO 9660 LEVEL1 Flop...

Page 34: ...unnaturally when the song file is modified on the external MIDI device such as sequencer etc The above mentioned problem does not occur in the following cases When the song file stored loaded in the Disklavier PRO Series is played back on the Disklavier PRO Series through an external MIDI device without any modification on that device When the song file is output from the MIDI OUT terminal or the ...

Page 35: ...haracter Tempo on To resume the original tempo tap on in step 3 Tip The value can be adjusted from 50 to 20 in 1 increments Playing Back Songs in a Different Key Transposition 1 Select the desired song pg 12 Selecting a Song in Quick Guide 2 Tap on in the Song screen 3 Tap on to adjust the transposition value and then on The adjusted value appears instead of the character Trans on To cancel the tr...

Page 36: ...and then on Repeats all songs in the current album Repeats the current song only Repeats all songs in the current album in random order The selected mode appears instead of the character Repeat on To cancel repeat mode tap on in step 4 Tap on in the Song screen to show the desired playback options Playback options Repeating a Specific Section of a Song A B Repeat 1 Select the desired song pg 12 Se...

Page 37: ... registered points point A and B during playback or while stopped tap on or Tip You can also locate a point by fast reversing forwarding between points A and B To clear the registered point tap on This could be useful for example when listening carefully to one part and also when you practice only the left or right hand part while the Disklavier plays the other Playing Back Only the Desired Piano ...

Page 38: ...eliminate the trouble of changing CDs floppy disks or USB flash memories each time you want to listen to songs on a different medium First create your own play list and then play back that list by following the procedures below Adding the Desired Song to the Play Lists 4 Tap on the desired part to change its setting play or mute Each time you tap on the part its setting changes as follows showing ...

Page 39: ... pg 56 Rearranging the Order of Songs Albums Select the Play Lists that you created in the above procedure pg 12 Selecting a Song in Quick Guide and then press Tap to cancel the selection You can change the voice of the ensemble tracks to your preference For details on the track structure see Ensemble Part Recording and Track Structure on page 47 Temporarily Changing the Voice of a Track 1 Select ...

Page 40: ... Tap on the desired voice name Tip You can also select the desired voice by specifying the voice number Tap and the voice number selection screen appears Confirm the desired voice number referring to Ensemble Part Playback Voice List pg 70 enter the number with the keyboard on the pocket controller and then tap on 7 Tap on To adjust the volume of the track tap Volume and then press Tap to cancel s...

Page 41: ...ul for arranging existing ensemble parts For example when you have transposed a specific track to suit its instrument voice in advance you can transpose other tracks in the same key Mix Move Copy Track Editing Tracks 1 Select the desired song pg 12 Selecting a Song in Quick Guide 2 Tap on once on the Song screen 3 Tap on The track information screen appears Each track number in the track list is c...

Page 42: ...on track number Mix Track The track selected in step 4 will be mixed with the destination track Move Track The destination track will be overwritten by the track selected in step 4 the selected track will be blank Copy Track The destination track will be overwritten by the track selected in step 4 the selected track will be retained 9 Confirm that the destination track number is marked with a blue...

Page 43: ... Mix Move Copy Track 2 Tap on 3 Tap on 4 Tap on after the completion message appears Tap to cancel editing Transpose Track 1 Perform steps 1 thru 5 in Editing Tracks Mix Move Copy Track pg 28 2 Tap on 3 Tap on the key change button The key change screen appears Key change button Selected track button Tap to cancel editing ...

Page 44: ...entirety Copyright Shows the copyright 4 Tap on to adjust the transposition value and then tap on Tip The track can be transposed in half step keys up or down 60 to 60 5 Tap on Tip To transpose all the tracks tap on the selected track button The selected track number indication changes to All Tracks Note that the rhythm track cannot be transposed 6 Tap on 7 Tap on after the completion message appe...

Page 45: ... Selecting a Song in Quick Guide 2 Tap on repeatedly in the Song screen so that the following screen appears Song Tag screen 3 Tap on the title of the desired information For Song Title and Comment The text box for the selected information title appears For Rate The selected title Rate is highlighted 4 Modify the information For Song Title and Comment Modify the information and then tap on For det...

Page 46: ... Caps lock To cancel the function press again Will insert a space Will act as a tab key On the Edit screen the cursor will move to the next field Back space Will delete the character to the left of the cursor Delete Will delete the character to the right of the cursor Num Will change the entering mode to enter numbers Num lock and symbols To cancel the function press again Carriage return Will sta...

Page 47: ... Adjusts the overall volume Audio Volume Adjust Adjusts the volume of the accompaniment or standard audio sound pre recorded on the software CDs Audio Pitch Adjust Adjusts the pitch of the accompaniment or standard audio sound pre recorded on the software CDs Skip Sets the song to be played OFF or not ON during playback a series of songs in an album Guide Turns the SmartKey function on ON or off O...

Page 48: ...ld be turned on in advance pg 34 SmartKey Playback 1 Select the desired song with icon pg 12 Selecting a Song in Quick Guide 2 Press Key prompt Key prompt The key slightly moves downward Key notation As a reference C3 is middle C which means C4 is an octave above middle C and so on 3 Follow and play the prompt key The Disklavier plays a simple melody 4 Continue to play the prompt keys one by one u...

Page 49: ...iano song and the CD with the Registering appearing on the screen Guide orange Normal play green Mute white 3 Wait until the Registering disappear and then press to start PianoSmart playback Note If Different CD screen appears in step 2 confirm that the CD paired with the selected SmartPiano song is loaded and then tap on Video Synchronized Playback 1 Perform the video synchronized recording in ad...

Page 50: ...ly for network communications by enabling it to get a DHCP IP address automatically recommended or by assigning an appropriate address manually The procedure is the same as the one used for setting up the Disklavier for Internet communications Please follow the instructions on page 90 for Setting Up the Disklavier for Internet Connection Note For information about configuring a personal computer f...

Page 51: ...he From ToPC folder will be refreshed on the screen and the new song files will be ready for playback on the Disklavier Note Do not access the From ToPC folder while the Disklavier is engaged in another operation such as file copying or deleting For Windows only In case that you cannot find the Dkv icon 1 Click Entire Network under Other Places in the left side menu of the My Network Places window...

Page 52: ...ce does with the left hand part You can also mute the piano sound to your preference Playing the Disklavier along with the Internal Metronome 1 Tap on in the Main screen 2 Tap on to start the metronome The color of changes to blue To stop the metronome tap on 3 Tap on to adjust the value of the desired option Tip Tap on to resume the default tempo In such a case note that the operation changes onl...

Page 53: ...up is selected depressing the pedal adds articulations specific to the wood brass wind Three types of articulation are assigned to the respective pedals Soft pedal Assigned for adding Head blow up articulation to the manner of beginning a note Sostenuto pedal Assigned for adding Joint articulation to the interval of two notes Damper pedal Assigned for adding Tail fall down articulation to the mann...

Page 54: ...t effective when the interval of the two notes is an octave Note When the interval of the jointed notes is narrower or wider than an octave Joint articulation may not effect those notes For Tail fall down articulation 1 Press the desired key 2 While the key is pressed depress the damper pedal and then release the key 3 Release the damper pedal to mute the note The note sustains for a while with it...

Page 55: ...n the Information Area 3 Tap on to activate Harmony Mode Each time you tap on Harmony Mode is activated or inactivated alternately 4 Tap on to clear the Voice screen 5 Play the desired chord on the keys lower than the split point and play the melody line on the keys higher than the split point Applying Reverb Effects to the Digital Piano 1 Tap on in the Main screen and then on 2 Tap on Type on the...

Page 56: ...n you record both left and right hand part go to step 4 When you record either left or right hand part go to step 5 4 Tap on Split Point and then press to select the desired note as the split point The selected note and notes lower than that note are assigned to the left hand part and the notes higher than that are assigned to the right hand part 5 Press to start and then immediately pause recordi...

Page 57: ...g and turn off Titling a Song at the Start of Recording 1 Perform the procedures from step 1 thru step 2 of Recording a New Song pg 43 REC REC User REC User User REC User REC User You can overwrite the desired part to a previous recording For example if you record the left hand part of a song and then record a right hand part over the previously recorded song both recording will be combined 2 Tap ...

Page 58: ...overwrite green Record overwrite red Tip You can also overwrite the previously recorded part along with the blank part 5 Press to start and then immediately pause recording 6 Confirm that Recording appears in the information area and then start playing the Disklavier The Disklavier starts recording 7 Press to stop recording and then tap on to overwrite or to record as a new song to complete the re...

Page 59: ...he following conditions While songs on SmartPianoSoft PianoSoftPlusAudio SmartKey and audio CD are played back While Vocal Harmony mode is activated In such cases the icon is shown in gray Each time you tap on this button and alternates 1 Press repeatedly until the Main screen appears and then tap on in the Main screen 2 Start recording on the camcorder 3 Confirm that Rec Wait appears in the infor...

Page 60: ...isklavier are recorded as MIDI data MIDI data consist of 16 tracks with a single voice assigned to each track There is a resemblance to a score with 16 staves Generally the left hand part of the piano including half pedal data is assigned to Track 1 the right hand part including half pedal data to Track 2 and the ensemble and rhythm parts to the remaining tracks CD Synchronized Recording 1 Load th...

Page 61: ... advance the desired voice number in Ensemble Part Playback Voice List pg 70 helps you quickly select the voice Tap on and the following screen appears Enter the voice number with the keyboard on the pocket controller and then tap on Appears when there are more voices not shown in the window In such a case tap on either end of this bar to show the hidden voices 7 Tap on 8 Tap on Volume and then pr...

Page 62: ...r from green to red pg 44 Recording the Left and Right Hand Parts Separately Overwrite Recording Overdubbing an Ensemble Part Tap on and then the desired track black number pg 47 Recording Ensemble Parts 4 Tap on twice 5 Tap on Overdub and then press to select ON 6 Press and then play the Disklavier along with the playback of the song Recording starts automatically 7 After playing the Disklavier p...

Page 63: ...onome steps 1 and 3 of Playing the Disklavier along with the Internal Metronome on page 39 2 Tap on 3 Press 4 Play the Disklavier along with the metronome Recording starts automatically 5 After playing the Disklavier press to stop recording Measure number counter starts 1 Select the song to be overwritten pg 12 Selecting a Song in Quick Guide and then tap on 2 Tap on 3 Set up the overwritten part ...

Page 64: ...ing Songs Based on Measures and Beats Metronome Mode Recording pg 50 2 Tap on the desired song in the list that appears 3 Tap on repeatedly until the following screen appears 4 Tap on Quantize and then press to select the desired option 1 4 1 6 1 8 1 12 1 16 The lower number of the fraction indicates the number of sections a measure is evenly divided into 5 Press The metronome starts clicking 6 Pl...

Page 65: ... part track and its voice pg 44 Recording the Left and Right Hand Parts Separately Overwrite Recording pg 47 Recording Ensemble Parts 4 Tap on 5 Tap on of Tempo to adjust the tempo To resume the original tempo tap on Note You cannot change the Beat setting of a song recorded in Metronome Mode EX A song recorded in Time Mode EX A song recorded in Metronome Mode 6 Press Time Mode Playback starts Met...

Page 66: ...r the Play Lists Ex Function Menu for the Album List of User Library Note The menu items differ depending on the screen To clear the Function Menu screen tap on or or press This function is available for PianoSoft Library User Library and Play Lists Menu items Creating an Album in the Library 1 Select the desired source pg 12 Selecting a Song in Quick Guide and then tap on 2 Tap on To name the new...

Page 67: ... appears Making Copies of Songs or Albums 1 Select the desired song or album pg 12 Selecting a Song in Quick Guide and then tap on or Tap to cancel renaming in step 3 2 Tap on or Ex Copy Song 3 Copy the selected song or album Copying a Song 1 Tap on and then on the destination source in the list that appears if necessary 2 Tap on tap on the destination album in the list that appears if necessary a...

Page 68: ...rt the format of the album stored in a floppy disk tap on the check box for Convert to E SEQ Piano1 Copying an Album when a source other than FD is selected Tap on Tap on the desired album and then go to step 4 Destination album list screen 4 Tap on 5 Tap on after the completion message appears Making Copies of the Entire Contents in a Medium or Song Library 1 Select the desired source pg 12 Selec...

Page 69: ...ick Guide and then tap on or 2 Tap on or To cancel deletion tap on 3 Tap on 4 Tap on after the completion message appears Rearranging the Order of Songs Albums 1 Select the desired song or album pg 12 Selecting a Song in Quick Guide and then tap on or 2 Tap on or Ex Sort Song List 3 Tap on repeatedly so that the selected song or album moves to the desired position 4 Tap on 5 Tap on after the compl...

Page 70: ...tion select OFF in step 2 Tip The shortcut button on the Song screen is also available Tap on to activate the function above and on to inactivate it You can start or stop playback of a song automatically at specific times A maximum of 99 timer programs can be set Note Be sure to set the date time and time zone in advance pg 16 Setting up the Current Date and Time Skipping the Blank Part at the Beg...

Page 71: ...nd then the desired library Tip If you want to select the current album tap on appears in the Album column in the timer list screen Tap to delete the current timer program Tap to close the list 8 Tap on Album and then the desired album 9 Tap on Tip The following indications in the Album column show the type of song library PS PianoSoft Library UR User Library CD CD Library PL Play list If you do n...

Page 72: ...You may feel as if you were singing in a bar lounge It s great fun to use this function Tuning the Tone Generator MasterTune 1 Tap on in the Main screen and then on 2 Tap on to tune the Disklavier To cancel tuning tap on 3 Tap on to complete the operation Applying an Effect to Your Voice Vocal Harmony 1 Hook up a microphone not supplied to the Media Center and then turn on the microphone 2 Set the...

Page 73: ...Each time you tap on the mode is activated the color turns to blue or inactivated Vocal Harmony screen Vocal harmony type 11Tap on to clear the Vocal Harmony screen Tip The shortcut button on the Song screen is also available Tap on to activate the mode above and on to inactivate it Note The following features are not available while Vocal Harmony Mode is activated Video synchronized playback Vide...

Page 74: ...o voice Setting Up the Disklavier for Foot Controls Switches Preparing for Use of Foot Controls Switches 1 Connect a foot control switch to the FOOT CNTRL1 2 jack Foot control switch not supplied Bottom of the Media Center 2 Tap on in the Main screen and then 3 Tap on Function of the desired foot control switch and then the desired function 4 Tap on Go to step 6 when you select the Play Stop funct...

Page 75: ...pressed playback will start When the switch is released playback will pause When Main Volume or Voice Volume is selected for Function with Direction set to Down 3 When the switch is pressed the sound will be muted When the switch is released the original volume will resume 3 When Up is selected and the switch is pressed the volume will increase all the way There is no effect for Voice Volume When ...

Page 76: ...adjust the ONMI IN Vol value and Video Synchronized Playback and Vocal Harmony Mode is not available OFF Select this when you cancel the data reception from the OMNI IN jacks OMNI OUT Selects the desired data to be output from the OMNI OUT jacks Output Select this when you output the same audio signals as the ones for the Monitor speakers Output PianoTG Select this when you output the ensemble par...

Page 77: ...hen on 2 Tap on OMNI IN OMNI OUT Digital Out and then press to select the desired option 3 Tap on to complete the operation By hooking up a TV or a monitor display to the I O Center lyrics are automatically displayed on the TV or the monitor display during playback a song with lyrics prerecorded Note For purchasing songs with lyrics consult your Disklavier dealer Note For users in North America re...

Page 78: ... song to standard MIDI format before using it for playback Strip XP also makes it possible to reduce the size of MIDI files when desired Note Once the XP event is stripped the original data cannot be restored Before converting valuable music data be sure to backup the original data 3 Start playback of a song with lyrics on the Disklavier The lyrics appear with a colorful background picture A color...

Page 79: ...upported for this function Making Backups Restoring the Song Library Making Backups and Restoring the Song Library 1 Connect an external USB HDD to the USB port on the Media Center 2 Tap on in the Main screen and then 3 Tap on in the System screen and then 4 Tap on 5 Tap on The Disklavier will start making backups 6 Tap on after the completion message appears and then 1 Perform steps 1 and 2 in Ma...

Page 80: ...en and then on 2 Tap on 3 Tap on to start restoring 4 Tap on to complete the operation Making an Install Floppy Disk 1 Tap on in the Main screen and then on 2 Load a formatted floppy disk 2HD to the drive pg 20 Loading and Ejecting a Floppy Disk 3 Tap on The Disklavier will start making a backup floppy disk 4 Tap on and then on to complete the operation Formatting a Floppy Disk 1 Tap on in the Mai...

Page 81: ...llow the instructions of your Yamaha dealer and perform the following procedure Resetting the Disklavier 1 Tap on in the Main screen and then on 2 Tap on 3 Tap on to start resetting 4 Tap on to complete the operation Assigning a Specific Function to the ONE TOUCH Button 1 Tap on in the Main screen and then on 2 Tap on Function press to select the desired option and then on 3 Tap on to complete the...

Page 82: ...c Piano Vintage Electric Piano Harpsichord Harpsichord 4 Harpsichord 4 8 Clavinet Vibraphone Vibraphone Marimba Celesta Church Organ Church Organ Principal Church Organ Flute Church Organ Full Jazz Organ Drawbar Organ Jazz Organ Rotor Organ Guitar Nylon Guitar Steel Guitar Bass Acoustic Bass Finger Bass Fretless Bass A Bass and Cymbal Strings Strings 1 Strings 2 Synth Strings Choir Choir Slow Choi...

Page 83: ...GrPnoK 13 XG Det CP80 14 XG ElGrPno1 15 XG ElGrPno2 16 XG HnkyTonk 17 XG HnkyTnkK 18 Electric Piano 19 Modern Elec Piano 20 Vintage Elec Piano 21 XG E Piano1 22 XG El Pno1K 23 XG MelloEP1 24 XG Chor EP1 25 XG HardEl P 26 XG VX El P1 27 XG 60sEl P Piano 28 DX Electric Piano 29 Galaxy Elec Piano 30 XG E Piano2 31 XG El Pno2K 32 XG Chor EP2 33 XG DX Hard 34 XG DXLegend 35 XG DX Phase 36 XG DX Analg 3...

Page 84: ... 91 XG DetPrcOr 92 XG LiteOrg 93 XG PercOrg2 94 Rotor Organ Group Name Voice Number Voice Name Organ 95 XG RockOrgn 96 XG RotaryOr 97 XG SloRotar 98 XG FstRotar 99 Ch Organ Principal 100 Ch Organ Flute 101 Ch Organ Full 102 XG ChrchOrg 103 XG ChurOrg3 104 XG ChurOrg2 105 XG NotreDam 106 XG OrgFlute 107 XG TrmOrgFl 108 XG ReedOrgn 109 XG Puff Org 110 XG Acordion 111 XG AccordIt 112 XG Harmnica 113 ...

Page 85: ...6 XG Ba DstEG 157 XG FngrSlap 158 XG FngBass2 159 XG ModAlem 160 XG PickBass 161 XG MutePkBa 162 Fretless Bass Group Name Voice Number Voice Name Guitar 163 XG Fretless 164 XG Fretles2 165 XG Fretles3 166 XG Fretles4 167 XG SynFretl 168 XG Smooth 169 XG SlapBas1 170 XG ResoSlap 171 XG PunchThm 172 XG SlapBas2 173 XG VeloSlap 174 XG SynBass1 175 XG SynBa1Dk 176 XG FastResB 177 XG AcidBass 178 XG Cl...

Page 86: ...yn Str1 225 XG ResoStr 226 XG Syn Str4 227 XG SS Str 228 XG Syn Str2 229 Choir Group Name Voice Number Voice Name Ensemble 230 Slow Choir 231 Scat 232 XG ChoirAah 233 XG S Choir 234 XG Ch Aahs2 235 XG MelChoir 236 XG ChoirStr 237 XG VoiceOoh 238 XG SynVoice 239 XG SynVox2 240 XG Choral 241 XG AnaVoice 242 XG Orch Hit 243 XG OrchHit2 244 XG Impact Brass 245 AEM Trumpet 1 246 AEM Trumpet 2 247 XG Tr...

Page 87: ... 291 AEM Baritone Sax 292 XG Bari Sax 293 XG Oboe 294 XG Eng Horn 295 XG Bassoon 296 XG Clarinet Pipe 297 XG Piccolo Group Name Voice Number Voice Name Pipe 298 XG Flute 299 XG Recorder 300 XG PanFlute 301 XG Bottle 302 XG Shakhchi 303 XG Whistle 304 XG Ocarina Synth Lead 305 XG SquareLd 306 XG Square 2 307 XG LMSquare 308 XG Hollow 309 XG Shmoog 310 XG Mellow 311 XG SoloSine 312 XG SineLead 313 X...

Page 88: ...wedPad 361 XG Glacier 362 XG GlassPad 363 XG MetalPad 364 XG Tine Pad Group Name Voice Number Voice Name Synth Lead 365 XG Pan Pad 366 XG Halo Pad 367 XG SweepPad 368 XG Shwimmer 369 XG Converge 370 XG PolarPad 371 XG Celstial Synth Effects 372 XG Rain 373 XG ClaviPad 374 XG HrmoRain 375 XG AfrcnWnd 376 XG Caribean 377 XG SoundTrk 378 XG Prologue 379 XG Ancestrl 380 XG Crystal 381 XG SynDrCmp 382 ...

Page 89: ...426 XG Sci Fi 427 XG Starz 428 XG Sitar 429 XG DetSitar 430 XG Sitar 2 431 XG Tambra 432 XG Tamboura Group Name Voice Number Voice Name Synth Effects 433 XG Banjo 434 XG MuteBnjo 435 XG Rabab 436 XG Gopichnt 437 XG Oud 438 XG Shamisen 439 XG Koto 440 XG T Koto 441 XG Kanoon 442 XG Kalimba 443 XG Bagpipe 444 XG Fiddle 445 XG Shanai 446 XG Shanai2 447 XG Pungi 448 XG Hichriki Percussive 449 XG TnklB...

Page 90: ...am 499 XG Bubble 500 XG Feed 501 XG Dog 502 XG Horse 503 XG Bird 504 XG Ghost 505 XG Maou 506 XG Tel Dial 507 XG DoorSqek 508 XG Door Slam 509 XG Scratch 510 XG Scratch 2 Group Name Voice Number Voice Name SFX Voice 511 XG WindChm 512 XG Telphon2 513 XG CarEngin 514 XG Car Stop 515 XG Car Pass 516 XG CarCrash 517 XG Siren 518 XG Train 519 XG Jetplane 520 XG Starship 521 XG Burst 522 XG Coaster 523...

Page 91: ...ails on the type selection see Applying an Effect to Your Voice Vocal Harmony on page 59 Vocal Harmony Type List Vocal Harmony Type Vocal Harmony Mode Instrument Scat Vocoder Octave Up Scat Vocoder Auto Key Harmony Vocoder Auto Harmony M Vocoder Auto Harmony F Vocoder Octave Up Chromatic Octave Down Chromatic Country Quartet Vocoder Closed Men Quartet Vocoder Mix Acap Quartet Vocoder Womem Choir V...

Page 92: ... Vocoder Diatonic Girl Vocoder A Capella Dia Vocoder Chordal XG Vocoder Karaoke Auto Vocoder Karaoke Mode Vocoder Karaoke Girl Vocoder Karaoke Pitch Vocoder 2 Unison High Vocoder 3 Unison High Vocoder Vocoder Auto Upper Vocoder Vocoder Auto Lower Vocoder DetuneXG Detune VocoderXG Vocoder Vocoder Mode Upper Vocoder Vocoder Mode Lower Vocoder Vocoder Girl Upper Vocoder Vocoder Girl Lower Vocoder Voc...

Page 93: ...ter to the Disklavier s I O Center Be sure to use the commercially available MIDI cable with the L shaped connector on the I O Center end Note When you use the USB connection it is required to install the USB driver to the connected device In such a case visit the following website and download the driver http www global yamaha com download usb_midi Hooking Up a MIDI Device MIDI device Drum Machin...

Page 94: ...ano parts and the 03 channel to the pedal part 1 2 Select this when the 01 and 02 channels are assigned to the piano parts Prg Selects the smallest number channel assigned to the piano group voice pg 70 to be played on the Disklavier Prg All Selects all channels assigned to the piano group voice pg 70 to be played on the Disklavier Delay When the Disklavier receives two kinds of data strong and we...

Page 95: ...mit Selects one of the following parts to be transmitted to the connected MIDI device ESBL Out Select this when you transmit the ensemble part played back on the Disklavier KBD Out Select this when you transmit the piano part played on the Disklavier P Part ESBL Out Selects the channel s to which the piano part is assigned ON Select this when you assign the piano parts to both the piano and the en...

Page 96: ...g played on the Disklavier on the external MIDI device This option inactivates the internal tone generator to prevent both the internal and external tone generator sound at the same time Split Sets the split point on the desired note that divides the keyboard into left hand and right hand part The selected note and the notes lower than that note are assigned to the channel set in Out Ch option and...

Page 97: ...vice is limited to residents of the United States who own the Disklavier To use the IDC service initial registration is required using an Internet connected computer Please register at the following website https music yamaha com serviceRegistration html Note If you have already registered for the IDC service with any other instrument such as the Clavinova you do not need to register again You can...

Page 98: ...e Disklavier to the Internet Please check your contract or contact your Internet provider for further information Note Some types of modems such as ADSL modems or cable modems have multiple ports for connecting two or more devices such as computer musical instrument etc If your modems have only one port an optional router or hub is required in order to connect several devices simultaneously For fu...

Page 99: ...an access a special Disklavier website where you can audition and purchase song files access DisklavierRadio and download software updates among other things Note Free contents that do not require an ID and password are available DisklavierRadio Select this to listen to streaming broadcasts of music with many channels of music content You can enjoy listening to piano performances that play continu...

Page 100: ...the Disklavier and perform step 1 again If the connection still fails see Setting Up the Disklavier for Internet Connection on page 90 and check the setting 2 Tap on the desired option Perform operations on the screen that appears 3 Tap on to return to the Internet screen 4 Press to return to the Main screen IDC service options Basic Operations on the IDC Service Screens Each time you tap on this ...

Page 101: ...ased song files Subscription Status Select this to renew a DisklavierRadio subscription or to unsubscribe from DisklavierRadio If you wish to use another IDC account or prevent the current account from being used by others you must first log out from the IDC service Checking Your Account Information 1 Perform step 1 of Accessing the Internet pg 87 2 Tap on 3 Tap on the desired option Perform opera...

Page 102: ... service Accessing the Download Library Tap to access Download Library Main screen Tap to access Download Library Internet screen Updating the Disklavier Using the Internet 1 Perform step 1 of Accessing the Internet pg 87 2 Tap on The version confirmation process between the IDC server and the Disklavier starts If there is any updated firmware available the following confirmation dialog appears 3 ...

Page 103: ... Tap to cancel the installation process Tap to reboot the Disklavier and install the firmware Tap to install the firemware next time you turn on the Disklavier You can change various settings related to the Internet connection In most cases you do not have to change the default factory settings You can access setup options by tapping on in the Setup screen Use DHCP Select the method to determine s...

Page 104: ...e in Glossary on page 101 Connection Info You can confirm the information of network settings Note For information about DNS server address IP address subnet mask and gateway server address check your contract or contact your Internet provider If you want to initialize Internet settings first you must reset the whole system of the Disklavier pg 68 Resetting the Disklavier However cookies are still...

Page 105: ... pg 12 Adjusting the Overall Volume in Quick Guide Make sure that the volume adjusted in Balance screen is adequately turned up on the Pocket Controller pg 25 Adjusting the Volume Balance among the Keyboard Playing Ensemble Sound Software Playback and Microphone s Input In Quiet mode no sound is heard other than the solo piano sound during playback of a PianoSoft Solo song The Monitor speakers are...

Page 106: ...The song files should be formatted in ISO 9660 LEVEL1 The Disklavier may not read song files other than this format Some notes drop out during playback In Acoustic mode when a piano song is played back at a low volume some notes in trill or tranquil part may drop out This is a characteristic of the Disklavier and not a malfunction PianoSmart playback cannot be performed Makes sure that the numbers...

Page 107: ...es into a library that already contains 10 000 songs CANNOT EXECUTE Exceeds limit of 10 000 songs The maximum number of songs in a library or playlist is limited to 10 000 You tried to copy song files into a certain medium NOT ENOUGH DISK SPACE The storage space in the destination medium is not enough You tried to erase entire contents in a floppy disk Delete All CANNOT EXECUTE DISK FORMAT The flo...

Page 108: ...95 CHAPTER 11 Screen Transition Diagrams Main screens pg 9 in Quick Guide and 39 43 pg 9 in Quick Guide and 38 39 57 59 61 64 68 81 83 87 89 pg 6 7 in Quick Guide ...

Page 109: ...CHAPTER 11 Screen Transition Diagrams 96 English Rec screens pg 43 L R Piano mode Time mode Time mode Ensemble mode Metronome mode Metronome mode pg 52 pg 49 pg 47 pg 52 pg 49 51 ...

Page 110: ...een Transition Diagrams 97 Song screens pg 15 in Quick Guide pg 24 pg 31 PianoSmart manual adjustment screen only for PianoSmart playback For normal use modification of these setups are not required pg 34 pg 32 pg 23 ...

Page 111: ...CHAPTER 11 Screen Transition Diagrams 98 English Song playback option buttons Setup menu screens pg 22 pg 23 57 Playback option buttons pg 46 60 pg 41 42 45 59 61 64 68 81 83 pg 57 65 67 68 90 ...

Page 112: ...CHAPTER 11 Screen Transition Diagrams 99 Setup option screens pg 81 pg 45 pg 64 pg 65 pg 67 68 pg 66 pg 90 pg 90 ...

Page 113: ...CHAPTER 11 Screen Transition Diagrams 100 English pg 82 pg 83 pg 42 pg 59 pg 41 pg 61 pg 68 pg 57 ...

Page 114: ... from a website to the Disklavier Ensemble Song A song which contains piano parts and accompanying instrumental voices An Ensemble song contains the same left and right hand parts as an L R song and in addition up to 13 accompanying instrument tracks These extra tracks are played by the internal XG tone generator The accompanying tracks may be used for acoustic bass drums strings vibes etc E SEQ S...

Page 115: ...er Modem A device which connects and allows data transfer between a conventional telephone line and a computer It converts the digital signals from the computer to analog audio for sending over the phone line and vice versa Piano Parts Refers to the left and right hand piano parts of a song The left hand piano part is recorded onto track 1 and the right hand piano part is recorded onto track 2 The...

Page 116: ...r Standard MIDI File SMF Song Format A song file format supported by MIDI sequencers and music software Song Normally a short piece of music with lyrics However for clarity in Disklavier manuals the term is used to refer to any piece of music of any genre Sound Muting Mode Yamaha s innovative system in which a tap of keeps the hammers from striking the strings effectively silencing the acoustic pi...

Page 117: ... For example the collection of web pages whose addresses begin with http www yamaha com is referred to as the Yamaha site XG Yamaha XG is an extension of the GM General MIDI format Its greater polyphony more voices and use of effects enhances the compatibility between MIDI devices When a song in the Yamaha XG format is played on another XG compatible tone generator or synthesizer it plays and soun...

Page 118: ...disk USB Flash Memory Yamaha does not assure the operation of all the commercially available USB flash memories For a list of compatible products please visit www yamaha com disklavier USB Hard Disk Drive FAT32 format Media Center Drive CD and floppy disk drive Dimensions W H D 405 257 73 mm 16 10 1 8 2 7 8 in Weight 3 3 kg 7 3 lb Pocket Controller Dimensions W H D 74 138 23 mm 2 15 16 5 7 16 15 1...

Page 119: ...ect Floppy disk CD USB media internal HDD Arrangement of Songs Song Libraries PianoSoft Library User Library CD Library Download Library From To PC pg 9 in Quick Guide Polyphony 32 keys PRO Series 16 keys Mark IV Series Volume 128 levels Repeat ALL all songs in current album RPT current song RND all songs in current album in random order A B repeat Programming Play Lists feature Part cancel L left...

Page 120: ...tures Overwrite Recording pg 44 Video Synchronization pg 45 Ensemble Part Recording pg 47 Overdubbing pg 49 Metronome Mode Recording pg 50 Quantize pg 51 Tempo Changing pg 52 Other Features Timer Play pg 57 Vocal Harmony pg 59 Foot control switch pg 61 XP Strip pg 65 Backup pg 66 One Touch Button pg 68 ...

Page 121: ......

Reviews: