background image

53

Digital Effects

• When the Voice Set function

is on (page 120), the
Harmony/Echo part setting
may change according to the
selected R1 panel voice.

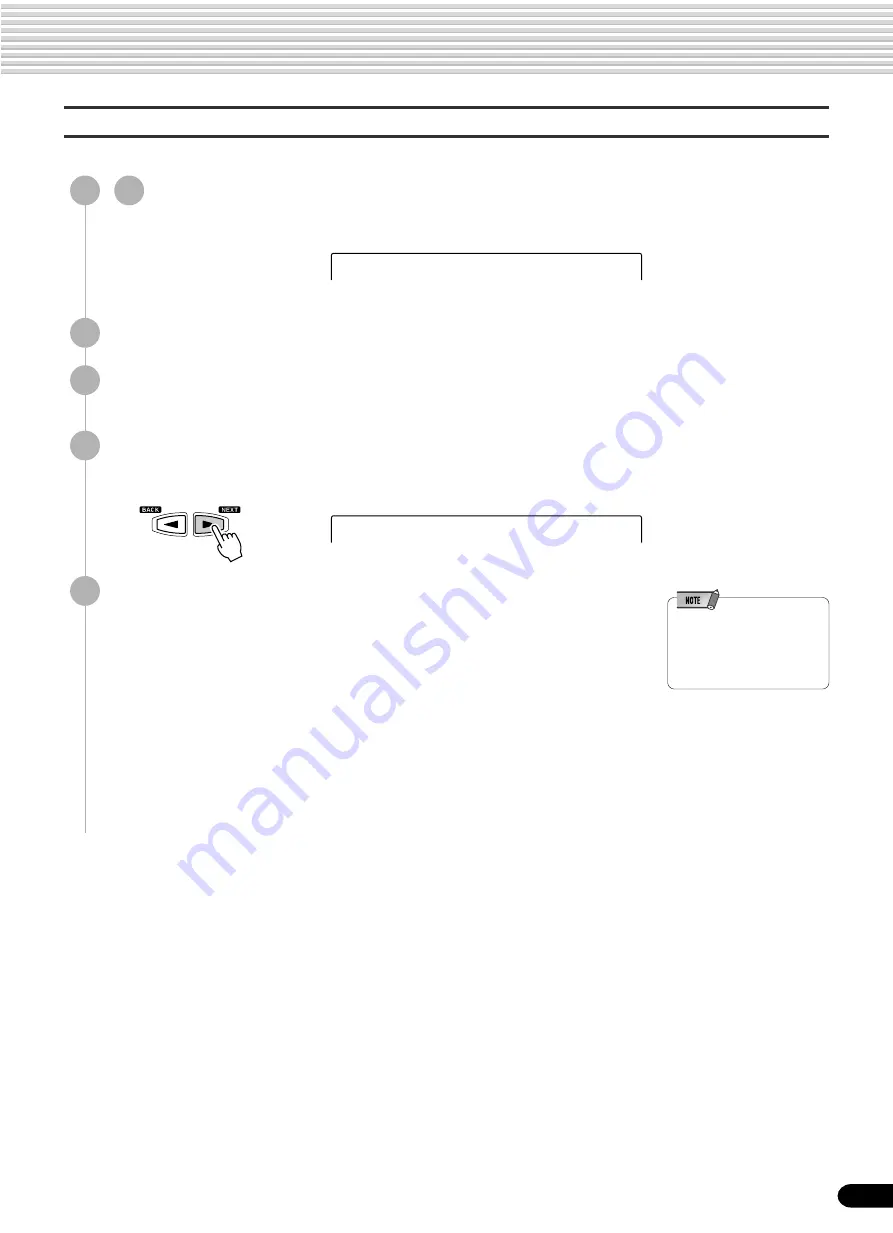
Changing the Part for the Harmony/Echo effect

5

Press the [NEXT] button to display the Type Selection screen.

6

Press the [NEXT] button to display the Harmony Volume
screen.

7

Press the [NEXT] button to display the Harmony Part setting
screen.

8

Set the part.

Use the data dial, the [+/YES] button or the [-/NO] button.

 Auto .......... Harmony/Echo notes are automatically assigned to the R1 and R2

parts, in that order or priority.

 R1 ............. Harmony/Echo is only applied to the Voice R1.

If Voice R1 is off, there will be no Harmony/Echo effect.

 R2 ............. Harmony/Echo is only applied to the Voice R2.

If Voice R2 is off, there will be no Harmony/Echo effect.

This allows you to select the part which is used for the Harmony/Echo effect.

1


-


4

Use the same operation as in “Selecting a Harmony/Echo
Type” (page 50).

H.Part =Auto

Effect =Harmony

51

Summary of Contents for Portatone PSR-540

Page 1: ......

Page 2: ...et these goals In keeping with both the letter and the spirit of the law we want you to be aware of the follow ing Battery Notice This product MAY contain a small non rechargeable battery which if app...

Page 3: ...vice personnel Use the specified adaptor PA 6 or an equivalent recommended by Yamaha only Using the wrong adaptor can result in damage to the instrument or overheating Before cleaning the instrument a...

Page 4: ...large graphic display and easy to use interface also greatly enhance the operability of this advanced instrument In order to make the most of your PortaTone s features and extensive performance poten...

Page 5: ...page 16 This section explains the display indications of the PSR 540 and how to read them for optimum operation Function Tree page 22 This lists all functions of the PSR 540 according to their hierarc...

Page 6: ...he Left L and Right R1 R2 Hands 28 Functions of the Keyboard 29 Transpose 30 Pitch Bend Wheel 30 Sustain 30 Keyboard Percussion 31 Auto Accompaniment 32 Using Auto Accompaniment rhythm track only 32 U...

Page 7: ...104 Clearing User Style Data 104 MIDI Functions 106 What s MIDI 106 What You Can Do With MIDI 108 MIDI Data Compatibility 109 Connecting to a Personal Computer 110 MIDI Template 112 MIDI Transmit Set...

Page 8: ...keyboard Page 92 Registration Memory The convenient Registration Memory feature lets you save virtually all panel settings to one of 128 Registration Memory settings and then instantly recall all you...

Page 9: ...he sound of your performance in a wide variety of ways These include Reverb Chorus DSP and Harmony Echo Page 46 Reverb recreates the rich spacial ambiance of various performance environments such as a...

Page 10: ...B4 83 H C5 84 L 85 S 87 D5 86 L E5 88 H F5 89 L M 90 G5 O 91 92 D1 38 E1 40 46 49 CHORD dim mM 6 7augsus4 119 513 1 REC 2 REC 3 REC 4 REC 5 REC 6 REC 7 REC 8 REC 9 REC 10 REC 11 REC 12 REC 13 REC 14...

Page 11: ...TRANSPOSE button 30 5 ACMP SONG VOLUME button 37 70 6 PART ON OFF VOICE L button 28 VOICE R1 button 27 VOICE R2 button 27 7 Number buttons 1 0 NO YES 20 8 EXIT button 17 9 Data dial 20 0 DISK LOAD but...

Page 12: ...R 540 requires six 1 5V SUM 1 D size R 20 or equiva lent batteries When the batteries need to be replaced Battery Low may appear on top of the display the volume may be reduced the sound may be distor...

Page 13: ...footswitch into this jack and use it to switch sustain on and off The footswitch connected to this jack can also be set to replicate the functions of some panel buttons doing things like starting and...

Page 14: ...devices Music stand Setting Up The PSR 540 is supplied with a music stand that can be attached to the instrument by inserting it into the slot at the rear of the control panel For more information on...

Page 15: ...om the instrument 2 Press the DEMO button to start demo playback If you play the PSR 540 with the volume at its maximum level when the batteries are used the life of the batteries will be shorter 3 Se...

Page 16: ...ct is turned on page 49 0 TOUCH Appears when the touch sensitivity is turned on page 120 1 SUSTAIN Appears when the sustain is turned on page 30 2 HARMONY Appears when the HARMONY effect is turned on...

Page 17: ...u can also directly select the desired displays by pressing the appropriate buttons as listed above DEMO button page 15 RECORD button pages 25 78 92 96 FUNCTION button pages 77 118 SONG button pages 2...

Page 18: ...ns 1 0 CHORD dim mM 6 7augsus4 119 513 BACK NEXT KEYBOARD START STOP YES TRACK 1 16 PART DIAL 0 9 FUNCTION SONG STYLE VOICE LR12 EASY NAVIGATOR 001 8Beat 1 Press the STYLE button This message means Th...

Page 19: ...VOICE LR12 EASY NAVIGATOR F1 Multi Pad CHORD dim mM 6 7augsus4 119 513 BACK NEXT KEYBOARD START STOP YES TRACK 1 16 PART DIAL 0 9 FUNCTION SONG STYLE VOICE LR12 EASY NAVIGATOR 001 Grand Piano CHORD d...

Page 20: ...a number of other voices To select number 106 for example press the 1 0 and 6 number buttons in sequence Basic Operation Entering one or two digit numbers One or two digit voice numbers can be entere...

Page 21: ...yles page 104 User Pad banks page 94 Registration Memory banks page 56 The example display below appears when naming a song on a floppy disk page 65 Basic Operation Entering a character Each key on th...

Page 22: ...ans Song transpose setting 73 VOICE CHANGE T01 001 Grand Pno Voice selection of R1 R2 L Style track Song track 75 MIXER Volume R1 Volume adjustment of Voice R1 R2 L 1 2 3 76 Volume Ph1 Volume adjustme...

Page 23: ...ng 120 Pedal Selecting footswitch function 16 121 PBRange Pitch bend range setting 17 122 F5 Midi Template MIDI template vselection 112 Load OK Loading the selected MIDI template setting 112 Transmit...

Page 24: ...of Voice R1 VOICE R1 13 Part octave setting of Voice R2 VOICE R2 14 Split point setting ACMP ON OFF 15 Touch sensitivity setting TOUCH 16 Selecting footswitch function Footswitch 17 Pitch bend range...

Page 25: ...wn original performances and songs create original styles and Multi Pad phrases Select this mode by pressing the LOAD button SAVE button or the UTILITY button In the Disk mode you can save and load im...

Page 26: ...ctions Pitch Bend Wheel page 30 Transpose page 30 Sustain page 30 Touch Sensitivity page 120 Selecting a Voice 1 Press the VOICE R1 button The voice selected here is called voice R1 RIGHT 1 See page 2...

Page 27: ...ices available for selection here VOICE R2 are the same as those available for VOICE R1 selected on page 26 3 Play the voice 2 Play the voices Two different voices are sounded simultaneously in a laye...

Page 28: ...e R1 RIGHT 1 is meant to be played with the right hand Voice L LEFT is played with the left hand Selecting a voice for VOICE L 2 Select a voice Use the data dial the YES button the NO button or the nu...

Page 29: ...ks and Registration Memory banks page 21 Playing Voices The point on the keyboard that separates voice L and voice R1 R2 is called the split point The split point is set to F 2 at the factory setting...

Page 30: ...he TRANSPOSE button 2 Set the transposition Use the data dial the YES button the NO button or the number buttons 1 0 Pitch Bend Wheel Use the PSR 540 pitch bend wheel to bend notes up roll the wheel a...

Page 31: ...i n g l e B e l l T r i a n g l e O p e n C u i c a O p e n W o o d B l o c k L W o o d B l o c k H G u i r o L o n g S a m b a W h i s t l e L S a m b a W h i s t l e H C a b a s a A g o g o H T i m...

Page 32: ...for getting the most out of the auto accompaniment Accompaniment Sections page 34 Tempo Tap page 36 Accompaniment Track Muting page 37 Accompaniment Volume Control page 37 Auto accompaniment functions...

Page 33: ...on so that its indicator lights The beat lamp also flashes in time with the tempo This condition is called synchronized start standby Refer to page 25 for details 5 As soon as you play a chord with yo...

Page 34: ...the song It plays an accompaniment pattern of several measures 2 4 measures and repeats indefinitely until another section s button is pressed There are two variations on the basic pattern A B and the...

Page 35: ...Press the MAIN B button A fill in plays automatically followed by the main B section 9 Press the MAIN buttons as desired during your performance The main section corresponding to the pressed button p...

Page 36: ...tapped the button The Tempo can also be changed during playback by tapping the TEMPO TAP button twice at the desired tempo The auto accompaniment can be started at any tempo you desire by tapping out...

Page 37: ...t page 33 2 Press the ACMP SONG VOLUME button Track contents RHYTHM SUB RHYTHM MAIN These are the main rhythm tracks The RHYTHM tracks produce the drum and percussion sounds BASS The BASS track always...

Page 38: ...ng a minimum number of keys on the Auto accompaniment section of the keyboard The following abbreviated chord fingerings are used The Fingered 1 mode The Fingered 1 mode lets you finger your own chord...

Page 39: ...5 7 or 1 3 5 7 Major seventh ninth M7 9 1 2 3 5 7 Major seventh add sharp eleventh M7 11 1 2 3 4 5 7 or 1 2 3 4 5 7 Flatted fifth b5 1 3 b5 Major seventh flatted fifth M7b5 1 3 b5 7 Suspended fourth...

Page 40: ...he third or G the fifth as the bass note rather than C When the Full Keyboard Mode is selected the PSR 540 will automatically create appropriate accompaniment while you play just about anything using...

Page 41: ...urned off SYNC STOP is the abbreviation of SYNCHRO STOP 1 Press the STYLE button 2 Turn AUTO ACCOMPANIMENT on page 33 3 Turn SYNCHRONIZED START on page 33 4 Turn SYNCHRONIZED STOP on Press the SYNC ST...

Page 42: ...hand the auto accompaniment starts For this example play a C major chord as shown below 4 Stop the accompaniment Part on off VOICE R1 R2 page 29 Voice Change setting VOICE R1 R2 page 75 Mixer setting...

Page 43: ...hrase in this case for Pad 1 starts playing back in its entirety as soon as the pad is pressed To stop playback in the middle of the phrase press the STOP button Simply tap any of the Multi Pads at an...

Page 44: ...utton again The chord match function has no effect with pads that contain percussion phrases The chord match on off setting is restored to its original status whenever a preset Multi Pad Bank is selec...

Page 45: ...Perc2 Brassy1 O O O O Brassy2 O O O O Swingy O O O O O O O O SynBrass O O O O GuitarPlay1 O O O O O O O O GuitarPlay2 O O O O O O O O GuitarPlay3 O O O O O O O O GuitarPlay4 O O O O O O O O PianoMan O...

Page 46: ...PSR 540 A total of 16 different chorus types are available DSP page 49 In addition to the Reverb and Chorus types the PSR 540 has special DSP effects that include additional effects usually used for a...

Page 47: ...or track Reverb Return Level see below Sets the amount of reverb returned from the reverb effect stage thus making it possible to adjust the degree of reverb effect applied to the overall sound Digita...

Page 48: ...ible to adjust the degree of chorus effect applied to the overall sound 9 Adjust the chorus return level Use the data dial the YES button the NO button or the number buttons 1 0 The range is from 0 to...

Page 49: ...rd Try out some of the other DSP types as well Adjust the depth of the DSP DSP Depth Send level page 74 Sets the DSP depth for the specified voice or track and thus the amount of DSP effect applied to...

Page 50: ...the amount of effect applied with the depth and return level parameters Reverb and chorus are both system effects Insertion Effects Applies the effect to only one designated part before inputting the...

Page 51: ...e played on the keyboard at the currently set tempo Steps 1 3 above are unnecessary for this type When a Tremolo type is selected A tremolo effect is applied to the note played on the keyboard at the...

Page 52: ...of the harmony sound may not produce audible effect for some R1 voices ex organ sounds when you select Harmony types Duet through Strum 7 Adjust the Harmony Echo volume Use the data dial the YES butto...

Page 53: ...etting screen 8 Set the part Use the data dial the YES button or the NO button Auto Harmony Echo notes are automatically assigned to the R1 and R2 parts in that order or priority R1 Harmony Echo is on...

Page 54: ...ge setting VOICE R1 R2 L page 75 Mixer setting VOICE R1 R2 L page 76 Parameter Edit setting VOICE R1 R2 L page 77 Touch Sensitivity page 120 DSP on off FAST SLOW on off DSP Type and Return Level page...

Page 55: ...ion Memory buttons since only the Voice R1 voice is used in those modes In this example the panel settings memorized to button number 3 are recalled For details about Accompa niment parameters page 54...

Page 56: ...the Registration Banks 1 3 Use the same operation as in Selecting a Registration Bank see above 4 Press the NEXT button to display the Name screen 5 Enter the desired name for the bank Use the keyboar...

Page 57: ...78 It may not be possible to record the full 60 files to a disk depending on the length of the recorded files The PSR 540 features special User style User pad and Registration Memory functions The dat...

Page 58: ...els to a floppy disk Also make sure that labels are attached in the proper location To protect your data write protect tab To prevent accidental erasure of important data slide the disk s write protec...

Page 59: ...TOP button again to stop the song For details see Song Playback page 68 CHORD dim mM 6 7augsus4 119 513 BACK NEXT KEYBOARD START STOP YES TRACK 1 16 PART DIAL 0 9 FUNCTION SONG STYLE VOICE LR12 EASY N...

Page 60: ...on CAUTION If data is already saved on the disk be careful not to format it If you format the disk all the previously recorded data will be deleted While formatting is in progress never eject the disk...

Page 61: ...ete unneeded files on the disk page 67 or replace the disk with a new one and repeat the Save operation If a write error occurs during a save operation an alert message appears If the error reoccurs a...

Page 62: ...e data dial the YES button or the NO button 4 Press the NEXT button to display the Data Type Selection screen 5 Select the file type data type to be loaded Use the data dial the YES button or the NO b...

Page 63: ...ation CAUTION When data is loaded from a floppy disk to the PSR 540 the data already in the memory of the instrument will be replaced by the data on the disk Save important data into a disk file befor...

Page 64: ...t One file can be copied at a time As shown in the illustration below first copy the desired file on the disk to internal memory then copy it to the destination disk If the quantity of data is large i...

Page 65: ...Song_01 Copy OK Cursor _ Nam Song 01 Insert Dest FD Executing 20 Executing 40 Completed Insert Source FD While data is being copied never eject the floppy disk or turn the power off If you want to can...

Page 66: ...S button or the NO button 8 Press the NEXT button to display the Name screen 9 Enter the destination file name directly from the keyboard page 21 10 Press the NEXT button to display the Copy operation...

Page 67: ...s the NEXT button to display the Delete operation screen 7 Execute the Delete operation Press the YES button to execute the Delete operation Press the NO button to abort the Delete operation Menu Dele...

Page 68: ...e voices defined in Yamaha s DOC format The following disks are compatible for playback on the PSR 540 including the sample disk Refer to page 9 for more details on the logos Disk songs can be played...

Page 69: ...t All Repeat Continue playback through all the songs on the floppy disk repeatedly Random Continue playback through all the songs at random 7 Press the START STOP button to start the song 8 Press the...

Page 70: ...O button or the number buttons 1 0 The range is from 0 to 127 The volume of the keyboard played voice s is not affected by this operation 4 Press the START STOP button again to stop the song CHORD dim...

Page 71: ...tton or the NO button 4 Press the NEXT button to display the Song Start Measure screen 5 Specify the measure from which to begin playback Use the data dial the YES button the NO button or the number b...

Page 72: ...B button at the ending point B to be re peated If only the A repeat point is specified repeat playback will occur between the A point and the end of the song Repeat playback is now set and the selecte...

Page 73: ...al the YES button or the NO button 4 Press the NEXT button to display the Song Transpose screen 5 Set the Transpose value Use the data dial the YES button the NO button or the number buttons 1 0 The t...

Page 74: ...pth Sets the reverb depth for the specified voice or track and thus the amount of reverb effect applied to that voice or track Chorus depth Sets the chorus depth for the specified voice or track and t...

Page 75: ...l occur when using Auto Accompaniment Make sure to first select the appropriate style for which you wish to set the part before calling up the relevant display Auto accompaniment part settings can eve...

Page 76: ...oice PART ON OFF VOICE R1 VOICE R2 VOICE L buttons Accompaniment track TRACK9 TRACK16 buttons Style mode Song track TRACK1 TRACK16 button Song mode 3 Adjust the volume from the corresponding display T...

Page 77: ...button to display the PARAMETER EDIT screen 4 Adjust the parameter value from the corresponding display Use the data dial the YES button the NO button or the number buttons 1 0 You can switch among t...

Page 78: ...88 This function allows you to change a variety of non note settings Naming User Songs page 90 This function assigns a twelve letter name to a recorded song Clearing User Song Data page 91 This funct...

Page 79: ...simultaneously In addition to being able to record to empty tracks you can also re record tracks that already contain recorded data About Quick Recording In Quick Recording you can quickly record with...

Page 80: ...ec Use the data dial the YES button or the NO button 7 Press the NEXT button 8 Select a Record method Use the data dial the YES button or the NO button Melody This records your keyboard performance Vo...

Page 81: ...recording 11 Stop recording If you ve selected Melody in step 8 above press the START STOP button If you ve selected Acmp or Mel Acmp in step 8 above press the START STOP button or the ENDING button...

Page 82: ...et the desired track to Rec Press the NEXT button and use the data dial the YES button or the NO button Make all necessary settings to each track by repeating steps 1 through 3 above For information o...

Page 83: ...n Auto accompaniment cannot be turned on or off during recording 12 Stop recording If you did not enable the auto accompaniment track for recording in steps 8 above press the START STOP button If you...

Page 84: ...d song In the eight measure example below the third measures through the fifth measure are re recorded 1 Insert the floppy disk into the disk drive 2 Press the RECORD button to engage the Record mode...

Page 85: ...NO button or the number buttons 1 0 14 Press the NEXT button to display the START MEASURE screen 15 Set the start measure the measure at which playback starts Use the data dial the YES button the NO b...

Page 86: ...es in a track so that the timing is absolutely accurate to the specified note value 1 4 Use the same operation as in Re recording page 84 5 Select the Song file to be quantized Use the data dial the Y...

Page 87: ...of the quarter notes 14 Press the NEXT button to display the Quantize operation screen 15 Press the YES button to execute the Quantize operation To abort the Quantize operation press the NO button CAU...

Page 88: ...the chorus depth for the specified track and thus the amount of chorus effect applied to that voice or track DSP depth Sets the DSP depth for the specified track and thus the amount of DSP effect appl...

Page 89: ...ave the data to disk press the YES button 14 Press the RECORD button to exit from the Record mode CAUTION While the file is being saved never eject the floppy disk or turn the power off Song Recording...

Page 90: ...RecMode screen 7 Select Edit Use the data dial the YES button or the NO button 8 Press the NEXT button to display the Edit Menu screen 9 Select Name Use the data dial the YES button or the NO button 1...

Page 91: ...enu screen 9 Select Clear Use the data dial the YES button or the NO button 10 Press the NEXT button 11 Select the track to be cleared Use the data dial the YES button or the NO button To clear the da...

Page 92: ...pads can be recorded to the PSR 540 Multi Pads User Pad data is recorded by playing voice R1 from the keyboard Voice R2 voice L and the auto accompaniment cannot be used Multi Pad Recording 1 Press t...

Page 93: ...play 10 Press the NEXT button to display the Record ready screen The beat indicator dots will flash at the currently set tempo indicating that the record ready Synchro Start mode is engaged 11 Start r...

Page 94: ...or the NO button 9 Press the NEXT button to display the Chord Match screen 10 Turn the Chord Match function on or off Use the data dial the YES button or the NO button To select the desired pad for se...

Page 95: ...on or the NO button 10 Select the Pad number to be cleared Use the data dial the YES button or the NO button To clear the data from all four pads select All 11 Press the NEXT button 12 Execute the Cle...

Page 96: ...Data page 104 This function is for clearing deleting or part of the recorded style User Style Tracks The tracks which can be recorded to the User styles are organized as shown in the chart below Secti...

Page 97: ...while recording an alert message will appear on the display and recording will stop Since recording is done in measure units you should first select a style that has the same number of measures as th...

Page 98: ...Select a style to begin with Use the data dial the YES button the NO button or the number buttons 1 0 5 Press the NEXT button again to display the RecMode screen 6 Select Record Use the data dial the...

Page 99: ...play a key on the keyboard Playback starts as described in the first method above Since the rhythm pattern plays back repeatedly you can record by overdubbing listening to the pattern and playing the...

Page 100: ...ial the YES button or the NO button Select from the following BASS CHORD1 CHORD2 PAD PHRASE1 and PHRASE2 Only one track can be recorded at a time 11 Press the NEXT button to display the Record Ready s...

Page 101: ...lay back from the next repetition letting you record while hearing previously recorded material Observe the following rules when recording the MAIN and FILL sections Use only the CM7 scale tones when...

Page 102: ...ified note value 1 5 Use the same operation as in Style Recording Rhythm Track page 98 6 Select Edit Use the data dial the YES button or the NO button 7 Press the NEXT button to display the Edit Menu...

Page 103: ...can audition the quantized pattern in this step allowing you to hear the results of the operation before actually changing the data To audition the pattern press the START STOP button 16 Press the YE...

Page 104: ...7 Use the same operation as in Quantize page 102 8 Select Clear Use the data dial the YES button or the NO button 9 Press the NEXT button to display the Section selection screen 10 Select a Section t...

Page 105: ...YES button to execute the Clear operation To abort the Clear operation press the NO button 15 Press the RECORD button to exit from the Record mode For information on leaving the recording mode see pag...

Page 106: ...a digital instrument go about playing a note As shown in the illustration above in an electronic instrument the sampling note previously recorded note stored in the tone generator section electronic c...

Page 107: ...es which are generated when the keyboard is played Each message includes a specific note number which corre sponds to the key which is pressed plus a velocity value based on how hard the key is stuck...

Page 108: ...eive settings page 115 Record performance data 1 16 channels using the PSR 540 Auto Accompaniment on a external sequencer such as a personal computer After recording edit the data with the sequencer t...

Page 109: ...mpatible with both Format 0 and Format 1 Song data recorded on the PSR 540 is automatically recorded as SMF Format 0 ESEQ This sequence format is compatible with many of Yamaha s MIDI devices includin...

Page 110: ...is set in the MIDI position input and output in the TO HOST switch is ignored When using a Macintosh series computer set the MIDI interface clock setting in the application software to match the sett...

Page 111: ...22 terminal modem or printer terminal on the computer to the TO HOST terminal on the PSR 540 using a serial cable system peripheral cable 8 bit Set the PSR 540 HOST SELECT switch in the Mac position S...

Page 112: ...settings with a single button press 2 Select Midi Use the data dial the YES button or the NO button 3 Press the NEXT button to display the MIDI screen 4 Select Template Use the data dial the YES butt...

Page 113: ...ata to an external sequencer Song Out All transmit channels are set with the Song tracks 1 16 When outputting the song data Used to play the PSR 540 song data with an external tone generator and to re...

Page 114: ...e 29 RhM Auto Accompaniment RHYTHM MAIN track RhS Auto Accompaniment RHYTHM SUB track Bas Auto Accompaniment BASS track Ch1 Auto Accompaniment CHORD1 track Ch2 Auto Accompaniment CHORD2 track Pad Auto...

Page 115: ...If all channels are set to XG GM the PSR 540 functions as a 16 channel multi timbral tone generator Keybd Received MIDI data is handled in the same way as data generated by the PSR 540 s own keyboard...

Page 116: ...an be played from the PSR 540 keyboard 5 Press the NEXT button to display the Local Control screen 6 Turn the Local Control on or off Use the data dial the YES button or the NO button Clock Reception...

Page 117: ...Init Send Use the data dial the YES button or the NO button The default Clock setting factory setting is Int When the Clock setting is Ext auto accompaniment playback cannot be started via the panel...

Page 118: ...ial the YES button or the NO button 1 Press the FUNCTION button Each of the above functions can be set as described below The operations for each function corresponding to step 6 are covered in the fo...

Page 119: ...ompaniment and Multi Pad sounds are affected by Scale Tuning Select the note to be tuned by pressing the NEXT BACK button Tune the selected note by using the data dial the YES button the NO button or...

Page 120: ...horus depth DSP depth Voice R2 Voice number volume octave pan reverb depth chorus depth DSP depth Harmony Type Volume Part setting DSP on off type return level and FAST SLOW Set the value with the dat...

Page 121: ...has the same effect as pressing the SYNC STOP button on the panel Bass Hold The bass root note will be held as long as you press the footswitch Break When you press the foot switch accompaniment will...

Page 122: ...um pitch bend range for the PITCH BEND wheel The range is from 0 to 12 Each increment corresponds to one semitone Set the Pitch Bend Range with the data dial the YES button the NO button or the number...

Page 123: ...0 112 1 Bright Piano 3 0 112 3 Honky Tonk 4 0 114 2 Rock Piano 5 0 112 2 Midi Grand 6 0 113 2 CP 80 7 0 112 6 Harpsichord 8 0 113 6 Grand Harpsi E Piano 9 0 114 4 Galaxy EP 10 0 115 4 Polaris EP 11 0...

Page 124: ...Brs 135 0 114 61 Full Horns 136 0 115 61 High Brass 137 0 120 61 Bright Brass 138 0 113 57 Trb Section 139 0 112 62 Synth Brass 140 0 112 63 Analog Brass 141 0 113 62 Jump Brass 142 0 114 62 Techno B...

Page 125: ...66 16 Cheezy Organ 299 0 67 16 DrawbarOrg3 300 0 0 17 Perc Organ 301 0 24 17 70sPercOrg1 302 0 32 17 DetPercOrgan 303 0 33 17 Light Organ 304 0 37 17 Perc Organ2 305 0 0 18 Rock Organ 306 0 64 18 Rot...

Page 126: ...nBrass 461 0 24 62 Poly Brass 462 0 27 62 SynthBrass3 463 0 32 62 Jump Brass 464 0 45 62 AnaVelBrass1 465 0 64 62 AnalogBrass1 466 0 0 63 SynthBrass2 467 0 18 63 Soft Brass 468 0 40 63 SynthBrass4 469...

Page 127: ...112 StereoGamlan 640 0 100 112 Rama Cymbal 641 0 101 112 Asian Bells 642 0 0 113 Agogo 643 0 0 114 Steel Drums 644 0 97 114 Glass Perc 645 0 98 114 Thai Bells 646 0 0 115 Woodblock 647 0 96 115 Casta...

Page 128: ...m 1 Rock Tom 1 E Tom 1 Analog Tom 1 Hi Hat Closed Analog HH Closed 1 Floor Tom H Room Tom 2 Rock Tom 2 E Tom 2 Analog Tom 2 Hi Hat Pedal Analog HH Closed 2 Low Tom Room Tom 3 Rock Tom 3 E Tom 3 Analog...

Page 129: ...ng Noise 2 Door Squeak AnSD Q SD Jazz L Brush Slap Marching Sn M Door Slam String Slap Scratch Cut AnSD Ana Acoustic SD Jazz M Brush Tap Marching Sn H Scratch Analog Tom 1 Brush Tom 1 Wind Chime Analo...

Page 130: ...co Hands SWING JAZZ 48 Swing 49 Big Band 1 50 Big Band Ballad 51 Jazz Ballad 52 Jazz Trio 53 Boogie 54 Bebop 55 Big Band 2 56 Dixieland Style Style Name Number R B 57 Gospel Shuffle 58 R B 59 Motown 6...

Page 131: ...r DSP effect is System or Insertion depends on the selected type DSP effect configuration will differ between System and Insertion effects as follows About the Digital Effects Reverb Chorus DSP Althou...

Page 132: ...rb effect in which the reverberation is quickly cut off for special effects Reverse Gate System Similar to Gate Reverb but with a reverse increase in reverb Karaoke1 3 System A delay with feedback of...

Page 133: ...pe will sometimes produce a more colorful sound 4Way Open Four note chords with open voice large intervals between the notes The result is a very open sound Since the harmony notes can be as much as t...

Page 134: ...or not If the Full fingering mode is selected chords are recognized over the entire range of the keyboard irrespective of the split point setting Harmony cannot be turned on when the Full Keyboard fin...

Page 135: ...ion Memory One Touch Setting status page 55 Freeze on off page 55 MIDI Transmit settings page 114 MIDI Receive settings page 115 Voice Set on off page 120 Voice L Voice Change Mixer Parameter Edit pag...

Page 136: ...o the disk drive Insert a disk An error occured because the disk was removed during a disk operation Never remove a disk during a disk operation since this could damage both the disk and the drive The...

Page 137: ...urned on during Style Pad recording DSP cannot be turned on during Style Pad recording This message appears to indicate you cannot enter the function when you select a Multi Pad function in the Multi...

Page 138: ...table above for example 144 159 decimal 9nH 1001 0000 1001 1111 binary displays the Note On Message for each channel 1 16 176 191 BnH 1011 0000 1011 1111 displays the Control Change Message for each...

Page 139: ...DATA ENTRY LSB v 0 127 1 c 7 MAIN VOLUME v 0 127 c 10 PANPOT v 0 127 c 11 EXPRESSION v 0 127 c 64 SUSTAIN v 0 63 OFF 64 127 ON 2 c 65 PORTAMENTO v 0 63 OFF 64 127 ON 2 c 66 SOSTENUTO v 0 63 OFF 64 127...

Page 140: ...0H 7FH 7FH 8192 100 8192 0 8192 100 8192 02H 00H mmH COARSE TUNE 28H 40H 58H 24 0 24 semitones 7FH 7FH NULL Clears the current RPN number setting Does not change the internal parameter settings 3 4 NO...

Page 141: ...message the SYSTEM MODE will be changed to XG Controllers will be reset all values of Multi Part and Effect and All System values denoted by XG data within All System will be reset to default values...

Page 142: ...00000 00 0mmmmmmm MM Master Tune MSB 0lllllll LL Master Tune LSB 0ccccccc CC don t care 11110111 F7 End of Exclusive Changes tuning of all channels MM LL values are used to define the MIDI Master Tuni...

Page 143: ...pe 31 1 00 7F Chorus Parameter 12 Refer to the Ef Parameter List Depend on Chorus Type 32 1 00 7F Chorus Parameter 13 Refer to the Ef Parameter List Depend on Chorus Type 33 1 00 7F Chorus Parameter 1...

Page 144: ...1 00 7F MW Filter Control 9600 9450 cent 40 nn 1F 1 00 7F MW Amp Control 100 100 40 nn 20 1 00 7F MW LFO PMod Depth 0 127 0A nn 21 1 00 7F MW LFO FMod Depth 0 127 00 nn 22 1 00 7F MW LFO AMod Depth 0...

Page 145: ...05 05 NO EFFECT 015 0F NO EFFECT 016 10 20 WHITE ROOM 017 11 21 TUNNEL 018 12 22 CANYON 019 13 23 BASEMENT 020 14 NO EFFECT 127 7F NO EFFECT CHORUS TYPE TYPE MSB TYPE LSB DEC HEX 00 01 02 03 07 08 09...

Page 146: ...ee Table Control 1 L R Delay 0 1 355 0ms variation block 1 3550 0 1 355 0ms insertion block 1 3550 2 R L Delay 0 1 355 0ms variation block 1 3550 0 1 355 0ms insertion block 1 3550 3 Feedback Level 63...

Page 147: ...ortion 12 12dB 52 76 14 LPF Cutoff 1 0kHz thru 34 60 table 3 15 Output Level 0 127 0 127 16 AMBIENCE variation block No Parameter Display Value See Table Control 1 Delay Time 0 0mS 50mS 0 127 table 2...

Page 148: ...ee Table Control 1 2 3 4 5 6 7 8 9 10 11 Low Adjust 0 26 0 26 12 High Adjust 0 26 0 26 13 14 15 16 NO EFFECT reverb chorus variation block THRU variation insertion block No Parameter Display Value See...

Page 149: ...118 185 8 23 36 3 55 86 7 87 137 0 119 187 4 24 37 9 56 88 2 88 138 6 120 189 0 25 39 5 57 89 8 89 140 2 121 190 6 26 41 0 58 91 4 90 141 8 122 192 1 27 42 6 59 93 0 91 143 3 123 193 7 28 44 2 60 94 5...

Page 150: ...38 o o Data Entry Control 64 66 67 o o 65 x o Portamento Change 72 o o Sound Controller 71 73 74 x o Sound Controller 84 x o Portament Cntrl 91 93 94 o o Effect SendLevel 96 97 x o Data Inc Dec 98 99...

Page 151: ...d on the keyboard In this mode only the following channel messages will be recognized Note On Off Control Changes Bank Select R1 voice only Modulation Volume R1 voice only Data entry Pan R1 voice only...

Page 152: ...15 Digital effect 46 131 Direct Access 21 24 DISK IN USE 58 Disk drive 58 Disk mode 25 Display 16 DOC 9 68 109 Drum Cancel 99 Drum Kit 31 128 DSP 49 E Easy Navigator 16 18 Echo 51 133 Edit 77 86 88 9...

Page 153: ...t 84 Q Quantize 86 102 Quick Recording 78 79 80 R Receive 115 Record 17 78 92 96 Record mode 25 Regist 121 Regist 121 Registration Memory 54 Rehearsal mode 25 Repeat 45 69 72 Return Level 47 48 49 Rev...

Page 154: ...se 16 30 73 Tremolo 51 133 Trill 51 133 Troubleshooting 134 U Upper 112 User Pad 92 User Song 78 User Style 96 Utility 17 60 64 67 118 V Velocity 106 Voice 26 Voice Change 17 74 75 Voice L 28 29 Voice...

Page 155: ...ettings ON OFF Repeat Play Song Transpose Song Recording Quick Record Multi Record Recording Tracks 1 16 Punch In Punch Out Quantize Naming Clear Setup Data Volume Octave Pan Reverb depth Chorus depth...

Page 156: ...e operation of other electronic devices Compliance with FCC regulations does not guarantee that interference will not occur in all installations If this product is found to be the source of inter fere...

Page 157: ...so contact Yamaha directly at the address provided below 2 Deliver the unit to be serviced under warranty to the retailer selling the product an authorized service center or to Yamaha with an explanat...

Page 158: ...156...

Page 159: ...Music Center Jalan Jend Gatot Subroto Kav 4 Jakarta 12930 Indonesia Tel 21 520 2577 KOREA Cosmos Corporation 1461 9 Seocho Dong Seocho Gu Seoul Korea Tel 02 3486 0011 MALAYSIA Yamaha Music Malaysia S...

Page 160: ...M D G EMI Division Yamaha Corporation 1999 Yamaha Corporation POTY 01A0 Printed in China...

Reviews: