background image

Selecting and Playing Songs

46

EZ-250i Owner’s Manual

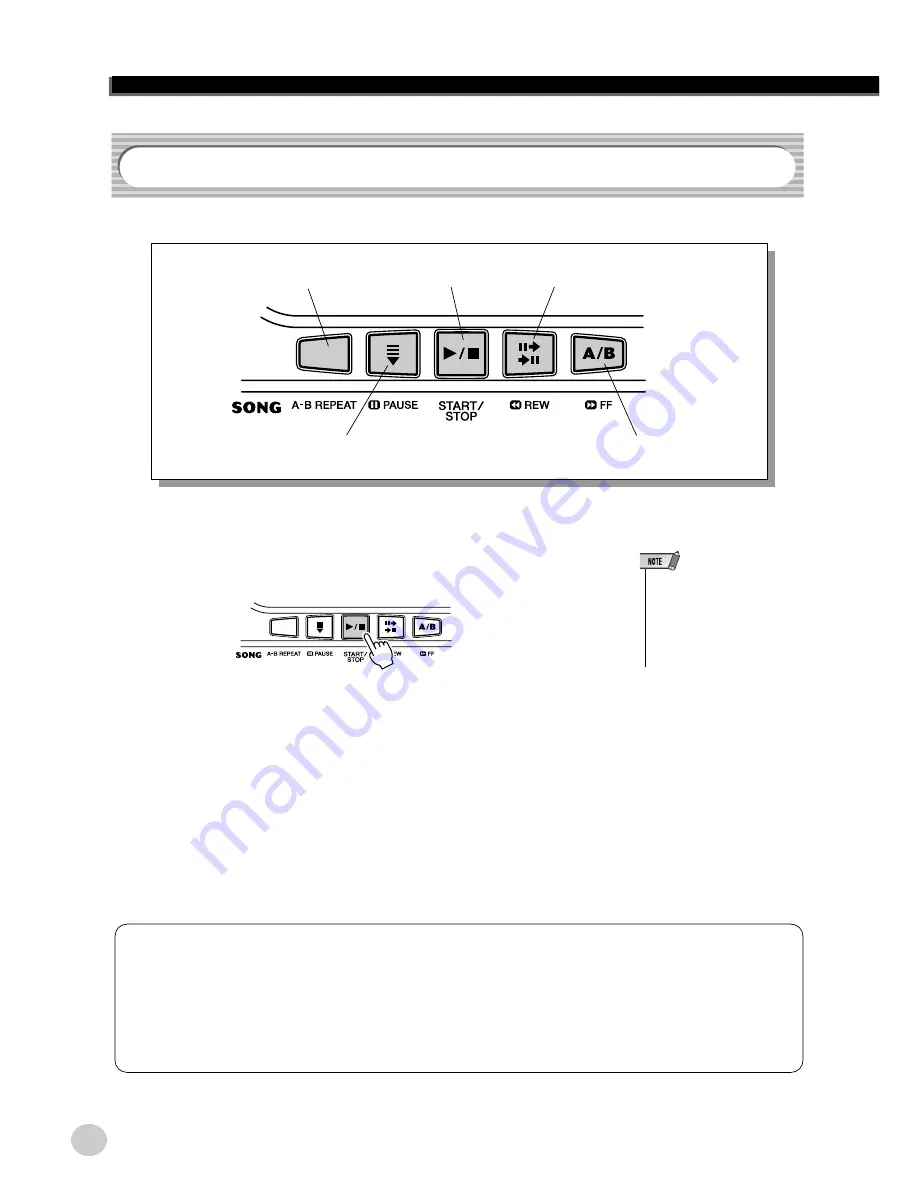
The Panel buttons below function as Song controls.

1

Start the selected song.

Press the [START/STOP] button.  As the song plays back, the measure num-
ber and playing keys are shown in the display.

2

Stop the song.

Press the [START/STOP] button.  If playback was started by pressing the 
[START/STOP] button, the selected song stops automatically.

Playing the Songs

Reverses the playback 
position.

Starts and stops 
song playback.

Pauses playback.

Advances the playback 
position.

Turns on the A-B Repeat 
function (page 47).

•  You can play along with the song 

using the currently selected 
voice, or even select a different 
voice for playing along. Simply 
call up the Voice mode while the 
song is playing back and select 
the desired voice. (See page 23.)

Playing the Flash Memory Song

The EZ-250i can play a song loaded into its internal flash memory. To do this, you’ll need to connect the EZ-250i to 
a personal computer, and use the “Song Filer” software to transmit the song from the computer.
For more information on Flash songs and Song Filer, refer to page 58.

Select the song number 081-180 using numeric keypad in the same way as preset songs.

44

Summary of Contents for Portatone EZ-205i

Page 1: ...Install KEYBOARDMANIA to your computer see page 3 and 60 and connect it to the EZ 250i by an USB cable then play musical games and learn songs ...

Page 2: ... PLATE LOCATION The name plate is located on the bottom of the product The model number serial number power requirements etc are located on this plate You should record the model number serial number and the date of purchase in the spaces provided below and retain this manual as a permanent record of your purchase Model Serial No Purchase Date SPECIAL MESSAGE SECTION 92 BP bottom 1 IMPORTANT NOTIC...

Page 3: ...artney Copyright 1964 Sony ATV Songs LLC Copyright Renewed All Rights Administered by Sony ATV Music Publishing 8 Music Square West Nashville TN37203 International Copyright Secured All Rights Reserved Can t Help Falling In Love Words and Music by George David Weiss Hugo Peretti and Luigi Cre atore Copyright 1961 by Gladys Music Inc Copyright Renewed and Assigned to Gladys Music All Rights Adminis...

Page 4: ...basic precautions listed below to avoid the possibility of physical injury to you or others or damage to the instrument or other property These precautions include but are not limited to the following When removing the electric plug from the instrument or an outlet always hold the plug itself and not the cord Unplug the AC power adaptor when not using the instrument or during electrical storms Do ...

Page 5: ...s might discolor the panel or keyboard Do not rest your weight on or place heavy objects on the instrument and do not use excessive force on the buttons switches or connectors Do not operate the instrument for a long period of time at a high or uncomfortable volume level since this can cause permanent hearing loss If you experience any hearing loss or ringing in the ears consult a physician Saving...

Page 6: ...pages 40 42 49 The EZ 250i features the newYamaha Education Suite a set of learning tools that utilize the latest technology to make studying and practicing music more fun and fulfilling than ever before One Touch Setting page 25 One Touch Setting OTS for automatically calling up an appropriate voice for playing with the selected Style and Song Powerful Speaker System The built in stereo amplifier...

Page 7: ...iment Multi Fingering 40 Dictionary 42 Selecting and Playing Songs 45 Selecting a Song 45 Playing the Songs 46 A B Repeat 47 Melody Voice Change 48 Adjusting the Song Volume 48 Song Lesson 49 Using the Lesson Feature 49 Select the Lesson Track 51 Lesson 1 Timing 51 Lesson 2 Waiting 52 Lesson 3 Minus One 52 Lesson 4 Both Hands 53 Grade 53 MIDI Functions 54 What Is MIDI 54 Connecting to a Personal C...

Page 8: ...the Melody Voice Change function See page 48 0 Dict button This calls up the Dictionary function See page 42 1 LESSON L Left and R Right buttons These call up the Lesson exercises for the corre sponding hand left or right for the selected song See page 49 2 Numeric keypad ON and OFF buttons These are used for selecting songs voices and styles See pages 19 They are also used for adjusting cer tain ...

Page 9: ... start a selected song or style at that tapped speed See page 35 9 DUAL button This turns the Dual voice on or off See page 25 0 SPLIT button This turns the Split voice on and off See page 26 1 HARMONY button This turns the Harmony effect on and off See page 29 2 TOUCH button This turns the Touch function on and off See page 27 Holding down this button calls up the Touch Sensitivity settings 3 LIG...

Page 10: ...w Insert the six new batteries being careful to follow the polarity markings in the compartment cover e Replace the compartment cover making sure that it locks firmly in place Power Requirements Use ONLY a Yamaha PA 3C or PA 3B AC Power Adaptor or other adaptor specifically rec ommended by Yamaha to power your instrument from the AC mains The use of other adaptors may result in irrepa rable damage...

Page 11: ...l By connecting the USB terminal of this instru ment to the USB terminal of a computer you can transfer performance data and song files between the instrument See page 56 Turning On the Power Even when the switch is in the STANDBY position electricity is still flowing to the instrument at the mini mum level When you are not using the EZ 250i for a long time make sure you unplug the AC power adapto...

Page 12: ...ant to find out more See page 21 GrandPno 001 03 Simply by pressing the PORTABLE GRAND button you can automatically select the Grand Piano voice z Press the METRONOME button x Stop the Metronome Want to find out more See page 21 Playing along with the Metronome Step 1 Voices Quick Guide Playing the Piano 10 ...

Page 13: ...h Bass 045 Hi Q Bass 046 Dance Bass STRINGS 047 String Ensemble 048 Chamber Strings 049 Synth Strings 050 Slow Strings 051 Tremolo Strings 052 Pizzicato Strings 053 Orchestra Hit 054 Violin 055 Cello 056 Contrabass 057 Banjo 058 Harp CHOIR 059 Choir 060 Vocal Ensemble No Voice Name 061 Vox Humana 062 Air Choir SAXOPHONE 063 Soprano Sax 064 Alto Sax 065 Tenor Sax 066 Breathy Tenor 067 Baritone Sax ...

Page 14: ...bers 081 180 Let s play the Demo song now z Start the Demo song x Stop the Demo song Playing the Demo song HardDays 001 03 You can also play back songs of other categories Simply select the appropriate number of the desired song during playback or The EZ 250i also has a Demo Cancel function that allows you to disable Demo song function Set Demo Cancel in the Function mode page 67 Naturally you can...

Page 15: ...5 Gavotte F J Gossec 036 String Quartet No 17 2nd mov Serenade F J Haydn 037 Menuett J S Bach 038 Canon J Pachelbel 039 From The Magic Flute W A Mozart 040 Piano Sonate op 27 2 Mond schein L v Beethoven 041 The Surprise Symphony F J Haydn 042 To A Wild Rose E A MacDowell 043 Air de Toréador Carmen G Bizet 044 O Mio Babbino Caro From Gian ni Schicchi G Puccini 045 Frühlingslied F Mendelssohn 13 DUE...

Page 16: ...rd and rhythm backing Use your right hand to play melodies and you ll sound like an entire band Left hand Auto accompaniment for example bass guitar drums Right hand Melody for example piano Accompaniment area For more infomation on playing proper chords for the auto accompaniment see Using Auto Accompaniment Multi Fingering on page 40 and Dictio nary on page 42 x Select a style c Turn the auto ac...

Page 17: ... Keys for entering the chord type C3 B4 Keys for entering the chord root C5 B5 Keys for entering the chord C1 B2 G M7 Root note Chord type Example Dict c Specify the chord type of the chord in this case M7 v Play the notes of the chord according to the Light Guide The Congratulation melody plays when the chord is played properly The keys light to show you how to play the chord You can also play ch...

Page 18: ...LCD indicates the function category Overall Volume etc when you select each function and the currently selected function name and value appears in the LCD Use the numeric 0 9 buttons or buttons Function settings and indications See page 66 See page 67 See page 23 67 See page 25 67 See page 26 67 See page 29 67 See page 67 Transpos 00 03 Function bar Value Function name For example when Transpose i...

Page 19: ...td Kit1 109 If the first digit or first two digits of the number are 0 ex 074 or 005 pressing the 0 button is unnecessary However pressing the 0 button is necessary if 0 is part of the number ex 105 Ex Voice number 109 Standard Kit 1 Press the numeric buttons 1 0 9 in order Music Rest Insert the bottom edge of the included music rest into the slot located at the top rear of the EZ 250i control pan...

Page 20: ...e chord name when playing in the style or song only chord type song mode CHORD Indicates that the Dual Voice feature is turned on Indicates that the Split feature is turned on Indicates that the Harmony fea ture is turned on Indicates that Touch is turned on Indicates that Sustain is turned on DUAL SPLIT HARMONY TOUCH SUSTAIN 18 Indicates the current measure number of the song or style Indicates w...

Page 21: ...AP button 2 Change the value Use the numeric keypad to set the desired Tempo value or use the buttons to increase or decrease the value Playing the Portable Grand GrandPno 001 001 Using the Metronome TEMPO 128 001 Current Tempo value Restoring the Default Tempo Value Each song and style has been given a default or standard Tempo setting If you ve changed the Tempo you can instantly restore the def...

Page 22: ... button until TimeSig appears in the display then press the but ton on the numeric keypad or buttons that corre sponds to the desired time signature see chart right The Time Signature also can be set in the Function mode page 67 The time signature changes automatically when a style or song is selected Numeric keypad Time signature 0 Plays no 1 beats all low clicks 01 1 4 Plays only 1 beats all hig...

Page 23: ...gories of each voice and their numbers are shown on the panel A complete voice list of the available voices is given on page 70 3 Play the selected voice Since either the Style or Song mode is active in the background you can also play styles or songs respectively in the Voice mode by simply pressing the START STOP button The last selected style or song will be played The following parameteres can...

Page 24: ...n T i m b a l e L A g o g o L B r u s h S l a p C a s t a n e t S t i c k s O p e n R i m S h o t S i d e S t i c k B r u s h T a p H a n d C l a p H i H a t C l o s e d M a r a c a s G u i r o S h o r t C l a v e s C u i c a M u t e T r i a n g l e M u t e S h a k e r C h i n e s e C y m b a l R i d e C y m b a l C u p S p l a s h C y m b a l C r a s h C y m b a l 2 R i d e C y m b a l 2 B o n g ...

Page 25: ...e other the Dual voice which is selected in the Function mode page 67 You can also set various parameters independently for these voices such as giving them separate volume octave Reverb and Chorus settings This lets you create an optimum mix for the voices and enhance the way they blend together The following parameters can be set in the Function mode page 67 To turn the Dual Voice on or off pres...

Page 26: ...e Function mode page 67 along with the other Split Voice parameters shown below The following parameters can be set in the Function mode page 67 To turn the Split Voice on or off press the SPLIT button The Split Point determines the highest key for the split voice and sets the split point Split Point can be set in the Function mode page 66 CATEGORY SELECT Split Voice Voice Volume Octave Reverb Sen...

Page 27: ...e 66 Settings When Touch is turned off a constant volume corresponding to a velocity value of 80 is produced 1 Soft This results in limited touch response and produces a relatively narrow dynamic range no matter how lightly or strongly you play the keys 2 Medium This lets you play over a normal dynamic range soft to loud 3 Hard This is designed for playing very soft passages giving you slightly mo...

Page 28: ... It also determines the pitch of the songs This allows you to accurately match the tuning with that of other instruments The Tuning settings can be adjusted over a range of 100 approx 1 semitone Tuning can be set in the Function mode page 66 You can switch the Light Guide on or off The Light Guide can be used as a keyboard guide during song playback while you are using the Lesson or the Dictionary...

Page 29: ...unction mode page 67 The Reverb effect reproduces the natural ambient wash of sound that occurs when a instrument is played in a room or concert hall A total of nine different Reverb types simulating various different performance environments are avail able See page 32 The following parameters can be set in the Function mode pages 67 CATEGORY SELECT Effect Reverb Type Main Voice Reverb Send Level ...

Page 30: ...tes a swirling metallic effect A total of four Chorus types are available See page 32 The following parameters can be set in the Function mode pages 67 The Sustain effect automatically adds a slow natural decay to the voice sound when the keys are released Sustain on off can be set in the Function mode page 66 CATEGORY SELECT Effect Chorus Type Main Voice Chorus Send Level Dual Voice Chorus Send L...

Page 31: ...ct precisely to the rhythm Triplet settings are also available 1 6 quarter note triplets 1 12 eighth note triplets 1 24 sixteenth note triplets The Trill effect Types 6 12 create two note trills alternating notes when two notes are held The Tremolo effect Types 13 19 repeat all held notes up to four The Echo effect Types 20 26 create delayed repeats of each note played 7 Trill 1 6 note Tril1 6 8 T...

Page 32: ...oom2 6 Stage 1 Stage1 Reverb for solo instruments 7 Stage 2 Stage2 8 Plate 1 Plate1 Simulated steel plate reverb 9 Plate 2 Plate2 10 Off Off No effect No Chorus Type Display Name Description 1 Chorus 1 Chorus1 Conventional chorus program with rich warm chorusing 2 Chorus 2 Chorus2 3 Flanger 1 Flanger1 Pronounced three phase modulation with a slight metallic sound 4 Flanger 2 Flanger2 5 Off Off No ...

Page 33: ...rmance letting you control the accompaniment by the chords you play Auto accompaniment effec tively splits the keyboard into two areas The upper is used for playing a melody line and the lower set by default to keys F 2 and lower is for the auto accompaniment function The EZ 250i also features the convenient Dictionary function page 42 Dictionary provides you with a built in chord encyclopedia tha...

Page 34: ...s and fill in sec tions are not available when one of the Pianist styles 093 100 are selected Playing the Styles Pressing this button alter nately starts and stops style playback Pressing this button alter nately enables and cancels the bass and chord accom paniment See below This controls the Intro Ending and Ritardand sections See pages 36 37 Pressing this button alter nately enables and cancels...

Page 35: ...le and auto matically start the style at that tapped speed Simply tap the TEMPO TAP button four times or three times for a 3 4 time style and the style starts automatically at the tempo you tapped You can also change the tempo while the style is playing by tapping the TEMPO TAP button twice at the desired tempo Using Sync Start The EZ 250i also has a Sync Start function that allows you to start th...

Page 36: ...Using Sync Start with an Intro section You can also use the Sync Start function with the special Intro section of the selected style To use Sync Start with an Intro section 1 Press the MAIN AUTO FILL button to select which section A or B is to follow the Intro 2 Press the INTRO ENDING rit button 3 Press the SYNC START button to enable Sync Start and start the Intro section and accompaniment by pla...

Page 37: ... the SYNC START button This immediately stops the style and automatically enables Sync Start let ting you restart the style by simply playing a chord or key in the auto accom paniment area of the keyboard The ACMP ON OFF button can also be used to turn off and on the bass chord accompaniment while playing allowing you to create dynamic rhythmic breaks in your performance Chords played in the auto ...

Page 38: ...po even when changing styles Current Tempo value TEMPO 128 001 Restoring the Default Tempo Value Each song and style has been given a default or standard Tempo setting If you ve changed the Tempo you can instantly restore the default setting by pressing both buttons simultaneously when Tempo is selected You can also use the convenient Tap Tempo function to change the tempo by tapping a new one in ...

Page 39: ... before starting the style The playback volume of the style can be adjusted in the Function mode page 67 This volume control affects only the Style volume The volume range is 000 127 Accompaniment Sections Main A B and Fill ins FIll A B This appears while the fill in pattern is playing 1 2 3 4 1 2 3 4 1 2 3 4 1 2 3 3 a fill in pattern plays from here and the Main A or B section begins here If you ...

Page 40: ...hows how to produce the four chord types The key of C is used here as an example other keys follow the same rules For example Bb7 is played as Bb and A Fingered Chords Using the key of C as an example the chart below shows the types of chords that can be recognized in the Fingered mode Using Auto Accompaniment Multi Fingering C Cm C7 Cm7 To play a major chord Press the root note of the chord To pl...

Page 41: ...b5 6 Cdim7 Cdim7 Seventh 7 1 3 5 b7 or 1 3 5 b7 C7 C7 Seventh flatted ninth 7 b9 1 b2 3 5 b7 C7 b9 C7 b9 Seventh add flatted thirteenth 7 b13 1 3 5 b6 b7 C7 b13 C7 b13 Seventh ninth 7 9 1 2 3 5 b7 C7 9 C7 9 Seventh add sharp eleventh 7 11 1 2 3 4 5 b7 or 1 2 3 4 5 b7 C7 11 C7 11 Seventh add thirteenth 7 13 1 3 5 6 b7 C7 13 C7 13 Seventh sharp ninth 7 9 1 2 3 5 b7 C7 9 C7 9 Seventh flatted fifth 7b...

Page 42: ... 3 Specify the type of the chord major minor seventh etc Press the key on the keyboard that corresponds to the desired chord type as printed on the panel Dictionary Make sure to turn on the Light Guide function when using the Dictionary function Dict Dict 001 Pressing this key selects the root G Dict 001 Pressing this key selects the major seventh chord type M7 Notation of chord Chord name root an...

Page 43: ...nious sound Triads are made up of three notes and are the most basic and common chords in most music In this triad the lowest note is the root The root is the most important note in the chord because it anchors the sound harmonically by determining its key and forms the basis for how we hear the other notes of the chord The second note of this chord is four semitones higher than the first and the ...

Page 44: ...chord type should be indicated to the right as well Exam ples for the key of C are shown below One important point Chords are made up of notes stacked on top of each other and the stacked notes are indicated in the chord name of the chord type as a number the number being the dis tance of the note from the root See the keyboard diagram below For example the minor 6th chord includes the 6th note of...

Page 45: ...s learning songs fun and easy You can also transfer song data from your computer to the EZ 250i for playback For details see page 58 1 Press the SONG button 2 Select the desired song number The categories of each song and their numbers are shown on the panel A complete list of the available songs is given on page 15 Use the numeric keypad Song numbers can be selected in the same way as with the vo...

Page 46: ...dvances the playback position Turns on the A B Repeat function page 47 You can play along with the song using the currently selected voice or even select a different voice for playing along Simply call up the Voice mode while the song is playing back and select the desired voice See page 23 Playing the Flash Memory Song The EZ 250i can play a song loaded into its internal flash memory To do this y...

Page 47: ...t cancel the set A B points or the A B Repeat function 4 Turn off the A B Repeat function Press the A B REPEAT button A B Repeat REPEAT A 006 006 The A and B points can only be specified at the beginning of a measure beat 1 and not at any point in the middle of a measure To set the A point to the begin ning of a song press the A B REPEAT button before starting playback If you re repeat practicing ...

Page 48: ...ns to select the desired song See page 45 2 Select the desired voice Press the VOICE button then use the numeric keypad or buttons to select the desired voice See page 23 3 Press and hold down the VOICE button for at least one second MELODY VOICE CHANGE appears in the display indicating that the selected panel voice has replaced the song s original melody voice The playback volume of the song can ...

Page 49: ...sson step lets you practice just the timing of the notes any note can be used as long as you play in rhythm Lesson 2 Waiting In this lesson step the EZ 250i waits for you to play the correct notes before continuing playback of the song Lesson 3 Minus One This lesson step plays back the song with one part muted letting you play and master the missing part following the Light Guide yourself in rhyth...

Page 50: ...t Lesson 4 press both L and R buttons simultaneously 3 Start the Lesson The Lesson and song playback start automatically following a lead in count as soon as the Lesson step is selected When the Lesson is finished your performance grade is shown in the display After a short pause the Lesson begins again automatically 4 Press the START STOP button to stop the Lesson The EZ 250i exits from the Lesso...

Page 51: ... repeatedly if necessary until Lesson 1 is indicated 3 Play the appropriate melody or chord with the song After the lead in the song starts automatically and the appropriate notes appear in the display In Lesson 1 simply play one note repeatedly in time with the music Regarding chords and the use of the left hand the EZ 250i actually has two different types of songs 1 songs with normal left hand c...

Page 52: ...Guide shows you which keys to play In Lesson 2 play the correct notes at your own pace until you can master playing them in rhythm This lesson step lets you practice one part of the song in rhythm at the proper tempo The EZ 250i plays back the song with one part muted either the left part or the right letting you play and master the missing part yourself The notes you are to play are shown continu...

Page 53: ...h hands in time with the rhythm along with the notation and Light Guide 1 Select one of the Lesson songs 2 Select Lesson 4 Press the L and R buttons simultaneously so that Lesson 4 is indicated 3 Play both the left and right hand parts with the song After the lead in the song starts automatically and the Light Guide shows you which keys to play In Lesson 4 both parts left and right are muted letti...

Page 54: ...llustration above in an electronic instrument the sampling note previously recorded note stored in the tone generator section electronic circuit is played based on informa tion received from the keyboard So then what is the information from the keyboard that becomes the basis for note production For example let s say you play a C quarter note using the grand piano sound on the instrument Unlike an...

Page 55: ...sages include messages like Exclusive Messages that transmit data unique to each instrument manufacturer and Realtime Messages that control the MIDI device The messages transmitted received by the EZ 250i are shown in the MIDI Imple mentation Chart on page 78 Message Name EZ 250i Operation Panel Setting Note ON OFF Messages which are generated when the keyboard is played Each message includes a sp...

Page 56: ...al on your computer You ll also need to install the USB MIDI driver also in the included CD ROM to your computer For details see the CD ROM Installation Guide Connecting to a Personal Computer Viewing the Notation for MIDI Channel 1 The EZ 250i has a special func tion that lets you view the notes of the MIDI data channel 1 only on the display EZ 250i Computer sequencer software USB Cable MIDI LSB ...

Page 57: ...tting is off These settings can be made in the Function mode page 67 The most common use for the Initial Setup Send function is in recording a song on a sequencer that is intended for playback with the EZ 250i Essentially this takes a snapshot of the EZ 250i settings and sends that data to the sequencer By recording this snapshot at the start of the song before any actual perfor mance data you can...

Page 58: ...gs that can be loaded will depend on the data size of the songs As an example about 20 20 kilobyte songs can be loaded Installing Song Filer You can install the Song Filer application from the included CD ROM see page 60 Yamaha PK CLUB Portable Keyboard Home Page http www yamahaPKclub com PC mode is on PC mode is off LOCAL ON OFF OFF ON PC Mode No sound is output from the EZ 250i when Local ON OFF...

Page 59: ... 800 x 600 256 colors or more Refer to page 56 for information on connecting the EZ 250i to a computer You cannot use the Song Filer s Receive Files function with the EZ 250i For more information on using Song Filer refer to the PDF man ual included in the Song Filer application EZ 250i Computer USB Cable Never attempt to turn the power off while transmitting song data Doing so will not only resul...

Page 60: ...d your computer via a USB connection for the indicated version of Windows USB Driver for Windows 2000 XP USBdrv2k_ YMIA Introduction HTML SampleSongs Enables you to take advantage via the Internet of the most up to date music software and tools enhancing your MIDI instrument experience Acrobat Reader 2 3 Acroread_ PDF Portable Document Format viewer Enables you to view each PDF manual for the appl...

Page 61: ...robat Reader Setup Dialog box will be displayed Execute the installation by following the on screen directions After installation is complete the Acrobat folder appears on your PC in Program Files as the default For information on using the Acrobat Reader refer to the Reader Guide in the Help menu USB MIDI Driver To operate the MIDI instrument from your computer via USB you ll need to install the ...

Page 62: ... From this window you can specify the location of the driver In Windows 98 check the Specify a location box click Browse then specify the USBdrv_ directory of the CD ROM drive such as D USBdrv_ and continue the installation In Windows 2000 check CD ROM drive and make sure all other items are unchecked Click Next The system searches for the driver in the CD ROM and prepares to install After confirm...

Page 63: ...MAHA in the CD ROM to the OMS Applications folder drag and drop it to the folder In the OMS Setup for YAMAHA folder you will find the OMS Setup files for the Yamaha tone generators which can be used as templates USB MIDI Driver To operate the MIDI instrument from your computer via USB you ll need to install the appropriate driver software The USB MIDI driver is software that transfers MIDI data ba...

Page 64: ... is contained in the included CD ROM This studio setup file is used for setting up OMS Use a USB cable to connect the USB terminal of the com puter or the USB hub to the USB terminal of the MIDI instrument and turn the MIDI instrument power on Start the computer Insert the included CD ROM into the CD ROM drive of your Macintosh computer The CD ROM icon appears on the desktop Double click on the CD...

Page 65: ...ormal conditions will not perform the functions described in the manual provided byYamaha the sole remedy will be thatYamaha will replace any media which proves defective in materi als or workmanship on an exchange basis without charge Except as expressly set forth above the SOFTWARE is provided as is and no other warranties either expressed or implied are made with respect to this software includ...

Page 66: ...o and including the Split Point key The default Split Point is 054 F 2 The Split Point setting and Accompaniment Split Point setting are automatically set to the same value Touch Sensitivity TouchSns 1 3 A setting of 1 results in limited touch response this setting produces a rel atively narrow dynamic range no matter how lightly or strongly you play the keys 2 lets you play over a normal dynamic ...

Page 67: ...olume 0 127 This determines the volume of the Split voice letting you create an opti mum mix with the Main voice Octave S Octave 2 2 octave This determines the octave range for the Split voice Use this to set the most suitable range for the Split lower voice Reverb Send Level S RevLvl 0 127 This determines how much of the Split voice s signal is sent to the Reverb effect Higher values result in a ...

Page 68: ... page 67 All data Initialization excluding song data All data except for loaded song data can be initialized by turning on the power while holding the highest rightmost white key on the keyboard Group Parameter SONG User Song Data FUNCTION Tuning Split Point Touch Sensitivity Sustain On Off Style Volume Song Volume Metronome Volume Demo Cancel On Off Touch Touch On Off Never attempt to turn the po...

Page 69: ... does not sound properly Make sure that the Style Volume or Song Volume page 39 is set to an appropriate level When playing back one of the Pianist styles 93 100 the rhythm cannot be heard This is normal The Pianist styles have no drums or bass only pi ano accompaniment The accompaniment of the style can only be heard when accompaniment is set to ON and keys are played in the auto accompaniment ar...

Page 70: ... 025 0 113 21 Traditional Accordion 026 0 112 21 Musette Accordion 027 0 113 23 Bandoneon 028 0 112 22 Harmonica GUITAR 029 0 112 24 Classical Guitar 030 0 112 25 Folk Guitar 031 0 113 25 12Strings Guitar 032 0 112 26 Jazz Guitar 033 0 113 26 Octave Guitar 034 0 112 27 Clean Guitar 035 0 117 27 60 s Clean Guitar 036 0 112 28 Muted Guitar 037 0 112 29 Overdriven Guitar 038 0 112 30 Distortion Guita...

Page 71: ... 2 Electric Grand Piano KSP 129 0 32 2 Detuned CP80 130 0 0 3 Honky tonk Piano 131 0 1 3 Honky tonk Piano KSP 132 0 0 4 Electric Piano 1 133 0 1 4 Electric Piano 1 KSP 134 0 32 4 Chorus Electric Piano 1 135 0 0 5 Electric Piano 2 136 0 1 5 Electric Piano 2 KSP 137 0 32 5 Chorus Electric Piano 2 138 0 41 5 DX Analog Electric Piano 139 0 0 6 Harpsichord 140 0 1 6 Harpsichord KSP 141 0 35 6 Harpsicho...

Page 72: ...low Synth Bass 242 0 12 39 Sequenced Bass 243 0 18 39 Click Synth Bass 244 0 19 39 Synth Bass 2 Dark 245 0 40 39 Modular Synth Bass 246 0 41 39 DX Bass Voice No Bank Select MIDI Program Change Voice Name MSB LSB STRING 247 0 0 40 Violin 248 0 8 40 Slow Violin 249 0 0 41 Viola 250 0 0 42 Cello 251 0 0 43 Contrabass 252 0 0 44 Tremolo Strings 253 0 8 44 Slow Tremolo Strings 254 0 40 44 Suspense Stri...

Page 73: ...us Bells 371 0 65 98 Soft Crystal Voice No Bank Select MIDI Program Change Voice Name MSB LSB 372 0 70 98 Air Bells 373 0 71 98 Bell Harp 374 0 72 98 Gamelimba 375 0 0 99 Atmosphere 376 0 18 99 Warm Atmosphere 377 0 19 99 Hollow Release 378 0 40 99 Nylon Electric Piano 379 0 64 99 Nylon Harp 380 0 65 99 Harp Vox 381 0 66 99 Atmosphere Pad 382 0 0 100 Brightness 383 0 0 101 Goblins 384 0 64 101 Gob...

Page 74: ...0 65 Door Squeak 456 64 0 66 Door Slam 457 64 0 67 Scratch Cut 458 64 0 68 Scratch Split 459 64 0 69 Wind Chime 460 64 0 70 Telephone Ring 2 461 64 0 80 Car Engine Ignition 462 64 0 81 Car Tires Squeal 463 64 0 82 Car Passing 464 64 0 83 Car Crash 465 64 0 84 Siren 466 64 0 85 Train 467 64 0 86 Jet Plane 468 64 0 87 Starship 469 64 0 88 Burst 470 64 0 89 Roller Coaster 471 64 0 90 Submarine 472 64...

Page 75: ...3 Swing1 044 Swing2 045 Five Four 046 Dixieland 047 Ragtime R B 048 Soul 049 DetroitPop 050 6 8Soul 051 CrocoTwist 052 Rock Roll 053 ComboBoogie 054 6 8Blues COUNTRY 055 CountryPop 056 CountrySwing 057 Country2 4 058 Bluegrass LATIN 059 BrazilianSamba 060 BossaNova 061 Tijuana 062 DiscoLatin 063 Mambo 064 Salsa 065 Beguine 066 Reggae BALLROOM 067 VienneseWaltz 068 EnglishWaltz 069 Slowfox 070 Foxt...

Page 76: ... Hard 2 SD Room H SD Rock Rim SD Rock H Analog Snare 2 53 F 2 41 F 1 Floor Tom L Room Tom 1 Rock Tom 1 E Tom 1 Analog Tom 1 54 F 2 42 F 1 1 Hi Hat Closed Analog HH Closed 1 55 G 2 43 G 1 Floor Tom H Room Tom 2 Rock Tom 2 E Tom 2 Analog Tom 2 56 G 2 44 G 1 1 Hi Hat Pedal Analog HH Closed 2 57 A 2 45 A 1 Low Tom Room Tom 3 Rock Tom 3 E Tom 3 Analog Tom 3 58 A 2 46 A 1 1 Hi Hat Open Analog HH Open 59...

Page 77: ...A 2 46 A 1 1 Hi Hat Open Analog HH Open 2 59 B 2 47 B 1 Mid Tom L Analog Tom 4 Jazz Tom 4 Brush Tom 4 Jazz Tom 4 60 C 3 48 C 2 Mid Tom H Analog Tom 5 Jazz Tom 5 Brush Tom 5 Jazz Tom 5 61 C 3 49 C 2 Crash Cymbal 1 Analog Cymbal Hand Cym L 62 D 3 50 D 2 High Tom Analog Tom 6 Jazz Tom 6 Brush Tom 6 Jazz Tom 6 63 D 3 51 D 2 Ride Cymbal 1 Hand Cym Short L 64 E 3 52 E 2 Chinese Cymbal Flute Key Click Ca...

Page 78: ... ON o 9nH v 1 127 o 9nH v 1 127 Note OFF o 9nH v 0 o 9nH v 0 or 8nH After Key s x x Touch Ch s x x Pitch Bend x 2 o 0 32 o o Bank Select 1 x 2 o Modulation wheel 6 x 2 o Data Entry MSB 38 x o Data Entry LSB 7 o o Part Volume 10 o o Pan Control 11 x 2 o Expression 64 o o Sustain Change 71 x 2 o Harmonic Content 72 o o Release Time 73 x 2 o Attack Time 74 x 2 o Brightness 84 x 2 o Portamento Cntrl 9...

Page 79: ... 7EH 7FH 09H 01H F7H This message automatically restores all default settings for the instrument with the exception of MIDI Master Tuning MIDI Master Volume F0H 7FH 7FH 04H 01H ll mm F7H This message allows the volume of all channels to be changed simultaneously Universal System Exclusive The values of mm is used for MIDI Master Tuning Values for ll are ignored MIDI Master Tuning F0H 43H 1nH 27H 3...

Page 80: ...ssages and parameter changes you can select the Reverb Chorus and DSP effect types which are not accessible from the EZ 250i panel itself When one of the effects is selected by the external sequencer will be shown on the display REVERB CHORUS TYPE MSB TYPE LSB 00 01 02 08 16 17 18 19 20 000 No Effect 001 1 Hall1 2 Hall2 3 Hall3 002 Room 4 Room1 5 Room2 003 Stage 6 Stage1 7 Stage2 004 Plate 8 Plate...

Page 81: ...mony Type Harmony Volume Utility Local On Off External Clock Initial Setup Send Lesson Track R Lesson Track L Demo Cancel Backup Clear Effects Reverb 9 types Chorus 4 types Harmony 26 types Song 80 Songs Song Volume MIDI Local On Off Initial Setup Send External Clock Auxiliary jacks PHONES OUTPUT DC IN 12V USB SUSTAIN Amplifier when using PA 3C power adaptor 2 5W 2 5W Speakers 12cm x 2 Power Consu...

Page 82: ...rds Single Finger 40 Chorus 30 D DEMO Cancel 14 Demo song 14 Dictionary 42 Drum Kit Voice Chart 76 Dual Voice 25 E Effects 29 Ending 37 External Clock 57 F Fill in 39 Fingered chords 40 Flash Memory 58 Footswitch 11 Function 18 66 G GM System Level 1 55 Grade 53 H Harmony 29 Headphones 11 I Indicator 20 Initial Setup Send 57 Intro 36 L Left 50 Lesson 49 Lesson Track 51 Level chorus send 30 Level r...

Page 83: ...T Tap 35 Tempo 21 38 Time Signature 22 Touch Sensitivity 27 Transpose 28 Troubleshooting 69 Tuning 28 V Voice List 70 voices Drum Kit 76 voices selecting and playing 23 voices XG Lite 71 Volume dual 25 Volume harmony 29 Volume main 23 Volume Metronome 22 Volume Song 48 Volume split 26 Volume Style 39 X XG Lite Voice List 71 69 ...

Page 84: ...may also contact Yamaha directly at the address provided below 2 Deliver the unit to be serviced under warranty to the retailer selling the product an authorized service center or toYamaha with an explanation of the problem Please be prepared to provide proof purchase date sales receipt credit card copy etc when requesting service and or parts under warranty 3 Shipping and or insurance costs are t...

Page 85: ......

Page 86: ......

Page 87: ... A Ctra de la Coruna km 17 200 28230 Las Rozas Madrid Spain Tel 91 639 8888 GREECE Philippos Nakas S A The Music House 147 Skiathou Street 112 55 Athens Greece Tel 01 228 2160 SWEDEN Yamaha Scandinavia AB J A Wettergrens Gata 1 Box 30053 S 400 43 Göteborg Sweden Tel 031 89 34 00 DENMARK YS Copenhagen Liaison Office Generatorvej 8B DK 2730 Herlev Denmark Tel 44 92 49 00 FINLAND F Musiikki Oy Kluuvi...

Page 88: ...strument Division Yamaha Corporation 2003 Yamaha Corporation WA07130 PO 03C0 Printed in China Yamaha PK CLUB Portable Keyboard Home Page English only http www yamahaPKclub com Yamaha Manual Library http www2 yamaha co jp manual english ...

Reviews: