background image

4

1

2

2

3

1

2

3

1

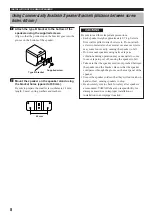
Hold down the tab.

2

Insert the bare wire of the speaker cord into
the hole.

3

Release the tab. (The tab will return to its
original position when you release your
finger.)

Connect the line-in cord to the + terminals (red) on the
right, and the other cord to the – terminals (black) on the
left.

Once connected, pull gently on the speaker cords to
check that they are connected securely.

Bare wire

Tab

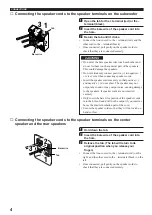
Connecting the speaker cords to the speaker terminals on the center
speaker and the rear speakers

1

Open the tab for the + terminal (red) or the –
terminal (black).

2

Insert the bare wire of the speaker cord into
the hole.

3

Return the tab until it clicks.

Connect the line-in cord to the + terminal (red), and the
other cord to the – terminal (black).

Once connected, pull gently on the speaker cords to
check that they are connected securely.

CAUTIONS

• Do not let the bare speaker wire touch each other and

do not let them touch any metal part of the speakers.
This could damage the speakers.

• Do not mistakenly connect positive (+) to negative(–)

or vice versa when connecting speaker cords.

• Insert the speaker cords securely so that positive (+)

and negative (–) do not short. The speaker may not
output any sound or may output noise, causing damage
to the speakers, if speaker cords are not inserted
securely.

• Only insert the bare wire portion of the speaker cords

into the holes. Sound will not be output if you insert as
far as the plastic insulation part of the cord.

• Secure the speaker cords so that they will not catch on

hands or feet.

Bare wire

Tab

Connecting the speaker cords to the speaker terminals on the subwoofer

CONNECTIONS

Summary of Contents for NX-SW10

Page 1: ...OWNER S MANUAL MODE D EMPLOI MANUAL DE INSTRUCCIONES NX SW10 Subwoofer Center Speaker Rear Speakers Caisson de grave Enceinte centrale Enceintes arriere UCA ...

Page 2: ...with the apparatus When a cart is used use caution when moving the cart apparatus combination to avoid injury from tip over 13 Unplug this apparatus during lightning storms or when unused for long periods of time 14 Refer all servicing to qualified service personnel Servicing is required when the apparatus has been damaged in any way such as power supply cord or plug is damaged liquid has been spi...

Page 3: ...manual may cause interference harmful to the operation of other electronic devices Compliance with FCC regulations does not guarantee that interference will not occur in all installations If this product is found to be the source of interference which can be determined by turning the unit OFF and ON please try to eliminate the problem by using one of the following measures Relocate either this pro...

Page 4: ...t use force on switches controls or connection wires When moving the unit first disconnect the power plug and the wires connected to other equipments Never pull the wires themselves 14 When not planning to use this unit for a long period ie vacation etc disconnect the AC power plug from the wall outlet 15 To prevent lightning damage disconnect the AC power plug when there is an electric storm 16 S...

Page 5: ...es advanced YAMAHA Active Servo Technology to achieve superior bass reproduction CONTENTS Wing nuts x 2 Screws x 2 Type B brackets x 2 Type A brackets x 2 wall brackets Speaker mounting brackets System connector cable 3 m x 1 Speaker cords Used for the rear speakers 15 m x 2 Checking the Package Contents Check that the following accessories are included in the package y indicates a tip for your op...

Page 6: ... on top of the television place it on a rack beneath the television as close to the television monitor as possible YAMAHA main speakers NX VS10M sold separately Place the main speakers an equal distance from each side of the TV monitor Placing the main speakers at almost the same height as your listening position is more effective CAUTION Although this center speaker is magnetically shielded this ...

Page 7: ...ubwoofer Note Do not connect any speakers to the speaker terminals on the subwoofer except for the supplied center speaker NX VS10C and rear speakers NX VS10E Damage may result if a different speaker is connected y Remove the plastic insulation from the ends of the speaker cords and twist the bare wires The bare wire will stay neat if you twist while removing the plastic insulation CONNECTIONS REA...

Page 8: ...the other cord to the terminal black Once connected pull gently on the speaker cords to check that they are connected securely CAUTIONS Do not let the bare speaker wire touch each other and do not let them touch any metal part of the speakers This could damage the speakers Do not mistakenly connect positive to negative or vice versa when connecting speaker cords Insert the speaker cords securely s...

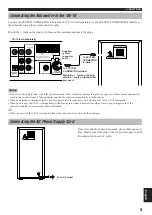
Page 9: ... cord of the subwoofer turn off the power of the VS 10 beforehand When you use only the VS 10 sold separately without using this system disconnect the plug of the AC power supply cord of the subwoofer and the system connector cable beforehand y When the power of the VS 10 is turned off that of the subwoofer is also turned off accordingly Connecting the AC Power Supply Cord Match the mark on the pl...

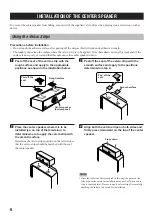
Page 10: ...rface Determine the velcro strips position on the television so that the velcro strips should be matched with those of the center speaker Center speaker bottom panel Rough surface 1 Peel off the seal of the velcro strip with the rough surface and apply to the appropriate positions as shown in the illustration below INSTALLATION OF THE CENTER SPEAKER To prevent the center speaker from falling secur...

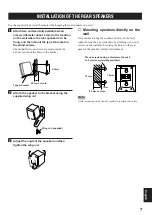
Page 11: ...speakers for direct attachment 3 Adjust the angle of the speaker and then tighten the wing nut Wing nut supplied 2 Attach the speaker to the bracket using the supplied wing nut Type A bracket 20 mm or more 65 mm 1 Attach two commercially available wood screws diameter about 4 mm in the location on the wall where the rear speaker is to be hung and then mount the type A bracket on the wood screws Ch...

Page 12: ...aker Secure the speaker cords so that they will not catch on hands or feet causing speakers to drop Be absolutely sure to check for safety after speakers are mounted YAMAHA bears no responsibility for damage caused due to improper installation or installation in an improper location 60 mm 2 Mount the speaker on the speaker stand using the bracket holes spaced at 60 mm Be sure to prepare the small ...

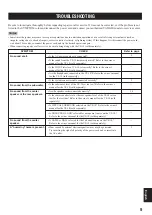
Page 13: ...the owner s manual for the VS 10 sold separately Is the sound from the VS 10 temporarily muted Refer to the owner s manual for the VS 10 sold separately TROUBLESHOOTING Be sure to investigate thoroughly before requesting repairs or after service If it cannot be corrected or if the problem is not listed in the SYMPTOM column disconnect the power cord and contact your authorized YAMAHA dealer or ser...

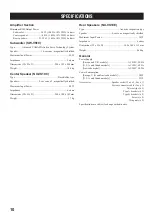
Page 14: ...x 2 Type A brackets x 2 Type B brackets x 2 Screws x 2 Wing nuts x 2 Specifications are subject to change without notice Amplifier Section Minimum RMS Output Power Subwoofer 50 W 100 Hz 10 THD 5 ohms Center speaker 40 W 1 kHz 10 THD 6 ohms Rear speakers 25 W x 2 1 kHz 10 THD 6 ohms Subwoofer SW VS10 Type Advanced YAMAHAActive Servo Technology System Speaker 16 cm cone magnetically shielded Maximum...

Page 15: ...N BEI HAMBURG F R OF GERMANY YAMAHA ELECTRONIQUE FRANCE S A RUE AMBROISE CROIZAT BP70 CROISSY BEAUBOURG 77312 MARNE LA VALLEE CEDEX02 FRANCE YAMAHA ELECTRONICS UK LTD YAMAHA HOUSE 200 RICKMANSWORTH ROAD WATFORD HERTS WD1 7JS ENGLAND YAMAHA SCANDINAVIA A B J A WETTERGRENS GATA 1 BOX 30053 400 43 VÄSTRA FRÖLUNDA SWEDEN YAMAHA MUSIC AUSTRALIA PTY LTD 17 33 MARKET ST SOUTH MELBOURNE 3205 VIC AUSTRALIA...

Reviews: