Yamaha NU1 Operations Download Page 10

Transferring MIDI Files Including Songs

10

Computer-related Operations

6

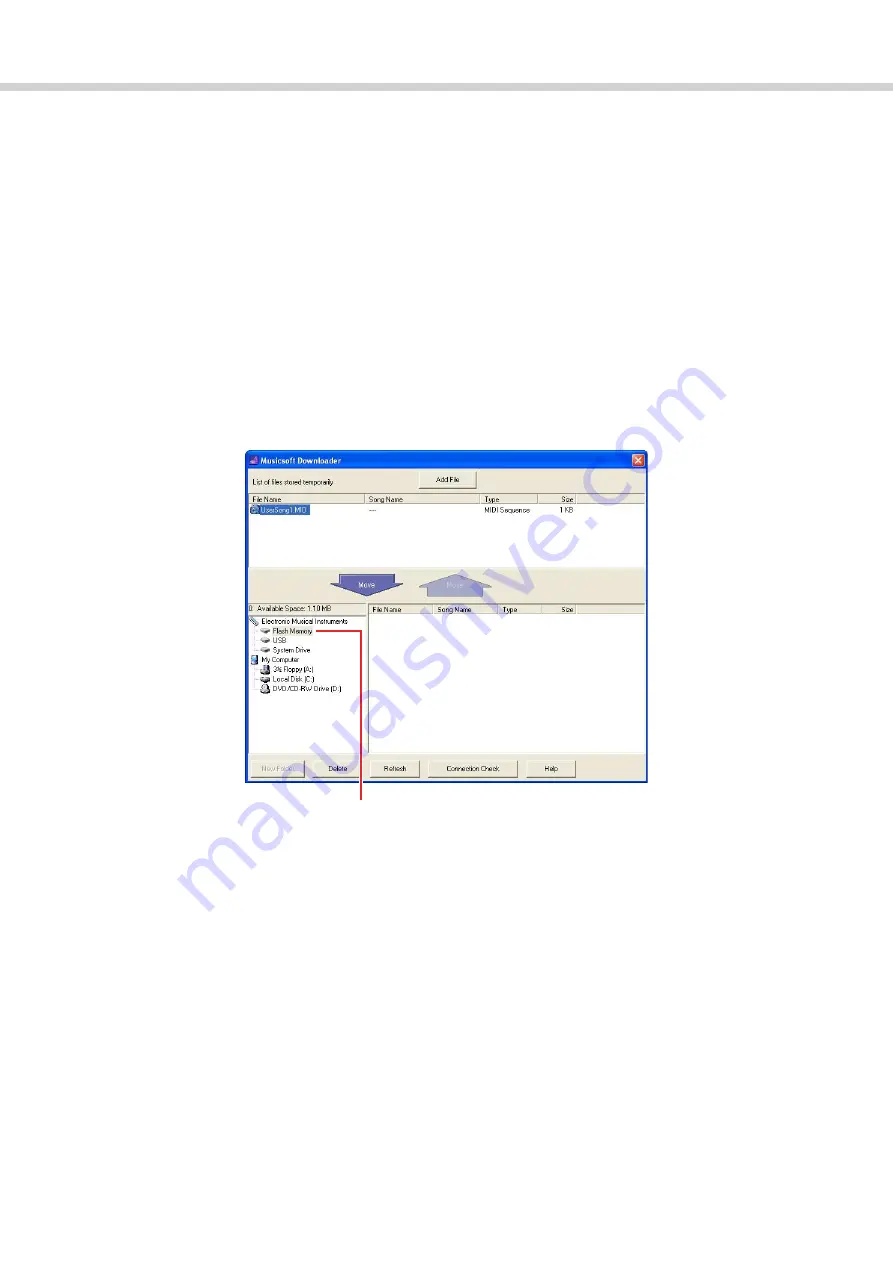
At the left center of the main window, click “Electronic Musical Instruments,” then select the 
desired destination drive. 

• If you wish to transfer Song (***.mid) or Style (***.sty) data to internal memory of the instrument, select 

“Flash Memory.” 

NOTE

• When “USER FILES” folder is located under “Flash Memory,” select “USER FILES” as the destination for the User Songs. Song files outside 

“USER FILES” will be handled as External Songs. 

• If you wish to transfer Song (***.mid) or Style (***.sty) data to the USB storage device connected to the USB 

TO DEVICE terminal of the instrument, select “USB.” 

• If you wish to transfer Backup file (****.bup) data, select “System Drive.”

IMPORTANT

• Regarding Backup files, User Songs and User Styles created on the instrument, never change the file name on the computer. Doing so 

makes it impossible to transfer the Backup file to the instrument, and prevents User Song and User Style data from being recognized by 
the instrument. 

7

Select the file in the upper half box, then click the downward [Move] button. 

A confirmation message will appear. To cancel the operation, click [CANCEL] in this step. 

8

Click [OK] to start data transfer from the computer to the instrument. 

NOTICE

• Never unplug the USB cable during data transfer. Not only will the data transfer fail, but also operation of the memory media may become 

unstable and its contents may disappear completely when the power is turned on or off. 

9

After data transfer is competed, close the window to quit the Musicsoft Downloader. 

10

On the instrument, use the data to play music. 

If you’ve transferred a Backup file (****.bup), confirm that the panel settings have been changed as expected. 
If you’ve transferred a Song (***.mid) or Style (***.sty), select the corresponding number then start playback. 
For details, refer to the Owner’s Manual of the instrument, or refer to 

page 12

 in this document. 

NOTE

• Note that the instrument cannot be operated while Musicsoft Downloader is running. 

Click “Electronic Musical Instruments,” then 
select the desired destination drive. 

Summary of Contents for NU1

Page 1: ...omputer page 6 Transferring MIDI Files Including Songs page 7 Installing Musicsoft Downloader page 8 Transferring MIDI data from the Computer to the Instrument page 9 Transferring Song Style data from...

Page 2: ...transferred to a computer and saved as a file while Song data MIDI files obtained via the Internet can be transferred and stored to the instrument for future listening or keyboard practice Data transf...

Page 3: ...HOST terminal page 4 In this case the instrument can be connected to the computer via a USB cable AB type USB cable of less than 3 meters When equipped with MIDI terminals page 5 In this case the ins...

Page 4: ...n turning the power of the instrument off then on again or 2 when alternately connecting disconnecting the USB cable Operating System OS Windows XP SP3 or later 32 bit Windows Vista 32 bit Windows 7 3...

Page 5: ...tall the Yamaha USB MIDI driver supplied with the USB MIDI Interface to the computer For details refer to the manual of the USB MIDI interface 2 Turn off the instrument then connect the USB MIDI inter...

Page 6: ...gs When recording the keyboard performance to the connected computer the MIDI data you play will be trans mitted to the computer then returned back to the instrument This causes a double sound since t...

Page 7: ...his refers to Style data which is created via the Recording function of the instrument User Style data can be transferred to the computer as backup and then returned to the instrument Backup file with...

Page 8: ...name then select Musicsoft Downloader Information about the computer system requirements and the latest version of this application can be confirmed there 2 Execute installation by following the on s...

Page 9: ...Downloader 5 Musicsoft Downloader Musicsoft Downloader launches and the main window appears 3 Click Connection Check at the bottom of the window This operation checks whether communication between th...

Page 10: ...and User Style data from being recognized by the instrument 7 Select the file in the upper half box then click the downward Move button A confirmation message will appear To cancel the operation clic...

Page 11: ...of the instrument select Flash Memory If you wish to transfer Song mid or Style sty data in the USB flash memory connected to the USB TO DEVICE terminal of the instrument select USB If you wish to tr...

Page 12: ...xt or previous Song 2 Press DEMO SONG or PLAY to stop playback Changing Playback Channels Try this operation when Song playback produces an unexpected or unnatural sound To set Playback Channels to 1...

Page 13: ...I Files including Songs Transferred from a Computer 13 Computer related Operations NU1 Refer to Playing Back Songs of the owner s manual PSR E433 Refer to Playing Songs and Loading a Style File of the...

Page 14: ...rget Models and Functions User Song User Style Backup File External Song External Style YDP C71 SMF Formats 0 1 NU1 SMF Formats 0 1 PSR E433 SMF Formats 0 1 U R G Digital Musical Instruments Division...

Reviews: