6
●
Installing the driver on a Windows XP system
1
Start the computer.
2
Select [Start]
→
[Control Panel].
If the control panel appears as shown below, click “Switch to Classic View”
in the upper left of the window.
All control panels and icons will be displayed.
3
Go to [System]
→
[Hardware]
→
[Driver Signing]
→
[File Signature
Verification], and check the radio button to the left of “Ignore -Install all
files, regardless of file signature” and click [OK].
4
Click the [OK] button to close System Properties, and then click “X” in the
upper right of the window to close the Control Panel.
5
Insert the included CD-ROM into the CD-ROM drive.
6
Make sure the POWER switch on the MOTIF is set to OFF and use the USB
cable to connect the USB terminal of the computer (or the USB hub) to the
USB terminal of the MOTIF. When the MOTIF is turned on, the computer
automatically displays the “Found New Hardware Wizard.”
7
Check the radio button to the left of “Search for a suitable driver for my
device. (Recommended).” Click [Next].
The system starts the installation.
8
When the installation is complete, the system displays “Completing the
Found New Hardware Wizard.” Click [Finish].
n
Some computers may take about ten seconds to show this screen after the installation
is complete.
9
Restart the computer.
The driver has been installed.
• • • • • • • • • • • • • • • • • • • • • • • • • • • • • • • • • • • • • • • • • • • • • • • • • • • • • • • • • • •
Voice Editor, File Utility
Once you‘ve installed these software programs, you can use your computer to
edit the voices of the MOTIF as well as access and organize data stored to media
connected to the MOTIF (Memory card and SCSI devices).
1
Double-click on the “Tools” folder in the CD-ROM.
The “VEMOT_” folder, “FU_” folder and “TWE” folder will be displayed.
2
Double-click on the “VEMOT_” folder or “FU_” folder.
“setup.exe” file will be displayed.
3
Double-click on the “setup.exe” file.
The Voice Editor or the File Utility Tools setup dialog will be displayed.
4
Execute the installation by following the on-screen directions.
n
When installing the above software, make sure to install the MIDI Setup program first.
For details, refer to the each on-line Help or the each PDF owner’s manual.
• • • • • • • • • • • • • • • • • • • • • • • • • • • • • • • • • • • • • • • • • • • • • • • • • • • • • • • • • • •
TWE
With the TWE audio editing software, you can edit wave data directly on your
computer.
1
Double-click on the “TWE” folder.
Four different language folders will be displayed.
2
Select the language that you want to use and double-click on its folder.
The “YAMAHA TWE” folder will be displayed.
3
Copy the “YAMAHA TWE” folder onto the desktop of your computer.
For details on operation, refer to the PDF manual provided in the folder.
Setup Files for remote control of sequencing
• • • • • • • • • • • • • • • • • • • • • • • • • • • • • • • • • • • • • • • • • • • • • • • • • • • • • • • • • • •
software
To use these files, the appropriate sequencing software should be installed to
your computer.
●
Setup Files for Cubase
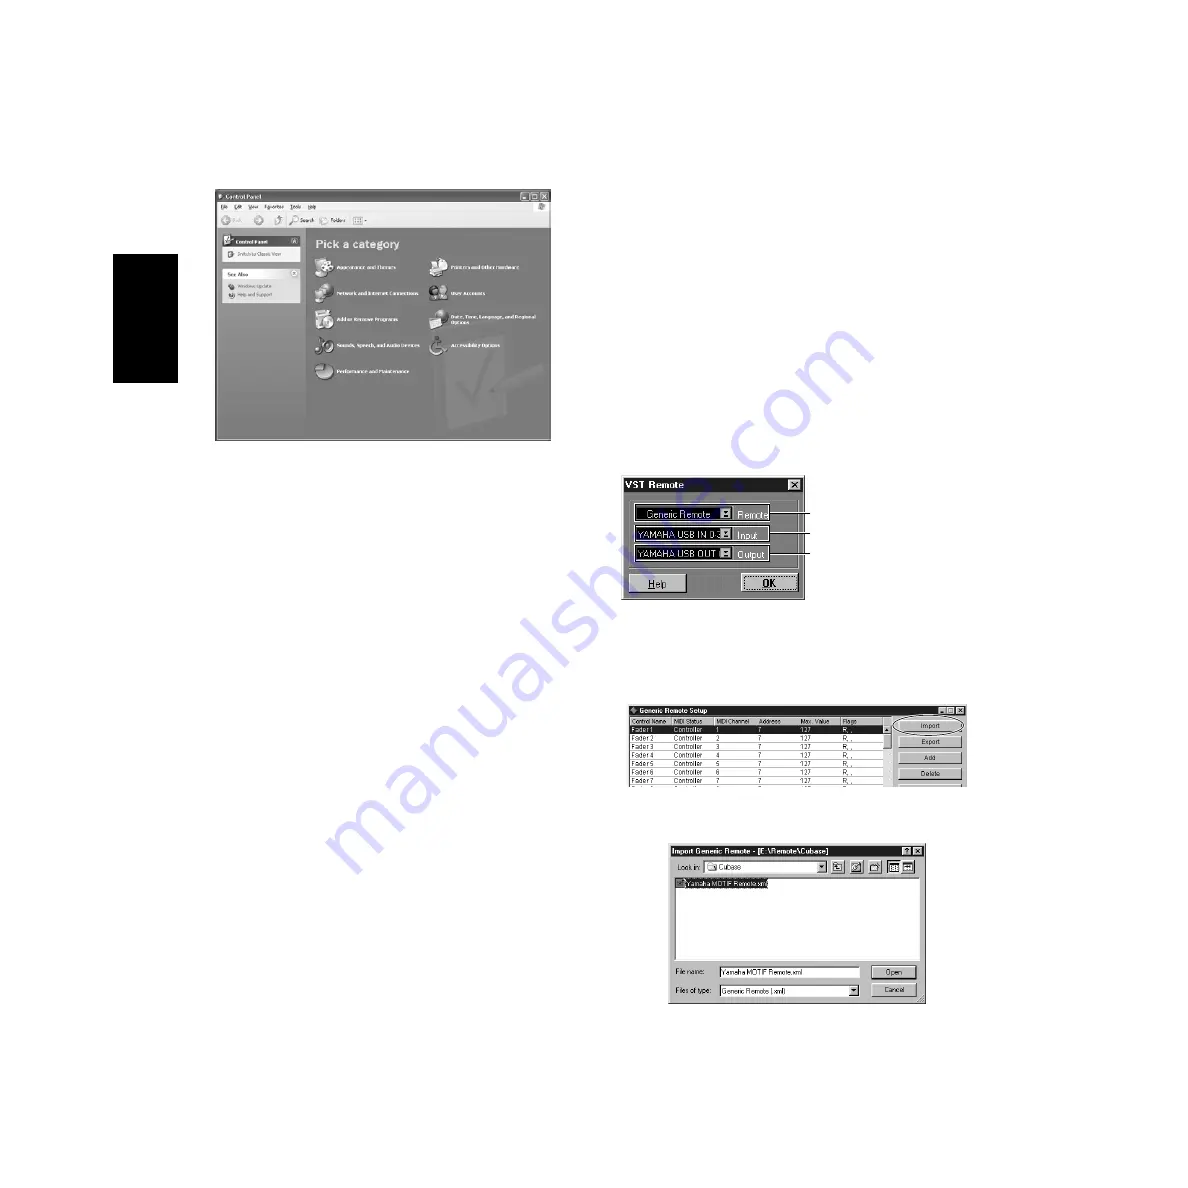
1
Start Cubase.
2
Select Option from the menu bar and select Setup in Remote Setup.
3
Set the value in the VST Remote window called up via step #2 as illustrated
below, and click the [OK] button.
n
If the MOTIF is connected to the computer via MIDI, set the port to 1.
4
Click the [EDIT] button in the Generic Remote window called up via
step#3.
5
Click the [Import] button in the Generic Remote Setup called up via step#4.
6
Select the Setup file for remote control of Cubase (Yamaha MOTIF
Remote.xml) in the dialog opened via step #5 and click the [Open] button.
7
Close the Generic Remote Setup window.
Remote: Generic Remote
Input: YAMAHA USB IN 0-3
Output: YAMAHA USB OUT 0-3
English
Summary of Contents for MOTIF 6
Page 43: ......


