background image


2. System Configuration and Channel Planning 


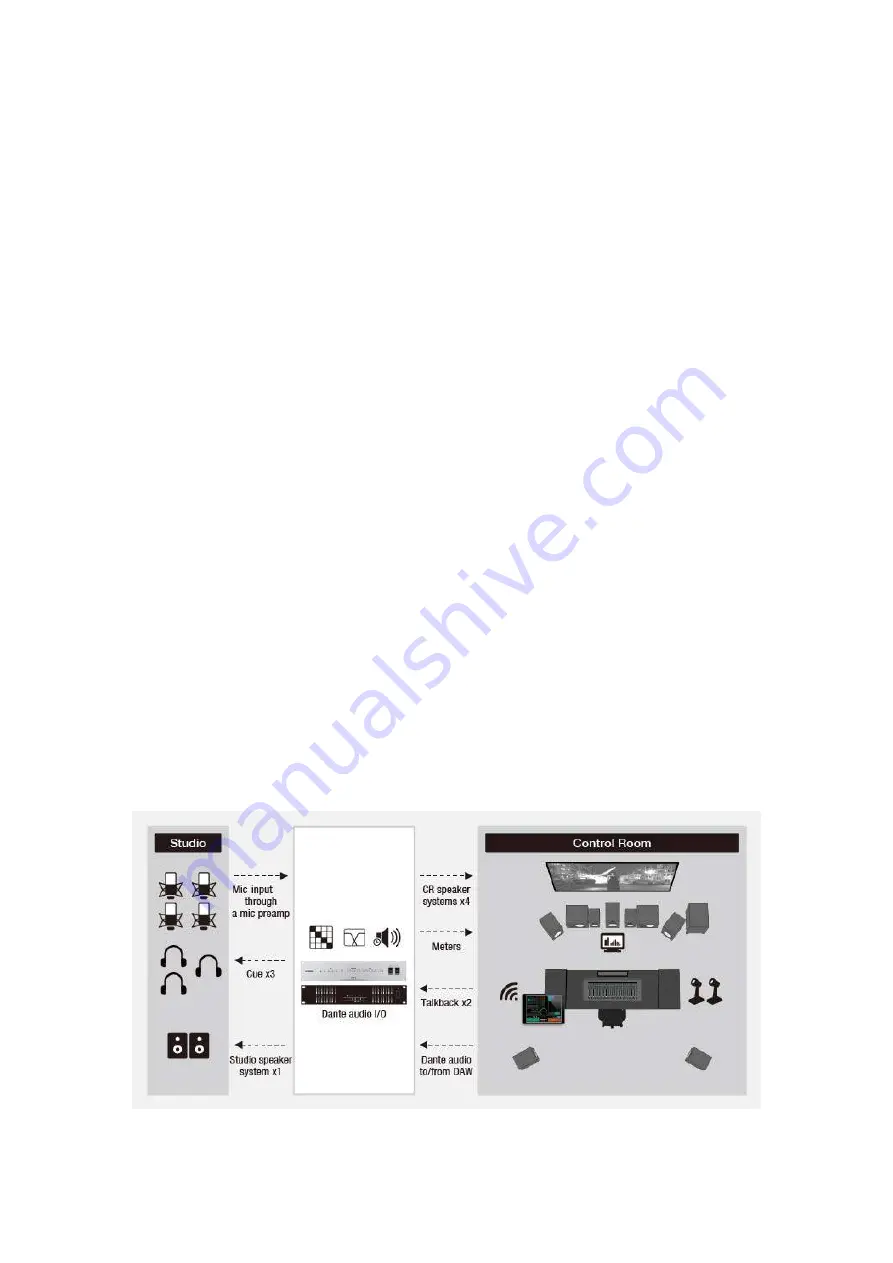
This guide will use the following system example of a studio for recording and editing 5.1 

surround sound. 


Surround Studio (5.1ch) 


A full 5.1 channel speaker system is provided in the control room in addition to two pairs of stereo monitors 

(near-field and small). Separate talkback microphones are provided for the engineer and director. Three 

cue feeds are provided for the recording. MMP1 analog output is expanded via the Dante interface, and 

built-in MMP1 bass management is applied to the 5.1 channel speaker system. 

-


5.1 channels of “Dialog”, ”Music” and “Sound Effects” stems are input to MMP1 as monitor sources 

-


Bass management is applied to the Main Monitor (5.1ch, with LPF off and the trim level at 0dB) 

-


3 different sets of speakers (5.1ch/Stereo[Large]/Stereo[Small]) are connected to Nuage I/O 

-


5.1ch and stereo down-mix signals are sent to VU meter device 

-


3 different stereo Cue mixes are mixed in DAW are sent to MMP1 as Cue sources and output to 

each Cue headphones 

-


A pair of studio speakers are connected to Nuage I/O (via MMP1 Monitor Matrix to Studio Speaker 

Out bus, which are muted when Cough Mute is turned on) 

-


2 talkback microphones are connected to MMP1 (via mic preamps). Multiple Talkback 

Destinations will be created to send the talkback signals to each Cue and Studio Speakers 

-


4 more microphones are also connected to MMP1 (via mic preamps). Each signal will be 

processed by Channels Strip and sent out to DAW 


[System Diagram] 

Summary of Contents for MMP1

Page 1: ...MMP1 Setup Guide Version 1 0 ...

Page 2: ...g MMP1 Editor 32 5 2 Updating MMP1 Firmware 38 5 3 Installing Dante Controller 39 5 4 Installing MMP1 Controller 46 5 5 Installing Nuage Workgroup Manager 49 5 6 Installing Dante Accelerator driver 57 6 Configuring and running each program 62 6 1 Configuring Dante Patching 62 6 2 Configuring MMP1 Editor 64 6 3 Configuring MMP1 Controller 83 All Yamaha products described in this document are the re...

Page 3: ...3 History April 2018 version 1 0 released ...

Page 4: ...s GPI devices as well as computer system such as PC Mac iPad network switches and software such as DAW configuration software controller app and so on which requires experience and accumulated knowledge This guide will walk you step by step through installing each piece of primary equipment connecting them via various types of cabled needed installing software apps and all the aspects of setup tha...

Page 5: ...s monitor sources Bass management is applied to the Main Monitor 5 1ch with LPF off and the trim level at 0dB 3 different sets of speakers 5 1ch Stereo Large Stereo Small are connected to Nuage I O 5 1ch and stereo down mix signals are sent to VU meter device 3 different stereo Cue mixes are mixed in DAW are sent to MMP1 as Cue sources and output to each Cue headphones A pair of studio speakers ar...

Page 6: ...6 2 1 Connecting Diagram Below is the connecting diagram for this example black analog red LAN blue AES EBU Connecting Diagram ...

Page 7: ...flow of this example in other words how the input signals go through each device to the DAW for recording and how the DAW playback signals go out to the speakers and headphones In order to easily make the channel planning refer to the following flow chart Signal Flow Chart ...

Page 8: ...r Downmix L 8 VU Meter Downmix R Dante Input from Dante Accelerator Output to Nuage I O Dante Accelerator 1 Dialog L 1 Left Nuage I O 2 Dialog R 2 Right 3 Dialog C 3 Center 4 Dialog LFE 4 LFE 5 Dialog Ls 5 Ls 6 Dialog Rs 6 Rs 7 Music L 7 Large L 8 Music R 8 Large R 9 Music C 9 Small L 10 Music LFE 10 Small R 11 Music Ls 11 Studio Speaker L 12 Music Rs 12 Studio Speaker R 13 Sound Effects L 13 Micr...

Page 9: ...1 Studio Speaker L 12 Studio Speaker R Dante Accelerator Dante Input from MMP1 Output to MMP1 1 Mic In 1 1 Dialog L 2 Mic In 2 2 Dialog R 3 Mic In 3 3 Dialog C 4 Mic In 4 4 Dialog LFE 5 Dialog Ls 6 Dialog Rs 7 Music L 8 Music R 9 Music C 10 Music LFE 11 Music Ls 12 Music Rs 13 Sound Effects L 14 Sound Effects R 15 Sound Effects C 16 Sound Effects LFE 17 Sound Effects Ls 18 Sound Effects Rs 19 Cue ...

Page 10: ...r wired connection 13 Wifi access point Apple AirMac Extreme for wireless connection 14 6x microphone 4 for audio recording 2 for talkback 15 External DC power supply for MMP1 1 Yamaha MMP1 http www yamahaproaudio com global en products processors mmp1 In this example MMP1 works as a signal processor with which mic input signals are processed by using Channel Strip function and sent to the DAW via...

Page 11: ... expands the number of analog digital input and output channels There are three product lineup for Nuage I O and they are A16 analog 16 in 16 out D16 digital 16 in 16 out and A8D8 analog 8 in 8 out digital 8 in 8 out that you can choose from depending on the channel count requirement This example will use an A16 as required Yamaha NUAGE I O ...

Page 12: ...dware basis with up to 128 in 128 out channel capacity 96kHz Yamaha Dante Accelerator 4 Monitor speakers Yamaha HS powered speakers 5 1ch surround 2x stereo pair http www yamahaproaudio com japan ja products speakers hsseries This example uses a 5 1 channel speaker set as well as large small stereo speaker pair in the control room while we use another 5 1 speaker set in the preview room Yamaha HS ...

Page 13: ... com global en products interfaces swp1 index jsp This example requires at least one level two L2 switch for Dante audio network and we will use Yamaha SWP1 optimized for Dante Yamaha SWP1 7 Cough box One cough box mutes only during pressing the COUGH button another has volume fader or slider the others have built in microphone for Return Talkback RTB Connect the cough box to MMP1 via GPI connecto...

Page 14: ...y assign any analog digital or Dante channel for headphone output We will substitute headphone amps for Cue boxes because each Cue mix is created on the DAW and each performer simply hears their stereo Cue mix while they are performing Headphone amp image courtesy of Rupert Neve Designs ...

Page 15: ...urtesy of Current Inc 10 Main Computer Computer for DAW Workstation for DAW image courtesy of HP For running a DAW software prepare a Windows PC or a Mac If you are using a Mac or a Windows PC without PCIe slots and would like to use Dante Accelerator card you may need to have a PCI Thunderbolt chassis ...

Page 16: ...puter Laptop PC image courtesy of Apple Inc 12 Apple iPad Use an iPad for MMP1 Controller For connecting to MMP1 you can choose either wireless connection by using a Wi Fi access point or wired connection by using LAN cable A Wi Fi router can be used but if that is the case use the router in the Bridge mode instead of Router mode which disables the routing functions For wired connection some adapt...

Page 17: ...ons in Bridge mode Connect the access point to the network switch Wifi Access Point image courtesy of Apple Inc 14 Microphones In this example we will use 4 condenser microphones for recording narrations and 2 more microphones for talkback Since MMP1 does not have mic preamp use mic preamps for microphones and other mic level devices Microphones Images courtesy of Neumann Company and Current Inc ...

Page 18: ...ilt in AC power supply an external AC adapter to DC12V as the backup power supply In this example we will use IDX s IA 60A which we have tested for this purpose MMP1 has MAIN and BACKUP power buttons on the front panel and they can be independently switched on off IDX IA 60a ...

Page 19: ...e rear panel UNIT ID on MMP1 UNIT ID on Nuage I O Connecting LAN cables For most LAN connections use CAT5e or CAT6 cables For connecting Dante Accelerator to the LAN switch it is recommended to use CAT7 STP Shielded Twisted Pair cables For connecting multiple MMP1 Nuage I O units and the switch there are 3 ways to do so Refer to the manual for how to choose each mode Depending on the requirement c...

Page 20: ... port only Connect I O devices and switch Primary port only 2 Redundant mode Primary Secondary connections Connect I O devices and switch Primary Secondary ports 3 Daisy Chain mode Connect I O devices and switch daisy chain mode ...

Page 21: ... to MMP1 connect it to BACK DC INPUT on the back side of the unit Redundant DC Power Unit External power supply for MMP1 specifications DC output voltage 12V DC output wattage 45W DC output connector 4P XLR connector XLR 4 32 Pin assignment of external power supply for MMP1 ...

Page 22: ...nnect a LAN port not the WAN port at the bottom of the access point to the switch Wifi Access Point LAN port For connecting iPad to the switch wired there will be 2 adaptors needed One is Apple Lightning USB 3 Camera Adaptor and the other is Apple USB Ethernet Adaptor Connect as shown in the picture below connect lightning cable to the right connector of the adaptor for supplying power to the adap...

Page 23: ... EBU cable D sub 25pin Male D sub 25pin Male 4 26x XLR cables 6 for microphones 10 for speakers 6 for Cues 2 for Studio Speakers and 2 for headphone amp 1 For connecting MLA8 outputs and MMP1 analog inputs use a 25 pin D sub cable D sub 25pin cable Male Male 2 For MMP1 analog outputs and Nuage I O inputs outputs use a breakout cable with a D sub 25pin Male connector and 8 XLR connectors ...

Page 24: ...alog input and output device by using breakout cables For connecting microphones and other mic level devices use MLA8 or mic preamp 3 Connect AES EBU output 1 8 of MMP1 to the VU meter by using D sub 25pin cable AES EBU Digital Cable D sub 25pin ...

Page 25: ... 2 GND 3 IN 5 6 IN 3 4 4 IN 7 8 IN 5 6 5 OUT 1 2 IN 5 6 GND 6 OUT 3 4 IN 7 8 7 OUT 5 6 OUT 1 2 8 OUT 7 8 OUT 1 2 GND 9 N O OUT 3 4 10 GND OUT 5 6 11 N O OUT 5 6 GND 12 GND OUT 7 8 13 GND N O 14 IN 1 2 IN 1 2 _ 15 IN 3 4 IN 3 4 16 IN 5 6 A3 4 GND 17 IN 7 8 IN 5 6 18 OUT 9 10 IN 7 8 19 OUT 11 12 IN 7 8 GND 20 OUT 13 14 OUT 1 2 21 OUT 15 16 OUT 3 4 22 GND OUT 3 4 GND 23 GND OUT 5 6 24 GND OUT 7 8 25 ...

Page 26: ...ue output pair as well as the headphone outputs for Control Room to headphone amp analog inputs Connecting Headphone Amp Connecting Cough box Cough box and MMP1 are connected via GPI connectors Connect cough box and MMP1 via GPI ...

Page 27: ...and the cough main unit AB 1B Below is a diagram of the pin assignment for each connector MMP1 GPI IN connector and AB 1B CONTROL connector MMP1 GPI OUT connector and AB 1B COMMAND connector Contact Output Photocoupler Contact Output Open Collector Output Photocoupler Photocoupler ...

Page 28: ...MP1 Editor and assign Cough Mute 1 High to GPI I In 1 and CH Strip RTB 1 Low to 2 respectively For GPI Out 1 choose Cough Status 1 Make Settings Global GPI Next go to Settings Editor and check channel 1 in Show Cough Status Show Cough Status ...

Page 29: ...29 And the Editor and the cough box will interact depending on each operation When Cough is turned on When Cough is turned off ...

Page 30: ... status is also visible on the Control Room side Go to Settings User Assignable of MMP1 Editor and create a button and assign RTB Status to it Create a RTB status button Now the status of RTB on both the cough box and MMP1 Editor will interact RTB Return Talk Back is ON ...

Page 31: ...e When Cough Mute Override is turned on via GPI or User Assignable button the operation from the cough box is defeated and the orange icon below will appear on the Editor Channel Strip Cough mute is defeated overwritten ...

Page 32: ...d or updated 1 Install MMP1 Editor 2 MMP1 firmware 3 Dante Controller 4 MMP1 Controller 5 Nuage Workgroup Manager for Nuage I O 6 Dante Accelerator driver 5 1 Installing MMP1 Editor MMP1 Editor is the offline editing and online monitoring software for MMP1 compatible with both Windows and Mac OS MMP1 Editor Download and install the latest MMP1 Editor from Yamaha PA website http www yamahaproaudio ...

Page 33: ...n Mac version of MMP1 Editor Click on I agree to the license agreement and download the software now Installation will begin When finished downloading double clock on the downloaded file and the file will be extracted ...

Page 34: ...34 MMP1 Editor Installer Double click on MMP1 Editor V1 0 0 pkg and the installation will begin MMP1 Editor Installer Click on Continue ...

Page 35: ...35 Click on Continue Click on Agree to accept the software license agreement ...

Page 36: ...36 Click on Install Type the user name and password and then click on Install Software ...

Page 37: ...37 Installation will finish automatically Click on Close to close the installer MMP1 Editor is now installed in the Application folder ...

Page 38: ... of April 2018 there is no downloadable firmware available on the website The firmware update can be performed from MMP1 Editor First make MMP1 and MMP1 Editor online and go to Information page of MMP1 Editor MMP1 Editor Information Check the version number in Version field and if needed click on Update ...

Page 39: ...ally Please do not turn of the power of the equipment until the update is finished to avoid any accidental failure of the update process or possible damage to the equipment 5 3 Installing Dante Controller Dante Controller can be downloaded from Audinate website https www audinate com products software dante controller lang en Registration required ...

Page 40: ...OS in Choose your operating system Audinate website When any OS is selected appropriate version of Dante Controller will be shown Click on the button and download the installer this time Mac OSX10 13 will be installed ...

Page 41: ... be asked if you have an account and If so click on I have an account and if not click on I need to create an account and have one with Audinate Type your email address or username and password and click on Log in ...

Page 42: ...u are successfully logged in the installer can be downloaded Click on the fine name and download the installer When the download is finished double click on the file and then double click on DanteController pkg ...

Page 43: ...43 Click on Continue Similarly click on Continue ...

Page 44: ...44 Click on Agree Click on Install and the installation will begin automatically ...

Page 45: ...45 Type user name password and click on Install Software When completed click on Close to finish the installer ...

Page 46: ...46 Click on Move to Trash 5 4 Installing MMP1 Controller Since MM1 Controller is an iPad app please download it from Apple s App Store ...

Page 47: ...47 Apple App Store Type mmp1 in the search box and it will auto complete as mmp1 controller so tap on it Search box ...

Page 48: ...48 Tap on GET button and then INSTALL button to complete the installation GET button INSTALL button ...

Page 49: ... Nuage called TOOLS for NUAGE TOOLS for NUAGE can be downloaded from the following website http www yamahaproaudio com global en downloads firmware_software nuage_utilities Click on TOOLS for NUAGE V2 0 0 for Mac macOS 10 13 OSX10 10 Click on I agree to the license agreement and download the software now ...

Page 50: ...50 Double click in the downloaded file and then double click TOOLS for NUAGE V2 0 0 pkg Click on Continue ...

Page 51: ...51 Click on Continue Click on Agree ...

Page 52: ...52 Check only NUAGE Workgroup Manager and click on Continue Click on Install ...

Page 53: ...53 Type user name and password and then click on Install Software TOOLS for NUAGE is now installed Click Close and go to the next installation which is for Dante Infrastructure ...

Page 54: ...54 Click on Continue Click on Continue ...

Page 55: ...55 Click on Agree to accept the software license agreement Click on Install ...

Page 56: ...56 Type user name password and click on Install Software Installation of Dante Infrastructure is now finished Click on Close and finish the installer ...

Page 57: ...can be downloaded from the following website http www yamahaproaudio com global en products interfaces dante_accelerator download s jsp Click on Dante Accelerator Driver V2 5 2 for Mac OS 10 13 10 9 Click on I agree to the license agreement and download the software now ...

Page 58: ...58 Double click the downloaded file and then double click yaic128 d_2 5 2 pkg Click on Continue ...

Page 59: ...59 Click on Continue Click on Agree ...

Page 60: ...60 Click on Install Click on Continue Installation as installing this driver requires rebooting the computer after the installation ...

Page 61: ...61 Type user name password and click on Install software Click Restart and the installation will be completed After rebooting the computer Dante Accelerator will become available ...

Page 62: ...ired for this example 1 Patch Dante output 1 12 of MMP1 to Dante input channel 1 12 of Nuage I O Large Small Studio Speakers 3x Cue Patch MMP1 to Nuage I O Note If the Dante devices are either not correctly displayed on the Dante Controller or no audio is heard even if patches are correctly made check if the IP address of each device is correctly configured private link local address subnet mask e...

Page 63: ... 5 1ch stem playback from DAW 3x stereo Cue Patch Dante Accelerator to MMP1 The initial device name of each Dante device can be renamed Double click on the device name on the grid or choose Device View in the Device menu and Device View window will open Go to Device Config page and you can change the device name ...

Page 64: ...MMP1 Editor Next run and configure MMP1 Editor offline by using Setup Wizard Since Setup Wizard guides you though a basic setup procedure with mouse clicking and keyboard typing you may need to make additional settings manually after Setup Wizard is completed Below is how to do so First run MMP1 Editor offline click on the file icon and select New MMP Editor New ...

Page 65: ... The following confirmation dialog will show up so click on YES If any change has been made before selecting New Do you want to save will be asked Setup Wizard confirmation Click on Next MMP1 Setup Wizard ...

Page 66: ... order is selected internal order or the order shown in the Speaker Matrix is always in the order of L R C LFE Ls Rs and only the order of input output patching will be changed 5 1 or other multi channel formats can be selected only when using Setup Wizard If chosen in Setup Wizard speaker shaped mute buttons are available in the Controller View of MMP1 Controller ...

Page 67: ...67 Turn Bass Management on and click on Next Setup Wizard LFE Channel Bass Management Settings ...

Page 68: ... monitor source on MMP1 Editor or MMP1 Controller Labels can be multi line In this example there are three 5 1 stems as the monitor source and those are Dialog Music and Sound Effects Choose the first Dante channel of each source and type the label Click Next Setup Wizard Monitor Source Settings ...

Page 69: ...eo as B and Small stereo as C Choose the first channel of each speaker set as Destination Only A is in multi channel format when using Setup Wizard If multi channel format is preferred for B C or D make additional changes manually after Setup Wizard is completed Setup Wizard Speaker Set Output Settings ...

Page 70: ...ose Cue mixes come from DAW and they are routed through MMP1 to each Cue Choose Stereo as Format and choose the first Dante channel of each Cue and then choose the first Dante channels of MMP1 for each Cue as Destination Click Next Setup Wizard Cue Mix Input and Output Settings ...

Page 71: ...kback microphones Even though we are using 2 talkback microphones in this example Setup Wizard allows us to assign only one microphone so choose the channel for the first talkback and go to next Setup Wizard Talkback Mic Input Setting ...

Page 72: ...nd if so click on Finish button and close the Setup Wizard If you look at the Main window of MMP1 Editor you will see some buttons such as those for speaker select and talkback created on the screen Setup Wizard completed From here we are going to manually make additional settings ...

Page 73: ...ut Patch In MMP1 there are 2 busses for talkback and those busses can be turned on off independently Also there are 4 areas in Talkback Mic In section that are 1 1 1 2 2 1 and 2 2 This means that 2 talkback microphones can be assigned to each bus 1 x and 2 x 1 1 and 1 2 and 2 1 and 2 2 are turned on off simultaneously so if you want to control 2 talkback microphones independently they should be pa...

Page 74: ...gs Monitor Matrix Next go to Patch Output Patch Click on Source 5 of Dante Out mouse over Monitor Matrix Out and choose STU 1 L Similarly choose STU 1 R for Source 6 we have patched those channels to Nuage I O Dante Input channels earlier on the Dante Controller Studio Speaker outputs are used to automatically mute themselves when Cough Mute is turned on If you do not use this function you don t n...

Page 75: ... outputs Since Setup Wizard has not configured the headphone monitoring for Control Room we will assign it manually Go to Patch Output Patch and assign Headphone Out L and Headphone Out R to Analog Source 7 and 8 respectively Patch Output Patch ...

Page 76: ...User Assignable buttons This time we will make the following 8 destinations Talkback Destinations 1 Talkback 1 Mic 1 to Cue 1 2 Talkback 1 Mic 1 to Cue 2 3 Talkback 1 Mic 1 to Cue 3 4 Talkback 1 Mic 1 to Cue 1 2 3 and Studio Speakers 5 Talkback 2 Mic 2 to Cue 1 6 Talkback 2 Mic 2 to Cue 2 7 Talkback 2 Mic 2 to Cue 3 8 Talkback 2 Mic 2 to Cue 1 2 3 and Studio Speakers Settings Talkback Destination ...

Page 77: ...of Label row the label of the User Assignable button 01 can be changed Type TB1 Cue1 hit Return Enter key and that label will appear on the button User Assignable Label Click on the color area and you will see the 16 color palette to choose button color from User Assignable Button color ...

Page 78: ...of 8 Talkback Destinations as Parameter respectively User Assignable Function Parameter Considering the color and position of each button configure other User Assignable buttons When configured check those buttons in the Main window Settings User Assignable ...

Page 79: ...x Meter L and R for Source 7 and 8 respectively Patch Output Patch Assign the input microphones Next we will patch the microphones to the MMP1 s Channel Strips process those signals using EQ Compressor etc and send them to DAW inputs via Dante earlier in 7 1 3 we have patched those Dante outputs to Dante Accelerator so they can be input to the DAW Patch Input Patch ...

Page 80: ... we have turned on in the Setup Wizard go to Speaker Matrix and you will see each channel with Low Pass Filter applied is sent to the LFE channel so you can adjust each trim and also select the process type IIR FIR and the filter slope of each channel in Settings Speaker Matrix page ...

Page 81: ...tor Speaker Matrix Now we have completed offline settings Connect MMP1 and the PC via switch and run MMP1 Editor to synchronize it with MMP1 Click on the sync icon at the top right MMP1 Editor Synchronization icon ...

Page 82: ...the MMP1 units that can be connected are shown in the Device area As we are sending the data we have just created to the MMP1 unit this time Click on CONNECT Editor MMP2 button MMP1 Editor Select MMP1 Then the synchronization will begin MMP1 Editor Synchronization ...

Page 83: ... going to learn how to connect iPad to MMP1 and how to configure them so you can remotely control MMP1 from MMP1 Controller Wireless connection with iPad In case you want to connect iPad to MMP1 wireless use a Wifi access point In this example we will use Apple AirMac Extreme as the Wifi access point Once you have connected the LAN port of AirMac to the switch configure the AirMac by using AirPort...

Page 84: ...ct the PC to the AirMac such as no Internet Connection and No DNS Servers simply ignore those messages Click on the AirMac icon and you will see an popup window And click on Edit button Type a name for the Base Station and the password for it AirPort Utility Base Station ...

Page 85: ...ecurity choose WPA WPA2 Personal AirPort Utility Wireless In the Network tab make sure you choose Off Bridge Mode as Router Mode AirPort Utility Network Now the AirMac is configured and next we are going to connect the iPad to this AirMac wireless Open Setting and turn the WiFi on ...

Page 86: ...86 Settings Wi Fi When you choose the AirMac you will see the No Internet Connection message there will be no problem Settings Wi Fi ...

Page 87: ...87 Tap on MMP1 Controller icon and MMP1 Controller will run Yamaha MMP1 Controller Tap on the icon at the upper right hand corner for synchronizing MMP1 Controller and MMP1 Sync icon at the upper right ...

Page 88: ... When you see the following screen tap on Connect and the synchronization will occur Select MMP1 Wireless Now the MMP1 Controller is online and you can remotely control MMP1 from it MMP1 Controller online ...

Page 89: ...nnected to the switch Make sure Apple USB Ethernet Adapter is shown tap on that and you will see the IP address and other setting in the next page in this example we are using Auto IP addressing so make sure each IP address is set at 169 254 xxx yyy with the subnet mask of 255 255 0 0 Settings Ethernet Settings Ethernet Apple USB Ethernet Adapter ...

Page 90: ...the following window will open Tap on Wired and make sure the device name and the IP address of the MMP1 are shown Tap on Connect button and the synchronization will occur Select MMP1 Wired Now the MMP1 MMP1 Editor and MMP1 Controller are online and you are ready to get started ...

Page 91: ......

Reviews: