13
Nomenclature
■
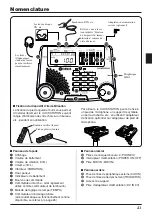
Front Panel
q
Display
w
Beat Volume
e
Vibration Volume (VIB.)
r
Volume (VOL.)
t
Vibrator (VIBRATION)
y
Speaker
u
Beat Indicators
i
Control Buttons
o
Start/Stop Switch (also used as Tap Switch)
!0
Tempo Dial (TEMPO)
!1
Back Light Switch
(auto off or continuous operation available,
refer to page 18)
■
Side Panel
!2
Headphones Jacks x2 (PHONES)
!3
Power Switch (POWER ON/OFF)
!4
MIDI IN jack (MIDI IN)
■
Rear Panel
!5
External Device Input Jack (AUX IN)
!6
Trigger Input Jack (TRIGGER IN)
!7
Holder Attachment
!8
Power Adaptor Jack (DC IN 9V)
B o t h s t a n d a r d
phone and mini
jacks can be used
simultaneously.
MIDI device
DTX pad, etc.
CD player, etc.
AC adaptor (optional)
■
Attaching the Holder
Attaching the supplied tilt angle lets you set the
CLICKSTATION at an angle on top of a desk, etc.,
for use.
Refer to the “Attach-
ing the Holder” section
described below.
Tilt Angle (supplied)
Wing Bolt (supplied)
Also, the CLICKSTATION can be attached to a
mic stand, cymbal stand, cowbell holder, etc.,
using the optional mount adaptor or mic stand
adaptor.
Summary of Contents for Metronome
Page 1: ......
Page 2: ...2 AC100V AC200V VOLUME 0...
Page 5: ...5 1 6LR61 9V S 006P 1 2 OFF 3 1 OFF DC DC IN 9V 2 A C AC100V 3...
Page 59: ...59...
Page 60: ......


