background image

1

English       Chapter 1:  Setting Up Y

our Disklavier

This chapter provides information on the supplied items and how to set up your Disklavier.

Items Supplied with
the Disklavier

Check that the following items are supplied with

your Disklavier:

1 Remote Control

2 Batteries for the Remote Control

2 Disklavier Sample PianoSoft Disks

1 Blank 3.5" 2HD Floppy Disk

1 Sample PianoSoft.PlusAudio

TM

 CD Software

Basic Operation Manual & Advanced

Operation Manual

1 Control Unit Suspension Bracket

1 Stereo Headphones

Connecting the Control
Unit

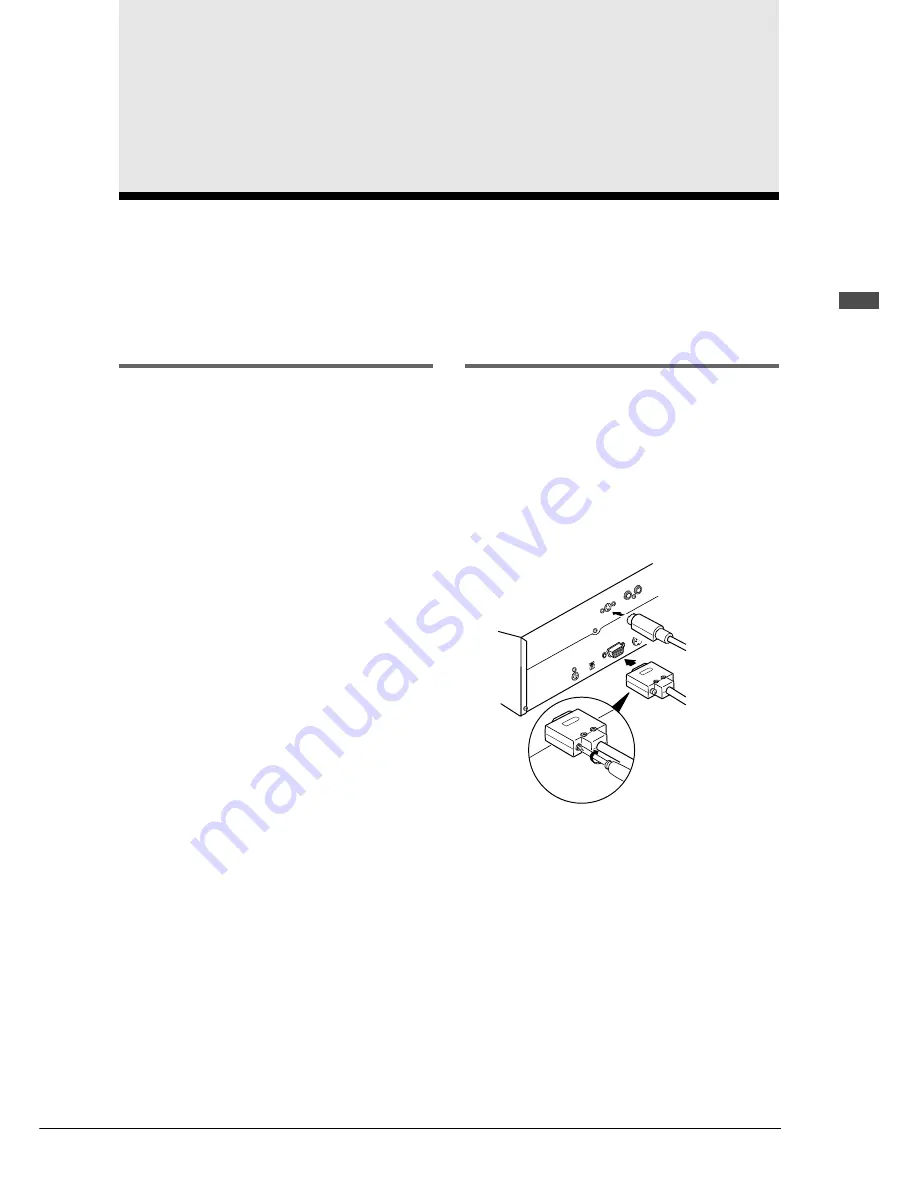
Make sure that the control cable extending from

the piano is firmly connected to the TO

CONTROL CABLE FOR PIANO connector on

the rear panel of the Control Unit.

Also make sure that the CD control cable

extending from the piano is connected to the CD

CONTROL connector on the rear panel of the

Control Unit.

Note:

The control cable should be connected to the

Control Unit when the Disklavier is installed.

If, however, it is not, carefully connect the

control cable to the Control Unit’s TO

CONTROL CABLE FOR PIANO connector

on the rear panel.  See step (4) in “Mounting

the Control Unit to the Grand Piano” at the

beginning of this manual.

It is recommended to mount the Control Unit to

the underside of the treble side key bed.  See

“Mounting the Control Unit to the Grand Piano”

at the beginning of this manual.

Chapter 1
Setting Up Your Disklavier

MID

I

OU

T

IN

TO

   C

ON

TR

OL

   C

AB

LE

FO

R  

 PI

AN

O

HOST SELECT

TO    HOST 

MID

I

PC

1

PC

2

MA

C

CD

 C

ON

TR

OL

AU

DIO

/A

NA

LO

M

ID

I I

N

R

L

Control cable

CD control cable

Summary of Contents for Mark III

Page 1: ......

Page 2: ...IMPORTANT The wires in mains lead are coloured in accordance with the following code GREEN AND YELLOW EARTH BLUE NEUTRAL BROWN LIVE As the colours of the wires in the mains lead of this apparatus may...

Page 3: ...ction methods used to produce them meet these goals In keeping with both the letter and the spirit of the law we want you to be aware of the following Battery Notice This product MAY contain a small n...

Page 4: ...ed it must be assumed that unobstructed ventilation is required Temperature considerations Electronic products should be installed in locations that do not significantly contribute to their operating...

Page 5: ...3 BWH Schrauben 4 4 4 3 Bei korrekter Montage ist das Steuerger t um ca 18 zur Horizontalen geneigt Mounting the Control Unit to the Grand Piano Installation du bo tier de commande sur un piano queue...

Page 6: ...nt le c ble 5 Glisser les fentes du support m tallique contenant le bo tier de commande sur les vis mentionn es l tape 3 6 Apr s avoir install le bo tier de commande l enfoncer jusqu l extr mit et ser...

Page 7: ...Mark IIISeries Full Function Models A Basic Operation Manual English...

Page 8: ...ng the tone touch and long term value that have long made Yamaha pianos the world s finest Before using your Disklavier piano please read this manual thoroughly and retain it for future reference Trad...

Page 9: ...could lead to fire or electric shock hazard When moving the Disklavier to another location turn off the power remove the power plug from the AC outlet and remove all cables connected to external devic...

Page 10: ...h the and poles reversed Misaligning the poles of dry batteries can lead the dry batteries to be charged or shorted or it can cause them to heat up leak electrolyte or burst which in turn may result i...

Page 11: ...ting Playback 21 Pausing Playback 21 Stopping Playback 21 Selecting Songs with the Control Unit 22 Selecting Songs with the Remote Control 22 Fast Preview Review 23 Fast Forward Reverse 24 Adjusting t...

Page 12: ...ces 50 Selecting Tracks for the Piano Parts 50 Chapter 12 Using the AUX Connectors AUX OUT 52 AUX IN 53 Chapter 13 Using the SmartKeyTM Feature SmartKeyTM Software 54 CueTIMETM Software 56 Guide Contr...

Page 13: ...ar panel of the Control Unit Also make sure that the CD control cable extending from the piano is connected to the CD CONTROL connector on the rear panel of the Control Unit Note The control cable sho...

Page 14: ...distance replace the batteries Replacement batteries should be UM 3 AA R6P or LR6 type Always replace both batteries If the remote control is not to be used for a prolonged period of time remove the...

Page 15: ...cal instruments to communicate with each other The PianoSoft Disk Collection is a library of prerecorded song disks made by Yamaha for use with the Disklavier Series Many titles are available and amon...

Page 16: ...en using the remote control point it toward this sensor 3 Display LCD Shows various information 4 DRIVE indicator Indicates the selected disk 5 SELECT buttons Used to select a disk Toggles the floppy...

Page 17: ...when playing the piano u cursor buttons Used to move the cursor in the display i FUNC button Used to access various Disklavier utility functions o METRONOME button Used to access the metronome p Selec...

Page 18: ...S jacks Connect HPE 170 stereo headphones optional or other standard stereo headphones here for listening to playback in Silent mode You can connect up to two sets of headphones 5 REVERB knob Used to...

Page 19: ...eadphones VOLUME HEADPHONES 3 4 REVERB 5 OUT IN AUX 7 6 FOOT CNTRL 8 7 AUX IN Used to connect external audio equipment 8 Foot Controller Connector Connect the optional YAMAHA FC 4 FC 5 or FC 7 foot co...

Page 20: ...connectors 6 BASS knob Used to adjust the bass sound of the built in speakers 7 TREBLE knob Used to adjust the treble sound of the built in speakers 8 Foot Controller connector Connect the optional Y...

Page 21: ...his switch is used to switch the Disklavier on and off See page 14 for information on power ON and OFF procedures Note The MAIN switch only needs to be switched off when you are not going to use the D...

Page 22: ...and Ensemble songs these buttons are used to choose which part will play left hand part right hand part or both parts They are also used to select a part for recording q SEARCH button Used to access...

Page 23: ...ier can play back songs stored on 3 5 inch MS DOS 720 Kbyte format 2DD floppy disks and MS DOS 1 44 Mbyte format 2HD floppy disks Handling Floppy Disks Be careful of the following when handling floppy...

Page 24: ...ct Discs You can enjoy listening to PianoSoft PlusAudioTM Yamaha s audio MIDI CD made especially for use with the Disklavier Besides PianoSoft PlusAudio the Disklavier can also play back standard audi...

Page 25: ...re information on using Memory Disks Inserting Removing CDs Press the CD eject button so that the CD tray pops out about 1 cm Then carefully pull it out as far as it will go To insert a CD place the C...

Page 26: ...MAINS switch to OFF is effectively the same as disconnecting the power cable from an AC wall outlet If the Disklavier is used regularly you only need to use the STANDBY ON button on the Control Unit I...

Page 27: ...d the hours display flashing 4 Use and to select year month date hours minutes and seconds and use the NO and YES buttons to set a value Pressing both NO and YES simultaneously in each respective fiel...

Page 28: ...wo large digits Disk Title When you select a floppy disk or Memory Disk for playback the title of the selected disk scrolls across the display Note CDs have no disk title Song Title The title of a son...

Page 29: ...dard audio CDs When you select a CD for playback the type of CD software is displayed Display CD Software AU Standard audio CDs YM Yamaha PianoSoft PlusAudio QR Audio MIDI CDs of other companies PD So...

Page 30: ...lay before or after the current one You can go to the previous or next display using the buttons Cursor The c cursor indicates the currently selected parameter In this case NO YES and are used to set...

Page 31: ...moving the keys up and down as if they were being played by a performer For songs containing Ensemble parts in addition to piano parts those parts are played by the internal XG tone generator and out...

Page 32: ...t a floppy disk or CD into their respective drives the letters Fd and Cd automatically appear on the left side of the display Note Fd and Cd appear only when a floppy disk or CD is inserted in their r...

Page 33: ...the instrumental parts The time display starts counting up and the velocity meters show the velocity of the piano part notes currently being played as shown Pausing Playback 1 Press PLAY PAUSE Playba...

Page 34: ...l across the display To stop the title scrolling press STOP Selecting Songs with the Remote Control You can also select songs at any time using the SONG SELECT buttons or number pad on the remote cont...

Page 35: ...ition within a song Note No sound is produced by the piano when fast previewing or reviewing PianoSoft PlusAudio CDs 1 To preview press SONG SELECT To review press SONG SELECT 2 Press PLAY PAUSE to co...

Page 36: ...ing press PLAY PAUSE to engage Pause mode then press SONG SELECT The PLAY PAUSE indicator flashes quickly and the time display shows the current position 2 Press PLAY PAUSE to continue normal playback...

Page 37: ...elow For example when two consecutive indicators are lit the volume level is between these two levels Note Make sure the VOLUME knob on the Amplifier is set to an appropriately audible level If the vo...

Page 38: ...rds the volume of the XG tone generator should not be too loud or too quiet compared to the piano played by the Disklavier Once you adjust the volume using the Tone Generator Master Balance function y...

Page 39: ...ll volume Balancing the CD Volume CD Master Balance Before playing back PianoSoft PlusAudio and other audio MIDI CDs it is a good idea to first balance the volume levels of the MIDI piano and Audio pa...

Page 40: ...rmanent See Changing the Default Song Tempo on page 26 in the Advanced Operation Manual To change the tempo use one of the following options a On the Control Unit press the Selector until the TEMPO in...

Page 41: ...too much may have an adverse effect on the sound quality b On the remote control use the TRANSPOSE buttons decreases the transposition value and increases the transposition value 0 resets the transpos...

Page 42: ...he acoustic piano Sound information is sent to the digital piano tone generator and output through the built in speakers or stereo headphones Additionally the optical sensor system registers every nua...

Page 43: ...ed to a level softer than what is possible on the acoustic piano Volume is adjusted using the VOLUME knob on the Silent Control Box The standard volume level is roughly the three o clock position At t...

Page 44: ...o increase and counterclockwise to decrease the reverb Reverb is off when the REVERB knob is turned fully counterclockwise Follow the procedure below to apply reverb to the digital piano sound in Sile...

Page 45: ...ht hand piano part 1 Press FUNC The FUNC indicator lights and the Function menu appears 2 Press until the c cursor is next to the Silent option then press ENTER The Silent menu appears 3 Press until t...

Page 46: ...ck in 32 note stereo sampling polyphony the number of notes beyond 32 are lost although these notes are minor notes that are barely audible 1 Press FUNC The FUNC indicator lights and the Function menu...

Page 47: ...low the procedures outlined in Tuning the Tone Generator TG Master Tune on page 48 Disengaging the Silent System Press the SILENT button so that the SILENT ON indicator goes out The Silent system is d...

Page 48: ...remote control to select a Repeat mode ALL RPT or RND The REPEAT indicator lights and the selected mode flashes on the display 2 Press PLAY to start Repeat playback 3 To cancel Repeat mode press REPE...

Page 49: ...nt B press A B again Point B is memorized and the B of A B stops flashing Playback stops the song returns to point A and Pause mode is engaged 3 Press PLAY to play back the specified section Playback...

Page 50: ...to point A press SONG SELECT Alternatively you may press PAUSE followed by SONG SELECT to return to point A In this case playback stops the song returns to point A and Pause mode is engaged 3 Press PL...

Page 51: ...ust press the search button again 1 Press SEARCH The time counter on the display flashes 2 Enter the time that you want to search for For example to search for 2 56 first press 2 then 5 then 6 If the...

Page 52: ...laying the other 1 When an L R song is selected the PART indicators light as shown 2 To cancel the left hand part press PART L To cancel the right hand part press the PART R The corresponding PART ind...

Page 53: ...al Using the Built in Metronome The Disklavier s built in metronome can be used for practice playing playback and recording You do not need to play back a song to use this function With each beat of t...

Page 54: ...the metronome along with song playback 1 Play back a song recorded using the measures and beats time format 2 Press METRONOME The METRONOME indicator lights and the metronome starts to click to the te...

Page 55: ...appears 2 Press the until the c cursor is next to the Vol parameter then use the NO and YES buttons to set the volume level The volume can be set between 50 and 127 Using an Optional Foot Switch or Fo...

Page 56: ...can also be controlled The following table shows which functions can be controlled using the controller pedal Current Mode Pedal Down Pedal Up STOP PLAY PAUSE PAUSE PLAY PAUSE PLAYBACK PLAY PAUSE Tem...

Page 57: ...s 2 Use the NO and YES buttons to select a voice number The voice name and number change accordingly See Chapter 15 Internal XG Tone Generator Voice Drum Kit List for a listing of basic voices Setting...

Page 58: ...ong with the selected Ensemble voice by setting the PianoTone parameter By setting PianoTone to off for example Ensemble track recording is possible allowing you to record orchestral tracks without he...

Page 59: ...number is changed See XG Normal Voice List on pages 11 and 12 in the Appendix section in the Advanced Operation Manual for a full listing of available voices 4 To adjust the volume press until the c c...

Page 60: ...need only perform this fine tuning operation once This function can also be used to tune a MIDI device connected to the MIDI OUT connector 1 Press FUNC The FUNC indicator lights and the Function menu...

Page 61: ...ver change this so that the piano parts are also played by the internal XG tone generator or a MIDI instrument connected to the MIDI OUT connector You can use this to double up the Disklavier piano pa...

Page 62: ...02 track 2 2 Press to select the part whose track you want to change 3 Use the NO and YES buttons to choose a different track Displaying Ensemble Voices When an Ensemble song starts playing back MIDI...

Page 63: ...track that contains a piano group voice Prg all The piano plays all tracks that contain a piano group voice The number of the chosen track appears next to L or R and the symbol moves across the displ...

Page 64: ...nnect the Disklavier s AUX OUT connectors to the appropriate connectors LINE IN or AUX IN on the external device you want to connect to 2 Turn the VOLUME knob on the Silent Control Box all the way dow...

Page 65: ...desirable volume is obtained Note The volume of the Amplifier is linked with the AUX IN connectors Make sure the VOLUME knob on the Amplifier is set to an appropriately audible level If it is turned f...

Page 66: ...ier then waits for you to press this key before it continues to the next note in the melody If you miss the movement of the key the Disklavier will repeat the movement until you press the key When you...

Page 67: ...g from a SmartKey disk Additional more complete arrangements like the built in SmartKey demo are available on floppy disks called SmartKey disks See your local Yamaha dealer for more information on th...

Page 68: ...E software the disk follows you Using a CueTIME Disk Make sure that the CueTIME disks are labeled SmartKey compatible These disks turn on the appropriate Guide and Prompt Repeat functions automaticall...

Page 69: ...ware not labeled SmartKey compatible you may be able to use special SmartKey functions such as the Guide function included in your Disklavier The Guide function allows you to practice at your own pace...

Page 70: ...ide settings can only be changed during pause or stop Key Prompt Key Prompt is the partial movement of a key that doesn t create any sound Key Prompt is very useful for a visual indication of guided n...

Page 71: ...whenever the Guide mode is engaged and Prompt Repeat function is set to AUTO default Note The Prompt Repeat function repeats prompting the same key for about five minutes If the cue key is not played...

Page 72: ...y are deactivated In other words at the end of a piece the Disklavier simply stops playing and does not proceed automatically to the next song This allows you to practice a song repeatedly or to selec...

Page 73: ...ith a VCR or other external component For details see Synchronization Using the MTC on page 62 in the Advanced Operation Manual Chapter 14 Using the PianoSmart Feature PianoSmart Playback A special pu...

Page 74: ...playback 2 Specify a FD Smart PianoSoft The following display appears PLAY PAUSE PLAY PAUSE This means PianoSmart SPS Type Disk appears as the disk title display when a Smart PianoSoft disk purchased...

Page 75: ...he live piano and the CD playback is heard as monaural sound See Tuning the Tone Generator TG Master Tune on page 48 PianoSmart Manual Adjustment Compensation can be performed manually in the case of...

Page 76: ...ximately 13ms The setting range is from 999 to 999 Upon completion of the adjustments 7 Align the cursor with QUIT and press the ENTER button 8 To register the adjustment value press YES to cancel the...

Page 77: ...for the new recording For example if the last song to be recorded was No 6 then the new song will be No 7 2 Specify the CD that is to be recorded When you insert CD into the CD drive the letter Cd aut...

Page 78: ...cording will begin Start playing your song with the CD sound The following display appears PS indicates PianoSmart 7 When you finish playing your song press STOP When STOP is pressed the following dis...

Page 79: ...tting screen appears The following display appears 4b Use the NO and YES buttons to select the number of the song on the CD to be played The following display appears 4c To end now press STOP and proc...

Page 80: ...following display appears The following table gives a description of each of options Option Description SAVE The new recording is saved under the current song number NEW The new recording is saved und...

Page 81: ...oAcd Tango Accordion Guitar 025 NylonGtr Acoustic Nylon Guitar 026 SteelGtr Acoustic Steel Guitar 027 Jazz Gtr Electric Jazz Guitar 028 CleanGtr Electric Clean Guitar 029 Mute Gtr Electric muted Guita...

Page 82: ...SFX 4 atmosphere 101 Bright SFX 5 brightness 102 Goblin SFX 6 goblins 103 Echoes SFX 7 echoes 104 Sci Fi SFX 8 sci fi Ethnic 105 Sitar Sitar 106 Banjo Banjo 107 Shamisen Shamisen 108 Koto Koto 109 Ka...

Page 83: ......

Reviews: