M7CL
Quick Start Guide Part 1
7
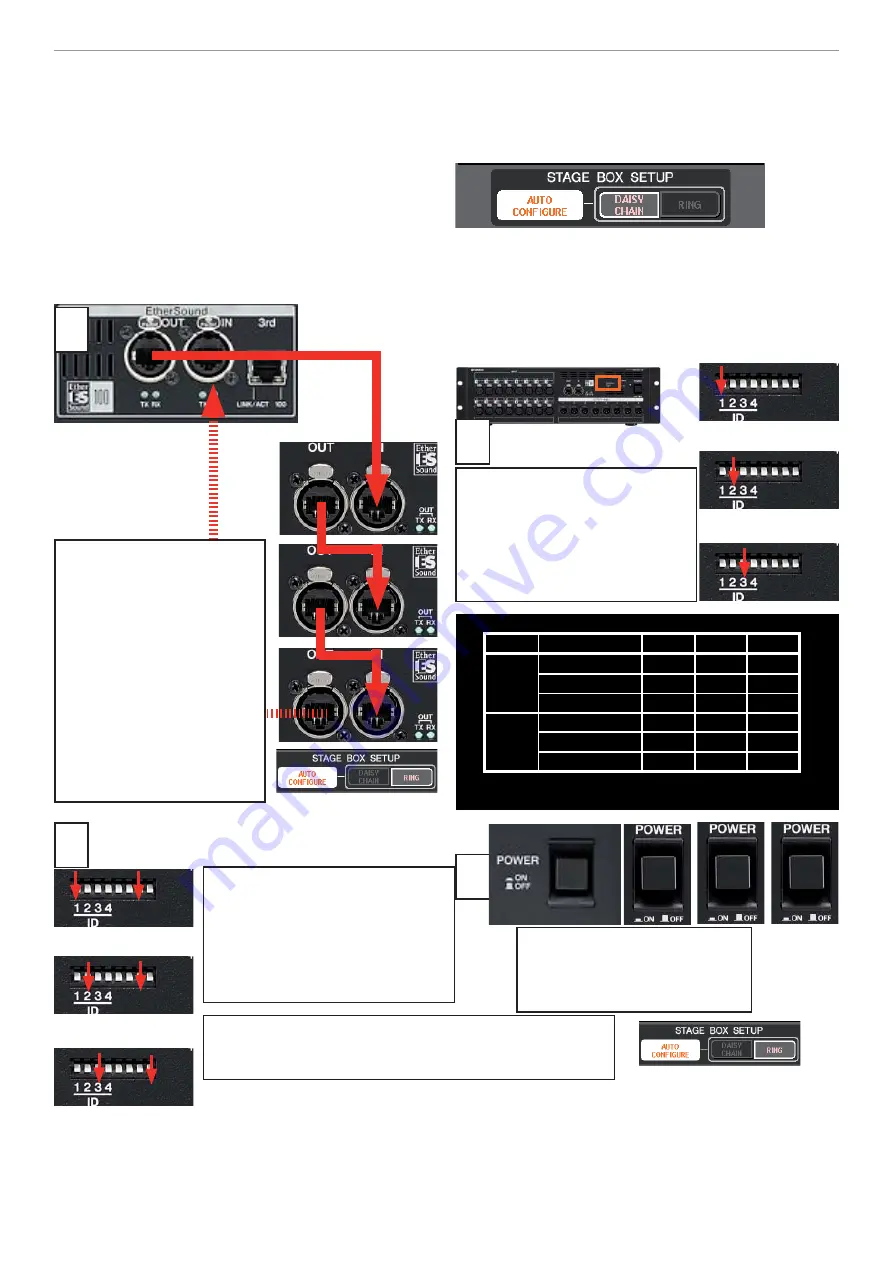
Getting sound from M7CL-48ES and SB168-ES in 2 easy stages!
1
2.
Set the 1,2,3 dip switches on
the SB168-ES front panels accord-
ing to the chart below. Dip1 for
Ch 1-16, Dip 2 for Ch 17-32 and
Dip 3 for 33-48. This gives the
boxes their identity; ID# 1 is 1-16
ID# 2 is 17-32 ID# 3 is 33-48.
2
4.
Power up the units (any order)
and the Auto Confi gure will use
EtherSound to patch the stage
boxes to the console.
3
M7CL-48ES back panel.
SB168-ES front panel.
Stage 1. Setup the system.
M7CL-48ES needs to be combined with extra EtherSound compatible HA
inputs. We recommend SB168-ES; they contain similar HA units and are designed to integrate with M7CL-48ES.
7
8
7
3.
Set the 7,8 dip switches accord-
ing to the chart; Dip 7 for the ID#1
and ID#2 box, but dip 8 for ID#3.
Even if you daisy chain the boxes
in a different order; still dip 8 for
ID#3. This tells the boxes which is
the highest number in the setup.
With the dipswitches set as shown below the combina-
tion of M7CL-48ES and SB168-ES will AUTO CONFIGURE
the EtherSound network in daisy chain mode. NO PC
is required. In AUTO CONFIGURE mode the EtherSound
patching is locked, if you wish to make changes or in-
corporate other EtherSound devices, use AVS-ES Monitor
from AuviTran.
You can AUTO CONFIGURE in Ring Mode too for cable re-
dundancy. In Ring mode set dip switches 5 and 6 instead
of 7 and 8.
Note;
Note;
If a ring setup is preferred use dipswitch 5 for ID#1
and #2 and dip 6 for ID#3. Set the AUTO CONFIGURE button
to RING on the EXT-ES HA page in the RACK.)
4
1.
Before powering up the
M7CL-ES and SB168s,
connect
the EtherSound OUT of the
M7CL-48ES to the EtherSound
IN port of the fi rst SB168-ES
and then daisy chain two
more SB168-ES using Cat5e.
Note;
Note;
If a ring setup is
preferred connect the last
stage box back to the IN port
of the console, but be sure
RING is selected on the RACK
EXT-ES HA page.
No. of Unit ID #1 ID #2 ID #3
3
1&7
2&7
3&8
2
1&7
2&8
1
1&8
3
1&5
2&5
3&6
2
1&5
2&6
1
1&6
P leas e s et s witc h before power on.
Daisy
C hain
R ing
Stage 2. Get the sound out!
The setup
Stage 1
is complete.
Stage 2
is to follow the Getting sound
from M7CL-48/32 in 10 easy steps! (Page 6)


