background image

E-5

English

L

R

SYSTEM

CONNECTOR

DIGITAL

OPTICAL

ANALOG

OUT

OUT

STEP

FREQUENCY

D

L

R

C

A

B

E

E

L

R

L

R

SUBWOOFER

OUT

OUT

IN

IN

MD

CD

AUX

TAPE

 MIN./SPEAKER

SPEAKERS

FM ANT

GND

AM ANT

75 

 UNBAL

L

R

SYSTEM

CONNECTOR

OUT

IN

B

A

SYSTEM

CONNECTOR

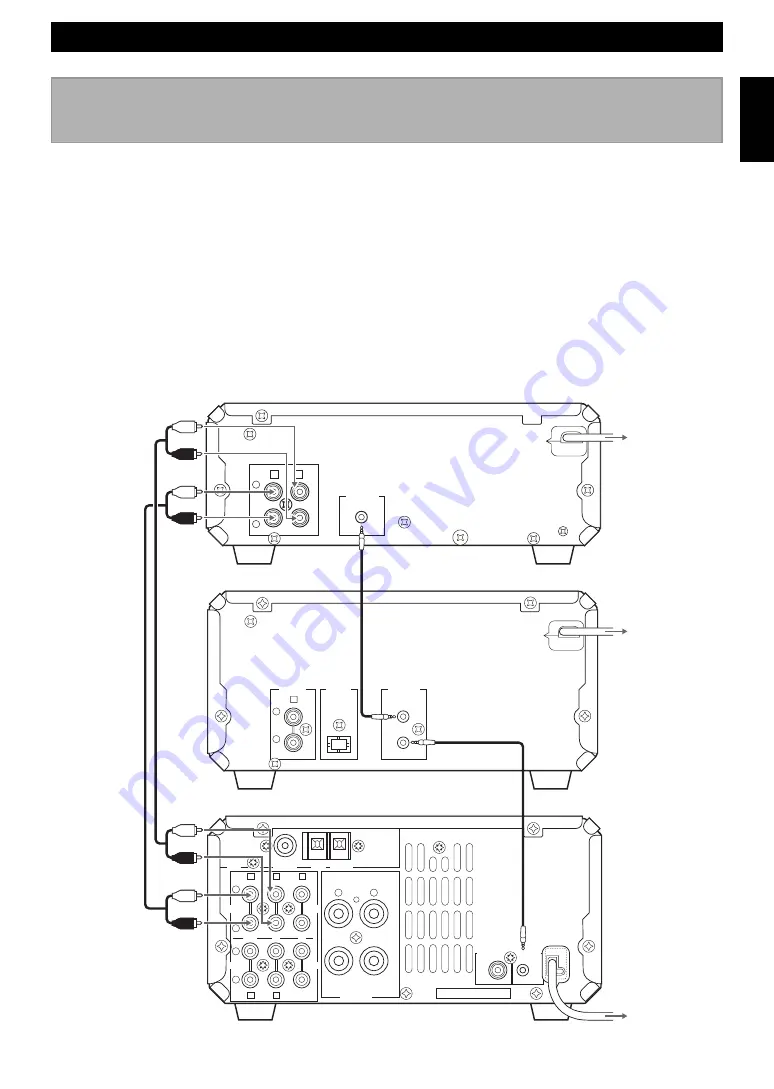
Connecting the unit to the receiver RX-E100 and

CD player CDX-E100

Never plug the AC power cord into the wall outlet until all other connections are completed.

Follow the steps as shown below to connect the unit to the receiver (RX-E100), CD player (CDX-E100), and MD recorder
(MDX-E100) using the supplied accessories.

1

Connect 

Å

 to 

Å

, and 

ı

 to 

ı

 using the RCA pin cables.

Insert the plugs into the jacks of the same colour.
• The two RCA pin cables are the same, so you can connect 

Å

 or 

ı

 using either cord.

2

Connect the unit and the CDX-E100 (or MDX-E100) with the system control cable.

3

Connect the AC power cord to 

AC OUTLET

 of CDX-E100 (or MDX-E100) (except for U.K. model).

GETTING STARTED

1

2

3

To wall outlet

To RX-E100

To CDX-E100

System control cable

RCA pin cables

<CDX-E100>

<KX-E100>

<RX-E100>

Summary of Contents for KX-E100

Page 1: ...MAX MIN REC LEVEL DIRECTION p B C UCA KX E100 Natural Sound Stereo Cassette Deck Platine Cassette Stéreo OWNER S MANUAL MODE D EMPLOI ...

Page 2: ...ir through the ventilation openings 9 Heat The unit should be situated away from heat sources such as radiators stoves or other appliances that produce heat 10 Power Sources The unit should be connected to a power supply only of the type described in the operating instructions or as marked on the unit 11 Power Cord Protection Power supply cords should be routed so that they are not likely to be wa...

Page 3: ...to be the source of interference which can be determined by turning the unit OFF and ON please try to eliminate the problem by using one of the following measures Relocate either this product or the device that is being affected by the interference Utilize power outlets that are on different branch circuit breaker or fuse circuits or install AC line filter s In the case of radio or TV interference...

Page 4: ...on INTRODUCTION Thank you for purchasing this YAMAHA product We hope it will give you many years of trouble free enjoyment For the best performance read this manual carefully It will guide you in operating your YAMAHA product ENGLISH FEATURES High Performance Auto Reverse Tape Deck Dolby B C Type Noise Reduction Applicable to Metal Tape Recording CONTENTS PRECAUTIONS 3 NAMES OF CONTROLS AND FUNCTI...

Page 5: ...s specified is dangerous and may result in a fire or other type of accident causing damage YAMAHA will not be held responsible for any damage resulting from use of this unit with a voltage other than that which is specified Never allow metallic items e g screwdrivers tools etc to come near the record playback head assembly Doing so may not only scratch or damage the head s mirror smooth finish but...

Page 6: ...Play p 6 Stop p 6 fi Open Close p 6 Tape tray p 6 Display Counter display Ÿ Reverse mode indicator Dolby Noise Reduction indicator Direction indicator REC indicator 30 20 15 10 8 6 4 2 0 2 4 6 db L R SEARCH B C REC PLAY MAX MIN REC LEVEL DOLBY NR MODE COUNTER RESET DIRECTION NATURAL SOUND STEREO CASSETTE DECK KX E100 STANDBY ON REC PAUSE DOLBY B C NR Music SEARCH indicator PLAY indicator Rewind Fa...

Page 7: ...the steps as shown below to connect the unit to the receiver RX E100 CD player CDX E100 and MD recorder MDX E100 using the supplied accessories 1 Connect Å to Å and ı to ı using the RCA pin cables Insert the plugs into the jacks of the same colour The two RCA pin cables are the same so you can connect Å or ı using either cord 2 Connect the unit and the CDX E100 or MDX E100 with the system control ...

Page 8: ... side B 7 Select the noise reduction type using DOLBY NR if necessary 8 Press to start play To stop play Press To eject a tape Press to open the tape tray and remove the tape from the tray To adjust the volume level Use the volume control of RX E100 To fast forward or rewind the tape Press or to fast forward or rewind the tape during stop mode To search for the beginning of a selection Press or to...

Page 9: ... indicators to flicker When recording a CD use Peak Level Search on CDX E100 for the optimum adjustment 6 Select the noise reduction type using DOLBY NR if necessary 7 Press MAX MIN REC LEVEL DOLBY NR REC PAUSE MODE COUNTER RESET DIRECTION NATURAL SOUND STEREO CASSETTE DECK KX E100 STANDBY ON DOLBY B C NR 8 Start playing the source component Synchronized start is possible if you have connected the...

Page 10: ...nnected Silent gaps between tracks are too short Excessively soft passages in the middle of selections Conversation or noise etc is recorded Turn the unit off and disconnect the AC power cord from the wall outlet After about 30 seconds have passed connect the power and try again Take up slack with a pencil before using Replace tape or cover erasure prevention hole with adhesive tape Clean heads Cl...

Page 11: ... tray tighten the slack portion of tape with a pen or pencil Maintenance Dirty heads capstans and pinch rollers can cause poor sound and tape jams Clean these parts with a commercially available cleaning tape Specifications Type Auto reverse stereo cassette deck Frequency Response 20 dB Type 1 Normal 30 to 15 000 Hz Type 2 High 30 to 16 000 Hz Type 4 Metal 30 to 18 000 Hz Wow and Flutter 0 09 W RM...

Page 12: ... BEI HAMBURG F R OF GERMANY YAMAHA ELECTRONIQUE FRANCE S A RUE AMBROISE CROIZAT BP70 CROISSY BEAUBOURG 77312 MARNE LA VALLEE CEDEX02 FRANCE YAMAHA ELECTRONICS UK LTD YAMAHA HOUSE 200 RICKMANSWORTH ROAD WATFORD HERTS WD1 7JS ENGLAND YAMAHA SCANDINAVIA A B J A WETTERGRENS GATA 1 BOX 30053 400 43 VÄSTRA FRÖLUNDA SWEDEN YAMAHA MUSIC AUSTRALIA PTY LTD 17 33 MARKET ST SOUTH MELBOURNE 3205 VIC AUSTRALIA ...

Reviews: