background image

14

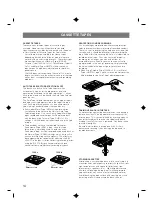
Detector slots

Detector slots

TYPE II

TYPE IV

CASSETTE TAPES

CASSETTE TAPES

There are many different types of cassette tapes
available. However, they all conform to standard
specifications so any brand may be used with the deck.

÷

Classification of Cassette Tapes by Formulation
Cassette tapes are available in four basic types
depending on their formulation, or type of magnetic
material and manufacturing process.  These four types
are commonly known as Normal (Type I/NORM),
Chrome (Type II/HIGH <CrO

2

>), Ferrichrome (Type III/

FeCr), and Metal (Type IV/METAL), and they each
require specific tape deck adjustments for optimum
performance.

* YAMAHA does not recommend the use of 120 minute

length cassettes since the extreme thinness of the tape
makes them susceptible to mechanical and recording
problems.

AUTO TAPE SELECTOR DETECTION SLOTS

The deck has a built-in Auto Tape Selector which
automatically adjusts for the proper bias, level and
equalization according to the tape formulation — all you
have to do is load a cassette and the Auto Tape Selector
does the rest.
The Auto Tape Selector determines which type of tape is
loaded by sensing detector slots in the top of the tape
shell. Each tape formulation has its own characteristic
hole markings standardized by the tape industry.

÷

Early model Metal (Type IV/Metal) tape formulation
cassette shells do not have the slots for Auto Tape
Selector operation. As a result, early model Metal type
tapes recorded on another deck will be played back
with the deck at the Chrome (Type II/HIGH <CrO

2

>)

settings. YAMAHA does not recommend using this kind
of tape.

÷

The deck does not have the required setting for
Ferrichrome (Type III/FeCr) tape, since this tape
formulation is not widely used. Should you use a
Ferrichrome tape, it will be recorded and played back at
the Normal (Type I/NORM) settings, which will result in
an unnatural high frequency emphasis. This effect may
be compensated for somewhat by adjusting the BIAS
ADJUST to the plus (+) direction during recording, or by
using the PLAY TRIM tone control and/or the tone
controls of your amplifier/receiver during playback.

PROTECTING YOUR RECORDINGS

All cassette tapes are provided with erasure protection
holes to prevent accidental erasure of recorded contents.
There is a small tab covering the hole on each side of the
cassette, and it should be broken off after recording the
tape. Without this tab covering the hole, it is impossible to
record onto that tape.  Thus, you can safely protect a
recording for as long as you wish without fear of
accidental erasure. Should you wish to use a cassette
tape protected in this way for recording, simply covering
the hole with adhesive tape will permit erasure and re-
recording.

÷

When using Chrome (Type II/HIGH <CrO

2

>) or Metal

(Type IV/METAL) tapes, make sure you do not cover the
hole intended for the Auto Tape Selector operation.

STORING CASSETTES

After putting a cassette tape back into its case, store it in
a location away from exposure to direct sunlight, humidity,
high temperatures, and magnetic fields (away from
television sets, speakers, etc.).  High temperatures and
humidity will damage the tape itself, while exposure to
magnetic fields may cause a loss of recorded material.
Avoid touching the tape surface with your fingers, since
dirt or finger oil will contaminate the deck’s heads.

TAKING UP SLACK IN THE TAPE

As a precaution against tape entanglement and damage,
remove any slack in the tape before inserting cassettes
into the deck. This is accomplished by inserting a pencil,
pen or similar object into one of the spools and gently
winding it until all the slack is removed.  You do not have
to wind it too tightly.
Be careful not to touch the tape part itself. It is very
delicate and touching it may damage the tape and its
recorded contents.

Summary of Contents for KX 380

Page 1: ...the serial number of your unit in the space below Model Serial No The serial number is located on the rear of the unit Retain this Owner s Manual in a safe place for future reference Í Natural Sound Stereo Cassette Deck s KX 580 KX 480 KX 380 ...

Page 2: ... its proper ventilation For example the appliance should not be situated on a bed sofa rug or similar surfaces that may block the ventilation openings or placed in a built in installation such as a bookcase or cabinet that may impede the flow of air through the ventilation openings 9 Heat The appliance should be situated away from heat sources such as radiators stoves or other appliances that prod...

Page 3: ...ion of America or its subsidiaries We Want You Listening For A Lifetime YAMAHA and the Electronic Industries Association s Consumer Electronics Group want you to get the most out of your equipment by playing it at a safe level One that lets the sound come through loud and clear without annoying blaring or distortion and most importantly without affecting your sensitive hearing Since hearing damage...

Page 4: ...ear panel of your amplifier receiver if provided FEATURES 4 CONNECTIONS 4 PLAYBACK 5 SELECTION SEARCH 7 INTRO SCAN 7 MEMORY STOP operation 8 REPEAT PLAYBACK KX 580 and KX 480 only 8 RECORDING 9 REC MUTE operation 12 0 STOP operation 12 REC RETURN operation 12 TIMER RECORDING PLAYBACK KX 580 and KX 480 only 13 Timer recording 13 Timer playback 13 CASSETTE TAPES 14 OPENING AND CLOSING THE SUB PANEL ...

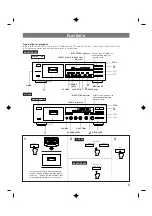
Page 5: ...t push in the compartment door until it locks shut 1 2 REC PAUSE 3 STOP MPX FILTER indicator When a tape is loaded the corresponding tape type indicator lights POWER ON ŸB ŸC indicators PHONES LEVEL PHONES PLAY TRIM KX 580 KX 480 KX 380 KX 480 KX 380 KX 580 PHONES LEVEL 1 3 STOP MPX FILTER indicator ŸB ŸC and ŸS KX 580 only indicators When a tape is loaded the corresponding tape type indicator lig...

Page 6: ...layback Press the STOP button To fast forward the tape Press the button To fast rewind the tape Press the button To adjust the volume level Use the volume control of the amplifier or receiver To use headphones for private listening Insert the headphones plug into the PHONES jack To adjust the headphones level Use the PHONES LEVEL control DOLBY NR button setting in step 2 DOLBY NR OFF ŸB ŸC MPX but...

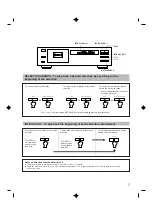
Page 7: ...neously INTRO SCAN To play back the beginning of each selection automatically To play back each selection in the reverse direction The INTRO indicator lights during reverse intro scan 3 To play back each selection in the forward direction The INTRO indicator lights during forward intro scan To resume normal playback when the desired selection is found PLAY 5 Notes on Selection search and Intro sca...

Page 8: ...ress the REPEAT OFF 0 M FULL button so that the REPEAT FULL indicator lights 3 REPEAT OFF 0 M FULL Note The length between the start and end points of the 0 M repeat section should be more than 4 counts To cancel repeat playback To cancel the 0 M repeat or Full repeat press the REPEAT OFF 0 M FULL button so that both REPEAT 0 M and REPEAT FULL indicators go off Each time this button is pressed rep...

Page 9: ... only 2 REC indicator Tape counter MPX FILTER indicator PEAK level meters ŸB ŸC ŸS KX 580 only indicators EJECT REC PAUSE DOLBY NR DOLBY NR PLAY To stop recording Press the STOP button To stop recording temporarily Press the REC PAUSE button To resume recording press the PLAY button Tape counter and COUNTER RESET button Before starting recording press the RESET button to set the counter reading to...

Page 10: ... seconds To perform the Auto Tape Tuning send the tape leader part forward and set the PLAY TRIM control and the BIAS ADJUST control to the center position before pressing the AUTO TAPE TUNING button When the Auto Tape Tuning is completed the TAPE TUNING indicator lights After completion of Auto Tape Tuning the tape automatically rewinds to the point where the Auto Tape Tuning began and the REC PA...

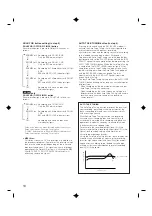
Page 11: ...ding needs further bias adjustment to compensate for absent or distorted high frequencies adjust this control to your liking Output Level dB 10 0 10 20 30 40 1 2 3 Frequency Hz 1 Insufficient bias High frequencies are distorted 2 Optimum bias 3 Excessive bias High frequencies are absent When high frequencies are distorted increase the recording bias by turning the BIAS ADJUST control clockwise Whe...

Page 12: ...TE SEARCH KX 580 only Tape counter Tape counter REC MUTE operation Inserting a blank space during recording A 4 second blank interval is automatically recorded on the tape and then the deck enters Rec Pause mode If a blank interval longer than 4 seconds is desired keep pressing the button as long as you want When the MUTE SEARCH button is released the deck enters Rec Pause mode after making a 4 se...

Page 13: ...t time the timer will turn power on to the amplifier receiver and cassette deck and begin playback It will shut power off at the preset time as well ending playback Note Whenever the timer recording playback is not intended make sure to set the TIMER switch to OFF position to prevent the unnecessary recording playback If the TIMER switch is set to REC position and the power is supplied plugging in...

Page 14: ...ack at the Normal Type I NORM settings which will result in an unnatural high frequency emphasis This effect may be compensated for somewhat by adjusting the BIAS ADJUST to the plus direction during recording or by using the PLAY TRIM tone control and or the tone controls of your amplifier receiver during playback PROTECTING YOUR RECORDINGS All cassette tapes are provided with erasure protection h...

Page 15: ... will cause an accumulation of dirt and dust on the heads capstans and pinch rollers This can lead to poor sound quality drop outs intervals with no sound unsteady tape speed loss of high frequency response etc Thus clean the heads and all surfaces over which the tape travels with a commercially available cleaning cassette and fluid type cleaner DEMAGNETIZATION After 20 30 hours of use enough resi...

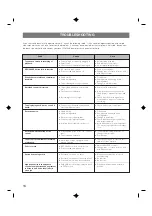
Page 16: ...tape Blank sections must be at least 4 seconds long No remedy No remedy Play back in appropriate Dolby NR position Fault Tape doesn t move in recording or playback REC PAUSE button fails to function Sounds become faint and sometimes inaudible Recorded sound is distorted Tape is playing back but no sound is heard Excessive noise Excessive wow wavering of the sound Tape stops in the middle of record...

Page 17: ...alloy Erase double gap Ferrite head Rapid Transport KX 580 480 90 sec C 60 KX 380 100 sec C 60 Wow and Flutter KX 580 480 WRMS 0 05 W Peak 0 08 KX 380 WRMS 0 07 W Peak 0 12 Signal to Noise Ratio KX 580 480 Dolby NR off 60 dB Dolby B NR on 68 dB Dolby C NR on 76 dB Dolby S NR on KX 580 only 80 dB KX 380 Dolby NR off 58 dB Dolby B NR on 66 dB Dolby C NR on 74 dB Frequency Response KX 580 480 Normal ...

Page 18: ...TR 22 34 D 2084 RELLINGEN BEI HAMBURG F R OF GERMANY YAMAHA ELECTRONIQUE FRANCE S A 17 RUE DES CAMPANULES LOGNES 77321 MARNE LA VALLEE CEDEX 2 FRANCE YAMAHA ELECTRONICS UK LTD YAMAHA HOUSE 200 RICKMANSWORTH ROAD WATFORD HERTS WD1 7JS ENGLAND YAMAHA SCANDINAVIA A B J A WETTERGRENS GATA 1 BOX 30053 400 43 VASTRA FRÖLUNDA SWEDEN YAMAHA MUSIC AUSTRALIA PTY LTD 17 33 MARKET ST SOUTH MELBOURNE 3205 VIC ...

Reviews: