


27
RX-V467/HTR-4063
RX-V467/HTR-4063
● 操作方法
1. 本機の電源コードを AC コンセントに接続します。
本機に電源が入り、マイコンが書き込みモードにな
ります。
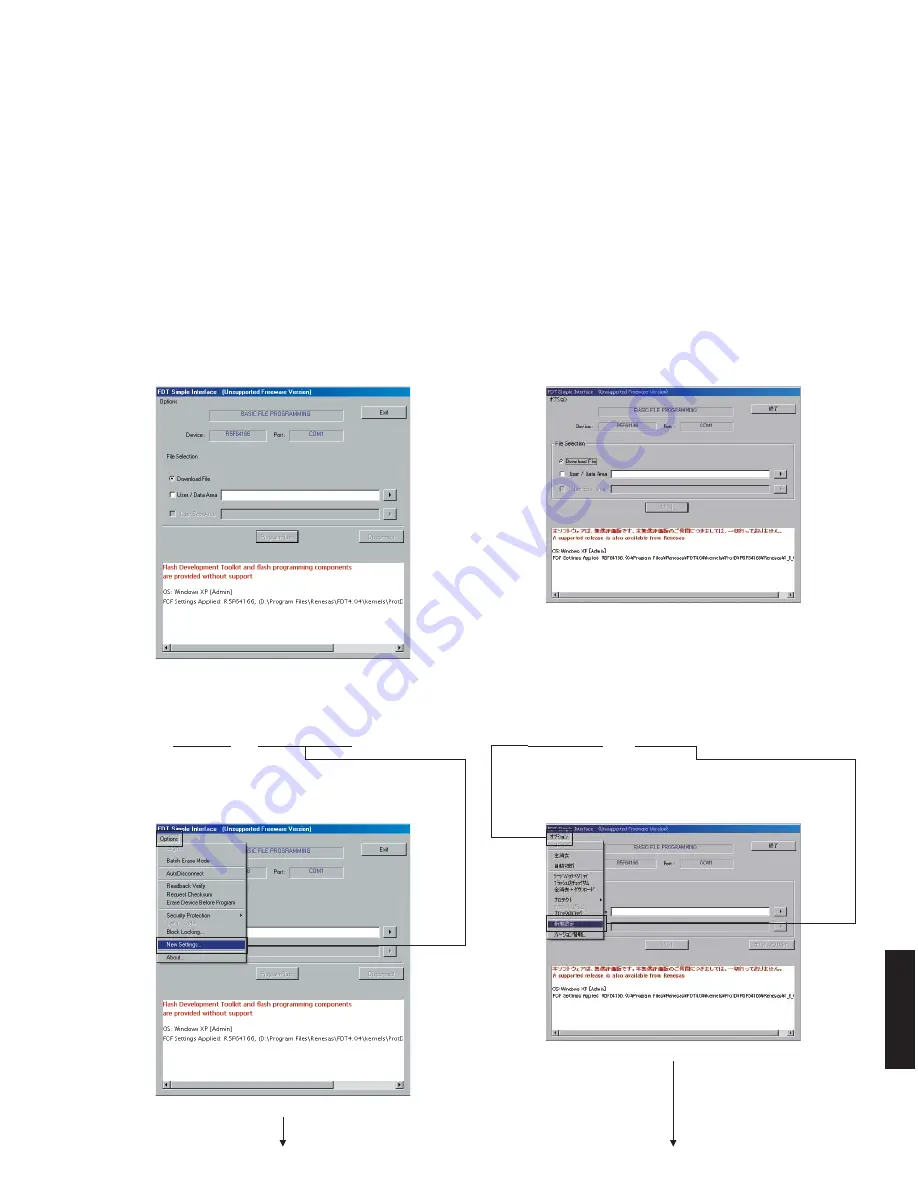
2. 下記の手順で Flash Development Toolkit 4.04 Basic.
exe を起動します。
[スタート]→[すべてのプログラム]→[Renesas]
→[Flash Development Toolkit 4.04]→[Flash
Development Toolkit 4.04 Basic]をクリックします。
下記の画面が表示されます。(Fig. 2)
※ Flash Development Toolkit 4.04 Basic.exe をパソコ
ンで初めて起動した場合、“デバイスとカーネルの
選択” 画面が表示されます。(Fig. 4)
3. [オプション]→[新規設定]をクリックし、Device、
Port を選択します。(Fig. 3)
“デバイスとカーネルの選択” 画面が表示されます。
(Fig. 4)
●
Operation
procedure
1. Connect the power cable of this unit to the AC outlet.
The power to this unit is supplied and the
microprocessor is in the writing mode.
2. Follow the procedure below to start up Flash
Development Toolkit 4.04 Basic.exe.
Click [start]
→
[All Programs]
→
[Renesas]
→
[Flash
Development Toolkit 4.04]
→
[Flash Development
Toolkit 4.04 Basic].
The screen appears as shown below. (Fig. 2)
*
When Flash Development Toolkit 4.04 Basic.exe
is started with the PC for the first time, the “Choose
Device And Kernel” screen appears. (Fig. 4)
3. Click
[Options]
→
[New Settings], and select the
Device and Port. (Fig. 3)
The “Choose Device And Kernel” screen appears.
(Fig. 4)
Fig. 2
Fig. 3
DRAFT
Summary of Contents for HTR-4063
Page 5: ...5 RX V467 HTR 4063 RX V467 HTR 4063 RX V467 T model RX V467 K model RX V467 A model DRAFT ...
Page 7: ...7 RX V467 HTR 4063 RX V467 HTR 4063 HTR 4063 R model HTR 4063 U model HTR 4063 C model DRAFT ...
Page 100: ...RX V467 HTR 4063 100 MEMO MEMO DRAFT ...
Page 133: ... ADVANCED SETUP RX V467 HTR 4063 134 DRAFT ...
Page 134: ...RX V467 HTR 4063 135 DRAFT ...
Page 135: ... 本機の設定を変更する RX V467 HTR 4063 136 DRAFT ...
Page 136: ...137 RX V467 HTR 4063 RX V467 HTR 4063 MEMO DRAFT ...
Page 137: ...RX V467 HTR 4063 DRAFT ...