background image

E

-8

MAINS

TV MODE

PAL
AUTO
NTSC

SUBWOOFER

OUT

VIDEO SIGNAL

OUT

IN

VCR

VIDEO

R

L

OUT

IN

AUX/MD

SPEAKERS

SEE OWNER'S MANUAL
FOR CONNECTION.

REAR

CENTER

REAR

R

L

CENTER : 6    MIN./SPEAKER
REAR :   12    MIN./SPEAKER

FRONT

R

L

6    MIN./SPEAKER

SPEAKERS

MONITOR

OUT

R

L

L

R

Preparations and connections

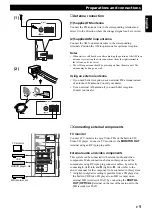
Connections

Never plug the AC supply lead of this system into the AC outlet until all connections are
completed.

On the main unit

Red: positive (+)
Black: negative (–)

Caution

Do not let the bare speaker wires touch each other as this could damage the amplifier and/or speakers.

When connecting a subwoofer (not included in this system)

You may wish to add a subwoofer to reinforce the bass frequencies.
When connecting a subwoofer to this system, connect the 

SUBWOOFER OUT

 terminal of this system to the INPUT

terminal of the subwoofer.
* Ordinary subwoofers, including the Yamaha Active Servo Processing Subwoofer System, are designed so that both the

amplifier and subwoofer are contained in the same unit.

* The 

SUBWOOFER OUT

 terminal outputs low frequencies from the left front, center and right front channels.

(The cut-off frequency of this terminal is 200 Hz.)

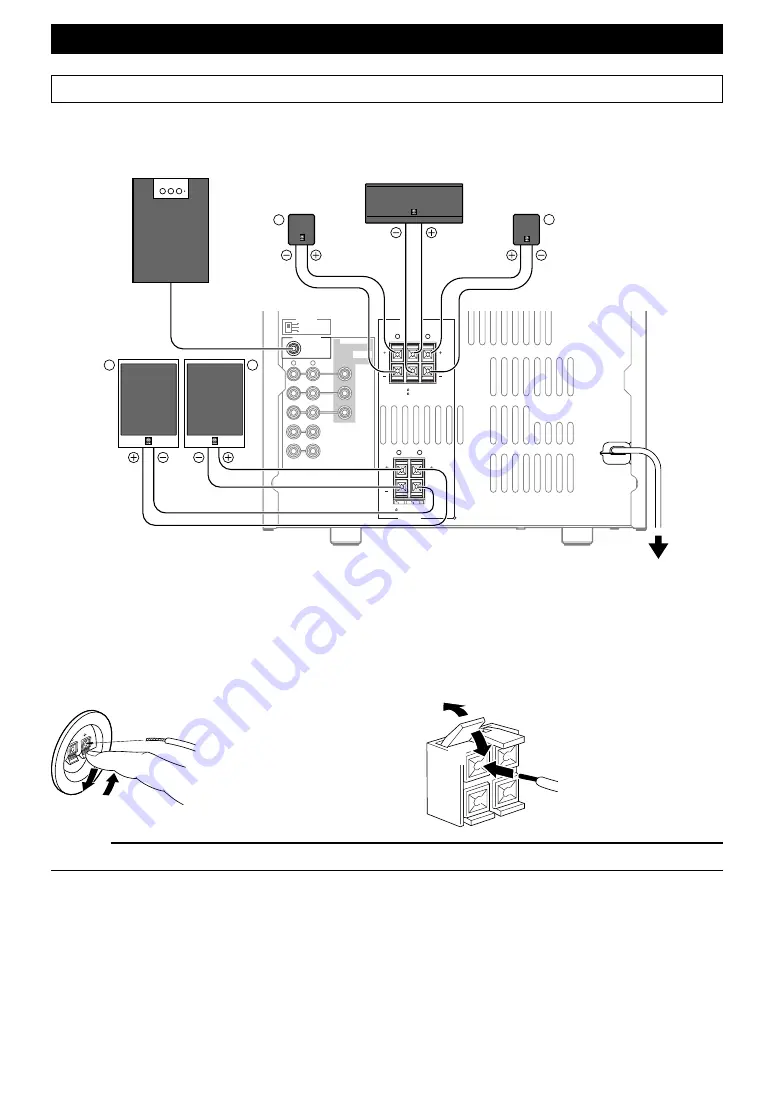
 Connecting speakers

Connect the speakers to the corresponding speaker terminals on the rear of the main unit by using the speaker cords. Make
sure that the polarity of the speaker cords is correct, that is the + and – markings are observed.  If these cords are reversed,
the sound will be unnatural and lack bass.

Subwoofer system
(not included in this system)

Rear speaker

Center speaker

Rear speaker

INPUT

Front speakers

To AC outlet

On the speakers

Red: positive (+)
Black: negative (–)

1

2

3

1

2

3

1

Press the tab.

2

Insert the bare wire.
[Remove approx. 5mm (1/
4”) insulation from the
speaker wires.]

3

Release the tab and secure
the wire.

1

Pull up the tab.

2

Insert the bare wire.
[Remove approx. 5mm (1/
4”) insulation from the
speaker wires.]

3

Press down the tab and
secure the wire.

Summary of Contents for GX-707RDS

Page 1: ...back Control 3 DISC VCD CHANGER STANDBY ON STANDBY TIMER PROGRAM B BOOST MUSIC INPUT PRESET TUNING BAND A B C D E VOLUME UP DOWN DIRECTION AUTO REVERSE CASSETTE DECK MINI COMPONENT SYSTEM GX 707VCD DOLBY B NR MIC MIXING 1 MIC 2 KARAOKE MIN MAX OPEN CLOSE DOLBY SURROUND P R O L O G I C ...

Page 2: ...de los altavoces Rear speakers Altavoces traseros Center speaker Altavoz central DISC3 OPEN CLOSE DISC CHANGE DISC2 DISC1 DIGITAL VIDEO VIDEO CD Version 2 0 Playback Control 3 DISC VCD CHANGER STANDBY ON STANDBY TIMER PROGRAM B BOOST MUSIC INPUT PRESET TUNING BAND A B C D E VOLUME UP DOWN DIRECTION AUTO REVERSE CASSETTE DECK MINI COMPONENT SYSTEM GX 707VCD DOLBY B NR MIC MIXING 1 MIC 2 KARAOKE MIN...

Page 3: ...cipal Precaución Cuando instale los altavoces alejados de la unidad principal asegúrese de dejar un espacio de por lo menos 20 cm encima detrás y a ambos lados de la unidad principal Si se coloca la unidad principal dentro de un mueble no debe cerrar la tapa delantera Los valores corresponden exclusivamente a los modelos para China y Singapur 1 cm 1 cm 20 cm 20 cm 20 cm 20 cm 20 cm 20 cm 20 cm 20 ...

Page 4: ...NDBY TIMER PROGRAM B BOOST MUSIC INPUT PRESET TUNING BAND A B C D E VOLUME UP DOWN DIRECTION AUTO REVERSE CASSETTE DECK DOLBY B NR MIC MIXING 1 MIC 2 KARAOKE MIN MAX OPEN CLOSE PHONES BASS TREBLE MODE DOLBY NR REC PAUSE AUTO MANUAL TIMER MEMORY TIME ADJ RANDOM HOUR REPEAT TIME DISPLAY MIN 1 3 4 5 6 7 8 9 0 A B F G H K 2 L M N Z a O P Q R C S I V J X W Y b c T D U E ...

Page 5: ...LUME p 33 G MUSIC p 34 H INPUT p 13 22 26 32 TUNER TAPE VCD CD AUX MD VCR VIDEO I HOUR p 10 40 J MIN p 10 40 K DISPLAY p 10 40 L MEMORY p 23 24 TIME ADJ p 10 M STANDBY ON p 13 N AUTO MANUAL p 22 TIMER p 40 O Disc tray Plato del disco p 13 P DISC 1 2 3 p 14 Q DISC CHANGE p 15 R OPEN CLOSE p 13 S p 15 20 T p 13 U p 13 V RANDOM p 18 W TIME p 18 X REPEAT p 17 Y Tray Bandeja p 26 Z MODE p 26 OPEN CLOSE...

Page 6: ... PAUSE TEST PROGRAM CENTER REAR DELAY KEY ECHO MUSIC SLEEP INPUT TAPE VOLUME 1 2 3 4 5 6 7 8 9 0 0 A B C D E POWER 1 1 2 2 3 3 4 4 5 5 6 6 7 7 8 8 9 0 PRESET TUNER I0 PRESET TIME A PROG B R TIME C EDIT D DISC SKIP INTRO MODE RETURN SELECT E KARAOKE TIME INDEX DIGEST TIME INDEX VCD CD DIRECTION LEVEL REC PAUSE TEST PROGRAM CENTER REAR DELAY KEY ECHO MUSIC SLEEP INPUT TAPE VOLUME X U W V U H G R T O...

Page 7: ...9 LEVEL p 39 8 POWER p 11 9 SLEEP p 41 0 PRESET p 24 A TUNER p 22 B PROGRAM p 36 C MUSIC p 34 D VOLUME p 33 E INPUT p 13 22 26 32 TUNER TAPE VCD CD AUX MD VCR VIDEO J DISC SKIP p 14 K p 15 20 L INTRO p 19 M TIME INDEX p 19 N DIGEST p 19 O RETURN p 20 P SELECT p 20 Q p 13 R EDIT p 30 31 S R TIME p 30 T p 13 Amplifier tuner Amplificador sintonizador CD Video CD player Tocadiscos de discos compactos ...

Page 8: ... display 18 To find the desired scene quickly for Video CDs 19 To get a quick overview of a track or a disc for Video CDs 19 Playback Control of Video CD version 2 0 for Video CDs 20 Tuning operation 21 Automatic tuning 22 Manual tuning 22 Automatic preset tuning 23 Manual preset tuning 24 Playing back a tape 25 General information 25 Basic operation 26 Winding the tape 27 Searching for the beginn...

Page 9: ...allow metallic items e g screwdrivers tools etc to come near the tape deck s record playback head assembly Doing so may not only scratch or damage the head s mirror smooth finish it may change the magnetic characteristics of the heads causing a deterioration in reproduction performance quality Although the tape deck s record playback heads are of high quality with outstanding reproduction characte...

Page 10: ...ION FOR CARRYING THE MAIN UNIT Be sure not to carry or tip the main unit with discs in it Voltage Selector China and General models only The voltage selector on the rear panel of the main unit must be set for your local main voltage BEFORE plugging into the AC main supply Voltages are 110 120 220 240 V AC 50 60 Hz WARNING To reduce the risk of fire or electric shock do not expose this system to ra...

Page 11: ...about handling discs Always handle the disc with care so that its surface is not scratched Discs are not subjected to wear during play but damage to the disc surface when the disc is being handled can adversely affect the disc s play Be sure to use a felt tip pen or similar writing tool when writing on the label side of the disc Do not use a ball point pen pencil or other hard tipped writing tool ...

Page 12: ...ol for the left and right main speakers in DOLBY PRO LOGIC mode CD Video CD Player 3 Disc Carousel Auto Changer for Video CDs and Compact Discs PLAYXCHANGE Disc changing while playing 20 Track Random Access Programming Repeat Play for Single Track Entire Disc All Discs Random Sequence Play Playback Control Function Available for Video CD version 2 0 Quick Overview of a Track and a Disc with a Touc...

Page 13: ...If you find that the remote control must be used closer to the main unit the batteries are weak Replace both batteries with new ones This system is designed for use with the NTSC and PAL television formats Set this switch to the position of the format your TV monitor employs PAL Set to this position if your TV monitor employs the PAL format AUTO Set to this position if your TV monitor can be switc...

Page 14: ...peakers Rear speakers Behind your listening position facing slightly inward About 1 8 m approx six feet from the floor Subwoofer The position of the subwoofer is not so not included in critical because low bass tones are not highly in this system directional However we recommend that you place the subwoofer anywhere in front of your listening position Mounting the center speaker Place the speaker ...

Page 15: ...wall If desired you can hang the speaker on the protruding screws on the wall without using the bracket Fasten screws into a firm wall or wall support as shown left and hang the holes of the speaker on the protruding screws Make sure that the screws are securely caught by a narrow part of the holes WARNING Each of the rear speakers weighs 0 8 kg 1 lbs 12 oz Do not mount them on thin plywood or sof...

Page 16: ...the Yamaha Active Servo Processing Subwoofer System are designed so that both the amplifier and subwoofer are contained in the same unit The SUBWOOFER OUT terminal outputs low frequencies from the left front center and right front channels The cut off frequency of this terminal is 200 Hz Connecting speakers Connect the speakers to the corresponding speaker terminals on the rear of the main unit by...

Page 17: ...hould be placed apart from the main unit The antenna may be hung on a wall Using an external antenna If you need better reception use an external FM antenna instead of an indoor FM antenna Consult your dealer Use an external AM antenna if you need better reception Consult your dealer Connecting external components TV monitor Connect a TV monitor to enjoy Video CDs on the built in CD Video CD playe...

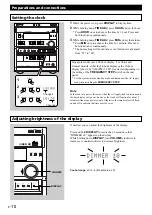
Page 18: ... any power supply Otherwise the time display will flash on and off to indicate that time must be reset Adjusting brightness of the display If desired you can adjust the brightness of the display Press and hold DISPLAY for more than 2 seconds so that DIMMER 0 appears on the display While holding down DISPLAY turn VOLUME clockwise to increase or counterclockwise to decrease brightness Control range ...

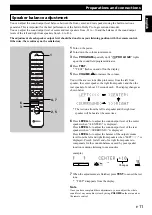
Page 19: ... seconds each The display changes as shown below The test tone from the left rear speaker and the right rear speaker will be heard at the same time 6 Press LEVEL to adjust the sound output level of the center speaker when CENTER is displayed Press LEVEL to adjust the sound output level of the rear speakers when SURROUND is displayed Press LEVEL to adjust the balance of the output volume level from...

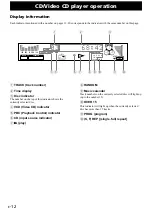
Page 20: ...sc 4 VCD Video CD indicator 5 PBC Playback Control indicator 6 CD input source indicator 7 play 8 RANDOM 9 Music calendar Track numbers on the currently selected disc will light up up to the number 15 0 OVER 15 This indicator will light up when the currently selected disc has more than 15 tracks A PROG program B S F REP single full repeat 100 350 1K 3 5K 10K MUSIC PROG S F REP VOLUME OVER 15 1 2 3...

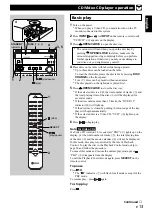
Page 21: ...isc is a Video CD VCD 4 lights up on the display 6 Press to begin play Note for Video CDs If a Video CD version 2 0 is selected PBC 5 lights up on the display yet the total number of tracks 1 the total playing time of the disc 2 and the music calendar 9 will not be displayed In this mode disc play is controlled by the rule of Playback Control To play the disc in the Playback Control mode skip to p...

Page 22: ...le to choose track 12 1 Press 10 2 Within a few seconds press 2 C For example to choose track 20 1 Press 10 2 Within a few seconds press 10 again 3 Within a few seconds press 0 Note If you select a track number higher than the number of tracks on the disc the last track of the disc may be played POWER 1 1 2 2 3 3 4 4 5 5 6 6 7 7 8 8 9 0 PRESET TUNER I0 PRESET TIME A PROG B R TIME C EDIT D DISC SKI...

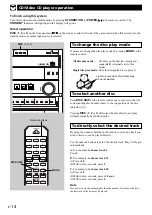
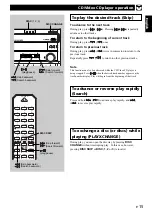
Page 23: ...sc tray by pressing DISC CHANGE without interrupting play In this case however pressing DISC SKIP or DISC 1 2 or 3 is invalid To advance or reverse play rapidly Search Press and hold to advance play rapidly and to reverse play rapidly CD Video CD player operation DISC3 OPEN CLOSE DISC CHANGE DISC2 DISC1 DIGITAL VIDEO VIDEO CD Version 2 0 Playback Control PROGRAM B BOOST MUSIC PRESET TUNING BAND A ...

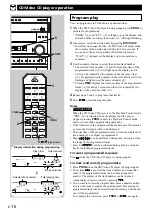
Page 24: ...cks will not be displayed if track number 16 or higher is programmed Skip can be performed during play but only within the range of the programmed tracks Search can be performed during play to search all tracks including unprogrammed tracks To cancel a programmed sequence Press while the CD Video CD player is being stopped To check and correct program data 1 Press PROG when the CD Video CD player ...

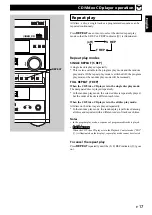
Page 25: ...selected disc is repeatedly played but the order of tracks is different each time When the CD Video CD player is in the all disc play mode All discs on the disc tray are played repeatedly In the random play mode the random play is performed among all discs and repeated with a different order of tracks each time Notes In the program play mode a sequence of programmed tracks is played repeatedly For...

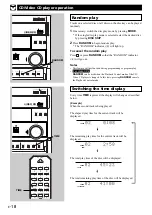
Page 26: ... is pressed the display will change as described below Example When the second track is being played The elapsed play time for the current track will be displayed The remaining play time for the current track will be displayed The total play time of the disc will be displayed The total remaining play time of the disc will be displayed CD Video CD player operation TRACK REM TRACK TOTAL TRACK TOTAL ...

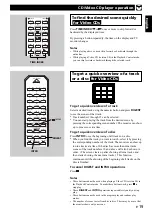
Page 27: ... by pressing the corresponding number of the track The monitor can show up to nine tracks at a time If the disc has more than nine tracks scenes of the track numbers 10 and above will also be shown in order The screen clears up after showing all nine tracks and then starts showing the next nine tracks This function continues until the showing of the beginning of all tracks on the disc is finished ...

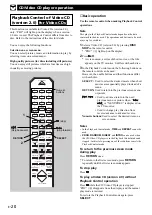
Page 28: ...LECT Used to select the desired movie when short movies are sequentially played instead of a menu RETURN Used to return to the previous screen menu or picture Used to advance return to the next previous menu or picture when or NEXT PREV is displayed on the TV monitor Used to change play direction from reverse advance to advance reverse Numeric buttons Used to select the desired item on a screen me...

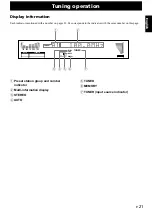
Page 29: ... 22 24 corresponds to the indicator with the same number on this page 1 Preset station group and number indicator 2 Multi information display 3 STEREO 4 AUTO 5 TUNED 6 MEMORY 7 TUNER input source indicator 100 350 1K 3 5K 10K MUSIC VOLUME PRESET STEREO AUTO TUNED MEMORY TUNER PROGRAM 7 6 5 4 3 1 2 ...

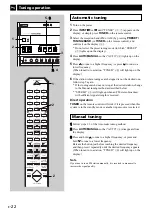
Page 30: ...trol will work if it is pressed when this system is in the standby mode or another input source is selected Manual tuning 1 1 Follow steps 1 3 of the Automatic tuning method 2 2 Press AUTO MANUAL so that AUTO 4 disappears from the display 3 3 Press and hold to tune to a higher frequency or press and hold to tune to a lower frequency Release the button just before reaching the desired frequency and...

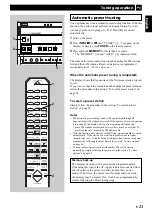
Page 31: ...ncies Since FM stations are searched for first there may be a case that 40 preset stations are occupied by FM stations only With this function only stations with sufficient signal strength are stored automatically If the station you want to program is weak in signal strength tune in to it with the Manual tuning method in monaural and program it by following the procedure in the section To store st...

Page 32: ...eric button 1 to 8 before MEMORY 6 goes out 7 Within about 5 seconds press MEMORY again To recall a preset station 1 1 Select a group of preset stations by pressing A B C D E 2 2 Select the desired preset station number by pressing or repeatedly or pressing a numeric button 1 to 8 Notes A new setting can be programmed in place of the former one As for the preset stations the setting of AUTO MANUAL...

Page 33: ... a pen or pencil Tapes have removable tabs which prevent accidental recording or erasing from taking place Removing the tab on the top left corner protects the side facing you from erasure Cover the tab holes with adhesive tape to erase or record again The tape deck features an automatic tape selector Just load the tape and the type of tape being used will be sensed automatically The tape deck can...

Page 34: ...Starts from side A Side B Side A Repeats 8 times Starts from side B Side A is not played the first time Reverse mode indicator 4 Tape direction indicator 3 Moves slowly in the current tape running direction during playback DIGITAL VIDEO VIDEO CD Version 2 0 Playback Control 3 DISC VCD CHANGER STANDBY ON STANDBY TIMER PROGRAM B BOOST MUSIC INPUT PRESET TUNING BAND A B C D E VOLUME UP DOWN DIRECTION...

Page 35: ...t work for tapes with Material with long pauses or quiet passages Low recording levels or excessive noise Pauses of less than 4 seconds between selections If searching is carried out near the beginning or the end of a selection the searching may not be done successfully Moves rapidly in the current tape running direction while winding Blinks on and off Moves rapidly in the current tape running dir...

Page 36: ...ly begins a few seconds before the disc play begins Displaying the tape counter During recording the information of the playing source is displayed in place of the tape counter 1 Press DISPLAY to change the display to the tape counter Pressing DISPLAY again will restore the previous display mode Basic recording 1 Turn on the power 2 Press INPUT or repeatedly to select the source you want to record...

Page 37: ... tape to the point where the recording started by simply pressing or Your singing karaoke can be recorded in the karaoke mode Refer to page 39 for details REC PAUSE DISC3 OPEN CLOSE DISC CHANGE DISC2 DISC1 DIGITAL VIDEO VIDEO CD Version 2 0 Playback Control 3 DISC VCD CHANGER STANDBY ON STANDBY TIMER PROGRAM B BOOST MUSIC INPUT PRESET TUNING BAND A B C D E VOLUME UP DOWN DIRECTION AUTO REVERSE CAS...

Page 38: ...ows the side currently selected 2 If the tape is not rewound to the end it will rewind to the end rapidly 3 The end part of the tape on which recording cannot be done is automatically wound 4 Both disc play and recording starts Recording is continuously carried out on both sides of the tape Note When the CD Video CD player is in the all disc play mode tracks on another disc are recorded continuous...

Page 39: ...step 9 The tape side indicator 9 shows the programming side currently selected 8 Repeat steps 4 and 5 to program selections for side B of the tape You can select the same track again 9 Press EDIT EDIT 8 lights up on the display The recording begins Note To check cancel or correct program data refer to page 16 To cancel the EDIT function Before recording press on the CD Video CD player or the tape ...

Page 40: ...or INPUT on the remote control 2 2 Play the source and then turn VOLUME up to confirm the input source 3 3 Begin recording on the tape deck VCR etc Note Your singing karaoke can be recorded in the karaoke mode Refer to page 39 for details A digital to digital recording is possible from a CD played on the built in CD Video CD player to an MD or tape on the MD recorder or DAT by connecting the DIGIT...

Page 41: ... bass frequencies when a subwoofer is not used BASS and TREBLE controls BASS Turn this knob clockwise to increase or counterclockwise to decrease the low frequency response TREBLE Turn this knob clockwise to increase or counterclockwise to decrease the high frequency response 3 VOLUME volume level meter 4 MUSIC preset equalizer mode indicator 5 PROGRAM sound field program indicator 100 350 1K 3 5K...

Page 42: ...hts up on the preset equalizer mode indicator MUSIC 4 Mode ROCK POPS JAZZ Feature High and low frequencies are emphasized This mode is suitable for reproducing dynamic and powerful sounds of rock music etc Vocals are emphasized and whole sound is clear This mode is suitable for pops High frequencies for piano sax etc are emphasized Medium frequencies for vocals are also moderately emphasized ROCK ...

Page 43: ...c and dynamic sound effects two main channels left and right a center channel for dialogue and a rear channel for special sound effects The rear channel reproduces sound within a narrow frequency range This program is used for simplified play of Dolby Surround encoded sources With this program sound effects are outputted from the front left and right speakers and no sound from the rear speakers YM...

Page 44: ...speaker output level DELAY TIME You can adjust the time difference between the beginning of the sound from the front speakers and the beginning of the effect sound from the rear speakers The larger the value the later the effect sound is generated This adjustment can be made individually for both PRO LOGIC and HALL Control range PRO LOGIC 15 20 25 30 milliseconds HALL 15 20 25 30 40 50 millisecond...

Page 45: ...vel value will be the same for both the PRO LOGIC and 3 STEREO programs REAR LEVEL Control range 10 to 21 1 1 Press CENTER REAR DELAY repeatedly until REAR appears on the display 2 2 By pressing LEVEL or continuously the level value also changes continuously Notes This adjustment can be made only when a sound field program PRO LOGIC or HALL is selected Adjustment can be made individually for both ...

Page 46: ...dly until no name is illuminated on the karaoke mode indicator Note The microphone s connected to the MIC jack s on the front panel of the main unit can be used only when a karaoke mode is selected For a karaoke source without vocals For a multi sound source For a normal music source Mode L R KARAOKE L L ONLY R R ONLY VOCAL CUT Feature Signals on the left channel and the right channel are outputte...

Page 47: ...al onto a tape You can record your vocal input from the microphone s along with the source sound onto a tape in the karaoke mode In addition the effects gained from adjusting MIC MIXING ECHO and KEY can also be recorded with the vocal and the source sound Recording sound will be monitored by the speakers To record them follow the basic recording procedures Notes The sound effects using the BASS an...

Page 48: ...the time when you want to finish the timer play in the same way as you did in step 3 If you do not set the time it will be automatically set so that the timer play finishes after 1 hour 2 Press TIMER to complete the timer play setting This system turns into the standby mode The STANDBY and TIMER indicators light up If you will continue using this system press STANDBY ON to turn on this system To c...

Page 49: ...anceled Using the built in timer Sleep timer operation This system will automatically be set to the standby mode when the selected sleep time passes 1 1 Play the desired sound source 2 2 Press SLEEP repeatedly until the desired sleep time appears on the display The display will change as described below The normal display mode will resume about 4 seconds after the selection is made SLEEP will ligh...

Page 50: ...mponent connected to the AUX MD or VCR terminals on the rear of the main unit is turned off There is an influence of magnet from the center speaker Interference from starting motor of nearby car Interference from thermostat of nearby electric appliance Antenna input is too weak due to obstructions or excessive distance from broadcasting station Insufficient antenna input Preset memory has been era...

Page 51: ...ng used Silent gaps between selections are too short Excessively soft passages in middle of selections Conversation etc is recorded There is an unrecordable part in the first few seconds of the tape Batteries are dead Remote control is too far away or tilted too much Direct sunlight or lighting of an inverter type fluorescent lamp etc is striking the remote control sensor of the main unit Remote c...

Page 52: ...erse stereo cassette deck Frequency Response 20 dB Type 1 Normal 50 to 15 000 Hz Type 2 High 50 to 16 000 Hz Wow and Flutter 0 09 W RMS Signal to Noise Ratio 58 dB Dolby NR OFF 66 dB Dolby B NR ON Harmonic Distortion 0 8 Speaker section Type Magnetic shielding type Front speaker 3 way bass reflex 13 cm 5 woofer 5 cm 2 tweeter 2 cm 3 4 super tweeter Center speaker 8 3 cm full range x 2 Rear speaker...

Page 53: ...34 25462 RELLINGEN BEI HAMBURG F R OF GERMANY YAMAHA ELECTRONIQUE FRANCE S A RUE AMBROISE CROIZAT BP70 CROISSY BEAUBOURG 77312 MARNE LA VALLEE CEDEX02 FRANCE YAMAHA ELECTRONICS UK LTD YAMAHA HOUSE 200 RICKMANSWORTH ROAD WATFORD HERTS WD1 7JS ENGLAND YAMAHA SCANDINAVIA A B J A WETTERGRENS GATA 1 BOX 30053 400 43 VÄSTRA FRÖLUNDA SWEDEN YAMAHA MUSIC AUSTRALIA PTY LTD 17 33 MARKET ST SOUTH MELBOURNE 3...

Reviews: