
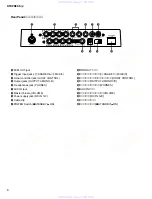

10
DTXPRESS
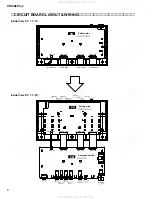
Fig. 3
(図3)
[180]: Bind Head Tapping Screw-B (Bタイト+BIND) 3.0X8 MFZN2W3 (WE774300)
[190]: Flat Washer (平座みがき丸) 3.0X8X0.5 MFZN2W3 (WF577000)
3.
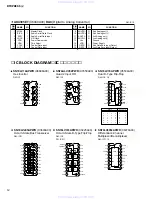
DM Circuit Board
(Time required: About 3 minutes)
3-1
Remove the front case. (See procedure 1)
3-2
Remove the bottom case. (See procedure 2)
3-3
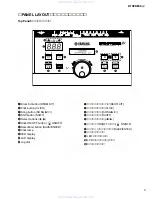
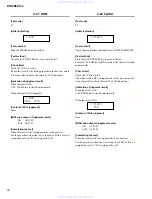
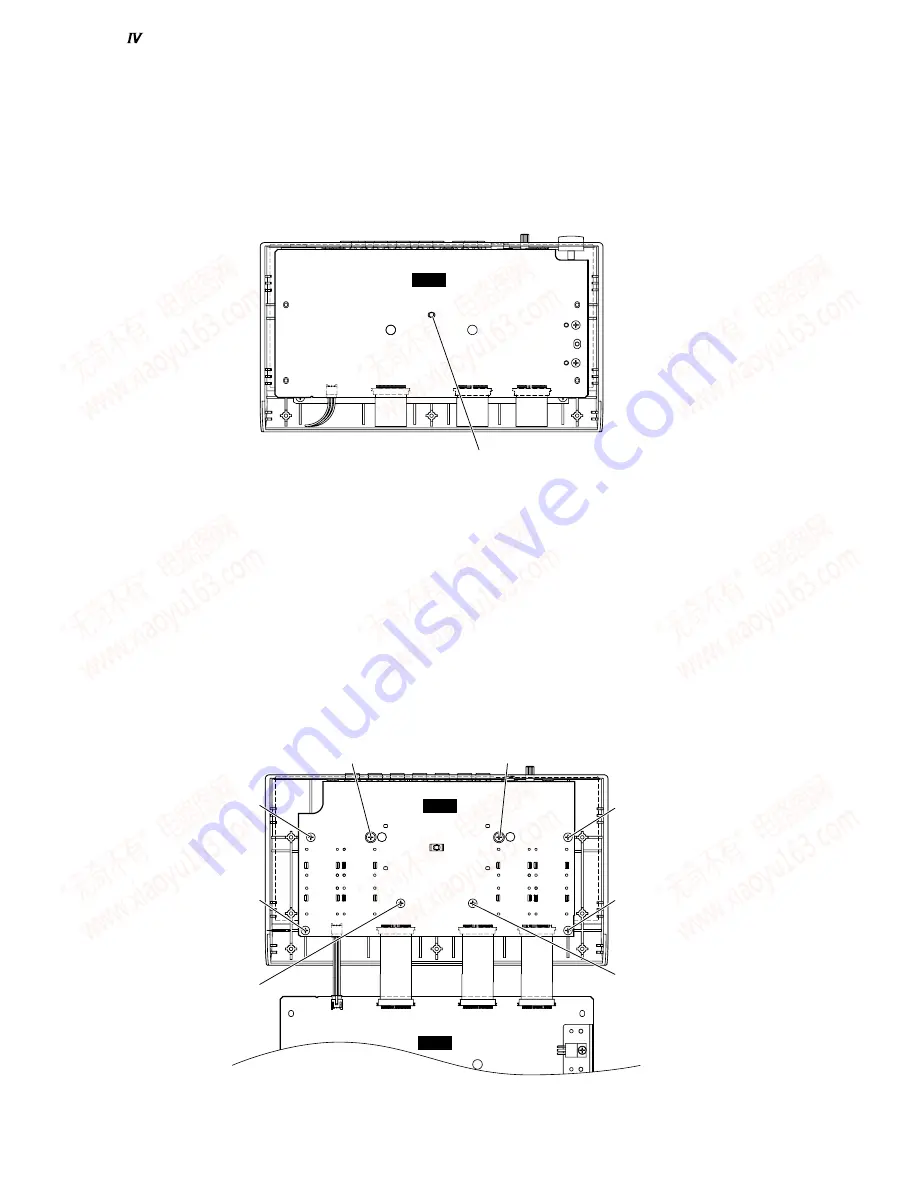
Remove the screw marked [160D]. (Fig. 2)
3-4
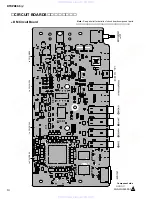
Remove the locking spacer. The DM circuit board can
then be removed. (Fig. 3)
3.
DMシート
(所要時間:約3分)
3-1
フロントケースを外します。
(1項参照)
3-2
ボトムケースを外します。
(2項参照)
3-3
[160D] のネジ1本を外します。
(図2)
3-4
ロッキングスペーサを外して、
DMシートを外しま
す。
(図3)
DM
Locking spacer
(ロッキングスペーサ)
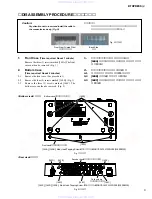
4.
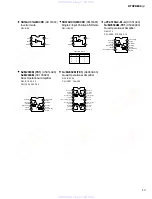
PN Circuit Board
(Time required: About 5 minutes)
4-1
Remove the front case. (See procedure 1)
4-2
Remove the bottom case. (See procedure 2)
4-3
Remove the DM circuit board. (See procedure 3)
4-4
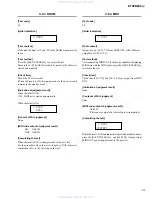
Remove the encoder knob. (Fig. 2)
4-5
Remove the two (2) screws marked [160E]. (Fig. 2)
4-6
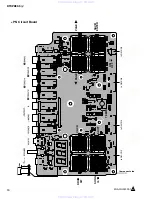
Remove the eight (8) screws marked [180] and the
two (2) flat washers marked [190]. The PN circuit
board can then be removed. (Fig. 4)
*
When mounting the PN circuit board, always start by
tightening screws (with washers)
q
,
w
in sequence.
(Fig. 4)
4.
PNシート
(所要時間:約5分)
4-1
フロントケースを外します。
(1項参照)
4-2
ボトムケースを外します。
(2項参照)
4-3
DMシートを外します。
(3項参照)
4-4
エンコーダツマミを外します。
(図2)
4-5
[160E] のネジ2本を外します。
(図2)
4-6
[180] のネジ8本と[190]の平座みがき丸2個を外し
て、
PNシートを外します。
(図4)
※
PNシートを取り付ける際、まず最初に
q
、
w
のネジ(ワッ
シャー含む)を順に締めます。
(図4)
Fig. 4
(図4)
DM
PN
CN3 22P
CN305 22P
CN6 22P
CN304 22P
CN4 22P
CN5 3P
CN303 22P
CN306 3P
[180]
[180], [190]
[180], [190]
[180]
[180]
[180]
1
2
www. xiaoyu163. com
QQ 376315150
9
9
2
8
9
4
2
9
8
TEL 13942296513
9
9
2
8
9
4
2
9
8
0
5
1
5
1
3
6
7
3
Q
Q
TEL 13942296513 QQ 376315150 892498299
TEL 13942296513 QQ 376315150 892498299