background image

E-

16

hg

hg

hg

hg

hg

hg

hg

hg

hg

hg

hg

hg

hg

hg

hg

hg

hg

hg

hg

hg

hg

hg

hg

hg

hg

hg

hg

hg

hg

hg

hg

hg

hg

hg

hg

hg

hg

hg

hg

hg

hg

hg

hg

hg

hg

hg

hg

hg

hg

hg

hg

hg

hg

hg

hg

hg

hg

Move Menu Window

Image

Black Level

Off

L

ML

MH

H

A

B

C

D

E

Memory 1

VIDEO

0

White Level

0

Gamma Trim

Hue

0

Saturation

100

Color Temp.

Sharpness Type

Sharpness Gain

Level Adjustment

Iris

Color Balance

16

Signal

Initial

Setup

6000K  +

–0.000uv

Standard

hg

Standard

Cinema

Location

Keystone

Remote Control Sensor

Remote Control ID

Lens Adjustment Lock

White Boost

Economy Mode

Menu Color

Message

Trigger Out

Baud Rate

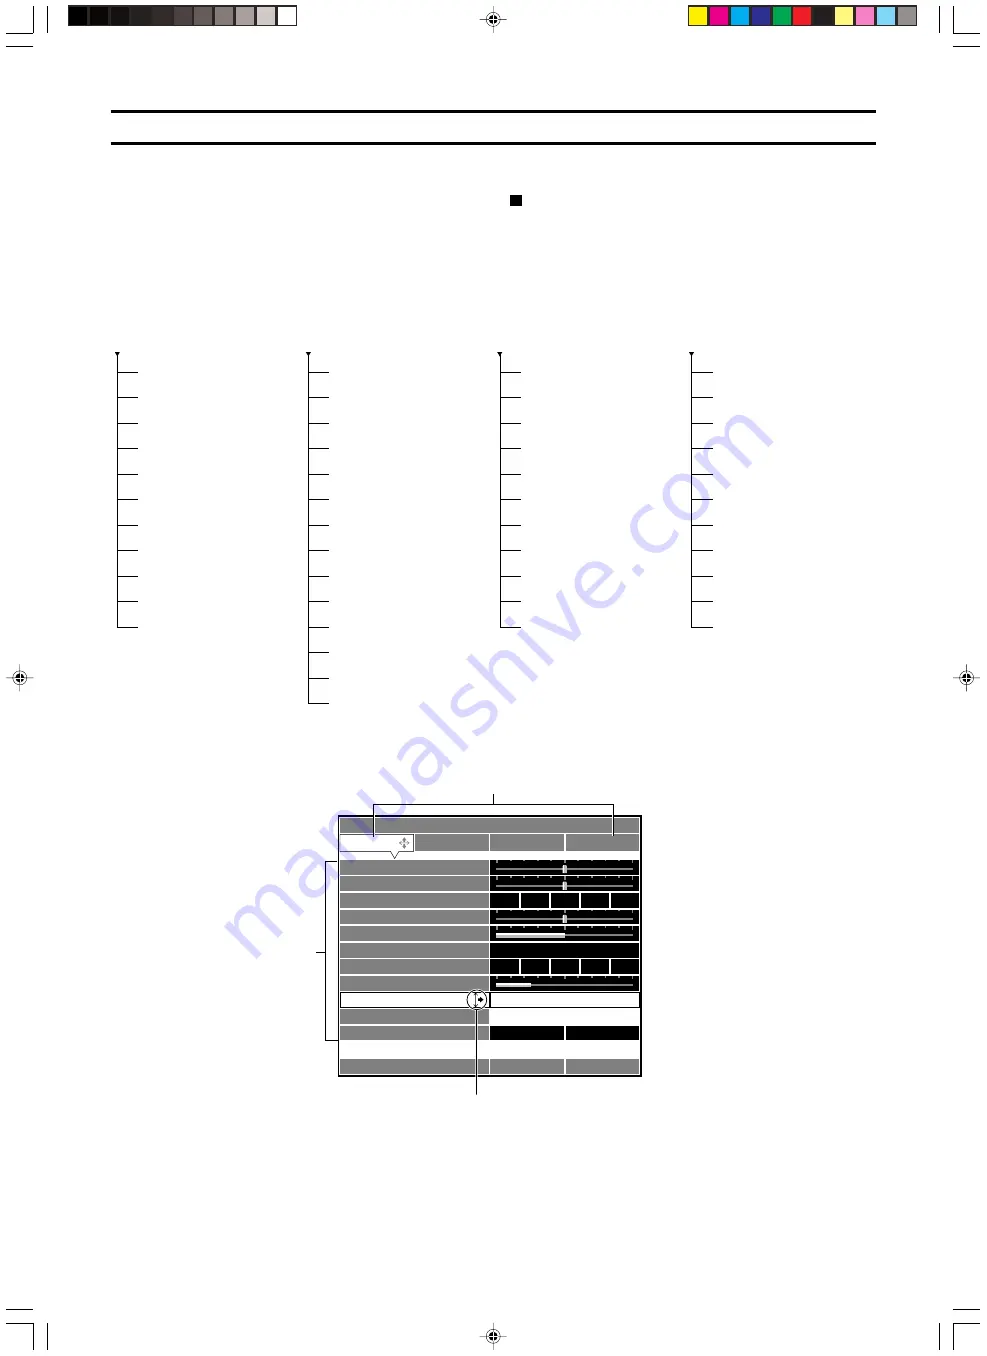
Menu structure

1

<IMAGE>

These menu items make adjustments
to the projection image. The menu
details will vary depending on the
input signal type.

2

<SIGNAL>

These menu items set parameters for
the various input signals. The menu
details will vary depending on the
input signal type.

3

<INITIAL>

These menu items set the initial
parameters for a number of menu
items.

4

<SETUP>

These menu items set parameters
related to installation method,
remote control and so on.

Black Level (Brightness)

White Level (Contrast)

Gamma Trim

Hue

Saturation

Color Temp.

Sharpness Type

Sharpness Gain

Color Balance

Level Adjustment

Iris

Display Aspect

3D Y/C  Separation

Noise Reduction

Video Type

Progressive Mode

Color Space Conversion

Setup Level (SDTV)

Setup Level (HDTV)

Signal Level

Sync Adjustment

Tracking

Horiz. Display Position

Vert. Display Position

Signal Status

Color System

INPUT A Signal

INPUT A Sync Type

INPUT B Signal

INPUT B Sync Type

DVI Signal

Auto Power Off

Auto Input Search

Display Language

Lamp Running Time

Reset

Menu Start Screen

Menu Item

Menu Group

Items with a submenu

It is necessary to set various properties on a variety of menus so that this unit can project in optimal condition. There are four menu groups,
each with a number of different menu items. Some of these items are not selectable for certain types of input signal, some have submenus
attached, and others have a three stage menu hierarchy. (Displayed with a 

S

 overleaf.)

Each menu group consists of the items below. Follow the procedures outlined to adjust the parameters in each menu to suit your viewing
requirements.

105_DPX-1000(E)16-21

03.2.19, 12:08 PM

16

Summary of Contents for DPX-1000

Page 1: ...DPX 1000 Digital Cinema Projector UCAK OWNER S MANUAL 000_DPX 1000 U H14 03 2 19 1 38 PM 3...

Page 2: ...wer cord from being walked on or pinched particularly at plugs convenience receptacles and the point where they exit from the apparatus 11Only use attachments accessories specified by the manufacturer...

Page 3: ...circuits or install AC line filter s In the case of radio or TV interference relocate reorient the antenna If the antenna lead in is 300 ohm ribbon lead change the lead in to coaxial type cable If the...

Page 4: ...own It may overheat possibly causing damage Take care of this unit so that no foreign objects and or liquid drop inside this unit To prevent damage by lightning disconnect the power cord from the wall...

Page 5: ...xhaust overheating the unit 3 Places where it gets dusty If the filter is blocked with dust the temperature of this unit may become too high 4 Places with too much vibration or impact Vibration and im...

Page 6: ...wired remote control 5 INSTALLATION Installation Installation methods 6 Screen and projection distance 7 Projection image position 8 Keystone 8 CONNECTIONS Connecting the unit Connecting A V componen...

Page 7: ...RN ESCAPE MENU INPUT DIGITAL CINEMA PROJECTOR DPX 1000 ASPECT 1 2 3 4 5 6 7 8 9 0 q w e r Front remote control sensor STANDBY ON indicator Ventilation Exhaust vent Lens cover Lens Adjuster Use this to...

Page 8: ...acks 3 G Y G or luminance signal 4 B PB CB B or color difference signal 5 R PR CR R or color difference signal 6 HD SYNC horizontal sync signal composite sync signal 7 VD vertical sync signal 8 S VIDE...

Page 9: ...Y DVI p o i u y t r e 1 2 3 4 5 6 7 8 9 0 q w R E S E T 5 6 1 2 3 V ID E O B D 4 S V ID E O A D V I S T IL L ASPECT ESCAPE H ID E IN P U T MENU I R I S PATT V POS ZOOM FOCUS AUTO 4 ID 2 ID 1 a s 0 INP...

Page 10: ...se of them immediately taking care not to touch the battery fluid If the battery fluid comes into contact with your eyes mouth or skin rinse it off with water immediately and consult a doctor Clean th...

Page 11: ...available which can be used to mount the unit on the ceiling Consult your dealer for details on their use and have installation done by either your dealer or a reputable contractor The image on the s...

Page 12: ...rd 4 3 image completely fills the screen Screen size 60 80 100 120 200 Wide Tele m feet inches 1 65 m 2 64 m 5 5 8 8 2 2 m 3 52 m 7 2 11 7 2 75 m 4 4 m 9 14 5 3 3 m 5 28 m 10 10 17 4 5 5 m 8 8 m 18 28...

Page 13: ...image above the centerline of the lens See page 12 Adjusting using the adjusters When this unit is mounted on a tabletop the position of the image can be adjusted by using the adjusters located on th...

Page 14: ...oise or other problems Connecting A V components As shown in the illustration below there are 6 types of connections provided on this unit for connection to A V components Follow the instructions on t...

Page 15: ...or the connector when making connections Connecting the unit Note Refer to see 2 SIGNAL in the menu described on page 19 for detailed settings for the type of image signal input DVI cable Digital D Su...

Page 16: ...age to confirm that you wish to turn the unit off Press the STANDBY ON button once more to confirm that you wish to do so The lamp will switch to a half lit state and the fan continues for roughly 2 m...

Page 17: ...tern for adjustment 2 Press the FOCUS button on the remote control or the SETTING button on the main unit repeatedly to place the unit in focus adjustment mode 3 Adjust the unit to an optimal focus se...

Page 18: ...the D sub 15 pin connector on INPUT B RGB PC RGB signals input from a computer to the D sub 15 pin connector on INPUT B RGB TV RGB signals input from a component to the D sub 15 pin connector on INPU...

Page 19: ...left and right edges of a 4 3 image without altering the center to project a 16 9 image which fills the screen 5 Zoom This mode projects images received in a letterbox format in a 16 9 format that com...

Page 20: ...ng orange Lamp cooling prior to going into Standby mode Blinking red or red One of the LAMP COVER TEMP FAN and orange lights is also red Consult a YAMAHA dealer or service center if this occurs 2 LAMP...

Page 21: ...installation method remote control and so on Black Level Brightness White Level Contrast Gamma Trim Hue Saturation Color Temp Sharpness Type Sharpness Gain Color Balance Level Adjustment Iris Display...

Page 22: ...the contents to be viewed HUE Adjusts the hue of the image Reducing this setting increases the amount of red in the image Increasing it will add blue to the image SATURATION Adjusts color depth Reduc...

Page 23: ...temperature settings From the RGB submenu press the RESET key on the remote control to automatically adjust the RGB setting and based on the color gain and temperature you have just set For RGBYCM you...

Page 24: ...NOISE REDUCTION Uses digital processing to eliminate noise in the luminance and color signals in sources with a comparatively large amount of noise producing a more vivid image Use where warranted by...

Page 25: ...UTO POWER OFF Setting the power saving mode to ON will cause the unit to automatically turn off the lamp and place itself in the standby mode if no signal is received through the inputs on the main un...

Page 26: ...t receive signals from the remote control You can operate the main unit with a wired remote regardless of how this parameter is set REMOTE CONTROL ID S The main unit can receive commands from the remo...

Page 27: ...ber Input signal Submenu parameter Submenu mark Parameter 1 MENU button Opens or closes the menu 2 Cursor buttons for side to side movements Select a menu group Open and close submenus Select or chang...

Page 28: ...andard Cinema hg hg hg hg hg hg hg hg hg hg hg hg hg hg hg hg hg hg hg hg hg hg hg hg hg hg hg hg hg hg hg hg hg hg hg hg hg hg hg hg hg hg hg hg hg hg hg hg hg hg hg hg hg hg hg hg hg hg hg Memory 1...

Page 29: ...d parameter using the h or g buttons and then use the or buttons to change the parameters It is not necessary to confirm the new setting Operation group D Press the or button to open the submenu This...

Page 30: ...ze Move Menu Window Image Display Aspect Initial Setup Auto Signal Smart Zoom Zoom Subtitle Zoom Through Through Squeeze Menu operation Basic submenu operation Operation groups A and B 1 Select the me...

Page 31: ...age Memory 1 VIDEO Enter Signal Initial Setup Color Balance Standard RGB RGBYCM Move Menu Window Image Memory 1 VIDEO ESCAPE Return Signal Initial Setup R Color Coordinate R Gain 0 96 x 0 640 y 0 330...

Page 32: ...Yes Memory 1 VIDEO Fix Setup Move Menu Window Image Signal Initial Lamp Running Time 0 Hour Press to reset lamp running time hg hg hg hg hg hg hg hg hg hg hg hg hg hg hg hg hg hg hg hg hg hg hg hg hg...

Page 33: ...items appear one by one at the bottom of the screen The display will disappear if no operation is performed within five seconds 2 Press h or g to select a menu item to adjust 3 Press or to select the...

Page 34: ...number of the desired memory setting number 5 Press ESCAPE to close the submenu 4 5 6 1 2 3 MEMORY MENU IMAGE BLACK LEVEL BRIGHTNESS WHITE LEVEL CONTRAST GAMMA TRIM SATURATION HUE COLOR TEMP SHARPNES...

Page 35: ...operation RESET on page 27 to select CURRENT MEMORY on the submenu Press the or buttons to open the confirmation message screen Press the button to reset the selected memory area to its factory defau...

Page 36: ...HDTV Additional information D connector This connector is designed for the Japanese D format only It is used for sending and receiving the image signal between the latest type of A V components This...

Page 37: ...ck bar to the top and bottom of the screen however this sacrifices vertical resolution to some extent Squeeze This method compresses a film image horizontally to an aspect ratio of 4 3 when recording...

Page 38: ...59 940 50 000 50 000 59 940 60 000 50 000 59 940 f V Hz 59 940 72 809 75 000 85 008 56 250 60 317 72 188 75 000 85 061 60 004 66 666 Type of signal VGA 60Hz VGA 72Hz VGA 75Hz VGA 85Hz SVGA 56Hz SVGA 6...

Page 39: ...le to decode the PC signal currently being input The unit is not able to decode the video signal currently being input The unit is setting itself to the most appropriate configuration for the RGB sign...

Page 40: ...unit Clean the filter approximately once every 200 hours Remove the power cable from the power outlet and remove dust from the filter with a vacuum cleaner Be sure to vacuum the filter with the unit o...

Page 41: ...details on replacement lamp cartridges Important Before starting to replace the lamp cartridge turn off the power disconnect the power cable after the fan has com pletely stopped and wait at least on...

Page 42: ...etting menu Tightly attach the filter cover Tightly attach the lamp cover Replace the lamp with a new one Replace the lamp with a new one Check that the ventilation slots are not covered Contact the s...

Page 43: ...h sync 1Vp p 75 negative sync 480i 576i 480p 576p G with sync 1Vp p 75 3 values sync 1035i 1080i 720p G 0 7Vp p 75 when using HD VD or SYNC B R 0 7Vp p 75 HD VD 1 to 5 Vp p 2 2 k positive and negative...

Page 44: ...INPUT B RGB YP B P R YC B C R D4 VIDEO G Y B P B C B R P R C R INPUT A HD SYNC VD OUT IN REMOTE RS 232C S VIDEO VIDEO TRIGGER OUT 465 4 18 5 16 124 6 4 7 8 119 1 4 3 5 124 4 7 8 297 4 11 3 4 132 1 5 3...

Page 45: ...F GERMANY YAMAHA ELECTRONIQUE FRANCE S A RUE AMBROISE CROIZAT BP70 CROISSY BEAUBOURG 77312 MARNE LA VALLEE CEDEX02 FRANCE YAMAHA ELECTRONICS UK LTD YAMAHA HOUSE 200 RICKMANSWORTH ROAD WATFORD HERTS WD...

Reviews: