background image

IMPORTANT SAFETY INSTRUCTIONS

INFORMATION RELATING TO PERSONAL INJURY, ELECTRICAL SHOCK,

AND FIRE HAZARD POSSIBILITIES HAS BEEN INCLUDED IN THIS LIST.

WARNING

- When using any electrical or electronic product, 

basic precautions should always be followed. These precautions 
include, but are not limited to, the following:

1.

Read all Safety Instructions, Installation Instructions, Spe-

cial Message Section items, and any Assembly Instructions 
found in this manual BEFORE making any connections, includ-
ing connection to the main supply.

2.

Main Power Supply Verification: Yamaha products are 

manufactured specifically for the supply voltage in the area 
where they are to be sold. If you should move, or if any doubt 
exists about the supply voltage in your area, please contact your 
dealer for supply voltage verification and (if applicable) instruc-
tions. The required supply voltage is printed on the name plate. 
For name plate location, please refer to the graphic found in the 
Special Message Section of this manual.

3.

This product may be equipped with a polarized plug (one 

blade wider than the other). If you are unable to insert the plug 
into the outlet, turn the plug over and try again. If the problem 
persists, contact an electrician to have the obsolete outlet 
replaced. Do NOT defeat the safety purpose of the plug. 

4.

Some electronic products utilize external power supplies 

or adapters. Do NOT connect this type of product to any power 
supply or adapter other than one described in the owners manual, 
on the name plate, or specifically recommended by Yamaha.

5.

WARNING: 

Do not place this product or any other 

objects on the power cord or place it in a position where anyone 
could walk on, trip over, or roll anything over power or connect-
ing cords of any kind. The use of an extension cord is not recom-
mended! If you must use an extension cord, the minimum wire 
size for a 25’ cord (or less) is 18 AWG. NOTE: The smaller the 
AWG number, the larger the current handling capacity. For 
longer extension cords, consult a local electrician.

6.

Ventilation: Electronic products, unless specifically 

designed for enclosed installations, should be placed in locations 
that do not interfere with proper ventilation. If instructions for 
enclosed installations are not provided, it must be assumed that 
unobstructed ventilation is required.

7.

Temperature considerations: Electronic products should 

be installed in locations that do not significantly contribute to 
their operating temperature. Placement of this product close to 
heat sources such as; radiators, heat registers and other devices 
that produce heat should be avoided.

8.

This product was NOT designed for use in wet/damp loca-

tions and should not be used near water or exposed to rain. 
Examples of wet/damp locations are; near a swimming pool, 
spa, tub, sink, or wet basement.

9.

This product should be used only with the components 

supplied or; a cart, rack, or stand that is recommended by the 
manufacturer. If a cart, rack, or stand is used, please observe all 
safety markings and instructions that accompany the accessory 
product.

10.

The power supply cord (plug) should be disconnected 

from the outlet when electronic products are to be left unused for 
extended periods of time. Cords should also be disconnected 
when there is a high probability of lightning and/or electrical 
storm activity.

11.

Care should be taken that objects do not fall and liquids are 

not spilled into the enclosure through any openings that may exist.

12.

Electrical/electronic products should be serviced by a 

qualified service person when:

a.  The power supply cord has been damaged; or
b.  Objects have fallen, been inserted, or liquids have been 

spilled into the enclosure through openings; or

c.  The product has been exposed to rain: or
d.  The product dose not operate, exhibits a marked change 

in performance; or

e.  The product has been dropped, or the enclosure of the 

product has been damaged.

13.

Do not attempt to service this product beyond that 

described in the user-maintenance instructions. All other servic-
ing should be referred to qualified service personnel.

14.

This product, either alone or in combination with an 

amplifier and headphones or speaker/s, may be capable of pro-
ducing sound levels that could cause permanent hearing loss. 
DO NOT operate for a long period of time at a high volume level 
or at a level that is uncomfortable. If you experience any hearing 
loss or ringing in the ears, you should consult an audiologist. 
IMPORTANT: The louder the sound, the shorter the time period 
before damage occurs.

15.

Some Yamaha products may have benches and/or accessory 

mounting fixtures that are either supplied as a part of the product 
or as optional accessories. Some of these items are designed to be 
dealer assembled or installed. Please make sure that benches are 
stable and any optional fixtures (where applicable) are well 
secured BEFORE using. Benches supplied by Yamaha are 
designed for seating only. No other uses are recommended.

PLEASE KEEP THIS MANUAL

92-469-2

Summary of Contents for Clavinova CLP-110

Page 1: ...ist das Instrument mit einem Spannungsw hler an der Unterseite neben der Netzkabeldurchf hrung ausgestattet Falls vorhanden mu der Spannungsw hler auf die rtliche Netzspannung eingestellt werden Der...

Page 2: ...environmentally friendly We sincerely believe that our products and the production methods used to produce them meet these goals In keeping with both the letter and the spirit of the law we want you...

Page 3: ...omputer Inc Windows ist ein eingetragenes Warenzeichen der Microsoft Corporation Alle weiteren Warenzeichen sind Eigentum der jeweiligen Inhaber URHEBERRECHTLICHE HINWEISE Dieses Produkt enth lt und b...

Page 4: ...wenden des Haltepedals 17 Klangvariationen Reverb Nachhall 18 Kombinieren von zwei Voices Dual Modus 19 Transponierung 20 Feinabstimmen der Tonh he 20 Verwenden des Metronoms 21 Informationen zu MIDI...

Page 5: ...mt Transponierung auf Seite 20 Feinabstimmung der Tonh he des ganzen Instruments beim Spielen auf dem Clavinova mit anderen Instrumenten oder zu Musik von CD Feinabstimmen der Tonh he auf Seite 20 nde...

Page 6: ...pl tzlichen Tonausfall kommt oder wenn es einen ungew hnlichen Geruch oder Rauch erzeugen sollte schalten Sie den Netzschalter sofort aus ziehen Sie den Netzstecker aus der Netzsteckdose und lassen S...

Page 7: ...ferner keine Vinyl Kunststoff oder Gummigegenst nde auf das Instrument da sich hierdurch das Bedienfeld oder die Tastatur verf rben k nnten Lehnen oder setzen Sie sich nicht auf das Instrument legen...

Page 8: ...cher Stellen Sie keine Gegenst nde aus Vinyl Kunststoff oder Gummi auf dem Instrument ab Andernfalls k nnen Bedienfeld oder Tasten verf rbt oder besch digt werden VORSICHT Lesen Sie vor der Verwendung...

Page 9: ...Klang eines echten akustischen Klaviers um vieles n her MASTER VOLUME DEMO METRONOME VOICE MIN MAX MIDI DAMPER PEDAL IN OUT THRU MASTER VOLUME DEMO METRONOME VOICE MIN MAX POWER PHONES MIDI IN OUT THR...

Page 10: ...infallen und u U ist es anschlie end schwer oder fast unm glich sie wieder herauszuholen M gliche Folgen sind ein elektrischer Schlag ein Kurzschlu Feuer oder ernsthafte Sch den am Instrument Notenabl...

Page 11: ...ste POWER erneut Die Spannungsanzeige erlischt Einstellen der Lautst rke Wenn Sie auf dem Instrument spielen oder Songs wiedergeben k nnen Sie mit dem Regler MASTER VOLUME die gew nschte Lautst rke ei...

Page 12: ...e en Verwenden der Aufh ngevorrichtung f r Kopfh rer Zum Lieferumfang des CLP 110 geh rt eine Vorrichtung mit deren Hilfe Sie einen Kopfh rer am Clavinova aufh ngen k nnen Bringen Sie die H ngevorrich...

Page 13: ...abstimmen der Tonh he 20 Verwenden des Metronoms 21 Informationen zu MIDI 23 Anschlie en eines Computers 24 MIDI Funktionen 26 Auswahl des MIDI Sende Empfangskanals 26 Local Control ON OFF Lokalsteuer...

Page 14: ...E VOICE MIN MAX C0 D0 E0 F0 G0 A0 B0 C1 D1 E1 F1 G1 A1 B1 C2 D2 E2 F2 G2 A2 B2 C3 D3 E3 F3 G3 A3 B3 C4 D4 E4 F4 G4 A4 B4 C5 D5 E5 F5 G5 A5 B5 C6 D6 E6 F6 G6 A6 B6 C7 B 1 A 1 8 1 9 2 6 7 3 4 5 1 POWER...

Page 15: ...drei unten genannten St cke handelt es sich bei den Demo Songs um Neukompositionen 2002 Yamaha Corporation Die Tastenzuordnungen der Voices finden Sie in der Voice Liste auf Seite 17 Die nachfolgend...

Page 16: ...w hrend der Wiedergabe oder fortlaufenden Wiedergabe anzuhalten dr cken Sie die Taste DEMO Um weitere Songs abzuspielen folgen Sie den Anweisungen der Vorgehensweise 2 siehe oben Vorgehensweise TERMI...

Page 17: ...no 1 Ein durch FM Synthese erzeugter Sound eines E Pianos Gut geeignet f r Popmusik D 1 E Piano 2 Der Klang eines E Pianos mit Metallzungen und mit Hartgummi belegten H mmern Weicher Klang bei weichem...

Page 18: ...Reverb Typ Beschreibung C2 Room Mit dieser Einstellung wird dem Sound ein st ndiger Halleffekt hinzugef gt der dem akustischen Nachhall in einem Raum hnelt C 2 Hall1 Saal 1 Um den Halleffekt zu intens...

Page 19: ...n Sie die Taste VOICE gedr ckt und dr cken Sie eine der Tasten C5 F5 Einstellen der Balance Sie k nnen eine Voice als Haupt Voice und eine zweite Voice als leisere hinzugemischte Voice festlegen Halte...

Page 20: ...choben wird Feinabstimmen der Tonh he Sie k nnen eine Feinabstimmung der Tonh he des gesamten Instruments vornehmen Diese Funktion ist n tzlich wenn Sie das Clavinova zusammen mit anderen Instrumenten...

Page 21: ...n Schritten von 1 zu erh hen halten Sie die Taste METRONOME gedr ckt und dr cken Sie die Taste C 5 Um den Tempo Wert in Schritten von 1 zu verringern halten Sie die Taste METRONOME gedr ckt und dr cke...

Page 22: ...onoms einstellen Halten Sie die Taste METRONOME gedr ckt und dr cken Sie eine der Tasten C1 G2 um die Lautst rke festzulegen 2 Halten Sie das Metronom an Schalten Sie das Metronom aus indem Sie die Ta...

Page 23: ...en MIDI OUT Sendet MIDI Daten MIDI THRU Leitet MIDI Daten die am Anschlu MIDI IN empfangen wurden in unver nderter Form weiter MIDI Kabel Besorgen Sie sich spezielle MIDI Kabel TIP MIDI Spieldaten und...

Page 24: ...t wiedergegeben Das Handbuch The Clavinova Computer Connection ist eine Zusatzanleitung die sich an Anf nger richtet und beschreibt wie Sie das Clavinova mit einem PC einsetzen k nnen und wie ein Clav...

Page 25: ...face z B UX256 UX96 oder UX16 an Installieren Sie den mit dem USB Interface gelieferten Treiber auf dem Computer und schlie en Sie das USB Interface mit Hilfe eines seriellen Kabels oder von MIDI Kabe...

Page 26: ...iert der interne Klangerzeuger auf MIDI Informationen die ber die Buchse MIDI IN empfangen werden Halten Sie die Tasten A 1 und C 0 gedr ckt und dr cken Sie die Taste C6 HINWEIS Daten von Demo Songs u...

Page 27: ...e ON OFF Controller nderungen ein aus Normalerweise reagiert das CLP 110 auf MIDI Controller Daten die es von einem externen MIDI Ger t oder einer externen Tastatur empf ngt Dadurch wirken sich die vo...

Page 28: ...zeugt St rger usche Die St rger usche werden m glicherweise durch Interferenzen mit einem in der N he des Clavinovas verwendeten Mobiltelefon verursacht Schalten Sie das Mobiltelefon aus oder verwende...

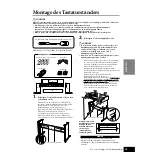
Page 29: ...schen der Hauptbaugruppe und der Vorderwand oder den Seitenteilen die Finger einklemmen Seien Sie besonders vorsichtig und lassen Sie die Hauptbaugruppe nicht fallen Halten Sie die Tastatur ausschlie...

Page 30: ...inova an Schlie en Sie das Pedalkabel an die DAMPER PEDAL Buchse an der Unterseite des Clavinovas an Befestigen Sie die zwei Kabelhalter am Clavinova s Abb und stecken Sie das Kabel in die Halter berp...

Page 31: ...K Kombinieren von zwei Voices Dual Modus 19 M MASTER VOLUME Lautst rke 11 14 METRONOME 14 21 MIDI 23 MIDI IN OUT THRU 14 MIDI Implementation Chart 38 MIDI Anschl sse 23 25 MIDI Datenformat 34 MIDI Kab...

Page 32: ...DEUTSCH 32 MEMO...

Page 33: ...de r f rence En esta secci n se incluye material de referencia MIDI Data Format MIDI Datenformat Format des donn es MIDI Formato de datos MIDI 34 MIDI Implementation Chart MIDI Implementierung stabel...

Page 34: ...Sostenuto 00H 3FH off 40H 7FH on 6 Soft Pedal reception only ccH Parameter Data Range vvH 43H Soft Pedal 00H 3FH off 40H 7FH on 7 Effect1 Depth Reverb Send Level ccH Parameter Data Range vvH 5BH Effe...

Page 35: ...received X don t care 04H Sub ID 1 Device Control Message 01H Sub ID 2 Master Volume llH Volume LSB mmH Volume MSB F7H End of Exclusive 2 Universal Non Realtime Message GM On General MIDI Mode On Dat...

Page 36: ...ulk block Only the top address of the block 00H 00H 00H is valid as a bulk data address 8 SYSTEM EXCLUSIVE MESSAGES Clavinova MIDI Format Data format F0H 43H 73H xxH nnH F7H F0H Exclusive status 43H Y...

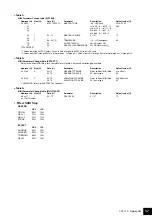
Page 37: ...8H are interpreted as 1 through 12 Table 2 MIDI Parameter Change table EFFECT 1 Refer to the Effect MIDI Map for a complete list of Reverb Chorus and Variation type numbers Address H Size H Data H Par...

Page 38: ...is always multi timbre and Poly mode Mode Default Changed Note ON Note OFF Key s Ch s 0 32 7 11 64 66 67 91 94 1 1 16 9nH v 1 127 9nH v 0 3 9 120 Mode 1 OMNI ON POLY Mode 2 OMNI ON MONO Mode 3 OMNI O...

Page 39: ...es tout moment sans aucun avis Du fait que les caract ristiques techniques les quipements et les options peuvent diff rer d un pays l autre adressez vous au distributeur Yamaha le plus proche Las espe...

Page 40: ...CLP 110 Appendix 40 MEMO...

Page 41: ...CLP 110 Appendix 41 MEMO CLP 110...

Page 42: ...CLP 110 Appendix 42 MEMO...

Page 43: ...ocations that do not significantly contribute to their operating temperature Placement of this product close to heat sources such as radiators heat registers and other devices that produce heat should...

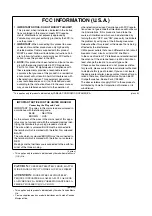
Page 44: ...e which can be determined by turning the unit OFF and ON please try to eliminate the problem by using one of the following measures Relocate either this product or the device that is being affected by...

Page 45: ...Canada Tel 416 298 1311 U S A Yamaha Corporation of America 6600 Orangethorpe Ave Buena Park Calif 90620 U S A Tel 714 522 9011 MEXICO Yamaha de Mexico S A De C V Departamento de ventas Javier Rojo G...

Page 46: ...ist das Instrument mit einem Spannungsw hler an der Unterseite neben der Netzkabeldurchf hrung ausgestattet Falls vorhanden mu der Spannungsw hler auf die rtliche Netzspannung eingestellt werden Der...

Reviews: