


PREPARATIONS
➤
Connecting to a network device wirelessly
En
47
Connecting the unit to a wireless network
There are several methods to connect the unit to a wireless
network.
Select a connection method according to your environment.
■
A: Sharing the iOS device setting
You can easily setup a wireless connection by applying the
connection settings on iOS devices (iPhone/iPad/iPod touch).
Before proceeding, confirm that your iOS device is connected to a
wireless router.
• You need iOS device with iOS 5.0 or later. For details on supported devices, see
“Supported devices and file formats” (p.145).
1
Press
z
(receiver power) to turn on the unit.
2
Turn on the TV and switch the TV input to display
video from the unit (HDMI OUT jack).
• Operations with TV screen are available only when your TV is connected to
the unit via HDMI.
3
Press ON SCREEN.
4
Use the cursor keys to select “Setup” and press
ENTER.
5
Use the cursor keys (
e
/
r
) to select “Network”.
6
Use the cursor keys (
q
/
w
) to select “Network
Connection” and press ENTER.
7
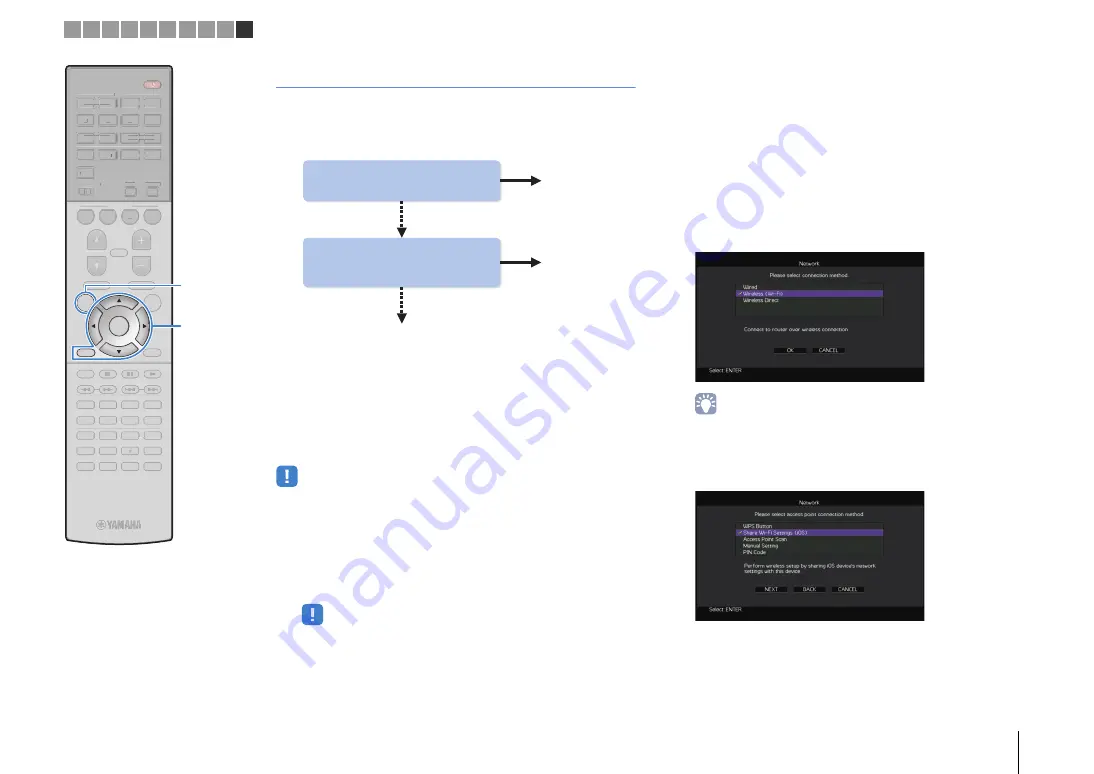
Use the cursor keys (
q
/
w
) and ENTER to check
“Wireless (Wi-Fi)” and select “OK”.
• The checkmark indicates the current setting.
8
Use the cursor keys (
q
/
w
) and ENTER to check
“Share Wi-Fi Settings (iOS)” and select “NEXT”.
Yes
Do you own iOS devices
(iPhone/iPad/iPod touch)?
Yes
A
B
Does your wireless router
(access point) has a WPS
button?
C
No
No
1 2 3 4 5 6 7 8 9 10
9
0
ENT
MEMORY
5
6
8
7
1
2
3
4
MOVIE
ENHANCER
TUNING
PRESET
BAND
DISPLAY
RETURN
ENTER
ON
SCREEN
OPTION
TOP MENU
MUTE
PROGRAM
VOLUME
POP-UP/MENU
PURE DIRECT
STRAIGHT
INFO
SLEEP
MUSIC
PARTY
HDMI OUT
TUNER
PHONO
MULTI
MAIN
ZONE 2
MODE
SCENE
4
3
2
1
TV
BD/DVD
NET
RADIO
AV
AUDIO
5
6
7
V-AUX
1
2
3
4
1
2
3
4
SUR. DECODE
USB
NET
9
0
ENT
MEMORY
5
6
8
1
2
3
4
MOVIE
ENHANCER
TUNING
PRESET
BAND
DISPLAY
OPTION
TOP MENU
MUTE
PROGRAM
VOLUME
POP-UP/MENU
PURE DIRECT
STRAIGHT
INFO
SLEEP
MUSIC
PARTY
HDMI OUT
TUNER
PHONO
MULTI
MAIN
ZONE 2
MODE
SCENE
4
3
2
1
TV
BD/DVD
NET
RADIO
AV
AUDIO
5
6
7
V-AUX
1
2
3
4
1
2
3
4
SUR. DECODE
USB
NET
ON
S
CREEN
ENTER
Cursor keys


