background image

86

Pre-operation checks

WARNING

Failure to inspect or maintain the boat properly increases the possibility of an accident
or damage to the boat. Do not operate the boat if you find any problem.
If a problem cannot be corrected by the procedures provided in this manual, have the
boat inspected by a Yamaha Boat Dealer.

Pre-operation checklist

Before operating this boat, perform the checks in the following checklist. Always follow the in-
spection and maintenance procedures and schedules described in this owner’s/operator’s man-
ual.
Pre-operation checks should be made each time the boat is used. These checks can be com-
pleted in a short time. It is worth the time spent to ensure safety and reliability.

The steering and shifting pre-operation checks will require two persons: one person to oper-
ate the controls and one person to observe the proper operation at the stern.

ITEM

CHECK

PAGE

PRE-LAUNCH CHECKS

Steering system

Check for proper steering operation.

87

Remote control lever

Check for proper throttle operation.
Check for proper shift operation.

87

Fire extinguisher

Check readiness of the extinguisher.

88

Hull

Check hull for damage and cracks before launching.

Access port cap

Check for proper installation.

89

Jet intake

Check that no debris is in the intake before launching.

90

Fuel system

Check fuel system for leaks.

90

Engine oil level

Check engine oil level; add as necessary.

81, 90

Battery

Check battery condition, mounting, and connection.

91

Bilge water

Check the engine compartment and fuel tank compart-
ment for bilge water.

92

Drain plugs

Check the drain plugs for damage and foreign material 
and check that they are securely installed.

92

Engine compartment and 
blower

Open the engine hood and check to be sure no gasoline, 
gasoline vapors, or loose electrical connections are 
present. Operate the blowers for at least 4 minutes.

92

Engine hood

Check that the hood latch is secure.

61

Lights and horn

Check lights to be sure they operate. Push the horn 
switch to be sure it operates.

93, 94

Bimini top

Check that the top is secure.

72, 76

Engine shut-off cord (lan-
yard)

Check the engine shut-off cord (lanyard) for damage.

94

Collapsible tower fasten-
ers (AR195/AR190)

Check that the tower fasteners are secured.

71

POST-LAUNCH CHECKS

Switches

Check operation of the main switch and engine shut-off 
switch.

94

Cooling water pilot outlet

Check that water comes out while the engine is running.

94

Fuel level

Check fuel level; add as necessary.

95

SportsBoat_F4V10.book  Page 86  Tuesday, July 3, 2018  1:03 PM

Downloaded from 

ManualsNet.com

 search engine

Summary of Contents for AR195 2019

Page 1: ...9 Yamaha Boat AR195 SX195 AR190 SX190 OWNER S OPERATOR S MANUAL F4V F8199 10 LIT 18626 12 21 Read this manual carefully before operating this boat U S A Edition Downloaded from ManualsNet com search engine ...

Page 2: ...r reproductive harm To minimize exposure avoid breathing exhaust service your vessel in a well ventilated area and wear gloves or wash your hands frequently when servicing this vessel For more information go to www P65warnings ca gov marine Read this manual carefully before operating this boat This manual should stay with the boat if it is sold SportsBoat_F4V10 book Page 1 Tuesday July 3 2018 1 03...

Page 3: ...t avoided could result in death or serious injury NOTICE A NOTICE indicates special precautions that must be taken to avoid damage to the boat or other property TIP A TIP provides key information to make pro cedures easier or clearer Because Yamaha has a policy of continuing product improvement this product may not be exactly as described in this owner s oper ator s manual Specifications are subje...

Page 4: ...trol functions 35 Engine shut off switch 35 Battery switch 35 Main switch 36 Remote control lever 36 Steering 38 Tilt lever 39 Instrument operation 40 Switches 40 Courtesy light switch 41 Navigation and anchor lights switch 41 Switch circuit breakers 42 No wake mode cruise assist switch 42 Operating the boat with a minimal wake no wake mode 42 Operating the boat at a steady speed cruise assist 43 ...

Page 5: ...6 Storing the bimini top in the upright position 77 Storing the bimini top in the fully collapsed position 78 Trailering with the bimini top 78 Removing the bimini top 78 Installing the bimini top 78 Operation and handling requirements 79 Fuel requirement 79 Fuel 79 Engine oil requirement 80 Engine oil 80 Draining the bilge water 83 Draining the bilge water on land 83 Draining the bilge water on w...

Page 6: ...ost operation care 111 Flushing the cooling system 111 Cleaning the boat 112 Basic stain guide 114 Battery care 115 Long term storage 116 Fuel system 116 Lubrication 116 Grease points 116 Maintenance 118 Maintenance 118 Owner s operator s manual and tool kit 118 Removing and installing the engine cover 118 Periodic maintenance chart 120 Specifications 123 Specifications 123 Trouble recovery 126 Tr...

Page 7: ...95 SX195 1 Primary Identification PRI ID number AR190 SX190 1 Primary Identification PRI ID number Hull Identification Number HIN The HIN is stamped into a plate attached to the right rear corner of the hull 1 Hull Identification Number HIN Engine serial number The engine serial number is stamped on a la bel attached to the engine unit See page 61 for engine hood opening and closing proce dures an...

Page 8: ...SX190 pre mium unleaded gasoline AR195 SX195 Approval label of emission control certificate These labels are attached to the engine unit and to the inside of the engine compartment See page 61 for engine hood opening and closing procedures and page 118 for engine cover removal and installation procedures 1 Emission control information label 3 star models 1 1 YAMAHA YAMAHA MOTOR CO LTD MADE IN JAPA...

Page 9: ...OWNER S MANUAL FOR MAINTENANCE SPECIFICATIONS AND ADJUSTMENTS MEETS U S EPA EVAP STANDARDS USING CERTIFIED COMPONENTS 1 YAMAHA MOTOR CO LTD EPA CERTIFIED EVAP COMPONENTS MAX POWER kW ENGINE FAMILY EMISSIONS CONTROL SYSTEM INFORMATION EPA FEL HC NOx CO g kW h DISPLACEMENT liters THIS ENGINE CONFORMS TO U S EPA EXHAUST REGULATIONS FOR SI MARINE ENGINES REFER TO OWNER S MANUAL FOR MAINTENANCE SPECIFI...

Page 10: ...andards for marine engines Two Stars Very Low Emission The two star label identifies engines that meet the Air Resources Board s Personal Watercraft and Outboard marine engine 2004 exhaust emission standards Engines meet ing these standards have 20 lower emis sions than One Star Low Emission engines Three Stars Ultra Low Emission The three star label identifies engines that meet the Air Resources ...

Page 11: ...terndrive and Inboard marine engine 2009 exhaust emission standards Personal Watercraft and Outboard marine engines may also comply with these standards Engines meeting these standards have 90 lower emissions than One Star Low Emission engines SportsBoat_F4V10 book Page 5 Tuesday July 3 2018 1 03 PM Downloaded from ManualsNet com search engine ...
Page 12: ...ead the following labels before operating this boat If you need any additional information contact a Yamaha Boat Dealer 1 14 2 15 3 4 5 9 16 6 8 7 6 SportsBoat_F4V10 book Page 6 Tuesday July 3 2018 1 03 PM Downloaded from ManualsNet com search engine ...
Page 13: ...General and important labels 7 10 12 10 13 11 10 17 17 10 18 4 star models 3 star models 18 SportsBoat_F4V10 book Page 7 Tuesday July 3 2018 1 03 PM Downloaded from ManualsNet com search engine ...
Page 14: ...abels 8 Warning labels If any of these labels is damaged or missing contact a Yamaha Boat Dealer for a replacement 3 4 2 1 SportsBoat_F4V10 book Page 8 Tuesday July 3 2018 1 03 PM Downloaded from ManualsNet com search engine ...
Page 15: ...General and important labels 9 6 7 5 SportsBoat_F4V10 book Page 9 Tuesday July 3 2018 1 03 PM Downloaded from ManualsNet com search engine ...
Page 16: ...General and important labels 10 9 10 11 8 SportsBoat_F4V10 book Page 10 Tuesday July 3 2018 1 03 PM Downloaded from ManualsNet com search engine ...

Page 17: ...General and important labels 11 13 AR190 SX190 13 AR195 SX195 12 AR195 AR190 SportsBoat_F4V10 book Page 11 Tuesday July 3 2018 1 03 PM Downloaded from ManualsNet com search engine ...
Page 18: ...EQUIREMENTS IS VERIFIED MANUFACTURER RESPONSIBLE FOR PRODUCTION CONTROL 1600 POUNDS PERSONS GEAR PERSONS OR LBS 8 1280 THIS BOAT COMPLIES WITH U S COAST GUARD SAFETY STANDARDS IN EFFECT ON THE DATE OF CERTIFICATION MEETS U S EPA EVAP STANDARDS USING CERTIFIED COMPONENTS MANUFACTURER YAMAHA JET BOAT MANUFACTURING U S A INC MODEL VONORE TN NATIONAL MARINE MANUFACTURERS ASSOCIATION 14 16 15 17 18 Spo...

Page 19: ...nors Know the operator age and training re quirements for your state A boating safety course is recommended and may be re quired in your state You can find local rules by contacting the United States Coast Guard USCG the National Association of State Boating Law Administrators or your local Power Squadron This boat is designed to carry the operator up to 7 passengers and cargo Never ex ceed the ma...

Page 20: ...ision This is a high performance boat not a toy Sharp turns or jumping wakes or waves can increase the risk of back spinal injury paralysis facial injuries and broken legs ankles and other bones Do not jump wakes or waves Do not operate the boat in rough water bad weather or when visibility is poor this may lead to an accident causing injury or death Be alert to the possibility of adverse weather ...

Page 21: ...se Attach the engine shut off cord lanyard to the PFD and keep it free from the steering wheel or other controls so that the engine stops if the operator accidentally leaves the helm Failure to attach the engine shut off cord lanyard could result in a runaway boat if the operator is ejected After operation remove the engine shut off cord lanyard and the main switch key to avoid accidental starting...

Page 22: ... the road for more information Navigation lights Your boat is equipped with navigation lights for use between sunset and sunrise and during periods of reduced visibility such as fog Be sure these lights are work ing and are turned on when necessary See pages 41 and 67 for more informa tion Additional equipment recommendations The following equipment can help make your boating experience safer and ...

Page 23: ...heel input until you ap ply throttle again or you reach a trolling speed Practice turning in an open area without obstructions until you have a good feel for the maneuver This Yamaha boat is water jet propelled The pump is directly connected to the en gine This means that the jet thrust will pro duce some movement whenever the engine is running The boat has a neutral position but since the boat is...

Page 24: ...ting parts of the jet pump 1 Intake grate 2 Jet thrust nozzle Stop the engine and remove the clip from the engine shut off switch before removing any debris or weeds which may have col lected around the jet intake See page 128 for more information Night operation When using your boat before dawn or after dusk you must have both bow and anchor lights operating When at anchor in the dark the anchor ...

Page 25: ...d be on board as a spotter to watch the wakeboarder or wa ter skier in most states it is required by law Let the person being pulled direct the operator s control of speed and direction with hand signals Be sure the seat is locked in place see page 58 before get ting underway When preparing to pull the wakeboarder or water skier operate the boat at the slowest possible speed until the boat is well...

Page 26: ...and what each vessel should do Stand on vessel The vessel with the right of way has the duty to continue its course and speed except to avoid an immediate collision When you maintain your direction and speed the other vessel will be able to determine how best to avoid you Give way vessel The vessel which does not have the right of way has the duty to take positive and timely action to stay out of ...

Page 27: ...power driven vessels are crossing each other s path close enough to run the risk of collision the vessel which has the other on the starboard right side must keep out of the way of the other If the other vessel is on your starboard right side you must keep out of its way you are the give way vessel If the other vessel is on your port left side remem ber that you should maintain course and di recti...

Page 28: ...power driven vessel the power driven vessel has the right of way 2 Sailing vessels should keep clear of any fishing vessel 3 In a narrow channel a sailing vessel should not hamper the safe passage of a power driven vessel that can navigate only in such a channel Reading buoys and other markers The waters of the United States are marked for safe navigation by the lateral system of buoyage Simply pu...

Page 29: ... with black letters and orange borders They signify speed zones restricted areas danger areas and general information Remember markings may vary by geographic location Always consult local boating author ities before riding your boat in unfamiliar waters SportsBoat_F4V10 book Page 23 Tuesday July 3 2018 1 03 PM Downloaded from ManualsNet com search engine ...
Page 30: ... NASBLA ap proved courses Enjoy your boat responsibly You share the areas you enjoy when operat ing your boat with others and with nature So your enjoyment includes a responsibility to treat these other people and the lands wa ters and wildlife with respect and courtesy Whenever and wherever you are boating think of yourself as the guest of those around you Remember for example that the sound of y...

Page 31: ...evice also known as life jacket Planing Traveling at a speed fast enough so the boat has leveled out and is skimming on top of the water There is a wake Port The left side of the boat Stand on The vessel with the right of way when two boats meet Starboard The right side of the boat Stern The back part of the boat Sub planing Traveling at a medium speed The bow of the boat is out of the water but y...

Page 32: ... Bimini top page 72 3 Anchor light page 41 67 4 Tow pylon 5 Reboarding grip 6 Cleat 7 Fuel tank filler cap page 79 8 Wakeboard tower page 70 9 Bow eye 10 Bow light page 41 1 10 9 5 6 7 6 6 2 8 3 4 SportsBoat_F4V10 book Page 26 Tuesday July 3 2018 1 03 PM Downloaded from ManualsNet com search engine ...
Page 33: ...imini top page 76 3 Anchor light page 41 68 4 Reboarding grip 5 Cleat 6 Fuel tank filler cap page 79 7 Bow eye 8 Bow light page 41 1 8 7 4 5 6 5 5 2 3 SportsBoat_F4V10 book Page 27 Tuesday July 3 2018 1 03 PM Downloaded from ManualsNet com search engine ...
Page 34: ...ght socket SX195 SX190 page 68 7 Cooling water pilot outlet page 94 8 Swim platform page 69 9 Reboarding grip 10 Wet storage compartment page 65 11 Flush hose connector page 111 12 Ski tow hook SX190 SX195 3 4 3 7 3 8 5 6 1 2 9 10 11 12 1 SportsBoat_F4V10 book Page 28 Tuesday July 3 2018 1 03 PM Downloaded from ManualsNet com search engine ...
Page 35: ... Ladder page 69 3 Hull drain plug page 83 4 Shift gate page 37 5 Articulating keel page 38 6 Jet thrust nozzle 7 Intake grate 1 3 6 5 4 3 2 7 1 SportsBoat_F4V10 book Page 29 Tuesday July 3 2018 1 03 PM Downloaded from ManualsNet com search engine ...
Page 36: ...page 58 4 Driver s seat page 59 5 Rear starboard seat page 58 6 Rear center seat page 58 7 Rear port seat page 58 8 Center port seat page 58 9 Passenger s seat page 60 1 8 7 2 3 4 9 5 6 SX190 SX195 SportsBoat_F4V10 book Page 30 Tuesday July 3 2018 1 03 PM Downloaded from ManualsNet com search engine ...
Page 37: ... switch page 42 9 Horn switch page 40 10 Bilge pump switch page 40 11 Navigation and anchor lights switch page 40 12 Courtesy light switch page 40 13 Switch circuit breaker page 42 14 Tilt lever page 39 15 Main switch page 36 16 Blower switch page 40 HORN BILGE NAV ANC CTSY LIGHTS BLOWER 16 1 2 3 4 5 6 7 12 11 10 9 13 15 13 13 13 13 8 14 SportsBoat_F4V10 book Page 31 Tuesday July 3 2018 1 03 PM Do...

Page 38: ... page 130 2 Engine oil filler cap page 81 3 Blower page 92 4 Engine cover page 118 5 Air filter case 6 Dipstick page 81 7 Spark plug Ignition coil 7 2 1 3 5 4 6 SportsBoat_F4V10 book Page 32 Tuesday July 3 2018 1 03 PM Downloaded from ManualsNet com search engine ...
Page 39: ...age 130 2 Engine oil filler cap page 81 3 Blower page 92 4 Air filter case 5 Engine cover page 118 6 Dipstick page 81 7 Spark plug Ignition coil 7 1 2 3 4 6 5 SportsBoat_F4V10 book Page 33 Tuesday July 3 2018 1 03 PM Downloaded from ManualsNet com search engine ...
Page 40: ...r cap page 81 2 Fuse box cover page 130 3 Blower page 92 4 Air filter case 5 Engine cover page 118 6 Dipstick page 81 7 Spark plug Ignition coil 7 2 1 3 4 6 5 SportsBoat_F4V10 book Page 34 Tuesday July 3 2018 1 03 PM Downloaded from ManualsNet com search engine ...

Page 41: ...must be attached to the engine shut off switch for the engine to run The cord must be attached to a secure place on the operator s PFD Should the operator fall over board or leave the helm the cord will pull out the clip stopping the ignition to the engine This will prevent the boat from running away under power 1 Clip 2 Engine shut off switch 3 Engine shut off cord lanyard Battery switch The batt...

Page 42: ...control lever WARNING Before shifting make sure there are no swimmers or obstacles in the water near you When operating in reverse go slowly Do not open the throttle more than half Otherwise the boat may become unsta ble which could result in loss of control and an accident Do not shift into reverse while traveling at planing speeds Loss of control boat swamping or damage to the boat could occur A...

Page 43: ...lp keep the boat from moving although some movement may occur 1 Shift gate 2 Jet thrust nozzle Forward When the remote control lever is initially moved to the forward position and the boat is operating at a slow speed the shift gate is lift ed up slightly from the neutral position and jet thrust is directed downward at an angle This function which is called the thrust directional enhancer TDE help...

Page 44: ...tion the direction of the articulating keel changes according to the movement of the jet thrust nozzle 1 Steering wheel 1 Jet thrust nozzle 2 Articulating keel Since the strength of the jet thrust determines the speed and direction of a turn the throttle must always be opened above idle when at tempting a turn except at trolling speed Because boats steer from the stern the stern of the boat swings...

Page 45: ... The tilt lever is located under the steering wheel and is used to adjust the tilt of the steering wheel There are 5 positions 1 Tilt lever To adjust the tilt 1 Push the lever down and then move the steering wheel up or down to the desired position 2 The lever will lock into place when the steering wheel is moved into one of the 5 available positions 3 Make sure that the tilt lever returns to its ...

Page 46: ... and bow light on or off 41 4 Bilge pump switch Turns the bilge pump on or off 84 5 Horn switch Activates the horn The horn can be used to signal other boats as required by the Rules of the road 20 6 No wake mode cruise assist switch Activates and sets the cruise assist no wake mode and reverse RPM control 42 HORN BILGE NAV ANC CTSY LIGHTS BLOWER 1 2 3 4 5 6 SportsBoat_F4V10 book Page 40 Tuesday J...

Page 47: ...r side of the switch to turn on both the bow light and an chor light for night running NAV Push the lower side of the switch to operate the anchor light alone when anchored at night ANC Put the switch in the middle position to turn off all lights See page 67 for more informa tion 1 Bow light AR195 AR190 1 Anchor light SX195 SX190 1 Anchor light 1 1 1 1 1 SportsBoat_F4V10 book Page 41 Tuesday July ...

Page 48: ...ing the boat with a minimal wake no wake mode The no wake mode is useful for operating the boat at a steady speed with a minimal wake This is especially convenient when traveling in harbors channels or other areas posted with low speed limits as no wake zones The no wake mode can be used only when the engine is operating at idle speed To activate the no wake mode 1 Put the remote control lever in ...

Page 49: ...ngine speed can be increased by pushing the plus side of the switch or decreased by pushing the minus side However the ad justment is limited to a maximum of 8 incre ments above or below the initial cruise assist setting Each time the switch is pushed the engine speed will increase or decrease approximately 100 200 rpm While the cruise assist is activated the en gine speed can also be adjusted by ...

Page 50: ... 3 stages up to a maximum of 6000 rpm and pushing the minus side will de crease the available engine speed However the adjustment is limited to these 3 incre ments To deactivate the reverse RPM control Operate the remote control lever to decrease the engine speed to less than 4500 rpm Accessory outlet There is a 12 V DC outlet with a circuit break er located on the helm NOTICE Do not use an automo...

Page 51: ...nual included with your boat 1 Stereo receiver 1 Auxiliary input jack 2 USB terminal Multi function display unit operation Because the multi function display unit is equipped with a touch screen you can touch the display directly to operate the display functions Touching the multi function display 1 12V 1 2 SportsBoat_F4V10 book Page 45 Tuesday July 3 2018 1 03 PM Downloaded from ManualsNet com se...

Page 52: ... 3 2 Name Function 1 Fuel level bar graph Displays the amount of fuel remaining in the fuel tank Depending on the amount of remaining fuel the bar graph is displayed in 3 colors blue yellow and red 2 Depth level Displays the water depth in feet or meters Depending on the wa ter depth the bar graph is displayed in 3 colors blue yellow and red am 10 27 FUEL 100 12 3V Depth 9ft 1350 RPM 1 4 2 3 Sport...

Page 53: ...e screen tab Displays the home screen See page 49 3 Trip screen tab Displays the trip screen See page 49 4 Setting screen tab Displays the setting screen See page 50 5 Mute Mutes the sound of the buzzer for a specific time depending on the warnings present Name Function 1 Center display Displays various information for each screen Name Function am 10 27 3 2 1 5 4 MPH 0 0 3 Avg MPG 1 SportsBoat_F4V...

Page 54: ...unction 1 Warning bar Displays the warning icons When a warning icon is displayed tap the icon to display the warning message for that icon 1 SportsBoat_F4V10 book Page 48 Tuesday July 3 2018 1 03 PM Downloaded from ManualsNet com search engine ...

Page 55: ... screen for more information MPH 0 No Wake Mode 0 3 Avg MPG 1 2 3 Name Function Water tempera ture Displays the ambient water temperature in degrees Fahrenheit or degrees Cel sius Average fuel con sumption Displays the average dis tance that was traveled on 1 0 gallon or 1 0 liter of fuel since the item was last re set When gallons are se lected for the display units the value is displayed in mile...

Page 56: ...er hour or kilometers per hour since the item was last re set Average speed Displays the average boat speed in miles per hour or kilometers per hour since the item was last reset Engine hours Displays the total number of hours that the engine have been running since the boat was new Name Function Item Function Displays the time setting screen Displays the depth alarm setting screen Displays the un...

Page 57: ... Unit setting screen The display units for the multi function dis play unit can be changed Item Function Saves the set time as the current time and displays the setting screen Displays the setting screen without saving the set time 9 10 8 pm am am 0 1 9 0 1 9 Set Time Back Save Save Back 50 Set Brightness Back Save NIGHT 100 DAY Item Function Displays the current night mode setting Displays the cu...

Page 58: ...firmation message ap pears tap the YES button to reset the number of hours of operation or tap the NO button to display the maintenance Item Function Sets the display units to US units Sets the display units to metric units Saves the selected unit setting as the current units and displays the setting screen Displays the setting screen without saving the select ed unit setting Item Function Saves t...

Page 59: ...e used to reset the settings to their factory default settings To reset the settings 1 Tap the Reset button 1 Reset button 2 When the confirmation message ap pears tap the YES button to reset the settings or tap the NO button to display the factory reset screen without resetting the settings 1 YES button YES NO Are you sure 1 Set Language Back Save Francais Espanol English Reset all parameters to ...

Page 60: ...splayed warning am 10 27 FUEL 100 Depth 9ft 12 3V 1350 RPM MPH 0 0 3 Avg MPG FUEL 10 am 10 27 Depth D Depth pth 9 9 9ft ft ft 12 3V 1350 135 RPM MPH 0 0 3 Avg MPG FUEL L FUEL 10 10 10 Fuel NEXT QUIT Low Fuel Level am 10 27 FUEL 100 Depth 9ft 12 3V 1350 RPM MPH 0 0 3 Avg MPG FUEL 10 am 10 27 Depth D Depth pth 9 9 9ft ft ft 12 3V 1350 135 RPM MPH 0 0 3 Avg MPG FUEL L FUEL 10 10 10 Fuel NEXT QUIT Low...

Page 61: ...ne Maintenance Due Fuel Low Fuel Level Depth Low Level Communication Error Engine CAN No transducer found Warning title Message SportsBoat_F4V10 book Page 55 Tuesday July 3 2018 1 03 PM Downloaded from ManualsNet com search engine ...

Page 62: ...ing will appear on the multi function display and the buzzer will sound If the engine is overheat ing Over Temperature will be displayed At the same time the engine speed is automat ically limited to help prevent damage If this occurs immediately reduce the engine speed return to shore or maneuver to a safe location and check for water discharge at the cooling water pilot outlets There are cooling...

Page 63: ...on error is detected for the GPS function a sensor or other device a warning will appear on the multi function dis play and the buzzer will sound If this occurs reduce the engine speed return to shore and have a Yamaha Boat Dealer check the boat Low fuel level warning If Fuel appears on the multi function dis play and the buzzer will sound refill the fuel tank as soon as possible See page 79 for i...

Page 64: ... in the bow for use as a sundeck WARNING Do not use the bow filler cushions while the boat is underway A passenger could lose balance and fall on the deck or overboard causing injury or death Stow the cushions securely before oper ating the boat A loose cushion could be blown by the wind distracting the oper ator or striking a passenger which could result in an accident 1 Bow filler cushion AR195 ...

Page 65: ...aised seating position Make sure that the seat is securely locked in place before getting underway To slide the seat 1 Extend the slide swivel lock lever 1 Slide swivel lock lever 2 Rotate the lever to port left 3 Move the seat to the desired position and then release the lever 4 Push the lever to its original position To swivel the seat 1 Extend the slide swivel lock lever 2 Rotate the lever to s...

Page 66: ...at bolster Lift up the seat bolster at the front of the seat so that it is resting against the backrest 1 Seat bolster Passenger s seat SX195 SX190 The passenger s seat can be adjusted in the same ways as the driver s seat See Driver s seat for instructions on adjust ing the seat However the seat bolster of the passenger s seat cannot be adjusted 1 Passenger s seat 1 1 1 SportsBoat_F4V10 book Page...

Page 67: ... make sure that the hood is securely closed Storage compartments This boat is equipped with the following con venient on board storage compartments Make sure that the storage compartments are securely closed before getting underway Anchor storage compartment The anchor storage compartment is located under the front center seat To open the anchor storage compartment pull the front center seat up 1 ...

Page 68: ... ment lower the front seat Ski locker The ski locker is located under the floor To open the ski locker 1 Pull the lock handle up 2 Turn the lock handle 180 and then open the ski locker lid 1 Lock handle 2 Ski locker lid 1 Ski locker To close the ski locker 1 Close the ski locker lid 2 Turn the lock handle and make sure that the lid is securely closed 3 Push the lock handle down To drain water from...

Page 69: ...ar underseat storage compart ment starboard place the rear starboard seat in its original position Rear underseat storage compartment port The rear underseat storage compartment port is located under the rear port seat WARNING Do not carry any flammable substances in the storage compartment or any heavy or metal items that can damage the battery or cause a short circuit Sparks or fire could result...

Page 70: ... port seat Glove compartment The glove compartment is located on the port console To access the glove compartment open the glove compartment lid AR195 AR190 1 Glove compartment lid 2 Strap SX195 SX190 1 Glove compartment lid 1 1 2 1 SportsBoat_F4V10 book Page 64 Tuesday July 3 2018 1 03 PM Downloaded from ManualsNet com search engine ...

Page 71: ...or and then push it to securely lock it in place Wet storage compartment The wet storage compartment is located un der the swim platform To open the wet storage compartment 1 Pull the lock handle up 2 Turn the lock handle 180 and then open the rear platform hatch 1 Lock handle 2 Rear platform hatch 1 Wet storage compartment To close the wet storage compartment 1 Close the rear platform hatch 2 Tur...

Page 72: ...ng the boat from the rear easier 1 Rear walk through Windshield The windshield can be opened and closed WARNING To avoid injury the windshield must be se cured when the boat is in motion To close the windshield 1 Unsnap the retaining strap from the strap base and then snap it onto the wind shield 1 Retaining strap 2 Strap base 2 Close the windshield and then turn the windshield latches to the lock...

Page 73: ...hield 1 Mirror The mirror can be moved up down to the left and to the right to adjust the mirror angle Anchor light AR195 AR190 NOTICE Do not attach a ski rope or other tow rope to the anchor light Otherwise the anchor light could be damaged The anchor light is located at the top center of the wakeboard tower See page 40 for infor mation on the anchor light on 1 Anchor light 1 1 SportsBoat_F4V10 b...

Page 74: ...he anchor light socket fit the protrusion on the anchor light into the slot in the socket and then install the light into the socket 1 Cap 2 Slot 3 Protrusion 4 Fit anchor light stopper into the anchor light socket 1 Anchor light stopper To store the anchor light 1 Pull anchor light stopper upward re move the anchor light and then close the cap of the anchor light socket 2 Install the anchor light...

Page 75: ...atform area provides a place to stand or sit while putting on skis or a wake board and includes a ladder to make board ing from the water easier 1 Swim platform To use the ladder 1 Unhook the ladder strap 1 Ladder strap 2 Pull the ladder out completely and then lower it 1 Ladder To stow the ladder 1 Raise the ladder until it is horizontal and then push it forward completely 2 Hook the ladder strap...

Page 76: ...w pylon can be used to attach a standard ski rope or other tow rope WARNING Severe injury or death can result if you ig nore any of the following Maximum towing capacity 1 Person 158 kg 350 lb max Make sure the tow rope is securely fas tened to the tow pylon on the wake board tower Do not tow a tube or other inflatable from the wakeboard tower Use the ski tow hook on the transom Stay clear of the ...

Page 77: ...e boat or both An assistant needs to help hold the wake board tower in place during the proce dure Do not operate the boat or transport it on the trailer with the tower in the col lapsed position to avoid possible dam age To collapse the wakeboard tower 1 While an assistant supports the wake board tower completely loosen the lock knobs on both sides of the wakeboard tower 1 Wakeboard tower 2 Lock ...

Page 78: ...ll out the front support poles from the bimini top 1 Front support pole 2 Flap 3 Insert the front support poles into the mounting holes in the wakeboard tower 1 Mounting hole 2 Front support pole 4 Pull the rear of the bimini top toward the stern and then unhook the rear support poles from the main pole 1 Rear support pole 2 Main pole 1 1 2 2 1 1 2 SportsBoat_F4V10 book Page 72 Tuesday July 3 2018...

Page 79: ... push the snap button and shorten each rear support pole to either the middle position for cruising or to the short position if you are using the wakeboard tower Be sure the snap buttons click into place 1 Rear support pole 2 Short position 3 Middle position 4 Snap button NOTICE Do not exceed 72 km h 45 mph with the bimini top in the up position Be careful not to push the snap button and extend th...

Page 80: ... ring to secure the pole 1 Rear support pole 2 Button 3 D ring 3 Push the snap button and shorten each rear support pole to the short position 1 Rear support pole 2 Short position 3 Snap button NOTICE Be careful not to push the snap button and extend the pole too far Otherwise the lower section of the pole could fall into the water 4 Hook the rear support poles onto the main pole and then pull the...

Page 81: ...nd install the storage cover If a boat cover is not used wrap an elastic cord around the top and secure the ends to the tow pylon on the wakeboard tower to re strict movement Removing the bimini top To remove the bimini top 1 Store the bimini top See Storing the bi mini top 2 While supporting the bimini top remove the lock pins securing the main pole to the wakeboard tower and then remove the top ...

Page 82: ...ting bracket using the lock pin Make sure that the tab on the end of the lock pin is pointing downward 1 Rear support pole 2 Rear support pole mounting bracket 3 Lock pin 3 Remove the storage cover unfold the bi mini top and pull it toward the bow 1 Storage cover 4 Hook the latch on each front strap onto the strap eye 1 Front strap 2 Latch 3 Strap eye 1 2 3 2 1 1 1 2 3 SportsBoat_F4V10 book Page 7...

Page 83: ...n to avoid damage To store the bimini top in the upright position 1 Loosen each front strap and then un hook the latch from the strap eye 1 Front strap 2 Latch 3 Strap eye 2 Pull the bimini top toward the stern and then fold it 1 Bimini top 3 Install the storage cover NOTICE Do not trailer the boat with the bimini top in the fully extended or upright position When transporting the boat put the bim...

Page 84: ...Yamaha boat cover simply store the bimini top in the fully col lapsed position and install the storage cover If a boat cover is not used wrap an elastic cord around the top and secure the ends to the ski tow hook to restrict movement Removing the bimini top To remove the bimini top 1 Store the bimini top See Storing the bi mini top in the fully collapsed position 2 Remove the main pole mounting kn...

Page 85: ...her If knocking or pinging occurs use a gasoline of a different brand Gasohol There are two types of gasohol gasohol con taining ethanol and that containing methanol Gasohol containing ethanol can be used if ethanol content does not exceed 10 and the fuel meets minimum octane ratings E 85 is a fuel blend containing 85 ethanol and therefore must not be used in this boat All ethanol blends containin...

Page 86: ...kely to accumulate these harmful deposits Engine Med RX available from your Yamaha Boat Dealer is formulated to remove existing deposits and when used continuously pre vent new ones from forming while also help ing to keep fuel injectors and other fuel system components clean for proper perfor mance and longer engine life Engine oil requirement Engine oil NOTICE Use only 4 stroke engine oil Usage ...

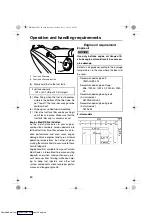
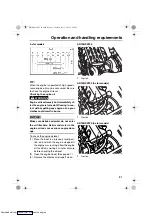
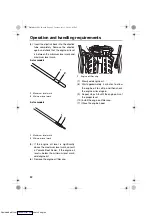
Page 87: ...t enter the oil filler hole Debris and water in the engine oil can cause serious engine dam age To check the engine oil level 1 Place the boat in a precisely level posi tion on land with the engine stopped If the engine was running allow the engine oil to settle by waiting 5 minutes or more before checking the oil level 2 Open the engine hood See page 61 3 Remove the dipstick and wipe it clean AR1...

Page 88: ...ificantly above the maximum level mark consult a Yamaha Boat Dealer If the engine oil level is below the minimum level mark add engine oil 6 Remove the engine oil filler cap 1 Engine oil filler cap 7 Slowly add engine oil 8 Wait approximately 5 minutes to allow the engine oil to settle and then check the engine oil level again 9 Repeat steps 3 8 until the engine oil is at the proper level 10 Insta...

Page 89: ...e in the fuel tank compartment wipe it up immediate ly with dry rags WARNING This indicates a fuel leak Do not operate the boat until the source of the fuel leak is found and cor rected Gasoline and its vapors are highly flammable and explosive 1 Open the engine hood 2 Remove the fuel tank compartment drain plug to drain the water 1 Fuel tank compartment drain plug 3 If the boat was operated in sa...

Page 90: ...er the engine compartment When the bilge pump switch is turned on the bilge pump will operate 1 Bilge pump switch Even if the bilge pump switch is not turned on the bilge pump will detect when there is excessive water in the bilge and will automat ically drain most of it through the bilge pump outlet This function works automatically even if the battery switches are turned to the off position 1 Bi...

Page 91: ... speed below 6000 r min After the engine break in is complete the boat can be operated normally Engine break in AR195 SX195 NOTICE Failure to perform the engine break in could result in reduced engine life or even severe engine damage The engine break in period is essential to al low the various components of the engine to wear and polish themselves to the correct operating clearances This ensures...

Page 92: ...ss port cap Check for proper installation 89 Jet intake Check that no debris is in the intake before launching 90 Fuel system Check fuel system for leaks 90 Engine oil level Check engine oil level add as necessary 81 90 Battery Check battery condition mounting and connection 91 Bilge water Check the engine compartment and fuel tank compart ment for bilge water 92 Drain plugs Check the drain plugs ...

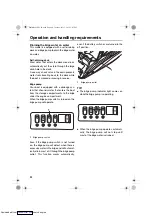
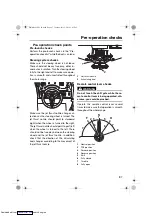
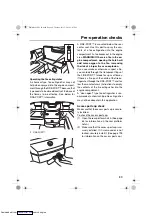
Page 93: ...hould point to port left when the wheel is turned to the left There should not be free play between the steering wheel and the jet thrust nozzle In addition check that the direction of the articulating keel changes according to the movement of the jet thrust nozzle 1 Jet thrust nozzle 2 Articulating keel Remote control lever checks WARNING Do not touch the shift gate while the re mote control leve...

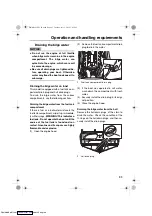
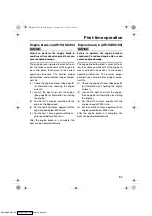
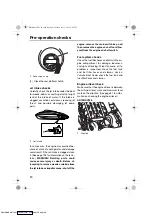
Page 94: ...rs are recommended See the instructions supplied by the extinguisher manufacturer to deter mine the indication of the condition A fire extinguisher is not standard equipment with this boat If you do not have a fire extin guisher contact your local Yamaha Boat Dealer or fire extinguisher dealer for one meeting the proper specifications Storing the fire extinguisher One fire extinguisher is to be mo...

Page 95: ... you can look through the transparent flaps of the FIRE PORT to look for signs of flames If there is a fire push the nozzle of the fire ex tinguisher through the FIRE PORT and fol low the manufacturer s instructions to empty the contents of the fire extinguisher into the engine compartment A clean agent type fire extinguisher is rec ommended a chemical type fire extinguisher may not be adequate in...

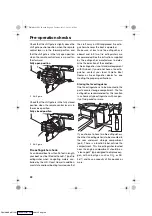
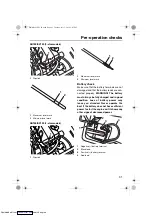
Page 96: ...or debris from the jet intake or impeller areas shut off the engine remove the main switch key and then remove the engine shut off cord lan yard from the engine shut off switch Fuel system checks Check the fuel filler hoses and joints in the en gine compartment for damage looseness and signs of leaking At least annually or if a problem is suspected check the fuel tank and fuel filler hoses and cla...

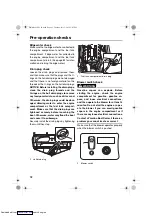
Page 97: ...e con nected properly WARNING The battery must always be fully charged and in good condition Loss of battery power may leave you stranded Never operate the boat if the battery does not have sufficient power to start the engine or if it shows any other signs of decreased power 1 Negative battery terminal 2 Black lead 3 Positive battery terminal 4 Red lead 1 2 1 1 2 1 4 3 2 1 SportsBoat_F4V10 book P...

Page 98: ... compartment or the fuel tank compart ment Make sure that the drain plugs are tightened securely before launching the boat Otherwise water may flood the boat and cause it to submerge Securely install the drain plugs by tightening them until they stop 1 Hull drain plug 1 Fuel tank compartment drain plug Blower switch check WARNING Gasoline vapors can explode Before starting the engine check the eng...

Page 99: ...n and an chor lights switch and check that the bow light and anchor light come on 1 Navigation and anchor lights switch AR195 AR190 1 Bow light 2 Anchor light SX195 SX190 1 Bow light 2 Anchor light 3 Push the bottom of the navigation and anchor lights switch and check that only the anchor light comes on 4 Put the navigation and anchor lights switch in the middle position and check that the bow lig...

Page 100: ...t off switch check Check the engine shut off switch for proper operation 1 Start the engine See page 96 for infor mation on starting the engine 2 Pull the engine shut off cord lanyard to remove the clip from the engine shut off switch to make sure that the engine stops immediately 3 Make sure that the engine cannot be started with the clip removed from the engine shut off switch 1 Clip 2 Engine sh...

Page 101: ... is flowing through the engine cooling water passages If wa ter is not flowing out of the pilot outlet dur ing operation do not continue to run the engine Overheating and serious damage could occur See Over temperature warning on page 56 for more informa tion Fuel level check Check the amount of fuel remaining in the fuel tank using the fuel level bar graph on the multi function display 1 Fuel lev...

Page 102: ... Do not operate where people are swimming Always attach the engine shut off cord lan yard to your PFD before operating You and all other passengers must always wear a USCG approved PFD when riding in the boat You should consider wearing water shoes eye protection and other protective apparel Water sports increase your risk of in jury from contact with your boat other ves sels docks rocks or coral ...

Page 103: ...cked into the jet intake damaging the impeller NOTICE There are two hull drain plugs at the bot tom of the stern Check the O rings on the hull drain plugs and make sure that the plugs are tightened securely before launching the boat Otherwise water may flood the boat and cause it to submerge 1 Hull drain plug 2 Turn the battery switch to the ON green position 3 Push the blower switch to operate th...

Page 104: ...e bat tery will become quickly discharged and it will be impossible to start the engine The starter motor may also be damaged if it is engaged continuously for more than 5 seconds On this boat the engine is connected directly to the drive unit Starting the engine gener ates some thrust immediately Only enough throttle should be applied to keep the engine at a fast enough idle to stay running Stopp...

Page 105: ...ay from the dock 2 When the stern is out a few feet release the bow mooring and then turn the steering wheel to the center position or away from the dock Move the remote control lever into the reverse position and move away from the dock Turning the boat WARNING Do not pull the remote control lever back to idle when trying to steer away from objects you need throttle to steer Be sure passengers ar...

Page 106: ...ws down the boat will no longer respond to steering wheel input until you apply throttle again or you reach a trolling speed At trolling speed the boat can be turned gradually by steering wheel position alone using just the amount of thrust available at engine idle D If the boat is moving and the remote con trol lever is in neutral position or if there is no thrust because the engine is stopped th...

Page 107: ...the throttle back to idle You need throttle to steer Do not use the reverse function to slow down or stop the boat from planing speed as it could cause you to lose con trol be ejected or impact the steering wheel or other parts of the boat This could increase the risk of serious injury The boat is not equipped with a separate braking system It is stopped by water resis tance after the remote contr...

Page 108: ... a dock or landing jetty 1 Board the boat from the side One per son should board at a time by stepping into the boat Never jump in Avoid step ping on slick gelcoat surfaces on the boat s gunwales especially if wet 2 Sit in one of the seats provided and put both feet on the deck Docking 1 Make sure no obstructions boats or swimmers are close to the boat Come to a stop before you reach the dock 2 No...

Page 109: ...he boat is in water 90 cm 3 ft deep from the bottom of the boat before starting the engine again Do not beach the boat on rocky beach es The hull gelcoat and exposed pump housings can be damaged Pay attention to shifts in tides Beaching at high tide may make it impossible to re launch the boat if the tide recedes 1 Make sure no obstructions boats or swimmers are near the beach 2 Approach the beach...

Page 110: ...e the anchor is holding Also periodically check your boat s position against the shoreline to make sure it is not drifting and dragging the anchor Reset if necessary 5 To pull in weigh the anchor start the engine and move forward keeping ten sion on the line as you pull it in When the anchor line is straight up and down pull hard to lift the anchor from the bottom material 6 If the anchor is stuck...

Page 111: ...h the boat in the water In addition conditions such as stray electrical voltage in the water marine organ isms and saltwater corrosion can adversely affect the life of many boat components NOTICE Leaving the boat in the water for extended periods will accelerate the rate of normal deterioration of the jet pump components sacrificial anodes hull finish and other components If you do decide to moor ...

Page 112: ... careful not to get water on the air filter area or electrical components Allow any water in the bilge to drain out After the water has drained wipe the engine compart ment and bilge with dry rags 9 Reinstall all drain plugs NOTICE Tight en the hull drain plugs securely before launching the boat Otherwise water may flood the boat and cause it to submerge Clean any foreign material such as dirt or ...

Page 113: ...ss Use a bolted on or welded on hitch clamp on bumper hitch es are not recommended Be sure the trailer hitch s release handle is latched with the lock pin installed before towing Use safety chains between the towing vehicle and the trailer so the trailer will not detach completely from the towing vehicle if it acci dentally comes loose from the hitch ball Crisscross the chains under the trailer to...

Page 114: ... races When making a turn do not cut corners The trailer has a smaller turning circle so it turns more sharply around the corner than the towing vehicle Backing your trailer It takes practice to back a trailer successfully If you are not familiar backing up with a trailer practice first in an open area away from ob stacles Keep the following points in mind when backing up Back slowly Make steering...

Page 115: ...oats or obstacles Loading 1 Disconnect the trailer lights from the towing vehicle 2 Back the trailer down the ramp as close to 90 to the shoreline as you can If pos sible have a second person act as an observer while standing to the side of the trailer Stop when the tops of the trailer s fenders are about 3 inches above the waterline 3 With the boat moving at the slowest idle speed guide the boat ...

Page 116: ...ling should be covered with a protective material to pre vent damage to the hull gelcoat Use spreader bars to avoid side stress to the hull that may cause cracks in the gel coat and fiberglass Attach guidelines to the bow eye and stern eyes to control movement of the boat dur ing lifting Remove all people and all cargo from the boat Drain any excess water from the bilge using the bilge pump Be sur...

Page 117: ...the engine The water could flow back through the muffler into the crankcase causing severe engine damage Be sure to turn on the water immediately after starting the engine to prevent engine overheating 5 Run the engine at a fast idle for 3 to 5 minutes If the engine stops while flush ing turn the water supply off immediately and perform the procedure again from step 4 6 Turn off the water supply a...

Page 118: ...ral soap and wa ter Rinse with fresh water Scum on the hull can be removed with Yamaclean Hull Cleaner NOTICE Incorrect cleaning can damage vinyl See Basic stain guide on page 114 4 Clean the engine and bilge areas with Yamaclean Bilge Cleaner or an equiv alent and rinse with fresh water Drain all water and wipe up any remaining mois ture with clean dry rags NOTICE Be careful not to get water on t...

Page 119: ...reas requir ing heavy protection use Yamashield 9 Wax the hull with Yamaclean Spray Wax or other non abrasive wax de signed for marine gelcoat WARNING Slippery surfaces can cause falls and injury Be careful not to apply too much wax on deck and gunwale step ping surfaces This will make them slippery 10 Wipe all vinyl and rubber components such as the seats and engine compart ment seals with Yamacl...

Page 120: ...olate B Grease E B Ink C F D Ketchup A B Lipstick C B A Mustard A B C Mildew Wet leaves C B A Motor oil B Permanent marker C F D Suntan lotion A B Tar Asphalt E B A Medium soft brush with warm soapy water B Yamaclean All Purpose Cleaner or equivalent C Isopropyl alcohol 91 is best D Mixture of 1 tablespoon 15 ml ammonia 1 4 cup 60 ml hydrogen peroxide and 3 4 cup 177 ml water E Wipe or scrape off ...

Page 121: ... a voltmeter and load tes ter at least once a month and recharge the battery if it gets too low To charge the battery 1 Remove the caps from the cells Add dis tilled water if necessary to top up the electrolyte to the proper level 2 Follow the battery manufacturer s in structions for charging WARNING When charging a battery keep it well away from sparks and open flames as it gives off explosive ga...

Page 122: ...during cooling system flushing will also help protect the fuel system TIP Use of Fuel Med RX eliminates the need to drain the fuel system Consult a Yamaha Boat Dealer or other qualified mechanic if the fuel system is to be drained instead Lubrication It is advisable to take the boat to a Yamaha Boat Dealer to have the engine fogged for long term storage Grease points To keep moving parts sliding o...

Page 123: ...er 10 hours or 1 month by a Yamaha Boat Dealer Fill the bearing housing with water resistant grease through the grease nipple After first service Every 100 hours or 6 months you may do this yourself 1 Bearing housing grease nipple Grease capacity 33 0 35 0 cc 1 11 1 18 oz Grease capacity 6 0 8 0 cc 0 20 0 27 oz 1 SportsBoat_F4V10 book Page 117 Tuesday July 3 2018 1 03 PM Downloaded from ManualsNet...

Page 124: ...anual and tool kit with you whenever you use the boat To protect these materials from water dam age it would be a good idea to put them in a waterproof bag If your owner s operator s manual is damaged order a replacement from a Yamaha Boat Dealer The service information included in this man ual is intended to provide you the owner with the necessary information for complet ing your own preventive ...

Page 125: ...AR190 SX190 1 Engine cover To install the engine cover 1 Place the engine cover in its original po sition and then push it down AR195 SX195 AR190 SX190 2 Install the engine cover screws 3 Close the engine hood 1 1 1 SportsBoat_F4V10 book Page 119 Tuesday July 3 2018 1 03 PM Downloaded from ManualsNet com search engine ...

Page 126: ...nk Check installation Main switch and en gine shut off switch Check operation Battery Check state of charge and termi nals and check for broken battery strap Battery leads Check terminals Battery switch Check operation Meters after com pleting the pre oper ation checks Check lighting Neutral switch Check operation Hatch interlock switch wet storage compartment Check operation Blower Check operatio...

Page 127: ...p Check exterior and installation Spark plugs Check High pressure fuel hose Check connections and exterior and check for leakage Engine oil Replace Engine oil filter Replace Air filter element Check for damage and dirt Intake hose and breather hose Check for damage and check con nections Throttle body Lubricate throttle valve Anodes engine Check for corrosion 2 Valve clearance Check and adjust 2 R...

Page 128: ...d for eign material Impeller duct Check and lubricate Jet thrust nozzle Check movement and lubricate Intermediate housing Lubricate Anode jet pump unit Check for corrosion Item Operation Initial Thereafter every 10 hours 50 hours or 12 months 1 100 hours or 12 months 1 200 hours or 24 months 1 SportsBoat_F4V10 book Page 122 Tuesday July 3 2018 1 03 PM Downloaded from ManualsNet com search engine ...

Page 129: ...90 4 star models 1078 kg 2377 lb SX190 3 star models 1088 kg 2399 lb SX190 4 star models Performance Maximum fuel consumption 83 7 L h 22 1 US gal h 18 4 Imp gal h AR195 SX195 48 5 L h 12 8 US gal h 10 7 Imp gal h AR190 SX190 3 star models 44 4 L h 11 7 US gal h 9 8 Imp gal h AR190 SX190 4 star models Cruising range at full throttle 1 82 hour AR195 SX195 3 13 hour AR190 SX190 3 star models 3 42 ho...

Page 130: ...85 Ah Charging system Flywheel magneto Drive unit Propulsion system Jet pump Jet pump type Axial flow single stage Impeller rotation Counterclockwise Pitch angle 15 1 AR195 SX195 14 0 AR190 SX190 Transmission Direct drive from engine Jet thrust nozzle angle 23 23 Jet thrust nozzle trim angle 3 Fuel and oil Recommended fuel Premium unleaded gasoline AR195 SX195 Regular unleaded gasoline AR190 SX190...

Page 131: ...acement 3 5 L 3 70 US qt 3 08 Imp qt Engine oil quantity with oil filter replacement 3 6 L 3 81 US qt 3 17 Imp qt Fuse amperage Electronic throttle valve fuse 10 A Fuel pump fuse 10 A Main relay drive fuse 10 A Main fuse 20 A Battery fuse 30 A Accessory fuse 20 A Bilge pump fuse 3 A ITEM Specification SportsBoat_F4V10 book Page 125 Tuesday July 3 2018 1 03 PM Downloaded from ManualsNet com search ...

Page 132: ...red Battery switch off Turn on switch 35 Rear platform hatch Not latched Latch securely 65 Starter compo nent Faulty Have serviced by Yamaha Boat Dealer Remote control lever Not in neutral posi tion Move remote control lever to neutral position 36 Starter mo tor turns over engine does not start Engine shut off switch Clip on cord is not in place Install clip in engine shut off switch 35 Fuel Empty...

Page 133: ... Dealer Fuel tank Water or dirt present Have serviced by Yamaha Boat Dealer Spark plug Fouled or defective Have serviced by Yamaha Boat Dealer Incorrect heat range Have serviced by Yamaha Boat Dealer Gap incorrect Have serviced by Yamaha Boat Dealer Boat speed too slow or loses power Cavitation Jet intake clogged Clean 128 Engine overheat Jet intake clogged Clean 128 Cooling system clogged Clean 9...

Page 134: ...d the engine may overheat and seize If there is any sign that a jet intake or impeller is clogged with weeds or debris follow this clean out procedure 1 Turn off and remove the main switch key remove the clip from the engine shut off switch and wait for all movement to stop 2 Open the rear platform hatch See page 65 3 Check that the retaining cord is securely attached to the access port cap and st...

Page 135: ... the handle turn the cap clock wise until the SET mark is aligned with the edge of the access port 1 SET mark 2 Slot 3 Edge of the access port 8 Check that the cap is perpendicular to the centerline of the boat Pull the handle forcefully to make sure that the cap is locked securely If a strong pull will move the access port cap it is not locked se curely the cap could be forced out by water pressu...

Page 136: ...er battery 3 Connect the other end of the negative jumper cable to an engine hanger NOTICE Be sure all connections are secure and correct before attempting to start the engine Any wrong con nection may damage the electrical system 1 Negative jumper cable 2 Positive jumper cable 3 Booster battery 4 Engine hanger 4 Start the engine and then disconnect the jumper cables by reversing the above steps N...

Page 137: ...Fuse puller 6 Battery fuse 7 Spare fuse 8 Unused fuse 3 When replacing an accessory fuse and bilge pump fuse remove the fuse holder See page 63 for rear port seat removal and installation procedures 1 Fuse holder 2 Accessory fuse 3 Bilge pump fuse 4 Replace the blown fuse with the spare fuse of the correct amperage by using the fuse puller 1 1 1 2 3 4 5 6 7 8 2 3 1 1 SportsBoat_F4V10 book Page 131...

Page 138: ... long enough so that the boat will not collide with the towing boat when slowing down A good rule of thumb is a tow rope which is three times the combined length of the towing boat and the boat Tow the boat using the bow eye only Tow the boat at a no wake speed NOTICE Do not tow the boat at speed fast enough to leave a wake 8 km h 5 mph Severe engine damage could result because water can flood the...

Page 139: ... Yamaha s option any parts adjudged defective by Yamaha due to faulty workmanship or material from the factory All parts replaced under warranty will become the property of Yamaha Motor Corporation U S A CUSTOMER S RESPONSIBILITY Under the terms of this warranty the customer will be respon sible for ensuring that the boat is properly operated maintained and stored as specified in the applicable Ow...

Page 140: ...e transfer YAMAHA MOTOR CORPORATION USA MAKES NO OTHER WARRANTY OF ANY KIND EXPRESSED OR IMPLIED ALL IMPLIED WARRANTIES OF MERCHANTABILITY AND FITNESS FOR A PARTICULAR PURPOSEWHICH EXCEEDTHE OBLIGATIONS ANDTIME LIMITS STATED IN THIS WARRANTY ARE HEREBY DISCLAIMED BY YAMAHA MOTOR CORPORATION USA AND EXCLUDED FROMTHIS WARRANTY SOME STATES DO NOT ALLOW LIMITATIONS ON HOW LONG AN IMPLIED WARRANTY LAST...

Page 141: ...his will ensure that Yamaha Motor Corporation U S A has an up to date registration record in accordance with federal law Q May I perform any or all of the recommended maintenance shown in the Owner s Manual instead of having the dealer do them A Yes if you are a qualified mechanic and follow the procedures specified in the Owner s and Service Manual We do recommend however that items requiring spe...

Page 142: ...et up to 5 years of coverage on the power train controls and other components to match the comforting 5 year standard protection on the hull Y E S is designed and administered by the same Yamaha people who handle your war ranty and it shows in the comprehensive coverage benefits There are no limitations on hours of use Coverage isn t limited to moving parts or the drive train like many other plans...

Page 143: ...CY PHONE PASSENGER 2 ADDRESS EMERGENCY PHONE PASSENGER 3 ADDRESS EMERGENCY PHONE PASSENGER 4 ADDRESS EMERGENCY PHONE DEPARTURE INFORMATION POINT OF DEPARTURE DATE TIME TOW VEHICLE MAKE MODEL LICENSE TRAILER LICENSE DESTINATION INFORMATION DESTINATION LORAN OR GPS COORDINATES INTENDED ACTIVITY EXPECTED RETURN DATE TIME LOCAL U S COAST GUARD PHONE NOTES HULL COLOR OPERATOR ADDRESS EMERGENCY PHONE PA...

Page 144: ...Boarding from a dock or landing jetty 102 Boarding from the water 102 Boat characteristics 17 Boat control functions 35 Boating with passengers 101 C Check engine warning 56 Cleaning the boat 112 Communication error warning 57 Cooling water pilot outlet check 94 Crossing wakes and swells 104 Cruising limitations 14 D Depth warning 57 Docking 102 Drain plug check 92 Driver s seat 59 Driving your bo...

Page 145: ...switch check 93 Night operation 18 O Operational requirements 15 Over temperature warning 56 Owner s operator s manual and tool kit 118 P Passenger s seat SX195 SX190 60 Periodic maintenance chart 120 Port console storage compartment 65 Post launch checks 94 Post operation care 111 Post operation checks 105 Pre launch checks 87 Pre operation check points 87 Pre operation checklist 86 Primary Ident...

Page 146: ... Trip screen 49 Troubleshooting 126 Troubleshooting chart 126 Turning the boat 99 W Wakeboard tower AR195 AR190 70 Wakeboard tower collapsing and setting up 71 Wakeboarding and water skiing 19 Walk through 66 Wet storage compartment 65 Windshield 66 Y YAMAHA EXTENDED SERVICE Y E S 136 SportsBoat_F4V10 book Page 140 Tuesday July 3 2018 1 03 PM Downloaded from ManualsNet com search engine ...

Page 147: ...l fit right and perform right right out of the box Yamalube Take care of your Yamaha with legendary Yamalube oils lubricants and care products They re formulated and approved by the toughest judges we know the Yamaha engineering teams that know your Yamaha from the inside out GenuineYamaha Service Manuals Get the same factory manual for your vehicle that the technicians at your authorized Yamaha d...

Page 148: ...DIC183 Printed in USA July 2018 0 3 1 CR Downloaded from ManualsNet com search engine ...

Reviews: