background image

12

TWO-YEAR LIMITED WARRANTY

TO OBTAIN SERVICE UNDER WARRANTY

Owner must present proof of original purchase date. Please keep a copy of your dated proof of purchase (sales slip) in order to obtain 

service under warranty.

PARTS AND SERVICE WARRANTY

For the period of two (2) years from the date of the original purchase, the supplier will provide free of charge, non consumable parts or 

components that failed due to manufacturing defects. During these two (2) years limited warranty, the supplier will also provide free of 

charge, all labor and in-home service to replace any defective parts.

WHAT IS NOT COVERED

• 

Damage or failure to the product caused by accident or act of God, such as, flood, fire or earthquake.

• 

Damage or failure caused by modification of the product or use of non-genuine parts.

• 

Damage or failure to the product caused during delivery, handling or installation.

• 

Damage or failure to the product caused by operator abuse.

• 

Damage or failure to the product caused by dwelling fuse replacement or resetting of circuit breakers.

• 

Damage or failure caused by use of product in a commercial application.

• 

Service trips to dwelling to provide use or installation guidance.

• 

Light bulbs, metal or carbon filters and any other consumable part.

• 

Normal wear of finish.

• 

Wear to finish due to operator abuse, improper maintenance, use of corrosive or abrasive cleaning products/pads and oven cleaner 

products.

• 

When the product has not been operated in accordance with the accompanying instructions for use.

WHO IS COVERED

This warranty is extended to the original purchaser for products purchased for ordinary residential use in North America (Including the 

United States, Guam, Puerto Rico, US Virgin Islands & Canada).

This warranty is non-transferable and applies only to the original purchaser and does not extend to subsequent owners of the product. 

This warranty is made expressly in lieu of all other warranties, expressed or implied, including, but not limited to any implied warranty 

of merchantability or fi tness for a particular purpose and all other obligations on the part of the supplier, provided, however, that if the 

disclaimer of implied warranties is ineffective under applicable law, the duration of any implied warranty arising by operation of law shall 

be limited to two (2) years from the date of original purchase at retail or such longer period as may be required by applicable law.

This warranty does not cover any special, incidental and/or consequential damages, nor loss of profi ts, suffered by the original 

purchaser, its customers and/or the users of the Products.

WHO TO CONTACT

To obtain service under warranty or for any service related question:

Contact this number:

888 732 8018

To ensure prompt after-sales service, when you call we will kindly ask you to provide the following information indicated on the 

nameplate inside the hood: 

hood model, 12 NC and date of purchase on original invoice

.To access the nameplate, all you have to 

do is remove the grease fi lters.

12NC:___________________________________________________________________________
Hood model:_____________________________________________________________________
Serial No.:_______________________________________________________________________
Date of purchase on original invoice:________________________________________________

Summary of Contents for PCHBL630SS

Page 1: ...de d utilisation d entretien et d installation Guía de instalación uso y mantenimiento READ AND SAVE THESE INSTRUCTIONS LISEZ CES INSTRUCTIONS ET CONSERVEZ LES LEA Y GUARDE ESTAS INSTRUCCIONES LIB0185143 05 22 Models PCHBL630SS PCHBL636SS ...

Page 2: ...t for the owner OWNER Please retain these instructions for future reference Safety Warning Turn off power circuit at service panel and lock out panel before wiring this appliance Requirement 120 V AC 60 Hz 15 or 20 A Branch Circuit English Important Safety Notice 3 Electrical Installation requirements 4 Product dimentions 5 List of materials 5 Ducting Options 6 Installation 7 Install Range Hood 8 ...

Page 3: ...e Speed Control Device WARNING TO REDUCE THE RISK OF A RANGE TOP GREASE FIRE a Never leave surface units unattended at high settings Boilovers cause smoking and greasy spillovers that may ignite Heat oils slowly on low or medium settings b Always turn hood ON when cooking at high heat or when flambeing food I e Crepes Suzette Cherries Jubilee Peppercorn Beef Flambe c Clean ventilating fans frequen...

Page 4: ...nces A U L or C S A listed conduit connector must be provided at each end of the power supply conduit at the range hood and at the junction box Copies of the standards listed may be obtained from National Fire Protection Association Batterymarch Park Quincy Massachusetts 02269 CSA International 8501 East Pleasant Valley Road Cleveland Ohio 44131 5575 BEFORE INSTALLING THE HOOD 1 For the most effic...

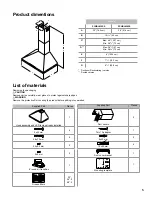
Page 5: ... materials Removing the packaging CAUTION Remove carton carefully wear gloves to protect against sharp edges WARNING Remove the protective film covering the product before putting into operation Supplied Part Pieces Supplied Part Pieces Hood assembly and LED lamps already installed 1 Duct covers 2 5x45 mm 6 Torx 10 adapter 1 5 4x75 mm 4 8x40 mm 2 3 5x9 5 mm 2 10x60 mm 4 4x8 mm 2 Duct cover bracket...

Page 6: ... Duct Size 6 Round Pipe B A A Deflector B 6 15 2 cm round vent Preparation Do not cut a joist or stud unless absolutely necessary If a joist or stud must be cut then a supporting frame must be constructed Fittings material is provided to secure the hood to most types of walls ceilings However a qualified technician must verify suitability of the materials in accordance with the type of wall ceilin...

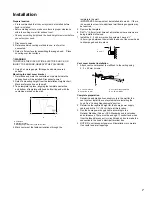
Page 7: ...tener locations through the template to the wall IMPORTANT All screws must be installed into wood If there is no wood to screw into additional wall framing supports may be required 5 Remove the template 6 Drill 3 16 4 8 mm pilot holes at all locations where screws are being installed into wood 7 Install the 2 5 x 45 mm mounting screws Leave a 1 4 6 4 mm gap between the wall and the back of the scr...

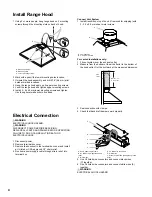
Page 8: ... bottom of the air deflector to the bottom of the hood outlet Cut the ductwork at the measured dimension Dimension to measure Roof outlet Wall outlet 3 Seal connection with clamps 4 Check that back draft dampers work properly Electrical Connection WARNING ELECTRICAL SHOCK HAZARD WARNING DISCONNECT POWER BEFORE SERVICING REPLACE ALL PARTS AND PANELS BEFORE OPERATING FAILURE TO DO SO CAN RESULT IN D...

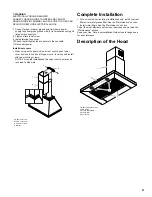
Page 9: ...to hood and lift upper cover to ceiling and install with two mounting screws NOTE For vented installations the upper vent cover may be reversed to hide slots C A B C D A Upper vent cover B Lower vent cover C 4 x 8 mm screws D Bracket Complete Installation For non vented recirculating installations only install charcoal filters over metal grease filter See the Mainteinance section Install metal fil...

Page 10: ...ormed with the hood off This indicator is normally deactivated press and hold the button to activate the function the button lights up with steady light To deactivate the function press and hold the button the button lights up flashing CFM Reduction System Before operating your hood Some States and Provinces of the US Canada restrict the maximum exhausting airflow of range hoods Airflow is measure...

Page 11: ...ropriate maintenance or failure to observe the above safety recommendations Metal grease filter The filters should be washed frequently Place metal filters in dishwasher or hot detergent solution to clean Let filter dry thoroughly before replacing it Turn off fan and lights Allow lamps to cool 1 Remove each filter by pushing down the spring release handle and then pulling down the filter 2 Wash me...

Page 12: ...purchaser for products purchased for ordinary residential use in North America Including the United States Guam Puerto Rico US Virgin Islands Canada This warranty is non transferable and applies only to the original purchaser and does not extend to subsequent owners of the product This warranty is made expressly in lieu of all other warranties expressed or implied including but not limited to any ...

Page 13: ...ructions pour pouvoir vous y référer plus tard Avertissement de sécurité Coupez l alimentation du circuit dans le panneau électrique et verrouillez le panneau avant de raccorder les fils de cet appareil Exigence 120 V c a 60 Hz circuit de dérivation de 15 V c a 20 Hz de 15 ou 20 A Français Avis de sécurité important 14 Exigences electriques et d Installation 15 Dimensions du produit 16 Liste des p...

Page 14: ...SQUES D INCENDIE DE GRAISSE SUR LES CUISINIÈRES a Ne laissez jamais la cuisinière sans surveillance lorsqu elle est réglée à une haute température Les débordements par bouillonnement causent de la fumée et des débordements de gras qui peuvent s enflammer Faites chauffer l huile lentement à une température basse ou moyenne b Faites toujours fonctionner la hotte lorsque vous utilisez la cuisinière à...

Page 15: ...pprouvé par l UL ou la CSA à chaque extrémité de la canalisation d alimentation À la hotte et à la boîte de jonction Vous pouvez obtenir un exemplaire des normes indiquées en vous adressant à La National Fire Protection Association Batterymarch Park Quincy Massachusetts 02269 La CSA International 8501 East Pleasant Valley Road Cleveland Ohio 44131 5575 AVANT D INSTALLER LA HOTTE 1 Pour assurer la ...

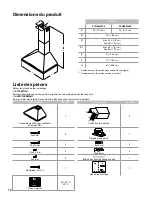
Page 16: ...rer les pièces de leur emballage ATTENTION Enlever délicatement le carton porter des gants pour se protéger des bords coupants AVERTISSEMENT Enlever le film de protection recouvrant le produit avant de commencer l opération Pièces Fournies Quantité Pièces Fournies Quantité Assemblage hotte avec soufflerie et lampes DEL 1 Conduits de cheminée 2 5x45 mm 6 Transition ronde de 6 1 5 4x75 mm 4 8x40 mm ...

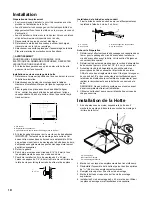
Page 17: ...de conduit La fumée et la vapeur sont recyclées Dans le cas de la version sans conduit à recyclage seulement procurez vous la trousse de conversion en hotte à recyclage B A A Deflécteur B Conduit rond de 6 15 2 cm Préparation Ne coupez pas une solive ou un montant à moins qu il soit absolument nécessaire de le faire Si vous devez couper une solive ou un montant vous devez construire un cadre de so...

Page 18: ...8 mm à tous les emplacements de pose des vis dans du bois 7 Pour bois installer les 2 vis de montage de 5 x 45 mm Laisser un espace de 1 4 6 4 mm entre le mur et l arrière de la tête de vis pour faire glisser la hotte et la mettre en place 1 4 6 4 mm Installation de la bride de cache conduit 1 Fixer la bride du cache conduit au mur en affleurement avec le plafond à l aide de 2 vis de 5 x 45 mm A C...

Page 19: ...boîtier de connexion et installer un serre câble de homologation UL ou CSA 4 Acheminer le cordon d alimentation du domicile à travers le serre câble dans le boîtier de connexion C D B E A A Câble d alimentation électrique du domicile B Conducteurs noirs C Connecteurs de fils homologation UL D Conducteurs blancs E Conducteurs verts ou nus ou vert jaune de liaison à la terre 5 Connecter ensemble les...

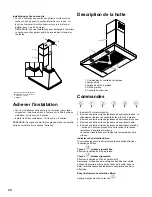
Page 20: ...gnée du filtre à graisse 4 Filtre à graisse 5 Conduits de cheminée Commandes 1 2 3 4 5 6 1 Bouton OFF moteur stand by 2 Bouton de sélection vitesse puissance d aspiration basse le clignotement indique la nécessité de laver le filtre à graisse 3 Bouton de sélection vitesse puissance d aspiration moyenne 4 Bouton de sélection vitesse puissance d aspiration haute 5 Bouton de sélection vitesse puissan...

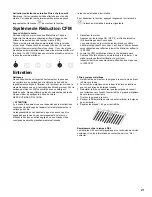
Page 21: ...at this hoods maximum airflow has been reduced to 300 CFM Entretien Nettoyage Ne pas vaporiser de nettoyants directement sur le panneau de contrôle lors du nettoyage de la Hotte La hotte doit être régulièrement nettoyée à l intérieur et à l extérieur au moins à la même fréquence que pour l entretien des filtres à graisse Pour le nettoyage utiliser un chiffon humidifié avec un détergent liquide neu...

Page 22: ...OUVERT Cette garantie s étend à l acheteur original de produits achetés pour un usage domestique habituel en Amérique du Nord Y compris Etats Unis Guam Porto Rico les Iles virgin Américaines le Canada Cette garantie n est pas transférable et vaut uniquement pour l acheteur original et ne s étend pas aux propriétaires successifs du produit Cette garantie vaut expressément en lieu et place de toute ...

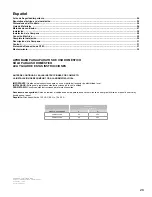
Page 23: ...nstrucciones para futuras consultas Advertencia de seguridad Antes de realizar el cableado de este aparato desactive el circuito de energía eléctrica en el panel de servicio y desbloquee el panel Requisito Circuito auxiliar de 120 V AC 60 Hz 15 ó 20 A Español Motor Interno incluido con lacampana MODELO DE CAMPANA A W PCHBL630SS 3 8 455 PCHBL636SS 3 8 455 Aviso de Seguridad Importante 24 Requisitos...

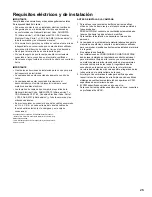
Page 24: ... externo en estado sólido para el control de la velocidad ADVERTENCIA PARA REDUCIR EL RIESGO DE INCENDIO OCASIONADO POR GRASA a No deje nunca ninguna unidad externa desatendida y con valores de fuego altos La cocción puede causar humo o reboses de grasa que pueden prender fuego Caliente el aceite a fuego lento o medio b Encienda siempre la campana cuando cocine a una temperatura alta o cuando real...

Page 25: ...rado en U L o C S A en cada extremo del canal de cables de fuente de alimentación en la campana y en la caja de conexiones Se pueden obtener copias de los estándares enumerados en National Fire Protection Association Batterymarch Park Quincy Massachusetts 02269 CSA International 8501 East Pleasant Valley Road Cleveland Ohio 44131 5575 ANTES DE INSTALAR LA CAMPANA 1 Para obtener una circulación del...

Page 26: ...ección PRECAUCIÓN Quite la caja cuidadosamente use guantes para protegerse contra los bordes afilados ADVERTENCIA Quite la película de protección que cubre el producto antes de ponerlo en funcionamiento Piezas suministradas Piezas Piezas suministradas Piezas Campana y lámparas LED previamente instaladas 1 Cubiertas del conducto Superior 1 Inferior 1 5x45 mm 6 Transición redonda de 6 1 5 4x75 mm 4 ...

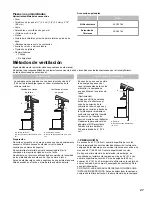
Page 27: ...ubo Los gases y vapores se reciclan a través de la rejilla superior mediante un conducto conectado al cambio de sección y el cambio de sección montado en el deflector Únicamente para esta versión adquiera el Kit Recirculante Tamaño mínimo del ducto Tubería redonda de 6 15 2 cm B A A Deflector B Ducto de escape redondo de 6 15 2 cm Preparación No corte una vigueta o un perno a menos que sea absolut...

Page 28: ...aje de la campana deben instalarse en madera donde sea posible Si no hay madera para instalar tornillos es posible que se requieran soportes de marco de madera adicionales 5 Retire la plantilla 6 Taladre orificios piloto de 3 16 4 8 mm en todas las ubicaciones donde se vayan a instalar los tornillos en madera 7 Instale los 2 tornillos de montaje de 5 x 45 mm Deje un espacio de 1 4 6 4 mm entre la ...

Page 29: ... escape 1 Haga encajar el sistema del ducto de escape sobre la salida de escape 2 Mida desde la parte inferior del desviador de aire hasta la parte inferior de la salida de la campana Corte el ducto al tamaño medido Tamaño medido Deflector Toma de corriente 3 Selle la conexión con las abrazaderas 4 Verifique que las compuertas de contratiro funcionen adecuadamente Conexión Eléctrica Característica...

Page 30: ...ornillo del protector de cables 9 Instale la cubierta de la caja de terminales 10 Cerciórese de que todos los focos estén seguros en sus portalámparas 11 Reconecte el suministro de energía Instalación de las cubiertas del ducto Cuando use ambas cubiertas del ducto de escape superior e inferior empuje la cubierta inferior hacia abajo sobre la campana y levante la cubierta superior hacia el techo e ...

Page 31: ...ltros Mantenga presionado el botón Activación indicador de saturación del filtro de carbón activo NOTA esta operación debe realizarse con la campana apagada Este indicador está normalmente desactivado mantenga presionado el botón para activar la función el botón se ilumina con una luz fija Para desactivar la función mantenga presionado el botón el botón se ilumina con una luz intermitente Sistema ...

Page 32: ... al incumplimiento de las normas de seguridad proporcionadas Filtro contra la Grasa Los filtros deben ser lavados frecuentemente Deje que el filtro se seque completamente antes de volverlo a colocar Apague el ventilador y las lámparas Permita que las lámparas se enfríen 1 Para quitar el filtro jale la manija de liberación con resorte y jale el filtro hacia abajo 2 Lave los filtros de metal cuando ...

Page 33: ... Esta garantía se extiende al comprador original de productos adquiridos para uso residencial en Norte América incluyendo Estados Unidos Guam Puerto Rico Islas Vírgenes de EU y Canadá Esta garantía no es transferible y aplica solamente al comprador original y no se extiende a propietarios subsecuentes del producto Esta garantía se expresa en lugar de otras garantías expresadas o implicadas incluye...

Page 34: ...34 ...

Page 35: ...35 ...

Page 36: ...36 ...

Reviews: